ZERO-X ZX-BTZ Скачать руководство пользователя страница 11

11


2.  

Once on, the LED lights on the arms of the Blitz drone should flash 
signalling no connection to the Remote Control. Place the Blitz drone on 
flat ground facing away from you and move back three metres.
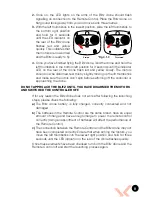
     

3. 

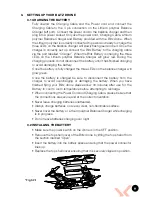
 With the left thumbstick in the lowest position, slide the left thumbstick to 
the bottom right position 
and hold for 3 seconds 
until the LED indicator on 
the rear of the Blitz drone 
flashes red and yellow 
quickly. This indicates that 
the motors are now armed 
and the Blitz is ready to fly.


4. 

 Once you have finished flying the Blitz drone, land the drone and hold the 
left thumbstick in the bottom left position for 3 seconds until the indicator 
LED on the rear of the drone flash red and yellow slowly. The motors 
should now be disarmed, test this by slightly moving up the lift thumbstick 
and make sure the rotors don’t spin before switching off the controller or 
approaching the drone.

DO NOT APPROACH THE BLITZ UNTIL YOU HAVE DISARMED THE MOTORS 
AND SWITCHED THE CONTROLLER OFF.


 If for any reason the Blitz drone does not work after following the launching 
steps, please check the following:


a) 

 The Blitz drone battery is fully charged, correctly connected and not 
damaged.


b)  

The batteries in the Remote Control are the same brand, have an equal 
amount of charge and have enough charge to power the remote control 
correctly (Using an assortment of batteries will affect the performance of 
the Remote Control).


c) 

  The connection between the Remote Control and the Blitz drone may not 
have been completed correctly. Ensure that when arming the motors, you 
move the left thumbstick into the lowest right position and hold for three 
seconds until the LED indicator on the rear of the drone flashes quickly.


 Once these elements have been checked turn both the Blitz drone and the 
Remote Control off and start the launching process again.

Armed

Disarmed

*Fig 4.1.2 

Содержание ZX-BTZ

Страница 1: ...DRONE USER MANUAL PRODUCT CODE ZX BTZ www zero x com au www zero x co nz BLITZ v1...

Страница 2: ......

Страница 3: ...nstalling a Micro SD Card Micro SD Card not included 10 Fig 3 3 1 10 3 4 Remote Control 10 4 Flight Safety 10 4 1 Flying your Blitz Drone 10 11 Fig 4 1 1 10 Fig 4 1 2 11 4 2 Controlling you Blitz Dron...

Страница 4: ...derstand this information as operating a drone outside of these guidelines may result in legal issues The manufacturer takes no responsibility for operation of this product outside of what is legally...

Страница 5: ...batteries when charging Do not leave batteries in direct sunlight After each flight or crash please check battery for any damage or swelling If the battery is damaged leaking making noise punctured or...

Страница 6: ...2 1 PACKAGE CONTENTS 2 7 1 1 X Blitz Drone 2 2 X Drone Batteries 3 1 X Remote Control 4 1 X Balance Charger with cables 5 8 X Rotor Blades 6 Maintenance Kit 7 User Manual 8 2 x Thumbstick covers 1 4 5...

Страница 7: ...r LED Lights 10 LED Status Light 11 Power Switch 4 Rear Rotor Blades 5 Motor 6 Front Rotor Blades 7 Camera 8 Front LED Lights 1 Top Shell Cover 2 Battery 3 Micro SD Card Slot 4 Rear Rotor Blades 4 Mot...

Страница 8: ...d 4 Power Indicator LED 5 Power Switch 6 Speaker 7 Handle 8 Left Thumb Stick Yaw 9 Photo Capture 10 5 8Ghz FPV Channel Switch 11 Video Start Stop REMOTE CONTROL 1 Mode Setting Switch 2 Right Thumb Sti...

Страница 9: ...the battery is fully charged the three LEDs on the balance charger will glow green Once the battery is charged be sure to disconnect the battery from the charger to avoid overcharging or damaging the...

Страница 10: ...any airport or airfield whilst flying Drones should also not be flown over populated areas or any closer than 30 metres from vehicles people or animals It is also required that you check your surround...

Страница 11: ...pin before switching off the controller or approaching the drone DO NOT APPROACH THE BLITZ UNTIL YOU HAVE DISARMED THE MOTORS AND SWITCHED THE CONTROLLER OFF If for any reason the Blitz drone does not...

Страница 12: ...at you always start in low speed mode To select low speed mode switch the Mode Setting Switch 1 to the top position marked beginner mode In this mode the Blitz drone will control and fly slowly It is...

Страница 13: ...flip and the accelerometer will be deactivated during the flip it is advised that the user has significant drone experience It is advised that rolls are performed quickly and that you allow 10M in all...

Страница 14: ...at is paired with the clockwise Rotor Blades 6045R is black and will be tightened by turning counter clockwise The lock nut that is paired with the counter clockwise Rotor Blades 6045 is silver and wi...

Страница 15: ...warrants that this product is free from defects in material and workmanship for a period of 12 months from the date of purchase or for the period stated on the packaging This warranty is only valid wh...

Страница 16: ...www zero x com au www zero x co nz Zero X v1 0 2016...

Отзывы: