background image

1-2

Introduction

Appendix A

System Cabling 

 Includes cabling information for the

two onboard SCSI controllers and the RAID controller.

Appendix B

Memory Configurations 

 Defines the allowable

memory configurations for your system.

Appendix C

Option Boards 

 Reserves a section of your user’s

guide to store add-in adapter board installation
procedures.

Appendix D

Devices 

 Reserves a section of your user’s guide to

store add-on device installation procedures.

Appendix E

Network Operating Systems 

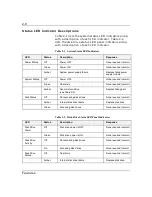
 Reserves a section of

your user’s guide to store your Network Operating
System Configuration Guide.

Glossary 

 Defines the standard acronyms and

technical terms used in this manual.

Equipment Log 

 Provides you with a sample

equipment log for documenting the system
configuration and updates.

Содержание MT2000

Страница 1: ...Server MT2000 U s e r s G u i d e...

Страница 2: ...n INTEL is a registered trademark of Intel Corporation Mylex is a registered trademark of Mylex Corporation MS DOS is a registered trademark of Microsoft Corporation Pentium is a registered trademark...

Страница 3: ...onnect and remove any I O cables that the digital device does not use Unterminated I O cables are a potential source of high RF emission levels Plug the digital device into only a grounded outlet rece...

Страница 4: ...ted for 250 VAC 10 amp minimum and must display an international agency approval marking The cord must be suitable for use in the end user country Consult your dealer or the local electrical authoriti...

Страница 5: ...or cool to room temperature before using it Keep the system away from magnetic forces Keep the system dry Do not wash the system with a wet cloth or pour fluid into it Protect the system from being bu...

Страница 6: ...raham...

Страница 7: ...Chapter 3 Setup Chapter 4 Configuring Your System Chapter 5 Upgrades and Options Chapter 6 Problem Solving Appendix A Cabling Appendix B Memory Configurations Appendix C Option Boards Appendix D Devic...

Страница 8: ...Bill Graham...

Страница 9: ...Chapter 1 Introduction Contents Organization 1 Notational Conventions 3...

Страница 10: ...Bill Graham...

Страница 11: ...he system make cable connections and power on the system Chapter 4 Configuring Your System Tells you how to configure the system and provides instructions for running the System Configuration Utility...

Страница 12: ...ide to store add in adapter board installation procedures Appendix D Devices Reserves a section of your user s guide to store add on device installation procedures Appendix E Network Operating Systems...

Страница 13: ...mple CTRL ALT DEL means hold down the CTRL and ALT keys and press the DEL key The special notices listed below are used throughout this manual to emphasize specific information Warning Warning indicat...

Страница 14: ...atures 13 Processor 17 Memory 17 Bus Master I O Expansion Slots 17 Real Time Clock Calendar 18 BIOS 18 Video 18 SCSI Controllers 19 Peripheral Controller 19 External Device Connectors 20 Keyboard and...

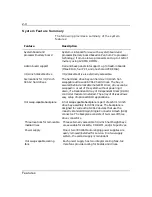
Страница 15: ...system is designed for use in applications where downtime must be minimized To this end the server includes or has the option to include the following Optional power system redundancy in a system con...

Страница 16: ...ve CD ROM drive Network add in boards One 330 Watt power supply SCSI drive backplane Five chassis hot swap fan modules six fans Onboard 1 MB video memory As server client needs grow you can expand sys...

Страница 17: ...ply can be added to provide redundant power Configuration Constraints Power supplies are hot swappable and are easily removed and installed The second optional power supply provides redundant power so...

Страница 18: ...d in or out of the system without powering it down if a Redundant Array of Independent Disks RAID controller module is installed The array of drives allows easy setup of optional RAID applications Hot...

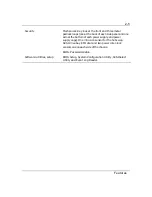
Страница 19: ...nd one across the bottom of each power supply and power supply cage One intrusion sensor for the hot swap SCSI drive bay EMI door and two power inter lock sensors one on each side of the chassis BIOS...

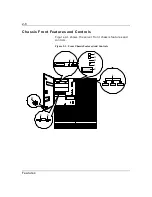
Страница 20: ...2 6 Features Chassis Front Features and Controls Figure 2 1 shows the server front chassis features and controls Figure 2 1 Front Chassis Features And Controls C B F G H I J K E D L A...

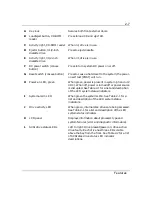
Страница 21: ...and 12 VDC When off power is turned off or power source is disrupted See Table 2 1 for a list and description of the LED system status indicators I System alarm LED When green the system is OK See Tab...

Страница 22: ...one required normal Green No alarms None required normal Amber Abnormal condition see Table 2 3 Replace failing part Disk Status Off Not accessing disk drives None required normal Amber Internal disk...

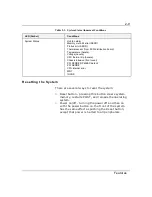
Страница 23: ...ta Chassis intrusion front cover PCI PERR OPB ESC detect PCI SERR CPU internal error WDT IOCHK Resetting the System There are several ways to reset the system Reset button pressing this button clears...

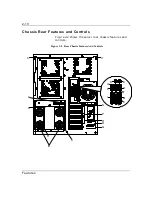
Страница 24: ...10 Features Chassis Rear Features and Controls Figure 2 2 shows the server rear chassis features and controls Figure 2 2 Rear Chassis Features And Controls C A S C N P R Q O C C D E F G I J K H M L B...

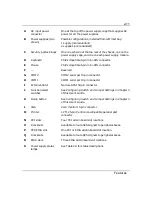
Страница 25: ...ector H COM1 COM1 serial port 9 pin connector I External SCSI Narrow SCSI 50 pin connector J Function select switches See Configuring Switch and Jumper Settings in Chapter 4 of this User s Guide K Dum...

Страница 26: ...atus LED Status Description Response DC Power Off Power is Off None required normal Green Power is On None required normal Alarm Off No alarm None required normal Amber Power failure Abnormal power te...

Страница 27: ...ared PCI EISA slot on the system board Primary and secondary bus architecture SCSI controller Two onboard SCSI 2 ultra wide SCSI channel and narrow SCSI channel support PCI based BIOS Flash memory bas...

Страница 28: ...s Figure 2 3 System Board Connector and Component Locations A EISA expansion slots B PCI expansion slots C Reserved D I O riser board connector E Optional Video DRAM sockets F Configuration jumpers se...

Страница 29: ...onnector H Wide SCSI connector I Front panel connector J Diskette connector K Reserved L Processor Memory board connector M Speaker connector N Fan connector O Real time clock battery P Non volatile m...

Страница 30: ...2 16 Features Figure 2 4 Processor Memory Board Connector and Component Locations A DIMM sockets B First processor C Second processor D DC to DC converters...

Страница 31: ...e 2 4 A The minimum system board configuration includes 32 MB of system memory 8 DIMM sockets allow for system memory expansion to 1 GB using 128 MB DIMMs ECC generation checking is provided for detec...

Страница 32: ...lock BIOS A BIOS and Setup Utility are located in the Flash EPROM on the system board and include support for system setup and PCI ISA Plug and Play auto configuration A number of security reliability...

Страница 33: ...row SCSI at a data transfer rate of 10 MB sec and the AIC7880 supports data paths of 16 bit fast wide or ultra wide SCSI at a data transfer rate of 20 MB sec or 40 MB sec As PCI bus masters these cont...

Страница 34: ...p backplane and 5 1 4 inch removable media drive bays SCSI 2 Hard Drive Bays The right side of the system contains six bays for 3 1 2 inch SCSI 2 hard drives and a hot swap backplane see Figure 2 5 Th...

Страница 35: ...nel and exterior door shown open A fault light on the front panel board gives a general indication that there has been a fault on a hot swap drive Each drive has a set of three lights to indicate the...

Страница 36: ...ler channel The backplane has two main functions SCSI drive control and system data logging Drive status is monitored to detect failing drives and to control LED indicators The backplane features are...

Страница 37: ...and top panel are removed Cosmetic filler panels and metal EMI shields are installed over all unused 5 1 4 inch bays On the left side of the system below the 5 1 4 inch removable media drive bays two...

Страница 38: ...th each power supply enclosure The fan circuitry implements fan failure detection Two indicators power and alarm Number of Power Supplies in a Configuration In a system power is drawn equally from all...

Страница 39: ...ock the short front panel door to prevent access to the power and reset switches This lock also secures the right hand door B Location of internal intrusion alarm switch The intrusion alarm switch is...

Страница 40: ...gure The system contains sensors to monitor temperature voltage and fan failure Software Locks via the BIOS Setup The BIOS has software features that let you control access to one or more parts of the...

Страница 41: ...power supply module can be removed without turning off power Each power supply module has two LEDs Table 2 3 shows the Power LED Indicators and Figure 2 8 shows removing the power supply modules Table...

Страница 42: ...e system has five hot swappable fan modules six fans The failed fan module can be easily removed or replaced without turning power off Each fan module has a fan alarm LED and each fan is redundant in...

Страница 43: ...2 29 Features Figure 2 9 The Front Fan Features CPU Front Fan Module 1 Fan Fan LED Option Board Fan Module 2 Fans Fan LED...

Страница 44: ...2 30 Features Figure 2 10 The Rear Fan Features HDD Upper Fan Module 1 Fan HDD Lower FAN Module 1 Fan LED LED CPU Rear Fan Module 1 Fan Fan LED...

Страница 45: ...Chapter 3 Setup Contents Selecting a Site 1 Unpacking the System 2 Getting Familiar with the System 2 Server Security 2 Making Connections 3 Connecting the Power Cords 5 Powering On Your System 6...

Страница 46: ...g the circuit is rated for that load Note For Denmark the system must be connected to an AC power source rated at 16 Amps Clean dust free and well ventilated Front and rear ventilating openings kept f...

Страница 47: ...e cartons and the packing materials If the contents appear damaged when you unpack the boxes file a damage claim with the carrier immediately Getting Familiar with the System Before setting up your sy...

Страница 48: ...Chapter 4 of this User s Guide Refer to Figure 3 1 and connect your keyboard monitor and mouse Connect any external peripheral devices such as a printer or modem by following the instructions included...

Страница 49: ...ctor C Reserved 9 pin connector D COM2 serial port 9 pin connector E COM1 serial port 9 pin connector F External SCSI 50 pin connector G VGA monitor 15 pin connector H Printer parallel port 25 pin con...

Страница 50: ...d for the available AC voltage and have a current rating that is at least 125 of the current rating of the system The power cord connector that plugs into the wall outlet must be terminated in a groun...

Страница 51: ...wer on LED is lit If it is not lit ensure the ac power cords are connected to a functional ac power source After a few seconds your system begins the internal Power On Self Tests POST POST automatical...

Страница 52: ...BIOS Setup Configuration Settings 13 Exiting BIOS Setup 18 Using the Utilities Diskette 18 Viewing the Event Log 20 SCSISelect Utility 21 Using the SCSISelect Utility 22 SCSISelect Configuration Setti...

Страница 53: ...1231231 Billy Graham...

Страница 54: ...ation of these drives If your system has been factory configured the SCU BIOS Setup or SCSISelect utilities do not need to be run unless you want to change the password or security features add option...

Страница 55: ...dded to the SCU configuration to reserve the resources required by the ISA boards After you add options using the SCU the system automatically configures and initializes them during system initializat...

Страница 56: ...ter of this guide 2 Power on the system 3 If the diskette drive is disabled enable it using the BIOS Setup utility explained later in this chapter Specify the correct type of diskette drive Note Perfo...

Страница 57: ...me Enables viewing and changing the time that the computer uses 5 Maintain system configuration diskette Enables viewing and changing Configuration CFG files and System Configuration Information SCI f...

Страница 58: ...and allows printing of a configuration report Step 5 Save and Exit Allows you to save your configuration and exits to the operating system You can also exit without saving 10 Select Step 3 to view you...

Страница 59: ...ations MAIN MENU NORMAL SETTING YOUR CONFIGURATION System Board Version 1 00 Diskette Drive Diskette Controller On Controller Enabled Floppy Drive 0 3 1 2 1 44MB Floppy Drive 1 No Floppy Drive Paralle...

Страница 60: ...ached D8000 DBFFF uncached DC000 DFFFF uncached Display F1 Prompt Enabled Display Setup Prompt Enabled NumLock Boot State ON Boot Device A then C Mouse Enabled Esm Interrupt IRQ13 Embedded PCI Bridge...

Страница 61: ...s to the next available slot If the slot displayed in Step 2 Add or Remove Boards is not the actual slot it can be moved by using the F7 function key Notice IRQ levels DMA channels I O port addresses...

Страница 62: ...llable list select the resources used by the new ISA board Table 4 4 provides a place for you to record the configuration you assign to the board 10 Press F10 when you are finished selecting the resou...

Страница 63: ...rked with an arrow indicate that the boards in your system may have jumpers and switches that you must physically verify or that a software statement with additional information about the board is pro...

Страница 64: ...written by the SCU the next time the SCU is run Since the configuration information stored in the SCU overrides the configuration information stored in the BIOS Setup utility it is strongly recommende...

Страница 65: ...ration Advanced Use this menu for setting the Advanced Features available on your system Security Use this menu to set User and Supervisor Passwords and the Backup and Virus Check reminders Server Use...

Страница 66: ...or SHIFT TAB Cycle cursor up and down HOME or END Move cursor to top or bottom of window PAGE UP or PAGE DOWN Move cursor to next or previous page F5 or Select the previous value for the field F6 or o...

Страница 67: ...change values indicates the type of diskette drive installed Not Installed in your system Not Installed IDE Adapter 0 Master Not used in your system None IDE Adapter 0 Slave Not used in your system No...

Страница 68: ...Sequence A then C SETUP Prompt Enabled POST Errors Enabled Floppy Check Enabled Numlock Press ENTER for menu Numlock ON Key Click Disabled Key Board auto repeat rate 30 sec Key Board auto repeat delay...

Страница 69: ...M Row 6 Status none DIMM Row 7 Status none DIMM Row 8 Status none Memory Row Errors Clear Press ENTER Memory Configuration Message Enabled Memory Warning POST Error Enabled CPU Reconfiguration Press E...

Страница 70: ...ssword Press ENTER Set User Password Press ENTER Password on boot Disabled Diskette Write Normal Diskette access Supervisor System backup reminder Disabled Execute User ROM Disabled Power Switch Mask...

Страница 71: ...cts a problem with the values stored in CMOS Load Previous Values Reverts to previously saved values if the new values have not been saved to CMOS Save Changes Stores the current selections without ex...

Страница 72: ...ities diskette is now bootable and includes CHOICE COM 4 Reboot the system with the Utilities diskette in Drive A 5 The MS DOS Startup Menu displays See Table 4 6 Table 4 6 MS DOS Startup Menu MENU OP...

Страница 73: ...plays See Table 4 6 4 Select 1 Read the Event Log From NVRAM from the MS DOS Startup Menu 5 The System Event Log Utility starts The System Event Log Utility screen is displayed The following screen ch...

Страница 74: ...des support for four internally mounted ultra wide hard disk drives The AIC7860 narrow SCSI controller provides support for internally mounted tape and CD ROM devices as well as externally connected S...

Страница 75: ...ber of each adapter When the selection menu appears select the channel you wish to configure as follows Bus Device Selected SCSI Adapter 00 08h AIC7880 01 06h AIC7860 5 Once you select the adapter the...

Страница 76: ...rations OPTION RECOMMENDED SETTING OR DISPLAY ONLY YOUR CONFIGURATION SCSI Bus Interface Definitions Host Adapter SCSI ID 7 SCSI Parity Checking Enabled Host Adapter SCSI Termination Enabled Additiona...

Страница 77: ...Support Disabled 1 BIOS Support for Bootable CD ROM Disabled 1 6 BIOS Support for INT 13 Extensions Enabled 1 Support for Ultra SCSI Speed Enabled 1 5 1 No effect if BIOS is disabled 2 Do not remove...

Страница 78: ...er cord from the back of the chassis Failure to disconnect power before setting switches and moving jumpers can result in personal injury and equipment damage The function select DIP switches configur...

Страница 79: ...ttings Switch Signal Settings Function SW1 RESERVED Off factory setting On Reserved for future use SW2 RSTMASK Off On factory setting Reserved for future use SW3 ACLINK Off factory setting On Sets ser...

Страница 80: ...the UPS unit press the Power button on the front of the server Configuring System Board Jumpers Before You Begin Only a qualified technical person should perform the procedures in this section Notice...

Страница 81: ...4 28 Configuring Your System Figure 4 2 System Board Jumpers...

Страница 82: ...3 2 3 2 3 CPU Speed J1A Used with jumpers at J3A J4A J2A J6B and J5B to set CPU speed Required on factory default 2 3 2 3 2 3 Reserved J7B Required on factory default 1 2 1 2 1 2 CPU Speed J6B Used w...

Страница 83: ...Used with jumpers at J613 J614 J615 J625 J626 J628 and J629 to set the server type Required on factory default 2 3 2 3 2 3 Model Type J625 Used with jumpers at J613 J614 J615 J624 J626 J628 and J629...

Страница 84: ...e 2 Check to ensure the system power cord is removed from the back of the system 3 Locate the position of the jumpers on the system board you are changing Refer to Figure 4 2 4 To change a jumper sett...

Страница 85: ...Complete screen appears remove the diskette and power down the system 6 Power up the system If the procedure fails perform the following steps and then retry the Update BIOS procedure 1 Turn off the...

Страница 86: ...2 3 to pins 1 2 6 Replace the panels and power on the system 7 Run the SCU to configure your system Clearing and Changing the Password To clear and change the password 1 Power off the system and remo...

Страница 87: ...1 Pentium Pro Processor 12 Installing a Processor 12 Removing a Processor 14 DIMMs 15 Installing DIMMs 15 Removing DIMMs 17 Installing the Processor Memory Board 17 Modifying the System Board 19 Video...

Страница 88: ...Drive in a Hot swap Bay 36 Installing or Swapping a Hard Drive 37 Removable Media Devices and Diskette Drives 40 Installing a 5 1 4 Inch Device or 3 1 2 Inch Diskette Drive 42 Removing a 5 1 4 Inch De...

Страница 89: ...power before opening your system can result in personal injury and equipment damage Warning System power on off The DC push button on off switch a convex button on the front panel DOES NOT turn off th...

Страница 90: ...and handling boards Always handle boards carefully They can be extremely sensitive to ESD Hold boards only by their edges After removing a board from its protective wrapper or from the system place it...

Страница 91: ...board connector before applying power Incomplete insertion can result in damage to the system board and the board being inserted Also ensure that add in boards are completely and correctly seated in...

Страница 92: ...iers Pen or pencil Utility knife ESD workstation or antistatic wrist strap recommended IC removal tool Equipment Log Use the equipment log form located at the end of this manual to record the model an...

Страница 93: ...ide panel after the system is set up you must first power off the system and all external devices Unplug the system power cord To remove a side panel 1 Power off the system and ensure it is disconnect...

Страница 94: ...sure no tools or loose parts have been left inside the system chassis 2 Make sure all option boards are firmly seated in their respective slots and that all interior cables are properly connected 3 Or...

Страница 95: ...overs before you can remove the top cover Caution For proper cooling and airflow do not operate the system with the top cover removed Always replace the cover before powering on the system Caution Do...

Страница 96: ...g the EMI fingers as you slide the cover back very slightly to about a 1 2 inch or less Then pick the cover straight up from the chassis Figure 5 2 System Top Cover A Removing top cover A Retaining sc...

Страница 97: ...screws at the back 6 Reinstall the two side panels Removing the Board Support Panel A metal panel supports the processor memory board To remove the processor memory board you must remove this board su...

Страница 98: ...4 Remove panel by pulling it out of the chassis Set the board support panel aside Figure 5 3 Removing Board Support Panel PO W ER ST AT US DI SK B A Removing board support panel A Support panel B Scre...

Страница 99: ...the Processor Memory Board Warning If the system has been running any processor and heat sink already installed on the board will be hot To avoid the possibility of a burn while removing the processo...

Страница 100: ...tem damage Do not touch or bend the processor s exposed pins The processor upgrade kit contains a DC to DC converter board processor chip and heat sink The heat sink has a heat transfer pad on the bot...

Страница 101: ...r the top surface of the processor until it seats in the socket The processor should easily fit do not force the processor into the socket 5 Push ZIF socket lever G down until it snaps into the locked...

Страница 102: ...ntium processor 1 Remove the processor memory board as described earlier in this section Notice Observe static precautions Use an antistatic wrist strap 2 Push on the heatsink retention clips to relea...

Страница 103: ...sequence M2 M8 Installing DIMMs When properly installed the DIMM module is oriented at an angle of 90 degrees relative to the processor memory board 1 Remove the processor memory board as described e...

Страница 104: ...vers on the sockets are not tools to aid in the insertion only to keep the DIMM s in place and to aid in extraction The levers should click in place once the DIMM is fully inserted 5 Repeat the above...

Страница 105: ...clips 4 Carefully lift the DIMM away from the socket and store it in an antistatic package 5 Repeat the above steps to remove the remaining DIMMs 6 Install the processor memory board back into the sys...

Страница 106: ...n Before pressing the board firmly into the system board connector confirm visually that the board edge connectors are correctly oriented not too low or high at the system board connector 5 Press the...

Страница 107: ...provide procedures for upgrading and configuring the system board in your system Topics covered include Installing video memory Replacing the non volatile memory Replacing the real time clock battery...

Страница 108: ...includes two 512K video memory modules and two sockets on the system board If you add two additional 512K video memory modules into the sockets shown in Figure 5 7 the base video memory size is increa...

Страница 109: ...Earlier versions of the system board do not have a socket for the non volatile memory chip You can not replace the non volatile memory chip on these system boards You may need to replace the non vola...

Страница 110: ...ing a IC removal tool or a small pointed tool gently pry up each end of the non volatile memory and pull it straight up out of its socket Figure 5 8 3 Orient the new chip over its socket so the dot is...

Страница 111: ...d on your system board as shown in Figure 5 9 Notice the plus sign on the battery This sign will assist you in correctly positioning the battery on the system board Contact your sales representative o...

Страница 112: ...he battery and pry the battery out of its socket Refer to Figure 5 9 for the socket location 3 Orient the new battery over its socket so the plus sign on the battery is facing up 4 Carefully insert th...

Страница 113: ...Figure 5 10 You can install one EISA board or one PCI board in the shared slot not both The high performance PCI local bus allows the adoption of newer networking technology such as ATM and 100 MB se...

Страница 114: ...user intervention Older ISA and EISA adapters must be manually configured as detailed below Once the manual configuration is complete the Plug and Play adapters are configured around the manually conf...

Страница 115: ...lot J11 having the highest priority PCI slot J11 is the top PCI option board slot on the system board See Figure 5 10 for PCI slot numbers On system power up and reboot BIOS initiates a scan sequence...

Страница 116: ...tions Controller Adapter Hardware Configurations Table 5 1 lists the option boards you may add to your system and provides information on slot location memory and I O addressing and assigned interrupt...

Страница 117: ...controller is plugged in use IRQ 14 for secondary controller non booting controller 2 For disk controllers plugged into slots and the onboard disk controllers the sequence for BIOS scanning to determ...

Страница 118: ...ier in this chapter 2 Observe the safety and ESD precautions at the beginning of this chapter 3 Remove and save the expansion slot screw and cover Figure 5 11 Figure 5 11 Removing the Expansion Slot S...

Страница 119: ...sion slot 7 Refer to Table 5 1 to determine the recommended option board slot assignment and configuration parameters Refer to Figure 5 10 to determine system board slot locations 8 Holding the board...

Страница 120: ...bracket slot up against the screw before you tighten it If this is not done the bracket may interfere with an adjacent bracket 11 If you have installed a SCSI host adapter board go to Appendix A for p...

Страница 121: ...oving 4 Remove and save the option board retaining bracket screw 5 Hold the board at each end and carefully rock it back and forth until the edge connectors pull free Make sure that you do not scrape...

Страница 122: ...e the power supply module can be hot swapped If the amber LED on a power supply module is not lite it is recommended that power to the system be turned off before removing the power supply module To r...

Страница 123: ...r supply module into the chassis until the power supply module release handle is almost closed upright position 3 Push the power supply module release handle up and in until the power supply module sl...

Страница 124: ...gged as faulty by the SCSI host controller Follow the procedure described in this section to remove the faulty drive and swap in a good one Note Install or swap SCSI drives without turning off power T...

Страница 125: ...swapping out a faulty SCSI drive you can pinpoint which drive to remove by checking the status LEDs that occur in sets of three above each of the six drive bays Refer to Status LED Indicator Descripti...

Страница 126: ...he hard disk s carrier and press down on its thumb release button see Figure 5 14 6 If you are removing a faulty drive check all the drive LEDs to confirm which drive to remove Refer to Status LED Ind...

Страница 127: ...ive so its SCA connector is near the top surface of the drive Place drive on the antistatic surface again 11 Slide the drive into the carrier with its SCA connector facing toward the front of the carr...

Страница 128: ...ay from the top bay A Figure 5 16 illustrates the recommended removable media configuration These bays are intended to hold tape CD ROM or other removable media drives Narrow SCSI drives in the 5 1 4...

Страница 129: ...always installed Device must have the internal SCSI terminators installed BAY B Second CD ROM QIC Tape SCSI address 2 DAT Tape SCSI address 6 Device must have the internal SCSI terminators removed Bay...

Страница 130: ...f you are replacing a diskette drive in Bay D or installing a diskette drive in bay E use the internal diskette drive cables provided with the system If you are installing a SCSI device in bays B and...

Страница 131: ...R STATUS DIS K POW ER RESET B A C Removing front plastic cover from media and diskette drive bays A Thumbscrew that secures the front plastic cover to the front of the chassis B Four snap in tabs that...

Страница 132: ...US DISK POWER RESET 8 Grasp the blank panel tray and slide it out of the bay 9 Remove the two screws securing each side rail to the blank panel tray Figure 5 19 10 Save the blank panel tray and screws...

Страница 133: ...vice Refer to the installation procedures that came with the device Notice SCSI termination resistors for the 5 1 4 inch devices must be installed in the last SCSI device of the daisy chain cabling to...

Страница 134: ...rive A Chassis mounting screws B Side rails C Four drive mounting screws D Drive 14 Engage the device side rails into the bay guide rails see Figure 5 21 Ensure that the device side rails see Figure 5...

Страница 135: ...you install in the 5 1 4 inch media bays The connectors are keyed and can be inserted in only one way For 3 1 2 inch diskette drives power cables are provided in the chassis including the diskette dr...

Страница 136: ...nstalling Device Cables REAR VIEW A B A Signal cable B Power cable 18 Reinstall the front plastic cover top cover the side cover and power on the system It may be necessary to run the SCU as described...

Страница 137: ...s from the back of the drive 6 Slide drive out the front of the bay and place on an antistatic surface 7 Remove and save the side rails and screws 8 Place drive in an antistatic wrapper 9 To cover an...

Страница 138: ...tray A Blank panel tray B Two screws that secure the blank panel tray 13 Reinstall the front plastic cover the side cover and power on the system 14 Power on the system and remove the drive serial nu...

Страница 139: ...f the system status LED indicator on the front of the system unit is amber abnormal condition it can be indicating a faulty fan condition Each fan module alarm LED lite steadily can then be checked to...

Страница 140: ...fan module out of the chassis 6 Remove the new fan module from its shipping container 7 Slide the new fan module into the fan bay until it docks with its connector 8 Tighten the two thumb screws that...

Страница 141: ...5 53 Upgrades and Options Figure 5 25 Removing the Rear Fan modules...

Страница 142: ...Specific Problems and Corrective Actions 4 Power LED Does Not Light 4 System Cooling Fans Do Not Rotate 4 No Characters Appear On Screen 4 Characters are Distorted or Incorrect 4 Incorrect Or No Beep...

Страница 143: ...dfgdfg...

Страница 144: ...ch on the front panel does not turn off the system AC power Before doing the procedures in this chapter make sure that your system is powered off and unplug the AC power cord from the back of the chas...

Страница 145: ...100 120 V ac or a NEMA 6 15R outlet 200 240 V ac Is AC available at the wall outlet Is the main power switch located on the top of the power supply cage at the rear of the system in the ON position I...

Страница 146: ...the operating system properly loaded Refer to the operating system documentation Are all drivers properly installed For information about installing drivers refer to your network operating system conf...

Страница 147: ...copy of the software If you are running the software from a floppy disk is it a good copy If you are running the software from a hard disk drive is the software correctly installed Were all necessary...

Страница 148: ...e problem recurs you may need to reformat the hard disk drive The drive the drive controller or the system board may be defective If the problems are intermittent there may be a loose cable dirt in th...

Страница 149: ...n case there is a problem with the display puts out a series of long and short beeps One short beep means the system passed POST Refer to the BIOS User s Information section in this chapter for a list...

Страница 150: ...onitor 2 Make sure the system power cord is plugged into a properly grounded AC outlet 3 Make sure your video display monitor and keyboard are correctly connected to the system Turn on the video monit...

Страница 151: ...ed This information is useful to your service representative Refer to the BIOS User s Information section in this chapter for a list of items to check for each error code and for an explanation of the...

Страница 152: ...ing Does the diskette drive activity indicator turn on briefly If not refer to Diskette Drive Activity Indicator Does Not Light in this chapter If a second diskette drive is installed does its activit...

Страница 153: ...eep pattern Floppy disk drive access LED does not light Hard disk drive access LED does not light The SCU does not boot Problems with application software Try the solutions in the order given If you c...

Страница 154: ...are accessible from the front of the system by removing the left hand bezel refer to the Upgrades and Options chapter 5 in this guide Check the following Is AC power available at the wall outlet Is th...

Страница 155: ...r board perform the following 1 Verify that the video controller board is fully seated in the system board connector 2 Run the SCU to disable the onboard video controller 3 Reboot the system for chang...

Страница 156: ...ou have attached to the system If the problem persists the video display may be faulty or it may be the incorrect type Contact your service representative for assistance Incorrect Or No Beep Code Chec...

Страница 157: ...p If you are using the onboard floppy disk controller use Setup or the SCU to make sure that Onboard Floppy is set to Enabled Conversely to use an optional fixed floppy disk controller make sure that...

Страница 158: ...ity LED cable connector plugged into the optional controller board if present If you received error messages refer to the Error Messages section for information about error messages If you did not rec...

Страница 159: ...up and using the software Verify a different copy of the software to see if the problem is with the copy you are using Make sure all cables are installed correctly Verify that the system board jumpers...

Страница 160: ...ta Area and by displaying a message on the screen which is sometimes preceded by the POST Error Code The error code will also be logged to the Event Logging area Error and Status Messages Table 6 2 is...

Страница 161: ...is correctly identified Incorrect Drive A type run SETUP or Incorrect Drive B type run SETUP Type of floppy drive is not correctly identified in Setup Invalid NVRAM media type Problem with NVRAM CMOS...

Страница 162: ...ery is dead Replace the battery and run Setup to reconfigure the system System BIOS shadowed The system BIOS is copied to shadow RAM System cache error Cache disabled The RAM cache failed the BIOS tes...

Страница 163: ...t code and attempting to display the test point error code on the upper left corner of the display screen BIOS derives the beep code from the test point error code as follows 1 The 8 bit hexadecimal e...

Страница 164: ...pt Controller 20 1 3 1 1 Test DRAM refresh 22 1 3 1 3 Test 8742 Keyboard Controller 24 1 3 2 1 Set ES segment register to 4 GB 28 1 3 3 1 Autosize DRAM 2A 1 3 3 3 Clear 512K base RAM 2C 1 3 4 1 RAM fa...

Страница 165: ...or unexpected interrupts 5A 2 2 3 3 Display prompt Press F2 to enter SETUP 5C 2 2 4 1 Test RAM between 512 and 640K 60 2 3 1 1 Test extended memory 62 2 3 1 3 Test extended memory address lines 64 2 3...

Страница 166: ...terrupts A0 3 3 1 1 Set time of day A2 3 3 1 3 Check key lock A8 3 3 3 1 Erase F2 prompt AA 3 3 3 3 Scan for F2 keystroke AC 3 3 4 1 Enter SETUP AE 3 3 4 3 Clear in POST flag B0 3 4 1 1 Check for erro...

Страница 167: ...s EC 4 3 4 1 Boot the Flash program ED 4 3 4 2 Initialize the boot device EE 4 3 4 3 Boot code was read OK System and Disk Status LED User s Information This section lists and describes the various sy...

Страница 168: ...rt Disk Status Off Not accessing disk drives None required normal Amber Internal disk drive failure Replace disk drive Green Accessing disk drives None required normal Table 6 5 Disk Drive Status LED...

Страница 169: ...nditions System Status Unit fan alarm Memory multi bit error SERR P6 bus error SERR Thermal sensor from SCSI distribution board Temperature heceta Voltage heceta CPU thermal trip heceta Chassis intrus...

Страница 170: ...Appendix A System Cabling Contents Before You Begin 1 Static Precautions 1 Standard SCSI Bus Configuration 2 RAID Configuration 5 Installing the RAID Controller 6 Configuring the RAID Controller 10...

Страница 171: ...Bill GrahamBill Graham...

Страница 172: ...powered off and unplug the AC power cord from the back of the chassis Failure to disconnect power before opening your system can result in personal injury and equipment damage Static Precautions An el...

Страница 173: ...your server doesn t have any removable media peripherals the cable is not used and the narrow SCSI controller is terminated using the SCSI termination resistors see Figure A 1 E The ultra wide SCSI i...

Страница 174: ...heral bays C Narrow SCSI interface cable D Narrow SCSI connector 50 pin E Internal SCSI termination resistors not installed when internal narrow SCSI devices are used F 3 1 2 inch diskette drive G 2nd...

Страница 175: ...nal narrow SCSI cable P External narrow SCSI device Q SCSI terminator R Front panel connector S SCSI distribution panel Figure A 2 Standard SCSI Bus Cable Routing POWER STATUS DISK POWER RESET A B C D...

Страница 176: ...ard which gives your system the added security of fault tolerance If you order a system with the RAID controller the system is pre cabled at the factory see Figure A 3 If you are adding the DAC960PDU...

Страница 177: ...Front panel connector S DAC960PDU RAID controller in PCI slot J11 T RAID channel 0 cable connector U Activity cable connector to J25 W SCSI distribution panel V Activity cable Installing the RAID Con...

Страница 178: ...through the cable opening in the metal chassis which is just to the top right of the system board see Figure A 4 Figure A 4 Removing the Top Ultra Wide SCSI Cable Connector 5 On the opposite side of...

Страница 179: ...the Metal Cover A A Metal panel with four screws 6 Route the cable down the inside of the chassis to the cable opening at the bottom of the chassis 7 Run the cable through the bottom opening back out...

Страница 180: ...A 9 System Cabling Figure A 6 Rerouting the Ultra Wide SCSI Cable 8 Route the cable up to the RAID controller and plug it into the channel 0 connector on the RAID controller board see Figure A 3 T...

Страница 181: ...nology and provides tips on making your array perform well in your specific application Chapter 3 Preparing the Array covers array hardware preparation configuration and initialization After completin...

Страница 182: ...Appendix B Memory Configurations Contents Memory DIMM Configurations 1...

Страница 183: ...Bill Grahamaerrterterter...

Страница 184: ...ns devices Parity generation checking is provided for each byte Separate banks of DIMMs may have different sizes of memory installed A DIMM bank consists of a single 72 pin 60 ns device with gold plat...

Страница 185: ...28 32 576 128 128 128 128 64 608 128 128 128 128 64 32 640 128 128 128 128 128 672 128 128 128 128 128 32 704 128 128 128 128 128 64 736 128 128 128 128 128 64 32 768 128 128 128 128 128 128 800 128 1...

Страница 186: ...Appendix C Option Boards Contents Introduction C 1...

Страница 187: ...C 1 Option Boards Introduction Use this section of your user s guide for storing controller adapter installation procedures that accompany option boards you purchase after your server is installed...

Страница 188: ...Appendix D Devices Contents Introduction 1...

Страница 189: ...D 1 Devices Introduction Use this section of your user s guide for storing device installation procedures that accompany add on peripheral devices you purchase after your server is installed...

Страница 190: ...Appendix E Network Operating Systems Contents Introduction 1...

Страница 191: ...E 1 Network Operating Systems Introduction Use this section of your user s guide for storing your Network Operating System Configuration Guide...

Страница 192: ...components added to the system such as hard disk drives add in boards or printers Record the model and serial numbers of the unit and system baseboard The model and serial numbers of the system unit a...

Страница 193: ...rtyrtyrtyrtyry...

Страница 194: ...Video Mem DRAM Srvr Monitor Mod Diskette Drive A Diskette Drive B Tape Drive 1 Tape Drive 2 Tape Drive 3 CD ROM Drive 1 CD ROM Drive 2 CD ROM Drive 3 Hard Disk Drive 1 Hard Disk Drive 2 Hard Disk Driv...

Страница 195: ...ipment Log Equipment Log continued Component Manufacturer Name and Model Serial Number if available Date Installed Network Controller 1 Network Controller 2 Monitor Keyboard Mouse External SCSI Periph...

Страница 196: ...or other media backup battery The battery in your computer that maintains the real time clock and the configuration information when the computer s power is removed base memory An area of memory betwe...

Страница 197: ...n which a computer is set up to operate Some configurable options include CPU speed serial port designation and memory allocation coprocessor See math coprocessor CPU Central Processing Unit See micro...

Страница 198: ...Some software requires EMS to operate EPROM Erasable Programmable Read Only Memory A type of memory device that is usually used to store system BIOS code This code can be erased with ultraviolet ligh...

Страница 199: ...type of hard disk drive with the control circuitry located inside the disk drive rather than on a drive controller card interface A connection between the computer and a peripheral device that enables...

Страница 200: ...e A circuit board that plugs into a dedicated connector on the system board in your computer mouse A small input device that you guide on a flat surface to control the cursor movement and operation of...

Страница 201: ...programs This type of memory must be periodically refreshed to maintain valid data and is lost when the computer is powered off See also NVRAM and SRAM real time clock The IC in your computer that mai...

Страница 202: ...operating system SRAM Static RAM A temporary storage area for data and programs This type of memory does not need to be refreshed but it is lost when the computer is powered off See also NVRAM and RA...

Страница 203: ...8 Glossary...

Страница 204: ......

Страница 205: ...101843 1...

Отзывы: