background image

4 Troubleshooting | 4.6 Wrong error message after PC upgrade

ZEISS

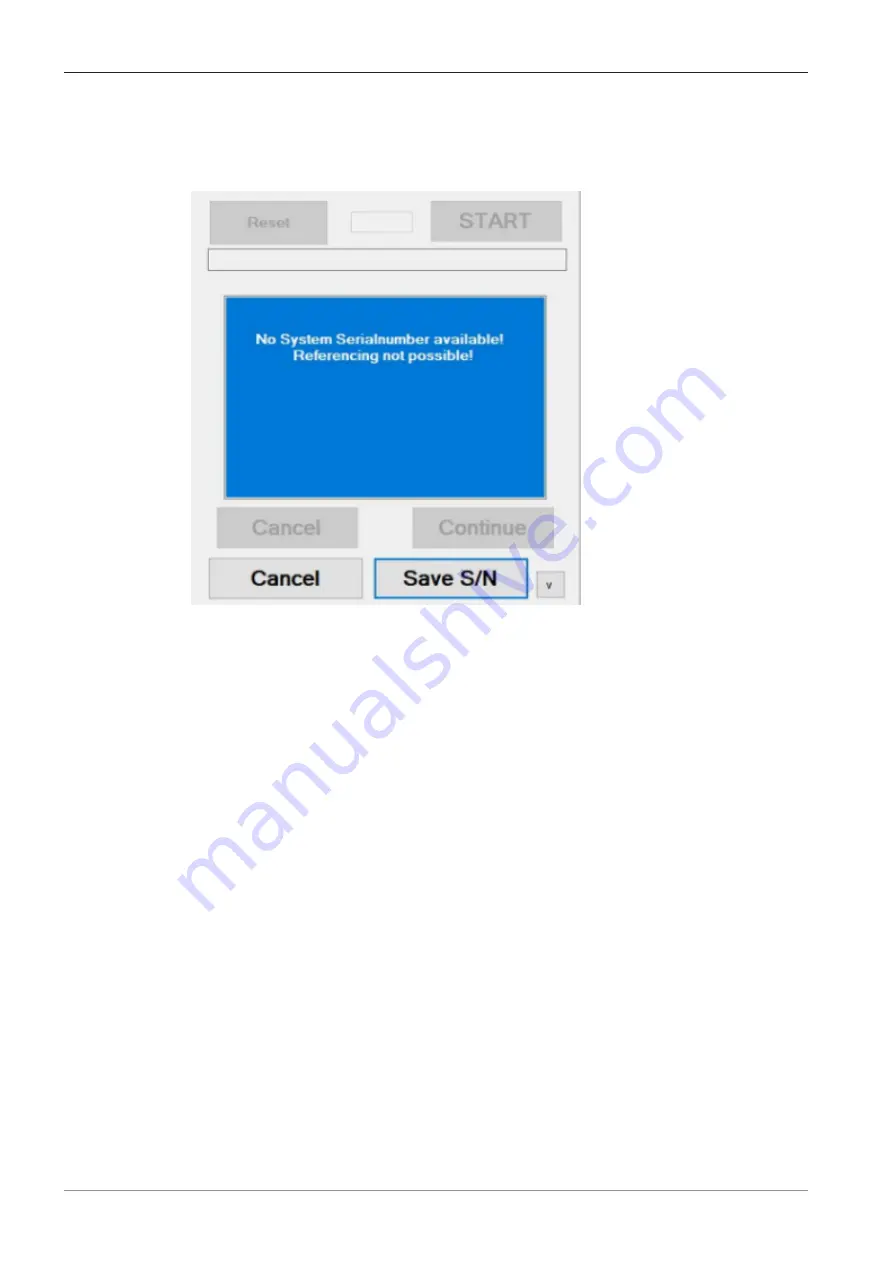
4.6 Wrong error message after PC upgrade

The wrong error message "No system serial number available" appears after starting the referenc-
ing process on the new computer (known bug).

Solution

Click 

Save S/N

 and continue referencing.

Quick Guide ZEISS Smartzoom 5 | en-US | Rev.1

32

Содержание Smartzoom 5

Страница 1: ...Quick Guide ZEISS Smartzoom 5 Referencing Application...

Страница 2: ...hall remain unaffected thereby Any viola tions may be prosecuted as copyright infringements The use of general descriptive names registered names trademarks etc in this document does not imply that su...

Страница 3: ...ing Pivot Point 14 3 7 Image Alignment 18 3 8 Stitching Referencing 21 3 9 3D Referencing 22 4 Troubleshooting 26 4 1 Angle stops not found 26 4 2 Overview distortion correction Upright position 27 4...

Страница 4: ...struction manual where these procedures are described in detail In case of mounting or dismounting the Transmittel Light Unit TLU repeat the referencing tasks Ov Image Dist Corr 12 and Image Alignment...

Страница 5: ...he live image from the microscope camera You will see the referencing proce dure of each step in here Additionally after starting a referencing task you will see the Referencing Wizard in a small dial...

Страница 6: ...pe stage Therefore the angle stops of the stage insert plate must be facing up As you have to mount an objective please read the Smartzoom 5 instruction manual where this procedure is described in det...

Страница 7: ...3 Referencing Tasks 3 1 Stage Angle Stops ZEISS 3 Click on the Start button within the wizard Quick Guide ZEISS Smartzoom 5 en US Rev 1 7...

Страница 8: ...the referencing points one after another The actual point is marked green After the Stage referencing Angle Stops the wizard will continue with the next activated step 3 2 Focus Position This referenc...

Страница 9: ...ocus Position ZEISS Ensure that the stage is empty and that the stand is in upright position The angle stops of the stage insert plate must be facing up 2 Click on the Start button Quick Guide ZEISS S...

Страница 10: ...ective This referencing task will find the best settings for the current used objective We highly recom mend to perform referencing for each new objective that you use Note that we will not describe t...

Страница 11: ...is performed After the referencing of the objective the wizard will continue with the next activated step 3 4 Tilting Accelerometer This referencing task will find the best settings for the accelerom...

Страница 12: ...w Image Distortion Correction will find the best settings to prevent image distortion Therefore an DIN A4 print out of the chessboard alignment sheet is re quired 1 Place the chessboard paper on your...

Страница 13: ...age 4 Drag the white frame to approx fit the outlines of the chessboard paper see screenshot and accept by clicking the left mouse key Note that this step must be performed twice For the Overview Vide...

Страница 14: ...ext activated step 3 6 Tilting Pivot Point This referencing task will find the best settings for the pivot point Therefore an alignment sheet is required Either the rear side of the new alignment shee...

Страница 15: ...ble With 5 0x objective selected With no objective selected 3 Place the new alignment sheet 2294 728 rear or old alignment sheet 2115 856 chess board front on the stage and align the paper with the to...

Страница 16: ...chessboard paper old alignment sheet 2115 856 on the crosshair Alternatively a clearly visible position can be taken 7 Click on the Continue button 8 Now you have to manually tilt the stand for appro...

Страница 17: ...ep 6 to the center of the crosshair with the mouse and focus again 14 Click on the Continue button 15 Tilt the stand to approximately 45 degree 16 Check if the image is in focus If not click AF button...

Страница 18: ...N A4 print out of the coordi nate system alignment sheet is required 1 Place the alignment paper rear on the stage Notice that for this tasks the angle stops of the stage insert plate must be facing d...

Страница 19: ...oints on the paper by moving each crosshair to the correspond ing position 5 Click on the Continue button The stage will move to the first position and the focus will zoom in to the first reference po...

Страница 20: ...e stage moves to the second reference point Again check if the image is in focus If not click AF button 8 Move the center of position 2 to the center of the crosshair by dragging the image with the mo...

Страница 21: ...mize staircase offset in the stitching applica tion Therefore a new version of the alignment sheet 2294 728 is required which can be or dered on the Smartzoom software download page Prerequisite Befor...

Страница 22: ...ll be performed 3 9 3D Referencing If you have an 1 6x objective for your Smartzoom 5 available now the 3D referencing procedure has to be started by using the Smartzoom 5 Referencing Application Note...

Страница 23: ...3 Referencing Tasks 3 9 3D Referencing ZEISS 1 Start the Smartzoom 5 Referencing Application from the Windows start menu Quick Guide ZEISS Smartzoom 5 en US Rev 1 23...

Страница 24: ...w Straighten the stand Make sure it sits in the mechanical upright position Insert the 1 6x objective lens Remove any objects from the sample stage 5 Click START to start the 3D referencing procedure...

Страница 25: ...ferencing this step has to be confirmed and saved by clicking on Save and Exit 7 Close the Smartzoom 5 Referencing Application Your ZEISS Smartzoom 5 is now up to date and all new functions are availa...

Страница 26: ...encing the window shows the error Searching angle stops X roughly or Searching angle stop X fine grained 1 Ensure that the angle stops are facing up 2 Clean your angle stops from dust or other dirt 3...

Страница 27: ...rview distortion correction Upright position During the Overview distortion correction the error Please ensure that the column is in up right position appears 1 Look at the current tilt angle red fram...

Страница 28: ...er cables and start the microscope 4 Start the referencing app and perform the referencing again If the red cross on the micro scope appears after the restart or the problem persists after the restart...

Страница 29: ...r stage has moved when aligning the individual center point Ensure that the crosshairs are at the corresponding position The following examples show how center point 1 can be set correctly and incorre...

Страница 30: ...ZEISS Wrong Incorrect position 1 You are on the left hand side from the correct position Recognizable with the bold horizontal line that is right finer The vertical line is stepped Wrong Incorrect pos...

Страница 31: ...SS You are right hand side from the correct position Recognizable with the bold horizontal line that ends on the right side The vertical line is stepped Correct All lines have the same width No line i...

Страница 32: ...Wrong error message after PC upgrade The wrong error message No system serial number available appears after starting the referenc ing process on the new computer known bug Solution Click Save S N an...

Страница 33: ......

Страница 34: ...roscopy GmbH Carl Zeiss Promenade 10 07745 Jena Germany phone 49 3641 64 3161 fax 49 3641 64 3439 info microscopy zeiss com www zeiss com microscopy Quick Guide ZEISS Smartzoom 5 en US Rev 1 Modificat...

Отзывы: