background image


Zavio D7110 Quick Installation Guide 

Please follow the installation steps below to set up your D7110 Indoor IR Dome Camera.   

Check the package contents against the list below. 

See P.1


Physical overview. 

See P.1


Install the hardware and connect all cables. 

See P.3 

Microsoft OS: 

Use the software CD to install Intelligent IP Installer.

 See P.6 

Access the IP Camera using Intelligent IP Installer. 

See P.6


Change the Web Interface into your preferred language.

 See P.8 

Change lighting setting.

 See P.8 

Auto IRIS setting.

 See P.8


Day Night function setting.

 See P.9


Use IP Camera via Mobile Phone. 

See P.9 

Access to Internet via Static IP, Dynamic IP or both. 

See P.10 

Application of IP Camera. 

See P.12 

For more information, please check the User Manual available in the Software CD or you can download the latest 

software from 

http://www.zavio.com


Package Contents 

Camera


D7110 Outdoor IR IP Camera 

Quick Installation Guide

  Brief product information and quick installation 

Software CD


IP Surveillance Software 

Intelligent IP Installer 

User Manuals 

Language Packs 

Mounting Bracket


Three plastic anchors and screws, Alignment sticker 

4pin, 2pin I/O terminal block 

Adaptor 

12V DC, max 9W 

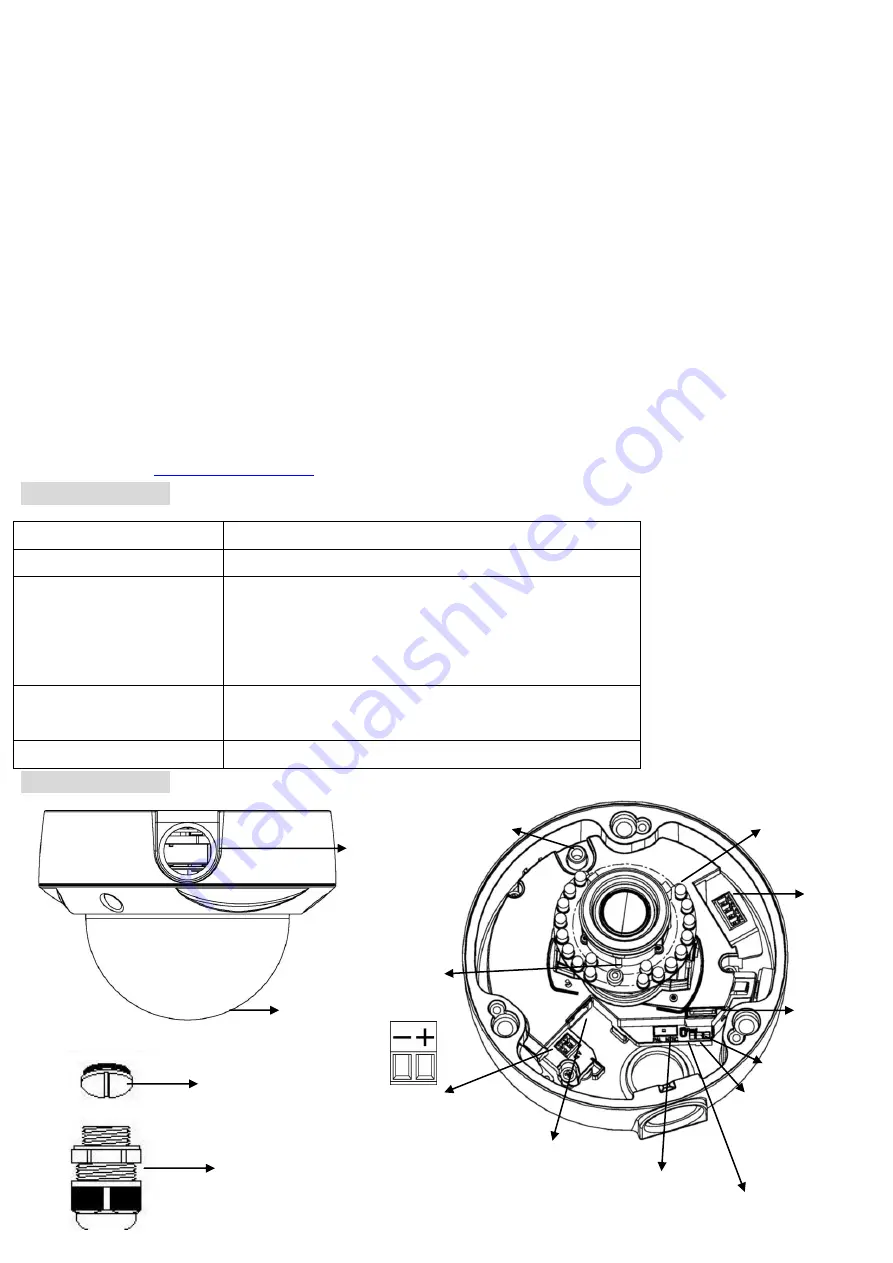
Physical overview   


DI/DO 

DO DI GND 12V 

  IR LEDs 

  Card slot 

SD Indicator 


PAL/NTSC 

Power Indicator 


        12V DC 


        Reset button 


Ethernet Socket 


          RCA 


        Dome bubble 


Light sensor 

        Conduit hole 


        Plug 


        Cable gland 


Содержание D7110

Страница 1: ...Phone See P 9 Access to Internet via Static IP Dynamic IP or both See P 10 Application of IP Camera See P 12 For more information please check the User Manual available in the Software CD or you can d...

Страница 2: ...e means SD card ready Flashes orange while accessing SD card Reset When the device is empowered press the Reset Button to reboot the device or hold the Reset Button for 10 seconds to set the settings...

Страница 3: ...to round all cable and cable gland To seal all cable in the claw part tightly in case of water leaking 5 Attach the cable gland to the conduit hole on the side or bottom of the rugged dome Push the c...

Страница 4: ...onnect the power adaptor to the IP Camera 2 Using a standard RJ 45 network cable connect the IP Camera to a normal Hub Switch Router d To adjust the view angle 3 axis Mechanism Design c1 Turn the lens...

Страница 5: ...ange and focus d2 Lock the zoom and focus pullers by rotating the screw clockwise after get satisfied focus f Completion f1 Clean the dome bubble to remove the dust and finger print f2 Fix the tamper...

Страница 6: ...ng Intelligent IP Installer please check two setting Select Intelligent IP Installer and follow the installation process to complete the installation a Browser s Internet Properties Security Default L...

Страница 7: ...st time a yellow information bar appears below the address bar This website wants to install the following add on AxvideoView cab from Zavio Inc 5 Click the information bar and select Install ActiveX...

Страница 8: ...ge Change lighting setting The default setting of lighting environment is Auto However you may also select 50 or 60 Hz upon the lighting environment of your country Go to Setting Basic Camera Advance...

Страница 9: ...get distance and view angle If you wish to use wide view angle and shorter target distance please set level1 otherwise please set level 2 or 3 5 Threshold Threshold value can be set according to appli...

Страница 10: ...tablished by inputting the cameras IP information within the Information section Please go to Setting Basic Network Information b Internet Connectivity of the IP Camera can be established through PPPo...

Страница 11: ...UPnP Internet Gateway Device IGD turn on the UPnP function within the UPnP section Please go Setting Basic Network UPnP Note If you turn on the UPnP Port Forwarding function RTSP Real Time Streaming...

Страница 12: ...Application of IP Camera 12...

Отзывы: