background image

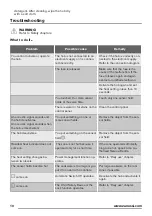
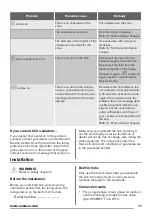
Problem

Possible cause

Remedy

 comes on.

There is no cookware on the

zone.

Put cookware on the zone.


The cookware is incorrect.

Use the correct cookware.

Refer to “Hints and tips” chapter.


The diameter of the bottom of the

cookware is too small for the

zone.

Use cookware with correct di-

mensions.

Refer to “Technical information”

chapter.

 and a number come on.

There is an error in the hob.

Disconnect the hob from the

electrical supply for some time.

Disconnect the fuse from the

electrical system of the house.
Connect it again. If   comes on

again, speak to an Authorised

Service Centre.

 comes on.

There is an error in the hob be-

cause a cookware boils dry. Au-

tomatic Switch Off and the over-

heating protection for the zones

operate.

Deactivate the hob. Remove the

hot cookware. After approximate-

ly 30 seconds, activate the zone

again. If the cookware was the

problem, the error message goes

out. Residual heat indicator can

stay on. Let the cookware be-

come sufficiently cool. Check if

your cookware is compatible with

the hob.

Refer to “Hints and tips” chapter.

If you cannot find a solution...

If you cannot find a solution to the problem

yourself, contact your dealer or an Authorised

Service Centre. Give the data from the rating

plate. Give also three digit letter code for the

glass ceramic (it is in the corner of the glass

surface) and an error message that comes on.

Make sure, you operated the hob correctly. If

not the servicing by a service technician or

dealer will not be free of charge, also during the

warranty period. The instructions about the

Service Centre and conditions of guarantee are

in the guarantee booklet.

Installation

WARNING!

Refer to Safety chapters.

Before the installation

Before you install the hob, write down the

information bellow from the rating plate. The

rating plate is on the bottom of the hob.

Serial number ...........................

Built-in hobs

Only use the built-in hobs after you assemble

the hob into correct built-in units and work

surfaces that align to the standards.

Connection cable

• For a single phase or two phase connection

use the following (or higher) mains cable

type: H05BB-F T min 90°C.

www.zanussi.com

11

Содержание ZI604FK

Страница 1: ...EN ZI604FK User Manual Hob ...

Страница 2: ...ical sensory or mental capabilities or lack of experience and knowledge if they have been given supervision or instruction concerning use of the appliance in a safe way and understand the hazards involved Do not let children play with the appliance Keep all packaging away from children Keep children and pets away from the appliance when it operates or when it cools down Accessible parts are hot If...

Страница 3: ...t the bottom of the appliance from steam and moisture Do not install the appliance adjacent to a door or under a window This prevents hot cookware to fall from the appliance when the door or the window is opened If the appliance is installed above drawers make sure that the space between the bottom of the appliance and the upper drawer is sufficient for air circulation The bottom of the appliance ...

Страница 4: ...erate the appliance with wet hands or when it has contact with water Do not use the appliance as a work surface or as a storage surface If the surface of the appliance is cracked disconnect immediately the appliance from the power supply This to prevent an electrical shock Users with a pacemaker must keep a distance of minimum 30 cm from the induction cooking zones when the appliance is in operati...

Страница 5: ...e correctly Disconnect the appliance from the mains supply Cut off the mains cable and discard it Service To repair the appliance contact an Authorised Service Centre Use original spare parts only Product description Cooking surface layout 210 mm 145 mm 180 mm 145 mm 1 1 1 1 2 1 Induction cooking zone 2 Control panel Control panel layout 1 3 2 4 5 Use the sensor fields to operate the appliance The...

Страница 6: ...are or no cookware on the cooking zone Automatic Switch Off function operates Residual heat indicator WARNING There is a risk of burns from residual heat The induction cooking zones make the heat necessary for cooking process directly in the bottom of the cookware The glass ceramic is heated by the heat of the cookware Daily use WARNING Refer to Safety chapters Activating and deactivating Touch fo...

Страница 7: ...ion chapter To activate the function for a cooking zone first set the cooking zone and than set the maximum heat setting Touch until comes on To deactivate the function touch Lock You can lock the control panel while cooking zones operate It prevents an accidental change of the heat setting Set the heat setting first To activate the function touch comes on for 4 seconds To deactivate the function ...

Страница 8: ...of the cookware must be as thick and flat as possible Cookware dimensions Induction cooking zones adapt to the dimension of the bottom of the cookware automatically to some limit The cooking zone efficiency is related to the diameter of the cookware The cookware with a smaller diameter than the minimum receives only a part of the power generated by the cooking zone Refer to Technical information c...

Страница 9: ...ntle fry escalope veal cordon bleu cutlets rissoles sausages liv er roux eggs pancakes dough nuts as neces sary Turn halfway through 7 8 Heavy fry hash browns loin steaks steaks 5 15 Turn halfway through 9 Boil water cook pasta sear meat goulash pot roast deep fry chips Boil large quantities of water Power function is activated Care and cleaning WARNING Refer to Safety chapters General information...

Страница 10: ...ntrol panel An acoustic signal sounds and the hob deactivates An acoustic signal sounds when the hob is deactivated You put something on one or more sensor fields Remove the object from the sen sor fields The hob deactivates You put something on the sensor field Remove the object from the sen sor field Residual heat indicator does not come on The zone is not hot because it operated only for a shor...

Страница 11: ...ly cool Check if your cookware is compatible with the hob Refer to Hints and tips chapter If you cannot find a solution If you cannot find a solution to the problem yourself contact your dealer or an Authorised Service Centre Give the data from the rating plate Give also three digit letter code for the glass ceramic it is in the corner of the glass surface and an error message that comes on Make s...

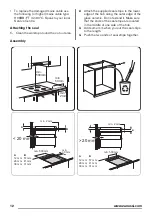
Страница 12: ...ob along the outer edge of the glass ceramic Do not extend it Make sure that the ends of the seal stripe are located in the middle of one side of the hob 3 Add some mm when you cut the seal stripe to the length 4 Push the two ends of seal stripe together Assembly min 50mm min 500mm min 2mm min 2 mm A B A 12 mm 28 mm 38 mm B 57 mm 41 mm 31 mm min 30 mm min 500 mm 20 mm 20 mm min 2 mm A B A 12 mm 28...

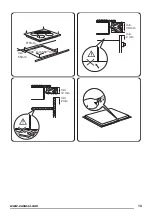
Страница 13: ...R 5mm min 55mm 560 1mm 490 1 mm min 38 mm min 2 mm min 12 mm min 2 mm www zanussi com 13 ...

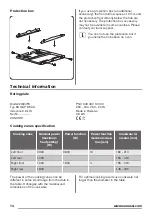
Страница 14: ...yp 58 GAP D5 AU 220 240 V 50 60 Hz Induction 6 6 kW Made in Romania Ser Nr 6 6 kW ZANUSSI Cooking zones specification Cooking zone Nominal power maximum heat setting W Power function W Power function maximum dura tion min Cookware di ameter mm Left front 2300 2800 10 180 210 Left rear 1200 125 145 Right front 1200 1800 4 125 145 Right rear 1800 145 180 The power of the cooking zones can be differe...

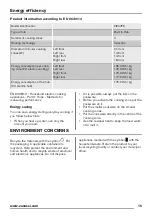
Страница 15: ... can save energy during everyday cooking if you follow below hints When you heat up water use only the amount you need If it is possible always put the lids on the cookware Before you activate the cooking zone put the cookware on it Put the smaller cookware on the smaller cooking zones Put the cookware directly in the centre of the cooking zone Use the residual heat to keep the food warm or to mel...

Страница 16: ...www zanussi com shop 867322194 A 162015 ...

Отзывы: