background image

instructions incorporated in this instruction booklet

be ignored.
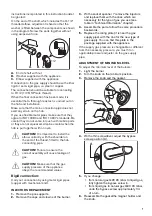
On the end of the shaft, which includes the G 1/2"

threaded elbow, adjustment is fixed so that the

washer is fitted between the components as shown

in the diagram. Screw the parts together without

using excessive force.

1/2

1/2

A

B

C

A. End of shaft with nut

B. Washer supplied with the appliance

C. Elbow supplied with the appliance
Connection to the gas supply should be with either

rigid or semi-rigid pipe, i.e. steel or copper.
The connection should be suitable for connecting

to R 1/2 (1/2 BSP male thread).
When the final connection has been made, it is

essential that a thorough leak test is carried out on

the hob and installation.
Make sure that the main connection pipe does not

exert any strain on the hob.
If you use flexible metal pipes make sure that they

agree to ISO 10380 and ISO 10807 standards. Be

careful they do not come in touch with mobile parts

or they are not squeezed. Also be careful when the

hob is put together with an oven.

CAUTION! It is important to install the

elbow correctly, with the shoulder on

the end of the thread, fitted to the hob

connecting pipe.

CAUTION! Failure to ensure the

correct assembly will cause leakage of

gas.

CAUTION! Make sure that the gas

supply pressure of the appliance

obeys the recommended values.

Rigid connection:

Carry out connection by using metal rigid pipes

(copper with mechanical end).

INJECTORS REPLACEMENT

1. Remove the pan supports.

2. Remove the caps and crowns of the burner.

3. With a socket spanner 7 remove the injectors

and replace them with the ones which are

necessary for the type of gas you use (see

table in "Technical Information" chapter).

4. Assemble the parts, follow the same procedure

backwards.

5. Replace the rating plate (it is near the gas

supply pipe) with the one for the new type of

gas supply. You can find this plate in the

package supplied with the appliance.

If the supply gas pressure is changeable or different

from the necessary pressure, you must fit an

applicable pressure adjuster on the gas supply

pipe.

ADJUSTMENT OF MINIMUM LEVEL
To adjust the minimum level of the burners:

1. Light the burner.

2. Turn the knob on the minimum position.

3. Remove the knob and the gasket.

4. With a thin screwdriver, adjust the bypass

screw position (A).

A

5. If you change:

• from natural gas G20 20 mbar to liquid gas,

fully tighten the bypass screw in.

• from liquid gas to natural gas G20 20 mbar,

undo the bypass screw approximately 1/4

of a turn.

6. Reassemble the gasketthe magnet holder and

the knob.

7

Содержание ZGH62414BA

Страница 1: ...GETTING STARTED EASY User Manual ZGH62414BA EN User Manual Hob IE ...

Страница 2: ...or instruction concerning the use of the appliance in a safe way and understand the hazards involved Children of less than 8 years of age and persons with very extensive and complex disabilities shall be kept away from the appliance unless continuously supervised Children should be supervised to ensure that they do not play with the appliance Keep all packaging away from children and dispose of it...

Страница 3: ...ger of fire Do not store items on the cooking surfaces Metallic objects such as knives forks spoons and lids should not be placed on the hob surface since they can get hot Do not use the appliance before installing it in the built in structure Do not use a steam cleaner to clean the appliance If the supply cord is damaged it must be replaced by the manufacturer an authorized Service or similarly q...

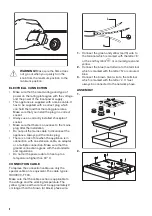
Страница 4: ...ust be accessible after installation ELECTRICAL CONNECTION WARNING Risk of fire and electric shock All electrical connections should be made by a qualified electrician The appliance must be earthed Before carrying out any operation make sure that the appliance is disconnected from the power supply Make sure that the parameters on the rating plate are compatible with the electrical ratings of the m...

Страница 5: ... let the appliance stay unattended during operation Set the cooking zone to off after each use Do not put cutlery or saucepan lids on the cooking zones They can become hot Do not operate the appliance with wet hands or when it has contact with water Do not use the appliance as a work surface or as a storage surface When you place food into hot oil it may splash WARNING Risk of fire and explosion F...

Страница 6: ...ations are contained in the following British Standards Codes Of Practice B S 6172 B S 5440 Par 2 and B S 6891 Current Editions The hob should not be installed in a bed sitting room with a volume of less than 20 m If it is installed in a room of volume less than 5 m an air vent of effective area of 100 cm is required If it is installed in a room of volume between 5 m and 10 m an air vent of effect...

Страница 7: ...e to ensure the correct assembly will cause leakage of gas CAUTION Make sure that the gas supply pressure of the appliance obeys the recommended values Rigid connection Carry out connection by using metal rigid pipes copper with mechanical end INJECTORS REPLACEMENT 1 Remove the pan supports 2 Remove the caps and crowns of the burner 3 With a socket spanner 7 remove the injectors and replace them w...

Страница 8: ... is in connection with an extension cable an adapter or a multiple connection Make sure that the ground connection agrees with the standards and regulations Do not let the power cable to heat up to a temperature higher than 90 C CONNECTION CABLE To replace the connection cable use only the special cable or its equivalent The cable type is H03V2V2 F T90 Make sure that the cable section is applicabl...

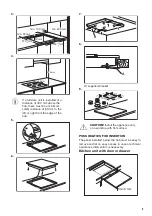
Страница 9: ...afety distance of 50 mm to the left or right from the edge of the hob 5 6 7 8 A A supplied bracket 9 CAUTION Install the appliance only on a worktop with flat surface POSSIBILITIES FOR INSERTION The panel installed below the hob must be easy to remove and let an easy access in case a technical assistance intervention is necessary Kitchen unit with door or drawer min 6 mm 9 ...

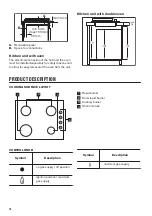
Страница 10: ... separately for safety reasons and to allow for easy removal of the oven from the unit Kitchen unit with double oven PRODUCT DESCRIPTION COOKING SURFACE LAYOUT 2 1 3 4 1 Rapid burner 2 Semi rapid burner 3 Auxiliary burner 4 Control knobs CONTROL KNOB Symbol Description no gas supply off position ignition position maximum gas supply Symbol Description minimum gas supply 10 ...

Страница 11: ...ight after 15 seconds release the control knob turn it into off position and try to light the burner again after minimum 1 minute CAUTION In the absence of electricity you can ignite the burner without electrical device in this case approach the burner with a flame turn the control knob counter clockwise to maximum gas supply position and push it down Keep the control knob pushed for equal or less...

Страница 12: ...ith water and then dry them with a soft cloth To remove burnt food fat and stubborn stains let them soak in a small amount of mild detergent for a few minutes before cleaning Use cleaning products designed specifically for cleaning stainless steel in order to protect the steel surfaces Do not use cleaning products containing corrosive chemicals such as chlorides do not clean the surface with disin...

Страница 13: ... is con nected incorrectly Check if the hob is correctly connected to the electrical supply The fuse is blown Make sure that the fuse is the cause of the malfunction If the fuse is blown again and again contact a qualified electrician Burner cap and crown are placed incorrectly Place the burner cap and crown correctly The flame extinguishes immedi ately after ignition Thermocouple is not heated up...

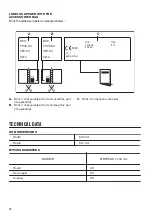
Страница 14: ...NO SER NO 03 IT MADE IN ITALY TYPE IP20 0049 A B C A Stick it on Guarantee Card and send this part if applicable B Stick it on Guarantee Card and keep this part if applicable C Stick it on instruction booklet TECHNICAL DATA HOB DIMENSIONS Width 594 mm Depth 510 mm BYPASS DIAMETERS BURNER Ø BYPASS 1 100 mm Rapid 42 Semi rapid 32 Auxiliary 28 14 ...

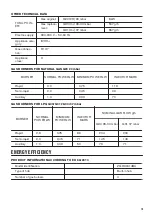
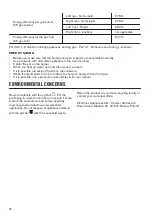
Страница 15: ...RMAL POWER kW MINIMUM POWER kW INJECTOR MARK Rapid 3 0 0 75 119 Semi rapid 2 0 0 45 96 Auxiliary 1 0 0 33 70 GAS BURNERS FOR LPG G30 G31 28 30 37 mbar BURNER NORMAL POWER kW MINIMUM POWER kW INJECTOR MARK NOMINAL GAS FLOW g h G30 28 30 mbar G31 37 mbar Rapid 2 8 0 75 86 204 200 Semi rapid 2 0 0 45 71 145 143 Auxiliary 1 0 0 33 50 73 71 ENERGY EFFICIENCY PRODUCT INFORMATION ACCORDING TO EU 66 2014 ...

Страница 16: ...water use only the amount you need If it is possible always put the lids on the cookware When the liquid starts to boil turn down the flame to barely simmer the liquid If it is possible use a pressure cooker Refer to its user manual ENVIRONMENTAL CONCERNS Recycle materials with the symbol Put the packaging in relevant containers to recycle it Help protect the environment and human health by recycl...

Страница 17: ......

Страница 18: ......

Страница 19: ......

Страница 20: ...WWW ZANUSSI COM SHOP 867367403 C 132022 ...

Отзывы: