background image

31

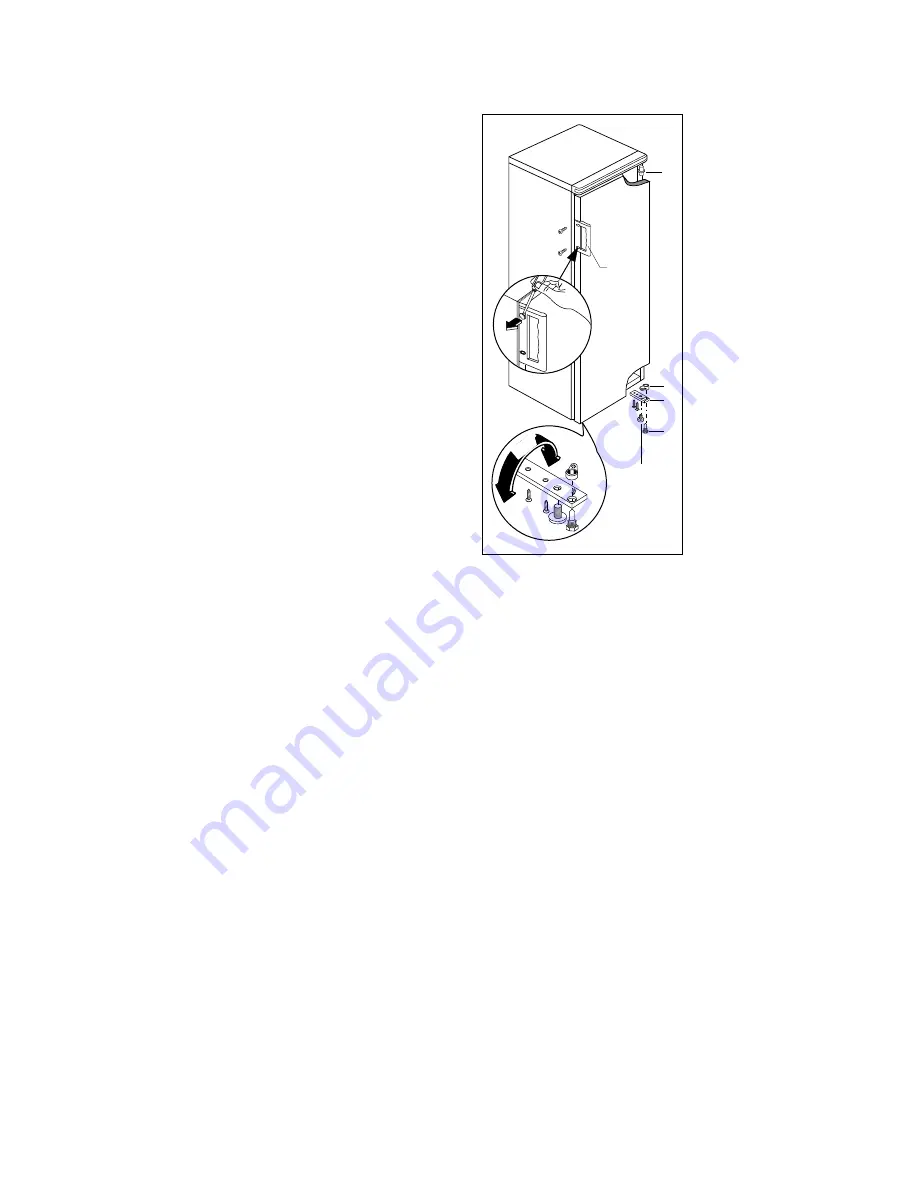
Door reversal

Unplug the appliance before all operations.

To reverse the door, proceed as follows:

dismantle the lower hinge (3), pin (1), the threaded 
insert (4) and the screw (2);

slide the door out from pin (5), unscrew the pin and 
reposition on the opposite side;

unscrew the left front foot and reposition on the 
opposite side;

unscrew the two screws which mask the holes for 
fixing the hinge from the left front side;

reassemble the door;

reassemble the lower hinge (turning it 180

°

), the 

threaded insert, the pin and the screw on the 
opposite side, as shown in the figure;

Dismantle the handle (6) and reassemble it on the 
opposite side.

Attention

After completion of the door reversibility operation, 
verify that the door gasket is adherent to the 
cabinet. If the ambient temperature is cold (i.e. in 
Winter), the gasket may not fit perfectly to the 
cabinet. In that case, wait for the natural fitting of 
the gasket or accelerate this process by heating up 
the part involved with a normal hairdrier.

Fig. 3

D193/B

180°

6

5

4

3

1

2

Содержание ZFC2405

Страница 1: ...KÜHLSCHRANK REFRIGERATEUR KOELKAST REFRIGERATOR ZFC 2405 BEDIENUNGSANLEITUNG MODE D EMPLOI GEBRUIKSAANWIJZING INSTRUCTION BOOKLET 2222 134 91 1 ...

Страница 2: ...eversal Page 31 Use Page 32 Operation Page 32 Temperature regulation Page 32 Fresh food refrigeration Page 32 Movable shelves Page 32 Positioning the door shelves Page 32 Defrosting Page 33 Maintenance Page 34 Periodic cleaning Page 34 Periods of non operation Page 34 Interior light Page 34 Customer Service and spare parts page 34 Printed on recycled paper ...

Страница 3: ...liance consists of channels through which the refrigerant passes If these should be punctured this would damage the appliance beyond repair and cause food loss DO NOT USE SHARP INSTRUMENTS to scrape off frost or ice Frost may be removed by using the scraper provided Under no circumstances should solid ice be forced off the liner Solid ice should be allowed to thaw when defrosting the appliance See...

Страница 4: ...sitioned as shown in Fig 2 Then turn them through 45 arrow A vertical until they lock into place Fig 2 Electrical connection Before plugging in ensure that the voltage and frequency shown on the serial number plate correspond to your domestic power supply Voltage can vary by 6 of the rated voltage For operation with different voltages a suitably sized auto transformer must be used The appliance mu...

Страница 5: ...nt side reassemble the door reassemble the lower hinge turning it 180 the threaded insert the pin and the screw on the opposite side as shown in the figure Dismantle the handle 6 and reassemble it on the opposite side Attention After completion of the door reversibility operation verify that the door gasket is adherent to the cabinet If the ambient temperature is cold i e in Winter the gasket may ...

Страница 6: ...t performance do not store warm food or evaporating liquids in the refrigerator do cover or wrap the food particularly if it has a strong flavour Position food so that air can circulate freely round it Useful hints Meat all types wrap in polythene bags and place on the glass shelf above the vegetable drawer For safety store in this way only one or two days at the most Cooked foods cold dishes etc ...

Страница 7: ...ressor stops during normal use The defrost water drains out through a trough into a special container at the back of the appliance over the motor compressor where it evaporates It is important to periodically clean the defrost water drain hole in the middle of the refrigerator compartment trough to prevent the water overflowing and dripping onto the food inside Use the special cleaner provided whi...

Страница 8: ... part by pressing it as shown in the figure If the door is open and the light does not come on check that the bulb is properly screwed in if it still does not work replace the bulb with one of the same power The maximum rating is shown on the light cover Fig 8 D411 CUSTOMER SERVICE AND SPARE PARTS If the appliance is not functioning properly check that the plug is firmly in the wall socket and the...

Отзывы: