background image


8


Fitting a decorative door panel


Important: The components needed to fit the decorative 
panel have been pre-fitted on the appliance.
The brackets are secured to the panel by means of the 7 


Ø 


3.5x13 screws supplied.

Before starting to fit the panel, remove the large top 
bracket by unscrewing the screws and adjusting pins 
pre-fitted on the appliance door. The small bottom 
bracket need not be removed.


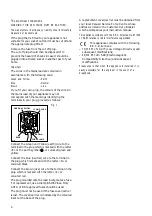
Place the appliance in the position where it is to be 
built in (Fig. 6). 
The appliance is fitted with adjustable feet; screw 
the front and rear feet in or out to adjust the height 
of the appliance to that of the recess.
Keeping the appliance central in the recess, slide it 
in until its back touches the wall.
With a tape measure (or similar instrument), 
measure distance (A) between the top edge of the 
door and the top edge of the decorative panel, 
placing it next to the recess.


Fig. 6


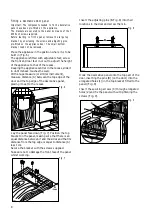
Lay the panel face down (Fig. 7). Position the top 
bracket on the panel, making sure that there is an 
equal distance between it and the sides and that its 
distance from the top edge is equal to distance (A) 
less 1 cm.
Secure the bracket with the screws supplied.
Take care not to damage the front face of the panel 
whilst working.


Fig. 7


D467

=

=

A

D468

A

-1cm

=

=

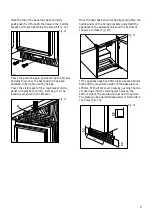
Insert the adjusting pins (B-Fig. 8) into their 
locations in the door and screw them in. 

Fig. 8

Hook the decorative panel onto the top part of the 
door, inserting the pins (B) (on the door) into the 
elongated holes (1) (in the top bracket fitted to the 
panel) (Fig. 9).

Insert the securing screws (C) through elongated 
holes (2) and fix the panel without tightening the 
screws (Fig. 9).

Fig. 9

D532

B

D533

1

B

2

C

Содержание ZEC40

Страница 1: ...FREEZER ZEC 40 INSTRUCTION BOOKLET 2222 258 04 This document was created with FrameMaker 4 0 4 ...

Страница 2: ... page 13 Freezing fresh food page 13 Helpful hints when buying food page 13 Defrosting page 14 Starting page 14 Normal sound page 14 Health and safety guidelines page 15 Maintenance and cleaning page 16 Internal cleaning page 16 When the appliance is not in use page 16 What happens if something goes wrong page 17 Guarantee conditions page 18 TECHNICAL SPECIFICATIONS POWER SUPPLY VOLTAGE AND FREQUE...

Страница 3: ...the appliance should be close to a wall but leaving the required distance for ventilation as stated in the installation instructions ª Before defrosting cleaning or maintenance work is carried out be sure to switch off the appliance and unplug it ª Frozen food must NOT be re frozen once it has thawed out ª Do not place carbonated or fizzy drinks in the freezer as it creates pressure on the contain...

Страница 4: ...p to keep your country tidy use authorised disposal sites for your old appliances For maximum efficiency Make sure that the appliance is cleaned properly Make sure that the door is closed properly Do not position the appliance near to sources of heat Do not over fill your appliance air MUST be allowed to circulate ...

Страница 5: ...ources of heat such as radiators boilers direct sunlight etc best performance is obtained with ambient temperature between 16 C and 32 C For building in and door reversibility if necessary refer to the relevant instructions in the following pages Before using Remove all securing tapes Wash inside the appliance with lukewarm water and bicarbonate of soda 5 ml to 0 5 litre of water Do not use soap o...

Страница 6: ...eutral wire to the terminal in the plug which is marked with the letter N or coloured black Connect the brown live wire to the terminal in the plug which is marked with the letter L or coloured red The plug moulded onto the lead incorporates a fuse For replacement use a 13amp BSI362 fuse Only ASTA or BSI approved fuses should be used The plug must not be used if the fuse cover carrier is lost The ...

Страница 7: ...pliance and remove the hinge itself be very careful to recover all the screws Remove the four screws that fix the upper hinge to the appliance and remove the hinge itself Take the hinge removed from the upper part of the appliance on the opposite side see Fig 5 and using the screws removed from the lower part fix it to the base of the appliance itself Remove and refit the other hinge on the upper ...

Страница 8: ...ith a tape measure or similar instrument measure distance A between the top edge of the door and the top edge of the decorative panel placing it next to the recess Fig 6 Lay the panel face down Fig 7 Position the top bracket on the panel making sure that there is an equal distance between it and the sides and that its distance from the top edge is equal to distance A less 1 cm Secure the bracket w...

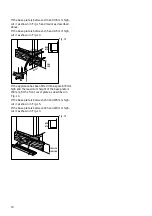
Страница 9: ...ons provided in the bracket Fig 11 D471 D472 D Once the door has ben correctly aligned tighten the holding nuts on the fixing brackets and attach the appliance to the adjacent units and the bottom of the work surface Fig 12 Fig 12 If the appliance has been fitted into a space 820 mm high and the maximum height of the base plate is 100 mm fit the front cover plate by pushing the two vertical lugs i...

Страница 10: ... Fig 13 Fig 14 If the appliance has been fitted into a space 870 mm high and the maximum height of the base plate is 150 mm fit the front cover plate as described in Fig 14 If the base plate is between 150 and 185 mm high cut it as shown in Fig 15 If the base plate is between 185 and 220 mm high cut it as shown in Fig 13 Fig 15 100 150 820 870 20 80 100 135 150 185 820 870 ...

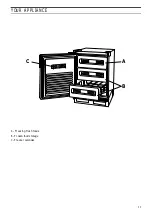
Страница 11: ...11 YOUR APPLIANCE A Freezing fresh foods B Frozen food storage C Freezer calendar B A 3 6 9 12 C ...

Страница 12: ...quired setting which is 3 4 D Mains On button The green mains on button is illuminated continuously to show that the appliance is on Frozen food storage Your appliance has the following frozen food net storage volume 92 litres weight of stored food 29 4 kg Operate the fast freeze switch BEFORE placing fresh food to be frozen in the freezer Place fresh food to be frozen in the top basket food is co...

Страница 13: ...ce sealed containers of carbonated liquids such as fizzy drinks into the freezer as it creates pressure on the container which may cause it to explode resulting in damage to the freezer 2 Water ices and ice lollies should not be consumed immediately after removal from the freezer as it may result in low temperature skin abrasions Freezing fresh food The maximum quantity of food you can freeze in 2...

Страница 14: ...ng defrosting its storage life may be shortened Starting Before the appliance is installed into the recess plug into the mains and switch on Check that the mains on light comes on and the control dial is correctly set See The controls You will hear the compressor start up Normal sound It is quite normal for refrigerators and freezers to make a certain amount of noise The noise level will vary acco...

Страница 15: ...iding what to have for tea ª Do not push food together too much try to allow air circulate around each item ª Cool cooked food as quickly as possible but do NOT place in the freezer until cool Leave food in a place as cool as possible in order that it can then be placed in the freezer as soon as possible ª Do not store food uncovered ª The best way to defrost food is to put it in the refrigerator ...

Страница 16: ...ml to 0 5 litre of water Rinse and dry thoroughly NEVER USE DETERGENTS ABRASIVE POWDERS HIGHLY PERFUMED CLEANING PRODUCTS OR WAX POLISHES TO CLEAN THE INTERIOR AS THESE WILL DAMAGE THE SURFACE AND LEAVE A STRONG SMELL When the appliance is not in use When the appliance is not in use for long periods disconnect from the electricity supply empty all foods and clean the appliance leaving the door aja...

Страница 17: ...ng the temperature to rise ª Sometimes the freezer door will be difficult to open shortly after you have closed it Don t worry this is due to pressure difference which will quickly equalise and allow the door to open normally If after the above checks there is still a fault call your local Zanussi Service Force Centre whose address can be found in the accompanying Customer Care Booklet and can als...

Страница 18: ...by us All service work under this guarantee must be undertaken by a Zanussi Service Centre Home visits are made between 8 30am and 5 30pm Monday to Friday Visits may be available outside these hours in which case a premium will be charged Any appliance or defective part replaced shall become our property Exclusions This guarantee does not cover ª Damage or calls resulting from transportation impro...

Отзывы: