background image

1

2

1

To replace the glass obey the procedure in
opposite sequence.

Cleaning the oven door

The door glass on your product can be dif-
ferent in type and shape from what you

see in diagrams. The number of glasses can be
different.

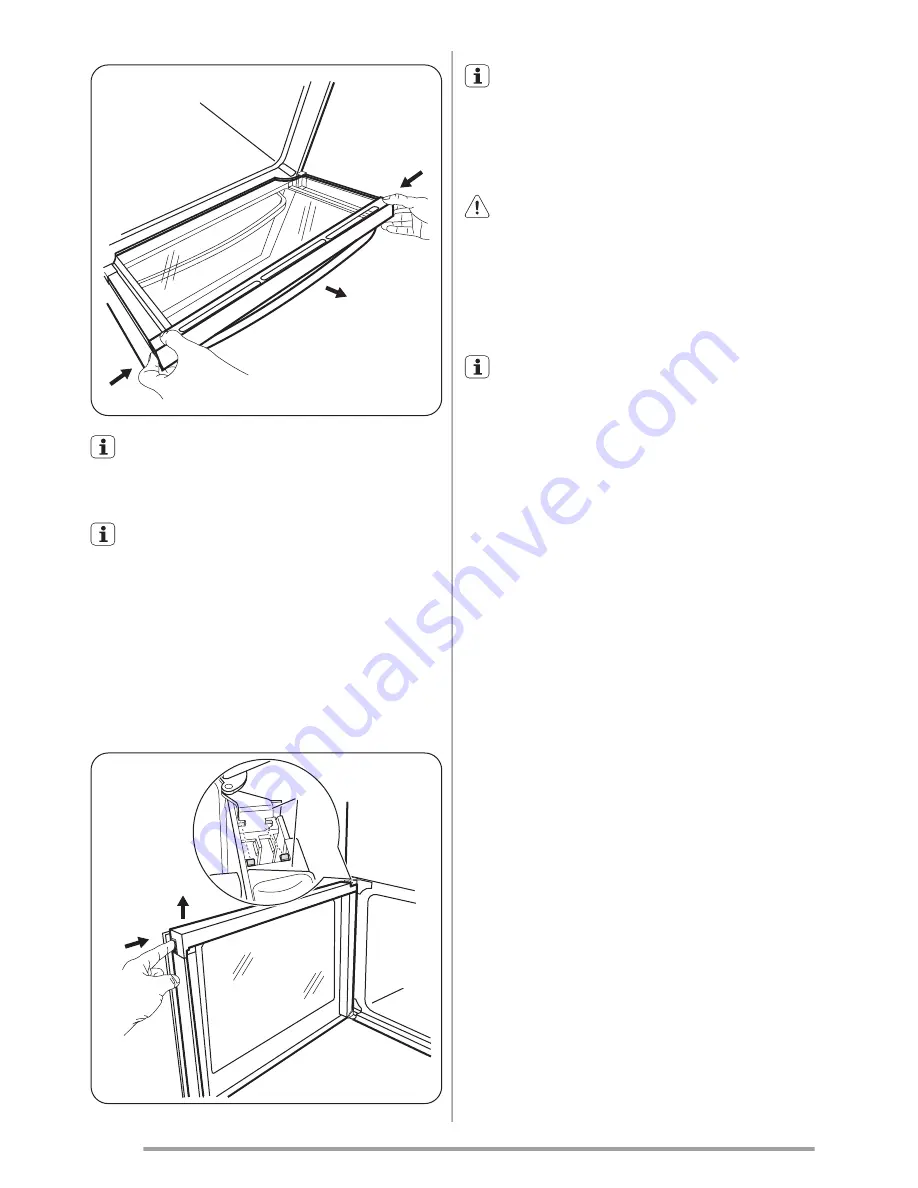
Removing the glass:

1. Push the door trim at one side to remove it.

Refer to the picture.

2. Pull up the trim.

3. Remove the glass panels.

1

2

A

To replace the glass panels obey the pro-
cedure in opposite sequence. Before you

lower the trim attach the A trim part to the door.
Refer to picture.

Oven lamp

Warning!

 There is a danger of electrical

shock!

Before you change the oven lamp:

• Switch off the oven.

• Remove the fuses in the fuse box or switch

off the circuit breaker.

Put a cloth on the bottom of the oven for
protection of the oven light and glass cov-

er.

Replacing the oven lamp

1.

You can find the lamp glass cover at the
back of the cavity.
Turn the lamp glass cover counterclock-
wise to remove it.

2.

Clean the glass cover.

3.

Replace the oven lamp with applicable
300°C heat-resistant oven lamp.

Important!

 Use the same oven lamp type.

4.

Install the glass cover.

16


www.zanussi.com

Содержание ZCV551

Страница 1: ...EN User manual Cooker ZCV551 ...

Страница 2: ...appliance carefully read the supplied instructions The manufacturer is not responsible if an in correct installation and use causes injuries and damages Always keep the instructions with the appliance for future reference Children and vulnerable people safety Warning Risk of suffocation injury or permanent disability This appliance can be used by children aged from 8 years and above and persons wi...

Страница 3: ...e installation instruction supplied with the appliance Always be careful when you move the appli ance because it is heavy Always wear safety gloves Do not pull the appliance by the handle Keep the minimum distance from the other appliances and units Make sure that the appliance is installed be low and adjacent safe structures The sides of the appliance must stay adja cent to appliances or to units...

Страница 4: ...liance Always use oven gloves to remove or put in accessories or ovenware Be careful when you open the appliance door while the appliance is in operation Hot air can release Do not operate the appliance with wet hands or when it has contact with water Do not apply pressure on the open door Do not use an external timer or a separate re mote control system to operate the appli ance Always keep the a...

Страница 5: ...ppli ance and disconnect the mains plug from the mains socket Make sure the appliance is cold There is the risk that the glass panels can break Replace immediately the door glass panels when they are damaged Contact the Serv ice Be careful when you remove the door from the appliance The door is heavy Clean regularly the appliance to prevent the deterioration of the surface material Remaining fat o...

Страница 6: ...Heating element 4 Rating plate 5 Oven lamp 6 Fan and heating element 7 Shelf positions of the main oven 8 Shelf positions of the top oven Cooking surface layout 180 mm 180 mm 145 mm 145 mm 5 4 1 2 3 1 Cooking zone 1200 W 2 Cooking zone 1700 W 3 Cooking zone 1200 W 4 Residual heat indicator 5 Cooking zone 1700 W 6 www zanussi com ...

Страница 7: ...cces sories can become hotter than in normal use During this period an odour can be emitted This is normal Make sure the room is well ven tilated Preheat the two ovens Heat up one oven at a time Hob Daily use Warning Refer to the Safety chapters Heat settings Control knob Function 0 Off position 1 6 Heat settings 1 lowest heat setting 6 highest heat setting 1 Turn the control knob to a necessary h...

Страница 8: ...e to the appli ance Use a special scraper for the glass Put the scraper on the glass sur face at an acute angle and move the blade on the surface Remove after the appliance is suffi ciently cool limescale rings water rings fat stains shiny metallic discolora tions Use a special cleaning agent for glass ceramic or stainless steel 2 Clean the appliance with a moist cloth and some detergent 3 At the ...

Страница 9: ...toast Full Grill The full grill element is on To grill flat food items in large quantities To make toast Main oven functions Oven function Application OFF position The appliance is OFF Oven lamp To illuminate the oven interior Defrost To thaw frozen food The knob for the temperature must be on the OFF position 100 250 Thermaflow This function is particularly suitable for cooking larger quantities ...

Страница 10: ...ecially good results when used to cook fruitcakes sweets and sa voury flants or quiche Main oven The main oven is particularly suitable for cook ing larger quantities of food Baking General instructions Your new oven may bake or roast differently to the appliance you had before Adapt your usual settings temperature cooking times and shelf levels to the values in the tables With longer baking times...

Страница 11: ... too high and baking time too short Set a lower oven temperature and a longer baking time Cake does not brown equally No equal mixture Put the mixture equally on the baking tray Cake does not cook in the baking time set Temperature too low Use a slightly higher oven temperature setting Top Oven Shelf Positions are not critical but ensure that oven shelves are evenly spaced when more than one is us...

Страница 12: ...20 Shortcrusts Meat Pies 2 190 210 25 35 Shortcrusts Quiche Tarts Flans 2 180 200 25 50 Scones 3 220 230 8 12 Shepard s Pie 2 190 200 30 40 Souffles 2 170 180 20 30 Vegetables Baked Jack et Potatos 2 180 190 60 90 Vegetables Roast Pota tos 2 180 190 60 90 Yorkshire Pudding Large 2 220 210 25 40 Yorkshire Pudding Indi vidual 2 210 220 15 25 Roasting Meat Poultry 2 See roasting chart Main Oven Shelf...

Страница 13: ...ng Chart 2 Roasting Roasting dishes Use heat resistant ovenware to roast please read the instructions of the manufacturer Large roasting joints can be roasted directly in the deep roasting pan or on the oven shelf above the deep roasting pan If present Roast lean meats in a roasting tin with a lid This well keep the meat more succulent All types of meat that can be browned or have crackling can be...

Страница 14: ...l as rec ommended in the grilling table Grill only flat pieces of meat or fish Top Oven Dual Circuit Grill Adjust shelf position and grilling set to suit different thicknesses of food Grilling Food Shelf Position Grill Time min Bacon Rashers 3 5 6 Beefburgers 3 10 20 Chicken Joints 2 20 40 Chops Lamb 2 3 15 25 Chops Pork 2 3 20 25 Fish Whole Trout Makarel 2 10 12 Fillets Plaice Cod 2 4 6 Kebabs 2 ...

Страница 15: ...ace Clean the oven control panel with the same precautions Oven Ceiling You can fold down the heating element on the oven ceiling to clean the oven ceiling easily Folding down the heating element 1 Remove the shelf support rails 2 Hold the heating element with the two hands at the front 3 Pull it forwards against the spring pressure and out along the support on both sides 4 The heating element fol...

Страница 16: ...er the trim attach the A trim part to the door Refer to picture Oven lamp Warning There is a danger of electrical shock Before you change the oven lamp Switch off the oven Remove the fuses in the fuse box or switch off the circuit breaker Put a cloth on the bottom of the oven for protection of the oven light and glass cov er Replacing the oven lamp 1 You can find the lamp glass cover at the back o...

Страница 17: ...place the oven lamp Steam and condensation settle on the food and in the oven cavity You left the dish in the oven for too long Do not leave the dishes in the oven for longer than 15 20 mi nutes after the cooking process ends If you cannot find a solution to the problem yourself contact your dealer or the service cen tre The necessary data for the service centre is on the rating plate The rating p...

Страница 18: ...he lower tabs are located inside the bottom edge of the aperture before you fix the two screws into the top edge of the mains ter minal cover Make sure that the cover is securely fastened To open the cover of terminal board obey the procedure in opposite sequence Terminal board Make sure that the links are fitted as shown N N N L L Do not remove blanking plates Environment concerns The symbol on t...

Страница 19: ...ny s property This guarantee is in addition to your statutory and other legal rights Exclusions Damage calls resulting from transport im proper use neglect light bulbs removable parts of glass plastic Costs for calls to put right appliance which is improperly installed calls to appliances out side United Kingdom Appliances found to be in use within a com mercial environment plus those which are su...

Страница 20: ... of the appliance and can not be transferred to another user The appliance is installed and used in ac cordance with instructions issued by Electro lux and is only used within the home i e is not used for commercial purposes The appliance is installed in accordance with all relevant regulations in force within your new country of residence The provisions of this European Guarantee do not affect an...

Страница 21: ...fício Gonçalves Zarco Q 35 2774 518 Paço de Arcos Romania 40 21 451 20 30 Str Garii Progresului 2 S4 040671 RO Schweiz Suisse Svizzera 0848 848 111 Industriestrasse 10 CH 5506 Mägenwil Slovenija 38 61 24 25 731 Gerbičeva ulica 110 1000 Ljubljana Slovensko 421 2 32 14 13 34 5 Electrolux Slovakia s r o Electrolux Domáce spotre biče SK Galvaniho 17 B 821 04 Bratislava Suomi 030 600 5200 Lankapuhelinv...

Страница 22: ...22 www zanussi com ...

Страница 23: ...23 www zanussi com ...

Страница 24: ...www zanussi com shop 892957000 B 022013 ...

Отзывы: