background image

BUILT-IN OVEN

ZBQ 465

INSTRUCTION BOOKLET

Please read this instruction booklet before using the appliance

GB

Содержание ZBQ 465

Страница 1: ...BUILT IN OVEN ZBQ 465 INSTRUCTION BOOKLET Please read this instruction booklet before using the appliance GB ...

Страница 2: ...n in case it is inadvertently switched ON You MUST read hese warnings carefully before installing or using the hob If you need assistance contact our Customer Care Department on 08705 727727 When using other electrical appliances ensure the cabledoesnotcomeintocontactwiththehotsurfaces oftheoven Maintenance and Cleaning Onlycleanthisoveninaccordancewiththeinstructions Theovenshouldbekeptcleanatall...

Страница 3: ...ctions Safety Instructions Step by step instructions for an operation Hints and Tips Environmental information Important Safety Information 2 Description of the Oven 4 Controls 5 Before the First Use 6 Electronic Programmer 7 Using the Oven 9 Hints and Tips 9 The Fan Oven 10 Cooking Chart Fan Oven 11 Grilling 12 Cleaning the Oven 13 Care of Catalytic Liners 14 Something not Working 15 Service and ...

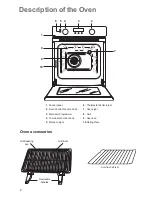
Страница 4: ...unction Knob 3 Electronic Programmer 4 Thermostat Control Knob 5 Mains on Light 6 Thermostat Control Light 7 Oven Light 8 Grill 9 Oven Fan 10 Rating Plate 1 6 5 2 3 4 7 8 9 10 Anti tip shelf x 2 Grilltrivet Grill roasting pan Removable handles Oven accessories ...

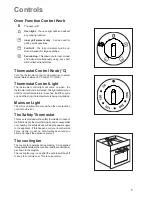
Страница 5: ...d Thelightwillremainon untilthecorrecttemperatureisreached Itwillthencycle on and off to show the temperature is being maintained Mains on Light The mains on light will come on when the oven function control knob is set The Safety Thermostat This oven is provided with a safety thermostat In case of malfunctioning of the main thermostat and consequential over heating the safety device will stop the...

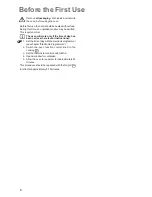
Страница 6: ...rk only if the time of day has been set see the relevant instructions 1 Set the time of day with the electronic programmer see chapter Electronic Programmer 2 Switch the oven function control knob to fan cooking 3 Set the thermostat control knob to MAX 4 Open a window for ventilation 5 Allow the oven to run empty for approximately 45 minutes This procedure should be repeated with the full grill fu...

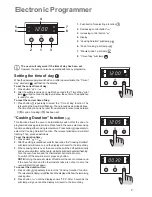
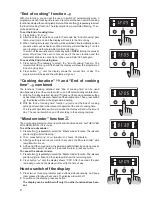
Страница 7: ... automatically switch off at the end of a programmedcookingdurationtime Place foodintheoven selectacooking functionandadjustthecookingtemperature Pressbutton repeatedlyto select the Cooking Duration function The relevant pilot lamp will start flashing Then proceed as follows To set the duration time 1 Press button or 2 After the setting is carried out wait for 5 seconds the Cooking Duration pilot ...

Страница 8: ... at a later time 1 With the Cooking duration function carry out the cooking duration setting as described in the relevant chapter set the duration time Then press button the display will show the programmed setting 2 With the End of cooking time function carry out the End of cooking setting as described in the relevant chapter set the end of cooking time The relevant pilot lamps will come on and t...

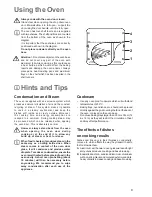
Страница 9: ...handle until it is fully open The oven has four shelf levels and is supplied with two shelves The shelf positions are counted from the bottom of the oven as shown in the diagram It is important that these shelves are correctly positioned as shown in the diagram Do not place cookware directly on the oven base Attention Do not place objects on the oven base and do not cover any part of the oven with...

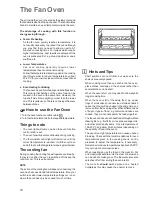
Страница 10: ...ng the cooling fan will operate continually It may run on after the oven is switched off to keep the controls cool This is quite normal NOTE The action of the cooling fan will depend on how long the ovenhasbeenusedandatwhattemperature Itmaynot switch in at all at lower temperature settings nor run on where the oven has only been used for a short time The Fan Oven Hints and Tips Shelf positions are...

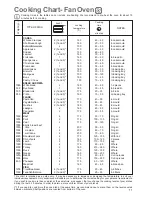
Страница 11: ...d 1500 medium 2 200 60 70 On grid 1500 well done 2 200 70 80 On grid 2000 Shoulder of pork 2 170 120 150 With rind 1200 Shin of pork 2 160 100 120 2 pieces 1200 Lamb 2 175 110 130 Leg 1000 Chicken 2 175 60 80 Whole 4000 Turkey 2 160 210 240 Whole 1500 Duck 2 160 120 150 Whole 3000 Goose 2 160 150 200 Whole 1200 Rabbit 2 175 60 80 Cut in pieces 1500 Hare 2 175 150 200 Cut in pieces 800 Pheasant 2 1...

Страница 12: ...and Tips Most foods should be placed on the grid in the grill pan to allow maximum circulation of air and to lift the food out of the fats and juices Food such as fish liver and kidneys may be placed directly on the grill pan if preferred Food should be thoroughly dried before grilling to minimise splashing Brush lean meats and fish lightly with a little oil or melted butter to keep them moist dur...

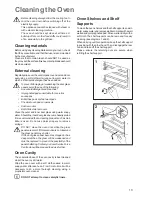
Страница 13: ...or glass become heavily soiled it is recommended that a cleaning product such as Hob Brite is used Do not use paint scrapers to remove soilage DO NOT clean the oven door while the glass panels are warm If this precaution is not observed the glass panel may shatter If the door glass panel becomes chipped or has deep scratches the glass will be weakened and must be replaced to prevent the possibilit...

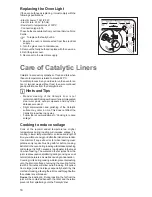
Страница 14: ...nd soilage It is NOT necessary to add water to the meat tin when roasting The water and the fat juices from the joint create excessive splattering during cooking even at normal temperatures as well as causing condensation Covering joints during cooking will also prevent splashing onto the interior surfaces removing the covering for the last 20 30 minutes will allow extra browning if required Some ...

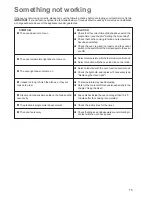
Страница 15: ...thermostatcontrolknob Select a function with the oven function control knob Select a function with the oven function control knob Check the light bulb and replace it if necessary see ReplacingtheOvenLight Thetemperaturemayneedadjusting Refer to the contents of this booklet especially to the chapter UsingtheOven Leave dishes inside the oven no longer than 15 20 minutes after the cooking is complete...

Страница 16: ...following details 1 Your name address and post code 2 Your telephone number 3 Clear and concise details of the fault 4 The model and serial number of the appliance found on the rating plate 5 The purchase date Customer Care Department For general enquiries concerning your Zanussi appliance or for further information on Zanussi products please contact our Customer Care Department by letter or tel e...

Страница 17: ...ass or plastic Costs incurred for calls to put right an appliance which is improperly installed or calls to appliance outside the United Kingdom Appliances found to be in use within a commercial or similar environment plus those which are the subject to rental agreements Products of Zanussi manufacture which are not marketed by Zanussi European Guarantee If you should move to another country withi...

Страница 18: ...50 C above the ambient temperature Before the oven is connected check that the main fuse and the domestic installation can support the load and that the power supply is properly earthed Themanufacturerdisclaimsanyresponsibilityshould these safety measures not be carried out The oven must be installed according to the instructions supplied Heating elements rating InnerGrillelement 1 650 W Full Gril...

Страница 19: ...nt diagrams z thematerialsmustwithstandatemperatureincrease of at least 60 C above ambient z proper arrangements must be made of a continuous supplyofairtotheoventopreventtheovenoverheating Dimensionsoftheovenandrecessrequiredaregivenin therelevantdiagrams Securing The Oven To The Cabinet 1 Fit the oven into the cabinet recess 2 Open the oven door 3 Secure the oven to the kitchen cabinet with four...

Страница 20: ...m the Electrolux Group The world s No 1 choice The Electrolux Group is the world s largest producer of powered appliances for kitchen cleaning and outdoor use More than 55 million Electrolux Group products such as refrigerators cookers washing machines vacuum cleaners chain saws and lawn mowers are sold each year to a value of approx USD 14 billion in more than 150 countries around the world ...

Отзывы: