


17
CONFIDENTIAL
DOC-USR-0102-01
____________________________________________________________________________________
Z3 Technology, LLC
♦
100 N. 8th St. STE 250
♦
Lincoln, NE 68508-1369 USA
♦
+1.402.323.0702
7.5
Run the HTTP-based User Interface to Configure Channel 1 for Streaming UDP
The following actions can be completed in either the serial interface or an HTTP-based user interface
run on a web browser. For ease of use, the HTTP-based interface is described.
Access the user interface by:
(8)
(a)
Opening an Internet browser window on your PC (for best results, FireFox or Chrome are
recommended) and enter the IP address of the RPS (192.168.0.120 by default) into the
URL text box. The HTTP-based graphical user interface (GUI) appears at the CH1 tab.
(b)
Running the ZFinder PC utility. See section 8.4 for more information.
Note:
Settings in the user interface cannot be changed if the unit is currently encoding.
Click the red “Stop” button at the bottom of any screen to stop any current encoding.
(9)
At the CH1 tab, verify the “Video Source” is set to “HDMI” using the dropdown menu.
(10)
Change “Output Resolution” to “Follow Input”.
(11)
Select the codec you would like to use for your encoding. Both H.265/HEVC and H.264/AVC are
(12)
supported. In the pictured example, verify “Video Codec” is set to “H265(HEVC)”.
Set “Output Format” to “UDP”.
(13)
You can set “Dest Address” to:
(14)
(a)
the IP address of your PC that will be running VLC media player (in the pictured example,
192.168.0.6).
(b)
or to a multicast address (An example multicast address would be “225.1.2.3”. If you are
on a shared network, check with your Network Administrator.)
Also make note of the value of “Dest Port” (8600 by default).
(15)
Click the green “Start” button.
(16)
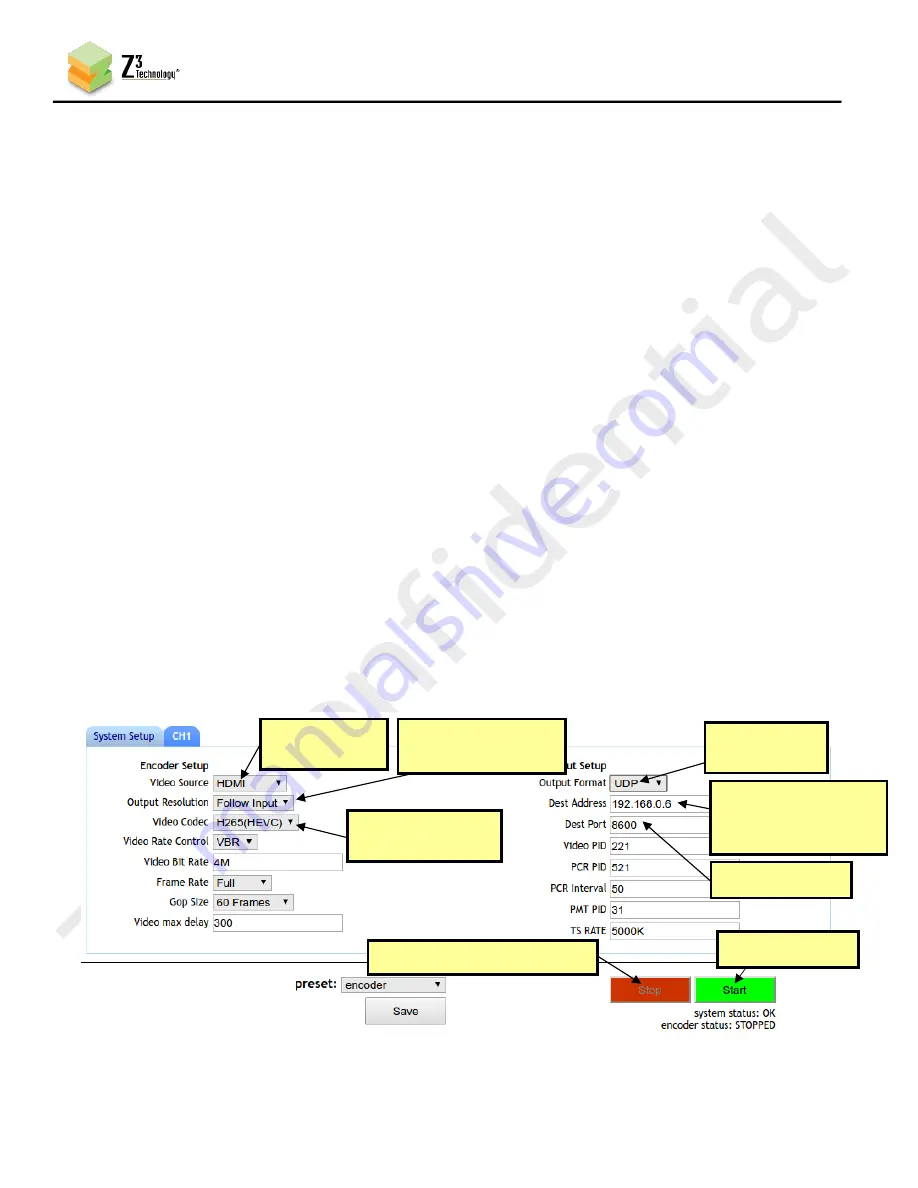
Figure 5 CH1 Tab UDP Configuration
(5) Change
to “UDP”
(1) If necessary, click “Stop”
(8) Click “Start”
(2) Verify
Is “HDMI”
(3) Change to
“Follow input”
(4) Verify Is
“H265(HEVC)”
(6) Set to PC
IP Address or
Multicast Address
(7) Note value