background image


CONFIDENTIAL 

DOC-USR-0055-05


___________________________________________________________________________________________ 

Z3 Technology, LLC 

 100 N 8

th

 ST, STE 250 

 Lincoln, NE 68508-1369 USA 

 +1.402.323.0702 

24 

(11)


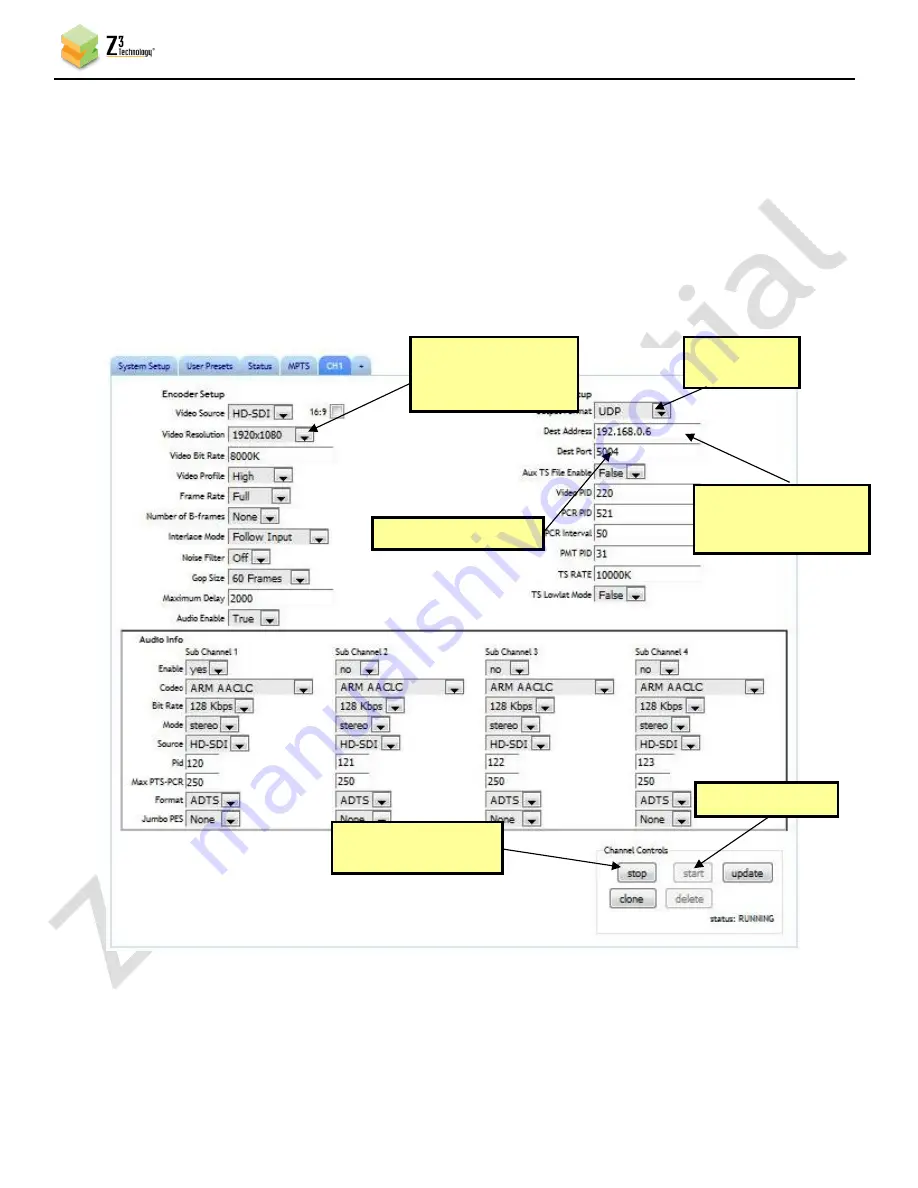
Click on the “CH1” tab. 

(12)


Change “Video Resolution” to “1920x1080” or “Follow Input”. 

(13)


Set “Output Format” to UDP  

(14)


You can set “Dest Address” to: 

(a)


 the IP address of your PC that will be running VLC media player (in the pictured 
example, 192.168.0.6).  

(b)


or to a multicast address (An example multicast address would be “225.1.2.3”. If you are 
on a shared network, check with your Network Administrator.) 

(15)


Also make note of the value of “Dest Port” (5004 by default). 


Figure 8  Channel 1 Configuration Screen – UDP  

(2) Change  
      to UDP 

(3) Change to IP  
address of your PC or 
multicast address 

(1) Change to 
      “1920x1080” or 
      “Follow input” 

(6) Click “start” 

(5) Click “stop” (if 
      necessary) 

(4) Note “Dest Port”  
      value 

Содержание Z3-DM8107-SDI2-RPS

Страница 1: ... future use 2016 Z3 Technology LLC All rights reserved This document contains proprietary and confidential information of Z3 Technology LLC Z3 This document may not be used reproduced disclosed or disseminated to anyone without the prior written approval of an authorized representative of Z3 Z3 Technology LLC incorporates HDMI technology The terms of HDMI and HDMI High Definition Multimedia Interf...

Страница 2: ... MPTS descriptions in Output Format modified Aux TS File Enable added Aux TS File Location descriptions in Section 12 5 Removed restriction of SDI only for Encode 1 to 3 Ch mode in Section 12 6 Modified RTP troubleshooting to add RTSP note and added mention of download device logs button in Appendix C Updated screenshots and filenames for latest version Made section numbering and cross referencing...

Страница 3: ... Making the Directories and Running the Make Script 13 6 0 CODE OVERVIEW 15 6 1 The z3apps rdk Directory 15 6 2 Z3 Application Overview 16 6 3 RDK Documentation 17 7 0 RUNNING THE ENCODER 20 7 1 Set up the HD Source 20 7 2 Connect and Power Up the Z3 DM8107 SDI2 RPS 20 7 3 Set up the Terminal Window 21 7 4 Power on the Board 22 7 5 Ensure your PC has a Proper IP Address 23 7 6 Run the Web Interfac...

Страница 4: ...un Decoder 51 10 0 RUNNING THE CODE YOU BUILT ON THE BOARD 52 10 1 Method 1 Updating the Image File 52 10 2 Method 2 Running Your Code through TFTP NFS 54 10 3 Other Available u boot Commands 56 11 0 EXERCISING OTHER FEATURES 57 11 1 Saving Settings 57 11 2 Using the Password Feature 57 11 3 Running the Command Line Interfaces 58 12 0 SUMMARY OF OPTIONS 59 12 1 The System Setup Tab 59 12 2 The Use...

Страница 5: ...iewing Bitrate in VLC 28 Figure 15 Changing the Bitrate Dynamically 28 Figure 16 Drop in Bitrate after Dynamic Bitrate Change 29 Figure 17 Status Tab Output Showing Lower Bitrate 29 Figure 18 Changing TS Rate 30 Figure 19 TS Rate and Lower Bitrate Reflected in VLC 31 Figure 20 Tuning for Various Use Cases 32 Figure 21 The User Presets Tab 33 Figure 22 Entering a User Preset Name 33 Figure 23 Selec...

Страница 6: ...Encode Channel 2 Settings 45 Figure 43 RTMP Encode Channel 3 Settings 46 Figure 44 Getting to the Wowza Test Player 47 Figure 45 Viewing Z3 DM8107 SDI2 RPS Content on Wowza 48 Figure 46 Connecting the Z3 DM8107 SDI2 RPS for Decode 49 Figure 47 Changing to Decoder Mode 50 Figure 48 System Setup in Decoder Mode 50 Figure 49 Decoder Configuration Settings for Decode Example 51 Figure 50 Updating the ...

Страница 7: ... and one Z3 DM8107 APP 21 board The software bundle consists of the necessary components for developing advanced multimedia graphics and DSP applications The Z3 DM8107 MOD is a compact OEM module which supports up to1080p60 H 264 encode decode1 in streaming or storage mode It is especially suited for power sensitive applications requiring a single video stream These applications include broadcast ...

Страница 8: ...f the Z3 DM8107 MOD to implement additional functions not present in the base module The Z3 DM8107 APP 21 application board has 1x SDI input 1x HDMI output and a port for composite analog audio input Figure 2 below shows an image of a Z3 DM8107 APP 21 application board Additional design services and support are available from Z Technology Please contact Z3 at www Z3technology com or e mail at sale...

Страница 9: ...__________________________________________________________________________ Z3 Technology LLC 100 N 8th ST STE 250 Lincoln NE 68508 1369 USA 1 402 323 0702 9 A block diagram of the Z3 DM8107 SDI2 RPS follows Figure 3 Z3 DM8107 SDI2 RPS Block Diagram ...

Страница 10: ...DECODER on page 49 describes using the Decoder mode If you have any questions about any GUI parameters you can refer to Section 12 0 SUMMARY OF OPTIONS on page 59 2 2 If You Already Have a System from Z3 and Need to Update the Firmware You can update the firmware via the user interface by following the instructions in Section 10 1 Method 1 Updating the Image File on page 52 2 3 If You are Ready to...

Страница 11: ...NE 68508 1369 USA 1 402 323 0702 11 3 0 INCLUDED PARTS LIST 1 x Z3 DM8107 MOD 1 x Z3 DM8107 APP 21 1 x Z3 DM8168 DEB 01 JTAG connector attaches to DM8107 MOD 1 x Cable Strip for connecting the Z3 DM8168 DEBUG 01 1 x 5V Power Supply 1 x Serial Cable 1 x Gender Changer 1 x BNC BNC Cable 1 x HDMI Cable 1 x Composite Adapter Cable 1 x Z3 DM8107 SDI2 RPS User Instructions ...

Страница 12: ...and USB 2 0 1 GB DDR3 256 MB NAND Flash Control through serial port or HTTP High density connectors to all signals 4 1 Supported Input Resolutions Encoder HDMI 1080p60 1080p50 1080i30 1080i29 97 1080i25 720p60 720p59 94 720p50 576p50 576i25 480p60 480i30 and 480i29 97 SDI 1080p60 1080p50 1080i30 1080i29 97 1080i25 720p60 720p59 94 720p50 576p50 576i25 480p60 480i30 and 480i29 97 Composite 576i25 4...

Страница 13: ...the cross compiling toolchain You can determine whether your OS is 64 bit by using the uname p command A 64 bit OS will return x86_64 while a 32 bit OS will return i386 i586 or i686 For 64 bit Ubuntu you can get the necessary libraries by typing sudo dpkg add architecture i386 sudo apt get update sudo apt get install libc6 i386 libncurses5 i386 libstdc 6 i386 zlib1g i386 For 64 bit Fedora you can ...

Страница 14: ...htly vary cd z3 centaurus dm810x_sdi2 rps 20150702 makeall Note Building can take around 30 40 minutes You will also need to type in the sudo password a few times The outcome of the build process should be newly created image files in the images directory You can confirm this by doing the following cd images ls alt The result should be something like the following Note that actual filenames dates ...

Страница 15: ...M8107 SDI2 RPS is run from the run sh script in dvr rdk dvr_rdk bin ti810x This code calls the z3_dvr_rdk_demo_mcfw_api out binary which initializes and runs the encoder This binary is built from the dvr rdk directory The code for the binary resides in z3apps rdk rdk_demo The z3apps rdk directory is described in more detail in the next section 6 1 The z3apps rdk Directory There are 3 main subdirec...

Страница 16: ...ased application this is what comes up in the serial terminal when the board is powered on The second is a command line interface that is more flexible and easier to use from a programming standpoint The web based interface uses the command line interface extensively The menu based application binary can be found at opt dvr_rdk ti810x bin z3_dvr_rdk_demo_mcfw_api out The command line interface bin...

Страница 17: ...can be found mainly in PRJROOT z3apps rdk rdk_demo The top level file for the menu driven application is demo c The top level files for the command line interfaces are demo_mcsenc c and demo_mcsdec c 6 3 RDK Documentation Documentation on the RDK can be found in PRJROOT dvr rdk dvr_rdk docs Below is a list of some of the major documentation available Docs DM81xx_DVR_RDK_Install_Guide pdf DM81xx_DV...

Страница 18: ...df DM81xx_DVR_RDK_Qt_Installation_Guidelines pdf DM81xx_DVR_RDK_SCD_AlgorithmIntegration pdf DM81xx_DVR_RDK_Software_OSD_Notes pdf DM81xx_DVR_RDK_Software_OSD_Text_Render_Notes pdf software_manifest htm TestReports DM810X_DVRRDK_Test_Report_04 00 00 03 xls DM814X_DVRRDK_Test_Report_04 00 00 03 xls DM816X_DVRRDK_Test_Report_04 00 00 03 xls HDMITestReports Trainings DVR_RDK_McFW_Link_API_Training pd...

Страница 19: ... STE 250 Lincoln NE 68508 1369 USA 1 402 323 0702 19 DM81xx_DVR_RDK_Demo_Guide pdf DM81xx_DVR_RDK_FAQs pdf DM81xx_DVR_RDK_IPC_Bits_Out_Host pdf DM81xx_DVR_RDK_Migration_Guide pdf DM81xx_DVR_RDK_Overview pdf DM81xx_DVR_RDK_PSP_Arago pdf DM81xx_DVR_RDK_SCD_DMVAL_FAQs pdf DMVAL_API_and_UsersGuide pdf DVR_RDK_ApiGuide CHM SCD_TI_API_UsersGuide_v00 50 pdf ...

Страница 20: ... differ from those pictured in this document 7 1 Set up the HD Source 1 Select a video source with SDI output Alternately a video source with HDMI output and an HDMI SDI converter can be used In this case an HDMI source with non HDCP output must be used HDMI source used at Z3 the Brite View BV 5005HD Power on the video source Connect the source to a monitor Select content you would like to stream ...

Страница 21: ... RPS A USB Serial converter may be needed If so the FTDI UC232R 10 Digikey part 768 1014 ND is recommended 7 3 Set up the Terminal Window 5 If you are running from a Windows PC run TeraTerm Select Setup Serial Port and set the following Port The serial port the port is connected to Baud Rate 115200 Data 8 bit Parity None Stop 1 bit Flow Control None 6 If you are running from Linux type sudo minico...

Страница 22: ...t the 5V power supply to the Z3 DM8107 SDI2 RPS 8 Turn on the power switch If all is configured properly you should see the board booting up within the terminal window After about a minute you will see the RPS Main Menu Note the local IP address and netmask typically 192 168 81 7 and 255 255 0 0 This is the IP address of the board You will need this later to access the HTTP based user interface Fi...

Страница 23: ...hat this is the case If necessary use the P and N options to modify the address network of the board to conform to your network Note that the first two parts being the same are based on a value of netmask of 255 255 0 0 If netmask were 255 255 255 0 for example then the first three parts of the IP address would have to be the same After you are done make note of the address you set it to This will...

Страница 24: ...Address to a the IP address of your PC that will be running VLC media player in the pictured example 192 168 0 6 b or to a multicast address An example multicast address would be 225 1 2 3 If you are on a shared network check with your Network Administrator 15 Also make note of the value of Dest Port 5004 by default Figure 8 Channel 1 Configuration Screen UDP 2 Change to UDP 3 Change to IP address...

Страница 25: ... first change Operating Mode at the bottom right from Encode Interlaced Progressive to Encode Single Ch No Scale Note that in Encode Single Ch No Scale mode only CH1 can be used 7 7 Run VLC to View Stream 17 Run the VLC media player on your PC version used in testing at Z3 2 1 5 18 Select Media Open Network Stream In the box type udp 192 168 0 6 5004 where 192 168 0 6 matches the values of the com...

Страница 26: ...treaming it is relatively simple to change to RTP streaming One parameter change is needed To stream using RTP complete the following steps 21 In the CH1 configuration tab click on stop to stop the current encoding session 22 Change Output Format from UDP to RTP RTSP 23 Click on start to start the RTP encoding session At this point your settings should look like the following Figure 11 Channel 1 C...

Страница 27: ...es instead of RTSP to stream RTP 25 In the Open Media box type rtsp IP Address z3 ch m mp4 where IP Address is the IP address of the Z3 DM8107 SDI2 RPS ch is 1 for CH1 and 2 for CH2 and m is added if a multicast address is being streamed For example if the IP address of the Z3 DM8107 SDI2 RPS is the default value of 192 168 81 07 encode is being done from CH1 and unicast streaming is being done th...

Страница 28: ...change the bitrate or frame rate without stopping and restarting the encoder To use this feature complete the following steps 1 In VLC click on Tools and select Codec Information This brings up a window with four tabs Select the Statistics tab In this tab you can see the current video audio bitrate 2 In the CH1 screen change the bitrate from 8000K to 2000K and click update Figure 15 Changing the B...

Страница 29: ...picture in VLC change and the video bitrate drop If you click on the Status tab and click Refresh you will also see the updated bitrate reflected The parameter Frame Rate Divider can also be updated dynamically using the update button All other parameters require a stop and then start to change Figure 16 Drop in Bitrate after Dynamic Bitrate Change Lower video audio bitrate Figure 17 Status Tab Ou...

Страница 30: ...f the video and audio bitrate For example the default value out of the factory is a value of 10Mbps corresponding to 8Mbps for the video There are times however when it is desirable to make this value higher For example if the encoder bitrate is very low below 1Mbps it is advisable to allow more leeway in the event there are some challenging scenes to encode An example follows 4 Return to the CH1 ...

Страница 31: ...start to start encoding 7 Open VLC to view your UDP stream Section 7 7 and view the Statistics tab Section 7 9 You will see a lower value for the overall input rate and for the content rate The value of TS Rate must be higher than video bitrate audio bitrate 1 25 If an attempt is made to input a value less than this the error message TS rate too small to carry elementary streams will appear Figure...

Страница 32: ... lower latency than streaming using TS If low latency with TS is desired there is a special TS lowlat mode that can be activated Setting this causes the TS muxer to send packets out immediately rather than gathering data and sending packets once they reach maximum network size The tradeoff is less efficient use of the network and a TS stream that is no longer perfectly smooth Because of this less ...

Страница 33: ...at is assigned can be seen through the ZFinder tool running on a PC To view how DHCP support works you can complete the following steps 8 The first thing you need to do is set up a custom configuration so that the DHCP setting is used the next time the system boots up To do this click on the User Presets tab and click on new 9 This brings up a new text box to enter the preset name Type z3_config1 ...

Страница 34: ... screen and select as the preset the z3_config1 configuration you just created 11 As soon as you select z3_config1 the screen will reload Check the Use DHCP box 12 Now that DHCP is set in z3_config1 save the configuration by clicking on the Save button Figure 23 Selecting z3_config1 within the System Setup Tab Figure 25 Saving a User Preset Figure 24 Setting DHCP within z3_config1 2 Select z3_conf...

Страница 35: ...he window to pop up as values get initialized 14 A new IP address is assigned to the unit through DHCP You have two ways of finding out that IP address The first is to check the serial UI for the new value 15 The second method is to use the Windows utility ZFinder To do this confirm the Windows PC with ZFinder is connected to the same network in which the Z3 DM8107 SDI2 RPS is connected 16 Run the...

Страница 36: ...DHCP Address 17 Select the Z3 DM8107 SDI2 RPS and then click Open Device 18 A web browser will then open at the IP address of the Z3 DM8107 SDI2 RPS and you will see the HTTP based GUI Figure 30 Web GUI Using DHCP Address 19 You can return to Static IP by unchecking Use DHCP and saving that to the preset New IP address 1 Select Z3 DM8107 SDI2 RPS 2 Click Open Device Figure 29 Selecting Z3 DM8107 S...

Страница 37: ... SDI2 RPS is used The steps to do a sample HDMI encode are shown below Similar steps can be used for Composite 20 In the user interface click on the CH2 tab If it is not currently present click on tab to create the CH2 tab for a second channel and then click on it 21 The options for Channel 2 appear Here you can specify HDMI or Composite by changing the Video Source to HDMI or Composite using the ...

Страница 38: ...t it is not necessary to use a multicast address for HDMI Composite It is used here as an example value If SDI encode is also being done at the same time the port set for HDMI or composite encoding needs to be different from the port used for SDI encode 2 Change to UDP 3 Change to multicast address 225 1 2 3 4 Change Dest Port to 8888 1 Change to 1280x720 5 Click on start Figure 32 Configuring HDM...

Страница 39: ...te that since a different IP address is used a different value will be needed in the VLC Open network stream window 24 If composite encode is desired a special composite adapter cable shown below is needed The yellow connector connects to the composite output of the video source while the red and white connectors connect to the analog audio outputs Figure 33 VLC Settings for Viewing Multicast Stre...

Страница 40: ...a included is used Encoding and subsequently extracting closed caption data from composite is shown below 1 Connect a composite input with closed caption data to the DM8107 SDI2 RPS using the supplied composite adapter cable 2 Configure the Encoder to use Composite input see previous section for details on creating second channel for Composite 3 Open VLC Select Open Network Stream If the settings ...

Страница 41: ...has extracted and encoded You will then see the subtitles on the screen Extraction of closed caption through SDI input is also possible In that case SDI In of the Z3 DM8107 SDI2 RPS is used The procedure for seeing the closed caption data through VLC is the same as shown above Note Full frame rate is needed for closed caption If frame rate divider is set to a value other than one then closed capti...

Страница 42: ... TS File Enable to True When this is done they can then specify the file name in the Aux TS File Location box that appears If a user connects a USB drive for example a value of media sda1 enc_dm8107 sdi2 rps ts would save to enc_dm8107 sdi2 rps ts on that drive Sample values are shown below Note After finishing the encode you should wait at least 10 seconds before removing the USB drive This will ...

Страница 43: ...the sections referring to Wowza in this section Note that if multiple channels off the same input is done the total performance cannot exceed the capability of the Z3 DM8107 SDI2 RPS up to the equivalent of one 1080i encode one 720p encode is supported Note VLC does not support RTMP The test player within Wowza Streaming EngineTM is recommended 8 1 Connect the Encoder 1 Follow steps 1 to 11 in Sec...

Страница 44: ...ers to HD SDI 720p and 4Mbps 4000K 6 Set Output Format to RTMP 7 For Dest Address enter 192 168 0 4 1935 live 720 where 192 168 0 4 is the IP address of the PC with the Wowza server live corresponds to your Wowza application and 720 is an example stream name used to distinguish this stream 8 If necessary set Authentication to Enable and enter your valid Wowza log in credentials 9 After you re fini...

Страница 45: ...ST STE 250 Lincoln NE 68508 1369 USA 1 402 323 0702 45 8 4 Configure CH2 for RTMP Streaming 10 Click on the CH2 tab 11 Set encode to HD SDI D1 resolution 720x480 and 2Mbps 2000K 12 Set the Output Format to RTMP and Dest Address to the same address used for CH1 replacing 720 with d1 to distinguish this stream Figure 42 RTMP Encode Channel 2 Settings ...

Страница 46: ...th ST STE 250 Lincoln NE 68508 1369 USA 1 402 323 0702 46 8 5 Configure CH3 for RTMP Streaming 13 Click on the CH3 tab 14 Set encode to CIF resolution 352x240 and 1Mbps 1000K 15 Set the Output Format to RTMP and Dest Address to the same address used for CH1 replacing 720 with cif to distinguish this stream Figure 43 RTMP Encode Channel 3 Settings ...

Страница 47: ...1 tab 8 8 View the Content on Wowza 18 Go to a PC that is on the same network as the Wowza server and open a web browser in this example FireFox is used Type in the URL of the Wowza server with the port 8088 in this example 192 168 0 4 8088 This will bring up the Wowza Streaming EngineTM home page Log in with your valid user name and password 19 At the top you will see four options Home Server App...

Страница 48: ...0 You will see the Test Players popup screen Select the Adobe RTMP tab change the Stream name to 720 This value must match the stream name you assigned in the Dest Address and click Start You will then see the content streamed from the Z3 DM8107 SDI2 RPS Figure 45 Viewing Z3 DM8107 SDI2 RPS Content on Wowza 1 Select Adobe RTMP tab 2 Type 720 for Stream name 3 Click Start 4 Audio and Video start to...

Страница 49: ...teps below 9 1 Create a ts File using the Encoder 1 Follow steps 1 through 16 in Section 7 0 to stream a TS stream 2 Follow the instructions in Section 7 13 to save the stream to a TS file Call the file enc_dm8107 sdi2 rps ts 9 2 Connect the Output 3 To decode from the Z3 DM8107 SDI2 RPS a Mini HDMI to HDMI adapter cable is needed 4 Connect the Mini HDMI portion of the cable to the Z3 DM8107 SDI2 ...

Страница 50: ...ting Mode in the lower right corner of any tab to Decoder 7 Once you do this the description at the top right will change from DM8107 SDI2 RPS Encoder to DM8107 SDI2 RPS Decoder and settings for Display Mode Resolution and Layout will appear 8 Click on Set Display to configure the display New Settings for Display Appear Figure 47 Changing to Decoder Mode Change to Decoder Mode Figure 48 System Set...

Страница 51: ...incoln NE 68508 1369 USA 1 402 323 0702 51 9 4 Configure and run Decoder 9 Click on the CH1 tab and change the settings to match the following configuration 10 After about 5 10 seconds decode will start and your video will appear Figure 49 Decoder Configuration Settings for Decode Example 2 Enter same path used when saving file 3 Click start 1 Change to TSFILE ...

Страница 52: ...E YOU BUILT ON THE BOARD There are two ways to take the image files you built in Section 5 0 and run them on the board 1 Updating the image file and 2 Setting up NFS TFTP to link to your development PC 10 1 Method 1 Updating the Image File 1 Access the user interface Steps 1 10 in Section 7 0 2 Select update device firmware from the System Setup tab Figure 50 Updating the Device Firmware from the ...

Страница 53: ...wse 4 This brings you to the File Selection Screen From here select the name of the img file to update with and click Open Figure 52 File Selection Screen The image file to be used will typically have the word upd in the name 5 Click on Upload and Update 6 You will see screens stating that the image is being uploaded and that the flash is being updated After about one minute you should see the mai...

Страница 54: ...nit d xinetd start 2 Enable NFS on the Linux PC The target DM8107 will mount the root file system using NFS This like TFTP will also vary depending on the Linux setup you have As an example here is a set of steps that would be run from Ubuntu 10 x or later these are in gray to denote they can vary from system to system a Get NFS if it is not already installed sudo apt get install nfs kernel server...

Страница 55: ...home z3 z3 dm810x filesys fs Z3 DM385 setenv tftp_root z3 z3 z3 dm810x images Z3 DM385 setenv bootcmd run boot nfs Z3 DM385 saveenv nfs_root is set to the fs subdirectory within the filesys link set up in step 2c tftp_root when combined with the value of server_args in the etc xinetd d tftp file set up in step 1b points to the images link set up in step 2c d After typing saveenv you should see a W...

Страница 56: ...D root file system from NFS setenv bootcmd run nand_boot_jffs2 Get kernel from NAND root file system from NAND JFFS2 setenv bootcmd run nand_boot_ubifs Get kernel from NAND root file system from NAND UBIFS setenv bootcmd run nand_boot_ramdisk Get kernel from NAND root file system from ramdisk The following scripts are also available to update the u boot environment run update uboot Update u boot b...

Страница 57: ...s those settings For an example of doing this please see the description in Section 7 12 Running DHCP on page 33 11 2 Using the Password Feature The Z3 DM8107 SDI2 RPS supports setting a password to restrict access to the HTTP based user interface GUI Please note once a password has been set this cannot be undone 1 In the System Setup tab click on go next to Set Password 2 The change password opti...

Страница 58: ...ces A command line interface called MCSENC is also available for running encode commands This can be invoked with the command source opt mcsenc mcsenc sh This can be used to start a streaming encode session or to encode to a file on a connected USB drive or SATA2 drive A separate manual for MCSENC is included in the Z3 DM8107 SDI2 RPS release package A command line interface on the decode side cal...

Страница 59: ...ay of the Z3 DM8107 SDI2 RPS Note that a save of these settings and a reboot is needed for changes to this value to take effect DNS Server IP 1 a b c d 8 8 8 8 Specifies the primary DNS server to be used for hostname lookup when in static IP mode When in DHCP mode DNS information is acquired from the DHCP server DNS Server IP 2 e f g h 8 8 4 4 Specifies the secondary DNS server to be used for host...

Страница 60: ...a different firmware image See Section 10 1 Method 1 Updating the Image File on p 52 download device logs Clicking this causes the RPS to extract a set of diagnostic logs that can be sent to Z Technology in the event of an issue to be reported This file is saved on the PC which the GUI is being run from Note 1 Resolutions supported 1080p60 1080i30 1080i29 97 1080i25 1080p60 1080p59 94 1080p50 720p...

Страница 61: ...of encoded picture Height Height of encoded picture A small i will appear if interlaced is being encoded Audio Status Channel The channel number 1 or 2 Subchannel Always 1 in this release Codec The codec being used to encode audio for that channel Stream Status channel The channel number 1 or 2 URL URL the channel is being streamed to frames of frames sent from encoder to channel since the beginni...

Страница 62: ...ls going into this stream plus at least a 10 overhead For example if four 8Mbps channels are being packed into the MPTS stream the recommended Rate is at least 36Mbps Destination 1 NONE ASI UDP Used to define where the multiple channels will be routed to after being combined into 1 stream ASI is not supported on the DM8107 SDI2 RPS and should not be selected The MPTS can also be used to send the c...

Страница 63: ...spect ratio in the bitstream is set to 16 9 For any HD input this value is ignored Video Resolution 176x144 1920x1080 1920x1080 Follow Input The encode resolution If this resolution is different from the capture resolution resizing will occur Follow Input generates the resolution based on the capture resolution Note 1 Video Bitrate 100 12000K 6000K The bitrate Video Profile High Main Baseline The ...

Страница 64: ...annel while the others are running a warning message will appear that the other 2 channels need to be stopped so that all 3 channels can have the same configuration Noise Filter On Off Turns on an optional noise filter This helps reduce noise in high detail areas for example around text The tradeoff is some detail may be lost when the filter is turned on GOP Size 10 240 frames 60 I frame frequency...

Страница 65: ...user to specify a smaller interval than 250ms between PTS and PCR This is for systems that require tighter PTS PCR intervals It is generally recommended to leave this value at 250 Certain decoders may require a value of Max PTS PCR similar to the video delay If an issue is encountered with a specific decoder please try setting this value to the same value as video delay Format UDP TS Only ADTS LAT...

Страница 66: ...e to example ts on a drive connected to USB1 FILE will write raw h264 and raw aac to 2 separate files If this is selected you should type the path name of the H 264 file in Dest Address for example media sda1 example h264 If audio is enabled a companion aac file is then created for example for example h264 a companion file example_0 aac is created MPTS can be used to multiplex multiple channels in...

Страница 67: ... Normally the TS muxer gathers data into packets of maximum network size While this leads to maximum network efficiency it can lead to increases in latency Turning Lowlat Mode on causes the TS muxer to instead send packets out as soon as it receives them This results in lower latency at the expense of decreased network efficiency and a less smooth bitstream If this is set the bitrate should be no ...

Страница 68: ...sed and the encoder is waiting for valid input data to be detected Note 1 Encode Resolutions Supported QCIF 176x144 WQVGA 320x180 QVGA 320x240 SIF 352x240 CIF 352x288 2 CIF 352x576 640x360 VGA 640x480 4 CIF 704x576 16 9 PAL 1024x576 D1 PAL 720x576 D1 NTSC 720x480 720p 1280x720 XGA 1280x1024 1080p 1920x1080 Follow input Follow input Generate encoder resolution based on capture resolution detected N...

Страница 69: ...ox to appear where the user can type the multicast address the decoder should connect to Address for Multicast only x y z w 225 1 2 3 The multicast IP address that the decoder retrieves data from used when RTP or UDP is selected for the Input Interface and Is Multicast is checked Port RTP and UDP only 0 9999 8888 The port the decoder retrieves data from Location TSFILE and FILE only If decoding fr...

Страница 70: ...ts Can also add more profiles by clicking on new in the User Presets tab Save Click on this to save preset value to what was selected Operating Mode Encoder Interlaced Progressive Encode Single Ch No Scale Encode 1 to 3 Ch Decoder This selects the operating mode of the Z3 DM8107 SDI2 RPS Encoder Interlaced Progressive is the default mode of operation it can be used to encode up to two channels Enc...

Страница 71: ...ECC BCH8 Selected 256 MiB Using default environment The 2nd stage U Boot will now be auto loaded Please do not interrupt the countdown till DM385_EVM prompt if 2nd stage is already flashed got board id of 4 4 Hit any key to stop autoboot 0 running edid init I2C write I O error programing edid programed 161 bytes of edid NAND read device 0 offset 0x80000 size 0x40000 262144 bytes read OK Starting a...

Страница 72: ...size 0x300000 3145728 bytes read OK Booting kernel from Legacy Image at 81800000 Image Name Linux 2 6 37 Image Type ARM Linux Kernel Image uncompressed Data Size 2991248 Bytes 2 9 MiB Load Address 80008000 Entry Point 80008000 Verifying Checksum OK Loading Kernel Image OK OK Starting kernel Uncompressing Linux done booting the kernel Linux version 2 6 37 z3 z3pci dev gcc version 4 5 3 20110311 pre...

Страница 73: ...0008000 0xc0042000 232 kB text 0xc0042000 0xc05b2000 5568 kB data 0xc05b2000 0xc0602d40 324 kB SLUB Genslabs 11 HWalign 64 Order 0 3 MinObjects 0 CPUs 1 Nodes 1 NR_IRQS 407 omap_hwmod gpio1 softreset failed waited 10000 usec IRQ Found an INTC at 0xfa200000 revision 5 0 with 128 interrupts Total of 128 interrupts on 1 active controller GPMC revision 6 0 Trying to install interrupt handler for IRQ40...

Страница 74: ... dma Intr IRQ 17 Cppi41 Init Done omap_i2c omap_i2c 1 Begin bus recovery procedure omap_i2c omap_i2c 1 End bus recovery procedure omap_i2c omap_i2c 1 bus 1 rev4 0 at 100 kHz omap_i2c omap_i2c 3 Begin bus recovery procedure omap_i2c omap_i2c 3 End bus recovery procedure omap_i2c omap_i2c 3 bus 3 rev4 0 at 100 kHz Advanced Linux Sound Architecture Driver Version 1 0 23 cfg80211 Calling CRDA to updat...

Страница 75: ...istered tcp transport module RPC Registered tcp NFSv4 1 backchannel transport module NetWinder Floating Point Emulator V0 97 double precision PMU registered new PMU device of type 0 omap iommu omap iommu 0 ducati registered omap iommu omap iommu 1 sys registered squashfs version 4 0 2009 01 31 Phillip Lougher JFFS2 version 2 2 NAND 2001 2006 Red Hat Inc msgmni has been set to 433 io scheduler noop...

Страница 76: ... smallest flash I O unit 2048 UBI VID header offset 2048 aligned 2048 UBI data offset 4096 UBI max sequence number 5 UBI attached mtd6 to ubi0 UBI MTD device name File System UBI MTD device size 200 MiB UBI number of good PEBs 1601 UBI number of bad PEBs 0 UBI number of corrupted PEBs 0 UBI max allowed volumes 128 UBI wear leveling threshold 4096 UBI number of internal volumes 1 UBI number of user...

Страница 77: ... mcasp 0 mapping ok asoc adv7611 hifi davinci mcasp 1 mapping ok ALSA device list 0 TI81XX EVM 1 Z3 30 0030 TCP cubic registered NET Registered protocol family 17 can controller area network core rev 20090105 abi 8 NET Registered protocol family 29 can raw protocol rev 20090105 can broadcast manager protocol rev 20090105 t lib80211 common routines for IEEE802 11 drivers Registering the dns_resolve...

Страница 78: ... opt z3 tppss tppss_tso ko TPPSS TSO Init debug mode is disabled TPPSS TSO registered module successfully initialize tso data structures create proc read entries tso_core_thread 440 TPPS_CORE TSO Core Thread Started tso_core_thread 448 TPPS_CORE TSO Thread running tso_core_thread 440 TPPS_CORE TSO Core Thread Started tso_core_thread 448 TPPS_CORE TSO Thread running remove stale dev tppss_tso major...

Страница 79: ... on Simple mixer control Right PGA Mixer Mic3R 0 Capabilities pswitch pswitch joined Playback channels Mono Mono Playback on numid 1 iface MIXER name PCM Playback Volume type INTEGER access rw R values 2 min 0 max 127 step 0 values 127 127 dBscale min 63 50dB step 0 50dB mute 0 numid 22 iface MIXER name Line DAC Playback Volume type INTEGER access rw R values 2 min 0 max 118 step 0 values 118 118 ...

Страница 80: ...slave procId 0 Started slave procId 0 After Ipc_loadcallback status 0x00000000 After Ipc_startcallback status 0x00000000 c6xdsp Remote Debug Shared Memory 0xbff00000 m3video Remote Debug Shared Memory 0xbff05020 m3vpss Remote Debug Shared Memory 0xbff0a040 m3vpss Received character s c6xdsp Remote Debug Shared Memory 0xbff00000 m3video Remote Debug Shared Memory 0xbff05020 m3vpss Remote Debug Shar...

Страница 81: ...ogy LLC 100 N 8th ST STE 250 Lincoln NE 68508 1369 USA 1 402 323 0702 81 Preset serial_menu 1 Change channel 1 H 264 RES 1280x720 URL rtp 192 168 0 6 5004 VSRC HD SDI1 2 Change channel 2 H 264 DISABLED Z Status S Start streaming U Update dynamic settings T Stop streaming W Write configuration to flash X eXit to prompt Enter option ...

Страница 82: ...M version 4 1 0 for RTMP streaming is described 1 Log in to the Wowza Streaming EngineTM Manager Home page by typing http localhost 8088 where localhost is the IP address of the server in the pictured example 192 168 0 4 2 Click on Server in the top band of options On the left column click on Performance Tuning and then Java Settings Click Edit and then change Java Heap Size to Production Level an...

Страница 83: ...MP Publishing and RTSP Publishing are both set to Open and Client Restrictions is set to No client restrictions Then click Save The Wowza Streaming EngineTM is now configured to work with your Z3 Technology product Note You can also specify Require password authentication for RTMP Publishing In this case Authentication on the channel tab needs to be enabled and a valid Wowza user name and password...

Страница 84: ...ly to the board without any routers etc Can the PC and target board see each other on the network Try pinging the Z3 DM8107 SDI2 RPS IP address from the PC Try pinging the PC from the Z3 DM8107 SDI2 RPS Problem Do not see video in VLC UDP Does the IP address set in Dest Address equal the IP address of the PC running VLC Does the port number in Dest Port equal the value entered in the URL for VLC I...

Страница 85: ...he items in Web interface does not come up Is the link to filesys properly set up see step 2c on page 54 Does the IP address in the line added in etc exports match the IP address set in nfsserver in u boot Does the value of nfs_root in u boot point to z3 dm810x filesys fs Did you start the NFS server If you modified the exports file did you remember to restart the NFS server after that When contac...

Отзывы: