


Installation steps:
1. Install the RaZberry 7 shield on the Raspberry Pi GPIO
2. Install Z-Way software
The RaZberry 7 shield is designed to work with the Raspberry Pi 4 Model B,
but is fully compatible with all previous models, such as: A, A+, B, B+, 2B, Zero,
Zero W, 3A+, 3B, 3B+. The maximum potential of the RaZberry 7 is achieved
together with Z-Way software.
There are several ways to install Z-Way:
1. Download a flash card image based on Raspberry Pi OS with pre-installed
Z-Way (flash card minimum size is 4 GB)
https://storage.z-wave.me/z-way-server/raspberryPiOS_zway.img.zip
2. Install Z-Way on Raspberry Pi OS from an apt repository:
wget -q -O - https://storage.z-wave.me/RaspbianInstall | sudo bash
3. Install Z-Way on Raspberry Pi OS from a deb package:
https://storage.z-wave.me/z-way-server/
It is recommended to use the latest version of Raspberry Pi OS.
NOTE:
RaZberry 7 is also compatible with other third party Z-Wave software
supporting Silicon Labs Z-Wave Serial API.
After the successful installation of Z-Way, make sure that Raspberry Pi has
Internet access. In the same local network go to
https://find.z-wave.me
, you
will see the local IP address of your Raspberry Pi below the login form. Click
on the IP to reach the Z-Way Web UI initial setup screen. The welcome screen
shows the Remote ID and will prompt you to set the administrator password.
NOTE:
If you are in the same local network as the Raspberry Pi, you can access
Z-Way Web UI using a browser by typing in the address bar:
http://RASPBERRY_
IP:8083
.
After setting the administrator password you can access the Z-Way Web UI
from anywhere in the world, to do this go to
https://find.z-wave.me
, type ID/
login (e.g. 12345/admin) and enter your password.
PRIVACY NOTE:
Z-Way by default connects to the server
find.z-wave.me
in order to provide remote access. If you don’t need this service, you can turn
off this feature after logging into Z-Way (Main menu > Settings > Remote
Access). All communications between Z-Way and the server
find.z-wave.me
are encrypted and protected by certificates.
Congratulations!
You have got a modern Z-Wave
shield RaZberry 7 with extended
radio range.
RaZberry 7 will transform your
Raspberry Pi into a full featured
smart home gateway.
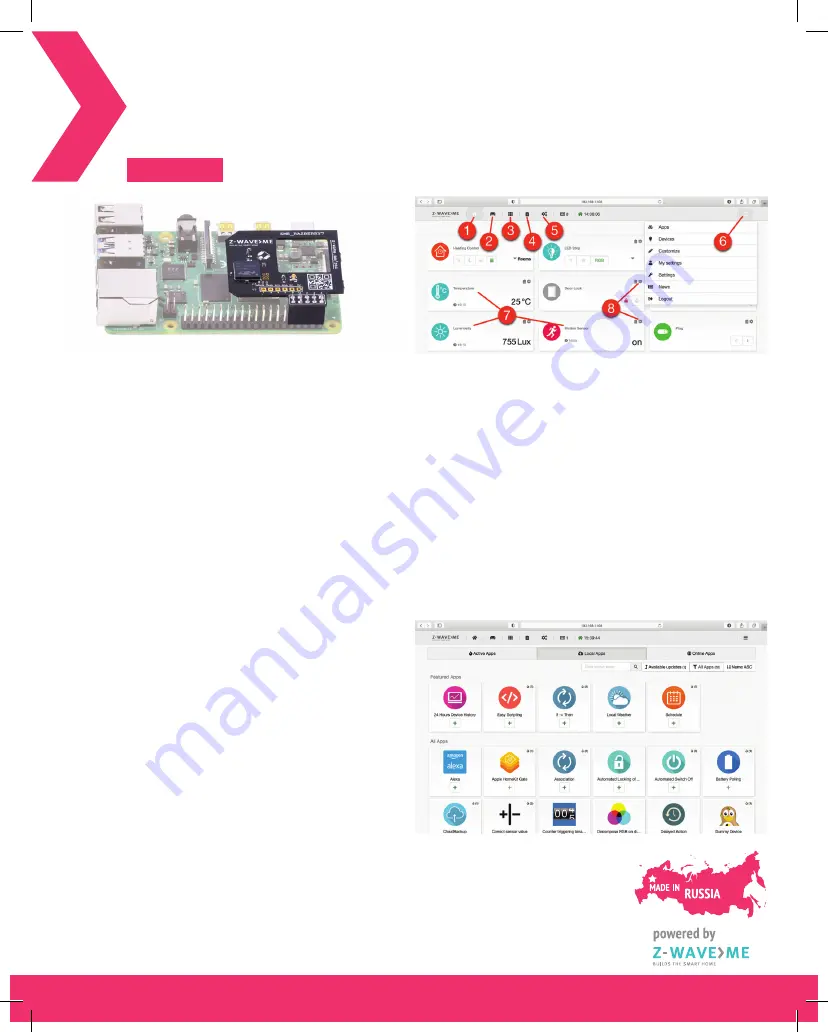
Dashboard (1)
Rooms (2)
Widgets (3)
Device widgets (7)
Widget settings (8)
Events (4)
Quick automation (5)
Main menu (6)
INTERFACE
The “SmartHome” user interface looks similar on different devices such
as desktops, smartphones or tablets, but adapts to the screen size. The user
interface is intuitive and simple:
1. Favourite devices are displayed on the Dashboard (1)
2. A devices can be assigned to a Room (2)
3. The full list of all devices is in Widgets (3)
4. Every sensor or relay triggerings are displayed in Events (4)
5. Set up scenes, rules, schedules and alarms in Quick Automation (5)
6. Apps and system settings are in the Main menu (6)
The device can provide several functions, for example a 3-in-1 Multisensor
provides: motion sensor, light sensor and temperature sensor. In this case there
will be three separate widgets (7) with individual settings (8).
Advanced automation can be configured using local and online Apps. Apps
allow you to set up rules like “IF > THEN”, to create scheduled scenes, set auto
off timers. Using applications you can also add support for additional devices:
IP cameras, Wi-Fi plugs, EnOcean sensors and set up integrations with Apple
HomeKit, MQTT, IFTTT etc. More than 50 applications are built-in and more
than 100 can be downloaded for free from the Online Store. Applications are
managed in the Main menu > Apps.
RaZberry 7 Z-Wave shield (Raspberry Pi not included)
Z-WAVE SHIELD
RAZBERRY 7
(ZME_RAZBERRY7)