background image

52

1

2

3

4

5

6

7

8

9

10

+

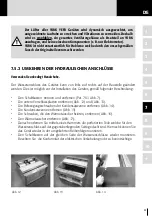
Wasseranschlüsse für YEFB 060÷070:

BEMERKUNG: Der Innendurchmesser der Wasseranschlüsse muss größer als 

28 mm sein und gut isoliert werden.

Die Verrohung muss so durchgeführt werden, dass hiernach eine einfache und ungehinderte 
Entfernung der Bodenabdeckung möglich ist.

Um die Installation und Wartung zu vereinfachen, empfehlen wir am Eingang und Abfluss 
je einen Absperrschieber und ein Y-Filter zwischen Eingangs-Absperrschieber und 
Austauscher zu installieren.

Wasseranschlüsse auf der rechten Geräteseite

2-LEITER-SYSTEM

1.  Wassereintritt .......................................1” M

2.  Wasseraustritt .....................................1” M

4-LEITER-SYSTEM

1.  Kaltwassereintritt .............................1” M

2.  Kaltwasseraustritt ............................1” M

3.  Warmwassereintritt ........................1” M

4.  Warmwasseraustritt .......................1” M

5.  Wasserablauf .............................. ø20 mm

6.  Elektroschaltkasten

Wasseranschlüsse auf der linken Geräteseite

Содержание YEFB Series

Страница 1: ...HIGH PRESSURE DUCTED UNIT YEFB KANAL KLIMAGER TE YEFB UNIT GAINABLE YEFB MANUALE USO ED INSTALLAZIONE INSTALLATION AND OPERATION MANUAL GEBRAUCHS UND WARTUNGSANWEISUNGEN MANUEL D UTILISATION ET INSTA...

Страница 2: ...2 2...

Страница 3: ...tive 2014 35 EU Electromagnetic compatibility Directive 2014 30 EU Hazardous substances Directive 2011 65 EU Ecodesign Directive 2009 125 EC Commision Regulation 2016 2281 EU and that all the followin...

Страница 4: ...LI DI GARANZIA 24 9 ELENCO RICAMBI CONSIGLIATI 24 10 SMALTIMENTO DELL APPARECCHIATURA A FINE CICLO VITA 25 ALLEGATI 86 1 INTRODUCTION 26 2 PURPOSES OF THIS MANUAL 26 3 APPLICABILITY OF THIS MANUAL 26...

Страница 5: ...DES GER TES AM ENDE DER LEBENSDAUER 65 ANLAGEN 86 1 INTRODUCTION 66 2 BUTS 66 3 APPLICABILIT DE CE MANUEL 66 4 DESCRIPTION DE L UNIT YEFB 66 4 1 Les composants 67 4 2 Les donn es techniques 67 5 TRANS...

Страница 6: ...el suo impiego una completa conoscenza dell apparecchiatura 3 APPLICABILIT DEL PRESENTE MANUALE I modelli di termoventilante considerati nel presente manuale sono i seguenti YEFB ad installazione oriz...

Страница 7: ...e di protezione termica dell isolamento del motore F Caratteristiche tecniche dello scambiatore di calore Pressione massima del fluido caldo o freddo per ventilconvettori ad acqua 1600 kPa Pressione m...

Страница 8: ...eveessere eseguita esclusivamente da personale professionalmente qualificato ed abilitato YORK declina ogni responsabilit per eventuali danni causati da una non corretta installazione ed improprio uso...

Страница 9: ...tere fenomeni di vibrazioni e o rumorosit il normale deflusso dell eventuale acqua di condensa dall unit Prima di eseguire qualsiasi operazione di instal lazione e o manutenzione munirsi di opportuni...

Страница 10: ...ig 4a 6 3 1 ANTIVIBRANTI Si consiglia in fase di installazione l uso di antivibranti e l utilizzo di barre filettate M8 come in figura LEGENDA 1 Antivibrante 2 Barra filettata 3 Staffa di fissaggio 6...

Страница 11: ...fronte lato uscita aria all apparecchiatura installata possibile ordinare le unit con attacchi sinistri Posizionamento delle connessioni su YEFB 020 050 Unit YEFB con attacchi idraulici posizionati su...

Страница 12: ...cchiatura si raccomanda di prevedere delle valvole d intercettazione manuale sulle tubazioni di collegamento ed interporre un filtro meccanico a Y tra la valvola e l ingresso allo scambiatore per prev...

Страница 13: ...qua e lo sfiato dell aria dallo scambiatore Adoperare occhiali protettivi per evitare il contatto con eventuali spruzzi di acqua calda durante l operazione di sfiato dell aria Per un corretto e razion...

Страница 14: ...densa 20 mm 6 Scatola collegamenti elettrici 7 Staffa di fissaggio tubi YEFB con valvole posizionate sul lato destro YEFB con valvole posizionate sul lato sinistro IMPIANTO 2 TUBI 1 Entrata acqua 1 F...

Страница 15: ...al corretto drenaggio dell acqua di condensa sono riportate nella seguente figura Nel caso in cui non sia possibile scaricare l acqua in modo naturale disponibile un apposita pompa evacuazione conden...

Страница 16: ...mite tubazioni circolari e flessibili diam 200 mm provviste di un adeguato isolamento termico esterno 6 6 I COLLEGAMENTI ELETTRICI Il collegamento elettrico deve essere preceduto da un accurata verifi...

Страница 17: ...li del cablaggio fisso nelle apposite feritoie presenti sulla base della scatola elettrica come riportato nelle seguenti figure Fig 5 e Fig 6 ed eseguire i collegamenti alle morsettiere in conformit a...

Страница 18: ...ente necessario ed infilare i fili cavi di alimentazione andan do a collegarli negli appositi morsetti come indicato nello schema elettrico Bloccare i fili cavi di alimentazione nella scatola elettric...

Страница 19: ...l periodo di inattivit dell apparecchio si raccomanda di far eseguire lo svuotamento totale della batteria di scambio servendosi delle apposite valvole e o raccordi predisposti 7 2 AVVIAMENTO E MANUTE...

Страница 20: ...2 2 ESTRAZIONE DEL FILTRO L accessibilit al filtro nelle unit termoventilanti immediata sufficiente togliere le viti di fissaggio dell apposito pannello di chiusura come indicato in figura e agendo s...

Страница 21: ...ltro e o batteria intasati Provvedere alla loro sostituzione una rumorosit anomala pulizia Vibrazioni generate da un non Eseguire un accurata verifica ed corretto fissaggio dell unit attuare le relati...

Страница 22: ...TORE Per la sostituzione dell elettroventilatore non necessaria la disinstallazione della termoven tilante Agire nel seguente modo Scollegare e rimuovere i fili di alimentazione del condensatore e del...

Страница 23: ...della termoventilante pu essere eseguita direttamente in cantiere Prima di iniziare la fase d installazione dell unit a soffitto agire nel seguente modo Scollegare e rimuovere la scatola elettrica Par...

Страница 24: ...ntilante ha la durata di 24 mesi ed inizia a decorrere dal momento della spedizione all acquirente Fa fede a tale scopo la data di consegna franco fabbrica YORK di Pordenone La garanzia copre solo i d...

Страница 25: ...triche ed elettroniche usate a centri di raccolta designati In al cuni paesi anche il rivenditore locale pu ritirare gratuitamente il vecchio prodotto se l utente acquista un altro nuovo di tipologia...

Страница 26: ...refully read the instructions contained in this manual The instructions allow a proper installation an optimised utilisation a complete knowledge of the unit 3 APPLICABILITY OF THIS MANUAL The followi...

Страница 27: ...EN 60335 2 50 Thermal protection class of the insulation of the motor F Technical features of the heat exchanger Max pressure of the hot or cold water for water fan coil 1600 kPa Min pressure of the h...

Страница 28: ...tallation and or maintenance must be executed by qualified personnel only by respecting the safety norms and the installation rules of the Country where the fan coil is installed YORK refuses every re...

Страница 29: ...ter the absence of conditions that can produce and transmit vibrations and or noises a correct water discharge of the condensing water coming out of the unit Before proceeding with any operation of in...

Страница 30: ...use of anti vibration mounts and M8 threaded rods is suggested during installation phase as shown in the picture LEGEND 1 Anti vibration 2 Threated rod 3 Fixing support 6 3 2 MOUNTING THE YEFB UNIT Af...

Страница 31: ...the unit has been installed It is possible to order the unit with left water connec tions Connections positioning on YEFB 020 050 YEFB unit with right water connections 2 PIPE SYSTEM 1 Water inlet 1...

Страница 32: ...aintenance we recommend that manual shut off valves are installed on the intake and outlet pipes and that a mechanical Y filter is interposed between the valve and the inlet of the heat exchanger in o...

Страница 33: ...the coil Use protection glasses to avoid hot water spays on the eyes during air bleeding operation For a correct use of the air handling unit we recommend to install an electric valve optional suppli...

Страница 34: ...g water 3 4 F 5 Condensate drain hose 20 mm 6 Electric box 7 Fixing support for pipes YEFB unit with right water connections YEFB unit with left water connections 2 PIPE SYSTEM 1 Water inlet 1 F 2 Wat...

Страница 35: ...mp optional can be installed The condensate pump has to be mounted according to the instruction manual given with the pump When finishing the water connection operation and after pressurizing the hydr...

Страница 36: ...ical connection verify the compatibility between power supply and the technical features of the controller and or of the other accessories to be connected to the unit These features are indicated in t...

Страница 37: ...6 6 1 POWER SUPPLY WITH STANDARD ELECTRIC BOX IP30 Insert the wires fix cable through the slots on the base of the control box as indicated in Fig 5 and Fig 6 and make the electrical connections acco...

Страница 38: ...entry and insert the wires power supply cables Make the electrical connections according to the electric wiring diagram supplied with the unit and to the diagram of the controller Fix the wires inside...

Страница 39: ...0 C drain the coil when the unit is not being used 7 2 ORDINARY START UP AND MAINTENANCE After connecting the unit to the pipe system and after filling the coil bleed any residual air in the system by...

Страница 40: ...7 2 2 REMOVING THE FILTER The filter can be easily reached in YEFB units by removing the fixing screws from the bottom closure panel as shown in the picture below By operating on the locking hooks the...

Страница 41: ...mperature and water flow on the coil and or the correct working of the WS water sensor Electric motor burnt Replace the faulty component The YEFB unit produces anomalous noise The filter and or the co...

Страница 42: ...REPLACING THE FAN DECK To replace the fan deck it is not necessary to uninstall the YEFB unit and operate as follows Disconnect and remove from the electric box the wires connected to the capacitor a...

Страница 43: ...e from the left to the right side before installing the unit by following the instructions below Disconnect and remove the electric box Par 7 5 1 Fig 7 Remove the bottom closure panels Fig 12 and Fig...

Страница 44: ...parts are guaranteed for 24 months beginning from the date the fan coil unit is delivered ex works in Pordenone The warranty only covers factory defects and not malfunctions caused by improper instal...

Страница 45: ...nment and human health which could otherwise arise due to inappropriate waste handling 2 In other Countries outside the EU If you wish to discard this product please contact your local authorities and...

Страница 46: ...esen um folgendes gew hrleisten zu k nnen eine einwandfreie Installation die Optimalisierung w hrend der Betriebszeit umfassendes Wissen ber das Ger t 3 GEBRAUCH DES VORLIEGENDEN HANDBUCHES In diesem...

Страница 47: ...I Schutzgrad des Elektromotors IP44 Kanal Klimager te Ref EN 60335 2 50 W rmeschutzklasse der Motorisolierung F Technische Daten des W rmetauschers Max Druck des Warm oder Kaltwassers 1600 kPa Minimal...

Страница 48: ...h rs Besonders weisen wir Sie darauf hin das die Verwendung von nicht geeigneten Anschl ssen flexiblen Schl uchen oder jegliche Befestigung welche nicht in der Lage ist das Gewicht des Ger tes sicher...

Страница 49: ...ussleitung zu achten Vor Service oder Installationsarbeiten ver sehen sich mit geeignete Schutzausr stung und versichern da das Ger t von der Strom versorgung abgeschlossen ist Abb 2 6 2 DAS GER T VOM...

Страница 50: ...CHWINGUNGSD MPFER Der Einsatz von Schwingungsd mpfern Abb 3 Punkt 1 wird w hrend der Installation vorgeschlagen wie in der Abbildung dargestellt LEGENDE 1 Schwingungsd mpfer 2 Gewindestange 3 Befestig...

Страница 51: ...er rechten Ger teseite au er anderweitiger spe zifischer Anfrage des Kunden Es ist m glich das Ger t mit Wasseranschl sse auf der linken Ger teseite zu bestellen Wasseranschl sse f r YEFB 020 050 Wass...

Страница 52: ...e Installation und Wartung zu vereinfachen empfehlen wir am Eingang und Abfluss je einen Absperrschieber und ein Y Filter zwischen Eingangs Absperrschieber und Austauscher zu installieren Wasseranschl...

Страница 53: ...ungs und Entl ftungsventile zu montieren Schutzbrille verwenden um hei es Wasser Sprays auf die Augen w hrend der Entl ftung zu vermeiden Im K hlbetrieb des Ventilatorkonvektors ist es immer empfohlen...

Страница 54: ...austritt 3 4 F 5 Wasserablauf 20 mm 6 Elektroschaltkasten 7 Halter f r Rohrbefestigung Ventile auf der rechten Ger teseite Ventile auf der linken Ger teseite 2 LEITER SYSTEM 1 Wassereintritt 1 F 2 Was...

Страница 55: ...nicht m glich sein kann eine Kondensatwasser pumpe Zubeh r verwendet werden Nach Fertigstellung aller Anschl sse f hren Sie eine Druckprobe mit h herem Druck als in normalem Betrieb durch um sp tere...

Страница 56: ...Netzteil und die technischen Eigenschaften der Kontrollen und oder der anderen Zubeh r die an das Ger t angeschlossen werden m ssen berpr ft werden Diese Eigenschaften sind in dem Typenschild auf eine...

Страница 57: ...abels gelbes gr nes Kabel 6 6 1 STROMVERSORGUNG MIT STANDARD ELEKTRODOSE IP30 Das Kabel durch die daf r vorgesehene ffnung in die Elektrobox einf deln s Abb 5 5a und danach gem dem mitgelieferten Elek...

Страница 58: ...stecken Sie das Kabel Stromkabel Die elektrischen Anschl sse gem dem mit dem Ger t gelieferten elektrischen Schaltplan und dem Diagramm der Kontrolle durchf hren Kabel mit Klemmen im Schaltkasten fix...

Страница 59: ...der Leitungen bzw des Registers f hren Sollte diese Gefahr bestehen sind die W rmetauscher bei l ngerem Ger testillstand zu entleeren 7 2 INBETRIEBNAHME UND REGELM SSIGE WARTUNG Nach erfolgtem Anschlu...

Страница 60: ...werden 7 2 2 ABNAHME DES FILTERS Der Filter kann leicht ausgetauscht werden Zu diesem Zweck sind die Schrauben an der Boden unterseite des Ger tes zu entfernen wie im Bild dargestellt 7 3 REINIGUNG D...

Страница 61: ...digt Die Wassertemperatur und Wasser menge im Heizregister kontrollieren und oder den richtigen Betrieb des WS pr fen Elektromotor ist durchgebrannt Den durchgebrannten Teil ersetzen Das YEFB Ger t is...

Страница 62: ...VENTILATORMOTORS Um die Gebl se zu ersetzen ist es notwendig das YEFB Ger t ausschalten und wie folgt vorgehen Dr hte mit Kondensator und Motorkabel verbunden vom Schaltkasten trennen und entfernen Ab...

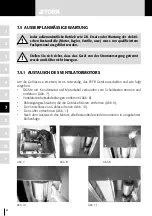
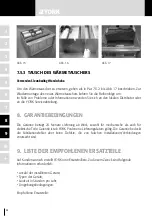
Страница 63: ...r der Installation des Ger tes gem folgender Beschreibung Den Schaltkasten trennen und entfernen Par 7 5 1 Abb 7 Die untere Verschlussplatten entfernen Abb 12 und Abb 13 Die Befestigungsschrauben der...

Страница 64: ...etr gt 24 Monate Lieferung ab Werk sowohl f r mechanische als auch f r elektrische Teile Garantie ist ab YORK Pordenone Lieferungsdatum g ltig Die Garantie bedeckt die Fabrikationsfehler aber keine De...

Страница 65: ...n k nnen Privathaushal te ihre gebrauchten Elektro und Elektronikger te nun kostenlos an ausgewiesenen R cknahmestellen abgeben In einigen L ndern k nnen Sie Altger te u U auch kostenlos bei Ihrem Fac...

Страница 66: ...nstallation L optimisation de son utilisation Une connaissance totale de l unit 3 APPLICABILIT DE CE MANUEL Les mod les YEFB consid r s dans ce manuel sont les suivants YEFB non carross horizontale ga...

Страница 67: ...ection thermique de l isolation du moteur F Caract ristiques techniques du motoventilateur Pression max du fluide froid ou chaud pour ventilo convecteurs eau 1600 kPa Pression minimale du fluide chaud...

Страница 68: ...es seulement par personnel qualifi YORK d cline toute responsabilit pour les dommages provoqu s par une installation noncorrecte et une utilisation non appropri e ou une alt ration du l unit YEFB et...

Страница 69: ...iltre air L absence de conditions qui peuvent engendrer vibrations et ou bruits Le correct reflux de l ventuelle eau de condensat Avant de proc der avec toutes op rations d installation et ou entretie...

Страница 70: ...rs de l installation l utilisation des anti vibration et des barres filet s M8 comme dans la figure suivante LEGENDE 1 Anti vibration 2 Barre filet 3 Bride de fixation 6 3 2 MONTAGE DE L UNIT YEFB Qua...

Страница 71: ...tant face l unit install e c t sortie air Il est possible de commander les unit s avec raccordements hydrauliques gauche Positionnement des connexions sur YEFB 020 050 Unit YEFB avec raccordements hyd...

Страница 72: ...ntretien de l unit il est recommand de pr voir de vannes d isolement manuelles sur les tuyaux de connexion et interposer un filtre m canique Y entre la vanne et l entr e de l changeur afin d viter l e...

Страница 73: ...ir de l changeur Utilis r lunettes de protection pour viter le contact avec des projection d eau chaude possibles pendant les op rations de d chargement de l air Pour une correcte et rationnel utilisa...

Страница 74: ...4 F 5 Evacuation du condensat 20 mm 6 Bo te connex lectriques 7 Brides de fixage des tuyaux Unit YEFB avec vannes droite Unit YEFB avec vannes gauche INSTALLATION A 2 TUBES 1 Entr e eau 1 F 2 Sortie e...

Страница 75: ...connection et pressurisation de l installation hydraulique effectuer une v rification de tenue une pression sup rieure la pression normale on vite de cette fa on les fuites d eau au moment de l utilis...

Страница 76: ...e l alimentation lectrique et les caract ristiques de l unit et ou charges qu on doit connecter Cette caract ristiques sont indiqu es sur la plaque situ e sur le c t de l unit Dans la ligne d alimenta...

Страница 77: ...O TE LECTRIQUE STANDARD IP30 Introduire les c bles c blage fixe dans les lumi res la base de la bo te lectrique Fig 5 et Fig 6 et effectuer les connexions aux bornes conform ment au sch ma lectrique q...

Страница 78: ...ement la quantit de passe c ble strictement n cessaire effec tuer les connexions aux bornes conform ment au sch ma lectrique qui se trouve dans l unit Bloquer les c bles dans la bo te lectrique par le...

Страница 79: ...e envisag pr voyez pendant la p riode d inactivit de l appareil d effectuer le vidange de la batterie d change l aide de la vanne de vidange plac e pr s des raccords qui se trouvent sur le c t du racc...

Страница 80: ...2 2 EXTRACTION DU FILTRE L accessibilit au filtre est imm diate et simple dans les unit s YEFB Il est suffisant d enlever les vis de fixation du panneau de fermeture comme indiqu dans le dessin En ag...

Страница 81: ...unit YEFB produit Filtre et ou batterie encrass s Remplacer nettoyer filtre et ou un bruit dr le batterie Vibrations produites par un fixage V rifier et r gler incorrect du ventilo convecteur la struc...

Страница 82: ...ILATEUR Pour le remplacement du groupe de ventilation il n est pas n cessaire de d sinstaller l unit Op rer comme il suit D brancher et enlever les fils d alimentation du condensateur et le c ble du m...

Страница 83: ...raccordements hydrauliques du c t droit au c t gauche peut tre ex cut e avant de l installation de l unit au plafond comme il suit Enlever la bo te lectrique en agissant sur les crochets de fixation a...

Страница 84: ...mois partir de l exp dition l acheteur A ces fins c est la date de livraison d part usine YORK de Pordenone qui fait foi La garantie couvre seulement les d fauts de fabrication elle ne couvre pas les...

Страница 85: ...ne Si vous souhaitez mettre ce produit au rebut veuillez contacter votre administration locale qui vous renseignera sur la m thode d limination correcte de cet appareil Suisse les quipements lectrique...

Страница 86: ...rows Condensate tray Access panel to fan deck Access panel to condensate tray Access panel to filter Water discharge fixing support Electric box LEGENDE Struktur Befestigungsb gel Filter Gebl se K hl...

Страница 87: ...040 050 060 070 A mm 407 60 517 60 B mm 902 1160 C mm 989 6 1239 6 1634 6 D mm 365 6 475 6 E mm 926 6 1176 6 1571 6 F mm 634 892 G mm 418 5 446 5 H mm 1019 6 1269 6 1664 6 Pesi Weights Gewichte Poids...

Страница 88: ...URE ANLAGE ANNEXE 2 A VANI TECNICI SERVICE OPENINGS TECHNISCHE R UME ESPACES TECHNIQUES Mod YEFB A B C 020 050 250 200 400 060 070 510 VISTA DALL ALTO TOP VIEW ANSICHT VON OBEN VUE DE DESSU VISTA LATE...

Страница 89: ...40 28 08 35 01 MED 6 20 9 62 12 19 15 53 24 95 32 16 MIN 4 55 8 20 10 39 13 85 18 90 28 84 Portata acqua l h Water flow l h MAX 1195 1632 2024 2360 4099 4974 MED 1015 1416 1780 2167 3714 4571 MIN 740...

Страница 90: ...55 8 20 10 39 13 85 18 90 28 84 Wassermenge l h D bit d eau l h MAX 1195 1632 2024 2360 4099 4974 MED 1015 1416 1780 2167 3714 4571 MIN 740 1223 1533 1954 2950 4167 Luftvolumenstrom m3 h D bit d air...

Страница 91: ...91 1 2 3 4 5 6 7 8 9 10 ALLEGATO ENCLOSURE ANLAGE ANNEXE 4 SCHEMI ELETTRICI WIRING DIAGRAM ELEKTRISCHE SCHEMA SCHEMES ELECTRIQUES YEFB 020 030 CBL00 YEFB 040 070 CBL20 IT EN DE FR...

Страница 92: ...92 1 2 3 4 5 6 7 8 9 10 YEFB 020 030 CBL00 EV YEFB 020 030 CBL00 EV PC...

Страница 93: ...93 1 2 3 4 5 6 7 8 9 10 YEFB 020 030 CBL00 EVC EVH YEFB 040 070 CBL20 EV IT EN DE FR...

Страница 94: ...94 1 2 3 4 5 6 7 8 9 10 CBL20 EVC EVH CBL20 EVC EVH PC...

Страница 95: ...95...

Страница 96: ...tive and can be modified without any notice Aufgrund des Innovationsprogramms und Verbesserungen k nnen die Beschreibungen die Daten und Abbildungen ohne Vorank ndigung ver ndert werden Pour l volutio...

Отзывы: