background image

6-7

IM MV1000-01E

D

splay Conf

gurat

on

1

2

3

4

5

6

7

8

9

10

11

12

13

App

Index

6.4  Wrtng a Message

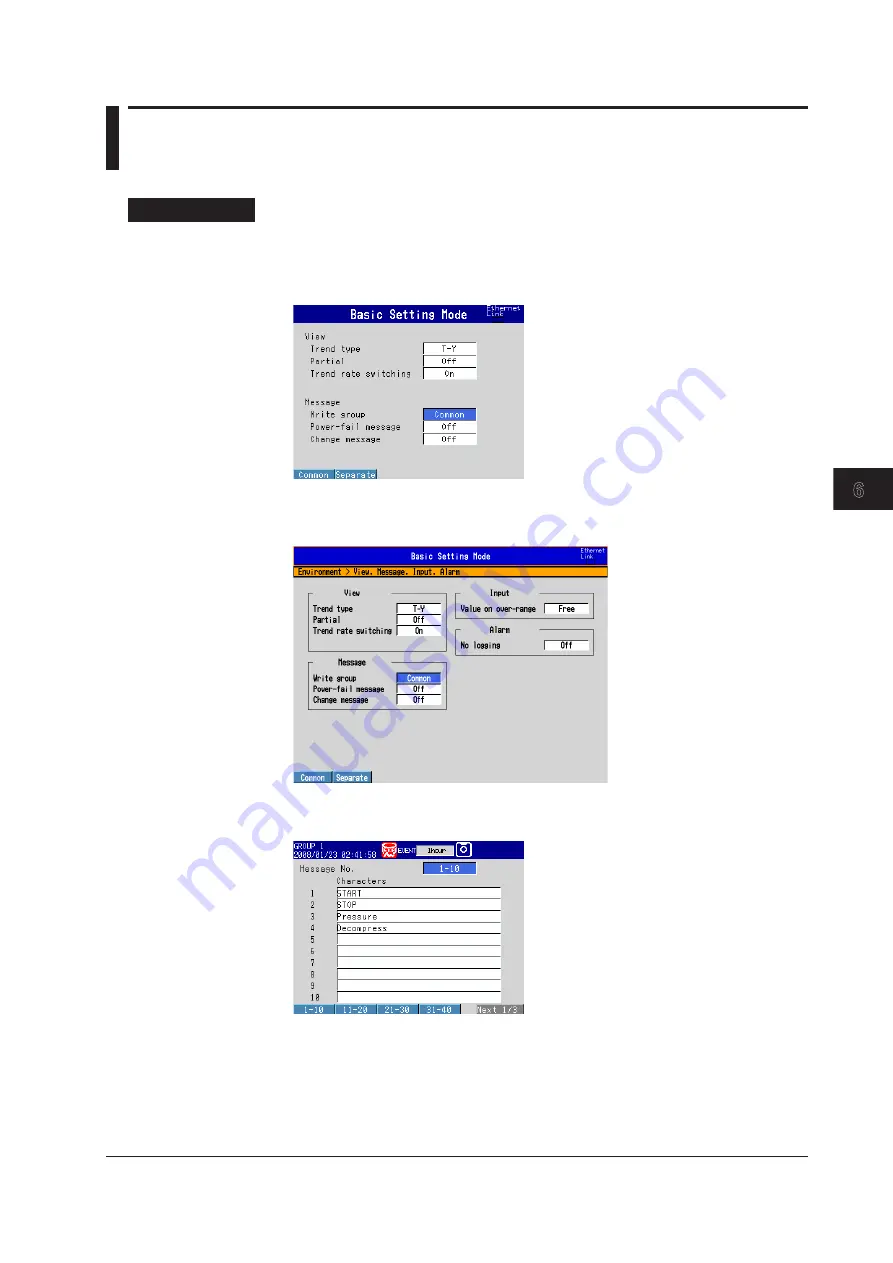
This section explains how to write a message in the trend display.

Dsplay

•  Message Wrte Group

  MV1000

  Press 

MENU

 and then select 

Menu

 tab > 

Basc settng mode

 > 

Envronment

 tab > 

Vew, Message

.


  MV2000

  Press 

MENU

 and then select 

Menu

 tab > 

Basc settng mode

 > 

Envronment

 tab > 

Vew, Message, Input, Alarm

.


•  Regsterng Messages


Press

 MENU 

> select the 

Menu

 tab > 

Message

.


Содержание MVAdvanced MV1000

Страница 1: ...User s Manual Models MV1004 MV1006 MV1008 MV1012 MV1024 MV2008 MV2010 MV2020 MV2030 MV2040 MV2048 MV1000 MV2000 IM MV1000 01E 2nd Edition ...

Страница 2: ...res except for communication and network features MV1000 MV2000 Communication Interface User s Manual IM MV1000 17E Explains how to use the Ethernet and serial interface communication features DAQSTANDARD Manuals All manuals other than IM 04L41B01 66EN are contained in the DAQSTANDARD CD Manual Title Manual No DAQSTANDARD Data Viewer User s Manual IM 04L41B01 63EN DAQSTANDARD Hardware Configurator...

Страница 3: ...ation in the United States and or other countries Adobe and Acrobat are trademarks of Adobe Systems Incorporated Company and product names that appear in this manual are registered trademarks or trademarks of their respective holders In this manual the and symbols do not accompany trademarks or registered trademarks Revisions 1st Edition December 2007 2nd Edition August 2010 ...

Страница 4: ...ure to check the version see section 9 3 Edition MV Addition and change to functions Refer to 1 Style number 1 Version number 1 New 2 Compatible with the DAQSTANDARD R8 21 page i and First Step Guide Acquire the contents of the Notice of Alterations rechargable battery model etc Section 2 4 and First Step Guide ...

Страница 5: ... and how to write a message 7 Event Action How to make the MV perform a specific action in response to an event a remote control signal input or a pressing of the USER key 8 Security Features How to use the key lock feature and the feature that allows only registered users to operate the MV 9 Environment Settings How to configure the time settings and how to operate the MV by using a keyboard 10 C...

Страница 6: ...or special instructions The same symbol appears in the corresponding place in the user s manual to identify those instructions In the manual the symbol is used in conjunction with the word WARNING or CAUTION Calls attention to actions or conditions that could cause serious or fatal injury to the user and precautions that can be taken to prevent such occurrences Calls attention to actions or condit...

Страница 7: ...2 Setting Burnout and Reference Junction Compensation 3 2 3 3 Setting the Input Range 3 3 3 4 Setting the Moving Average of the Input 3 6 3 5 Setting the Auxiliary Alarm Function 3 7 3 6 Hiding the Alarm Indication 3 10 3 7 Setting Alarms on Channels 3 11 3 8 Releasing Alarm Output 3 14 3 9 Calibrating Input Values CC1 option 3 15 3 10 Counting Pulses PM1 option 3 17 3 11 Setting Range Out Detecti...

Страница 8: ... Scale on the Trend Display 6 13 6 8 Displaying Alarm Value Marks and Color Scale Bands 6 18 6 9 Partially Expanding a Waveform 6 20 6 10 Changing the Display Layout Clearing of the Waveform at Start Message Display Direction Waveform Line Width and Grid 6 22 6 11 Changing the Bar Graph Display Method 6 24 6 12 Changing the Display Background Color 6 28 6 13 Automatically Switching Display Groups ...

Страница 9: ... 12 10 4 Starting Stopping Computation 10 15 10 5 Generating Reports 10 17 Chapter 11 External Input Channels MC1 option 11 1 Configuring External Input Channels 11 1 11 2 Displaying External Input Channels 11 4 Chapter 12 Troubleshooting and Maintenance 12 1 List of Messages 12 1 12 2 Troubleshooting 12 17 12 3 Periodic Inspection 12 20 12 4 Calibrating the MV 12 21 12 5 Recommended Replacement P...

Страница 10: ...ommunication Communication Interface User s Manual PC PC MV Recorder Temperature regulator FAIL status output Section 9 6 Remote input Section 7 4 Keys Keyboard Section 9 7 CF card First Step Guide Transmitter power supply Section 2 3 Pulse input Section 3 10 Measurement input Section 3 3 USB flash memory Section 4 10 Options Terminology Memory sampling Recording measured data Memory start A comma...

Страница 11: ...ttings menu Basic settings menu Operation screen Mode Description Operation Mode For performing measurements Setting Mode For configuring settings such as the input range and the measurement method You can change most of the settings in this mode while the MV is engaged in memory sampling Basic Setting Mode For configuring fundamental settings such as the scan interval and the measured data save m...

Страница 12: ...upply noise elimination is less effective in fast sampling mode than it is in normal mode When measuring in an environment susceptible to power supply noise we recommend that you measure in normal mode For configuration instructions see section 3 1 Input Types and Computation Functions You can measure the following types of input Input Type Description DC voltage You can measure DC voltages in the...

Страница 13: ...ion on a thermocouple Reference Junction Compensation Burnout Detection Detects and indicates a sensor burnout 1 5 V Detected on the 1 5 V value Burnout For configuration instructions see section 3 2 For configuration instructions see section 3 2 For configuration instructions see section 3 4 Burnout Indicated as Burnout Indicated as Burnout Thermoelectromotive force 1 2 3 10 0 mV 5 0 mV 0 0 mV 5 ...

Страница 14: ... of 100 Hz or less can be counted Counts pulses Input to the MV Count on the MV Measured value Output value For square root computation measured values below the specified value are cut For 1 5 V input values below 0 are cut Result of square root computation Low cut value MV For configuration instructions see section 3 3 For configuration instructions see section 3 3 For configuration instructions...

Страница 15: ... Time Interval t2 t1 Interval t2 t1 Amount of change in the setting T2 T1 t1 t2 T2 T1 t1 t2 T2 T1 Amount of change in the setting T2 T1 Hysteresis You can set a difference between the value that activates an alarm and the value that deactivates it For configuration instructions see section 3 5 Delay High Limit Alarm and Delay Low Limit Alarm If the measured value remains above or below the set ala...

Страница 16: ...arm output relay A options when an alarm occurs The alarm output relay operation can be changed For configuration instructions see Section 3 5 Alarm Alarm output relay reflash ON Alarm output relay reflash OFF Channel 1 Channel 3 Channel 2 Approx 500 ms Approx 500 ms Energize or De energize Non Hold Hold AND OR Alarm Channel 1 AND Channel 2 OR Alarm output relay or Internal switch NO Energize De e...

Страница 17: ...rm output relays will be in the same state when the power is shut off as they are when an alarm occurs This setting applies to all alarm output relays Nonhold Hold When an alarm condition is no longer met alarm relays can be set to Turn OFF immediately Nonhold Remain ON until the execution of an alarm output release AlarmACK operation Hold This setting applies to all alarm output relays Alarm Outp...

Страница 18: ...the MV1000 you can register up to 10 groups each with up to 6 channels With the MV2000 you can register up to 36 groups each with up to 10 channels The same groups are used for the trend digital and bar graph displays Displayed groups can be switched automatically at specified intervals 5 s to 1 min For configuration instructions see section 6 1 Channel Number Display and Tag Name Display You can ...

Страница 19: ...l also be used to display the batch and lot With the MV2000 the date time and batch name are displayed on different lines Batch name displayed alternately with the display name Current user name Batch name displayed alternately with the display name and date time Date and time If the function that gradually adjusts the time is enabled the time is displayed in yellow Display or group name If all ch...

Страница 20: ...and Section 6 8 Current value Section 6 7 Section 6 10 Trend space function Inserts a division wide space here Section 5 2 Time at the grid location Either displays the time or the date and time Sections 6 3 and 9 1 Grid Section 6 10 You can display a fine grid Fine grid Section 5 2 Trend interval 1 Sections 5 2 and 6 3 Trip line up to four lines Section 6 1 Measured value scale Section 6 7 Alarm ...

Страница 21: ... 6 3 You can press T DIV to change the trend interval You can also switch from the ordinary trend interval to the secondary trend interval and vice versa while the MV is collecting data Writing Messages Trend display Preset messages Free messages You can enter non preset messages 1 2 3 4 Start Material 1 Preset Messages For configuration and operating instructions see section 6 4 You can choose pr...

Страница 22: ...he display below 0 V the boundary value is shifted to the bottom 30 of the screen The bottom 30 of the screen displays 6 V to 0 V while the top 70 displays 0 V to 6 V Percentage of display span 100 Percentage of display span Measured value Boundary value Boundary value shifted location Measured value 100 30 0 50 0 6 V 6 V 0 6 V 6 V 0 Compressed area Time axis Time axis With partial expansion Witho...

Страница 23: ...770 0 C Over will be displayed If the temperature goes below 10 0 C Over will be displayed On channels that use linear scaling the range out values ignoring the decimal point are above 30000 and below 30000 However you can also set the range out values to 105 or greater and 5 or less of the scale width as long as those values fall within 30000 For configuration instructions see section 3 11 Comput...

Страница 24: ...ar graph base position is set to Center Section 6 11 Section 6 7 Section 6 11 Section 6 10 The bar graph base position is set to Center Section 6 11 Alarm mark Bar Graph Display Updating The bar graph display is updated at the same rate as numeric values Alarm Display The alarm mark alarm value mark and measured values are displayed in the following ways depending on the alarm condition Alarm Rele...

Страница 25: ... values at the cursor position You can also just display the digital values at the cursor position Waveform channel display color Background color Changeable Location of the most recent data Date and time at the left end of the time axis Trip line Date and time at the right end of the time axis or the time at the cursor position The time at the cursor position is surrounded by a yellow square You ...

Страница 26: ...e outside of the set display span 0 Time axis Measured value Measured value Auto span 0 Time axis When the maximum or minimum values are within the set display span 0 Time axis Measured value Measured value Auto span 0 Time axis If the maximum or minimum data value falls outside the maximum selectable display span the MV adjusts the display span to the maximum or minimum possible value The MV resp...

Страница 27: ...hannel number tag name alarm type and measured value all change in appearance based on alarm conditions in the following ways Alarm Release Blinking white Blinking black Blinking white Black White White Black Black Black Black Black AlarmACK AlarmACK Occurrence Whenindicationis settonon hold Whenindicationis settohold Tag Channel White None White None White White None None None None None Alarm typ...

Страница 28: ...operating instructions see section 5 7 To the historical trend display The alarm information number of the alarm on the screen s bottom line and the number of alarm entries in internal memory Cursor selects an alarm Alarm occurrence blinks until the AlarmACK operation is carried out if Indicator is set to Hold Channel Alarm number 1 2 3 4 and type H L h l R r T t Date time of alarm occurrence rele...

Страница 29: ...ns see section 5 8 To the historical trend display The message number displayed on the screen s bottom line and the number of message entries in internal memory Cursor used to select a message Message Added message blue Date and time when the message was written The groups on which the message was written Displays a group number or A for all groups Switching Displayed Items You can switch between ...

Страница 30: ...1 options samples For operating instructions see section 5 9 To the historical trend display Cursor selects a file Memory start date and time Memory stop date and time Sampling count Status Internal memory data files maximum number of recordable files Date and time of the most recently recorded data Data type Display data Event data Switching Displayed Items You can switch between two lists of inf...

Страница 31: ...ar graph For operating instructions see section 5 6 For information on report groups see section 10 5 Displayed Data Type The type of data that is displayed is determined by the report type Report kind which is set using the report function Report kind Displayed Data Hourly or hourly daily Sums for each hour and sums for the day Daily weekly Sums for each day and sums for the week Daily or daily m...

Страница 32: ...r Status Display Display the command status Log Display Displays all logs operation histories For operating instructions see section 5 10 Log Type Description Login Login and logout history time setting history power failure history Error Error message history Communication Communication command history FTP FTP transfer history WEB Web operation history E mail E mail transfer history SNTP SNTP ser...

Страница 33: ...meric display for more than 260 channels Alarm summary Message summary Memory summary Cannot use the cursor Modbus client status display Modbus master status display Relay status display Report display Cannot use the cursor Stacked bar graph display Sums of each channel numeric value display report group sums numeric value display Registering Display Configurations You can name and register up to ...

Страница 34: ...d LCD Display Condition Settings You can set the LCD Display conditions Display Attribute Settings Operation screen background color You can set the screen s background color to either black or white The default value is white For configuration instructions see section 6 13 Historical trend screen background color You can select white cream black or light gray as the background color The default v...

Страница 35: ...asured data values when a manual sample operation is performed You can write a header character string into the file shared with other files Data format Text Report Data M1 and PM1 options This is hourly daily weekly and monthly data Report data is recorded at specific intervals once a day once a week and so on You can write a header character string into the file shared with other files Data form...

Страница 36: ...Display Event data CF card USB flash memory External storage medium Setup data Display Internal memory FTP server on the network Sampling Save Screen image data Save Load Internal Memory Display data and event data are saved as files in internal memory They are also saved as files to an external storage medium Save operation Directory on an external storage medium Manual sampled data Report data D...

Страница 37: ...ata when an alarm occurs Use an alarm to trigger the recording of event data Internal Memory Measured data is partitioned and saved to files at set intervals If the internal memory is full or if the number of display data files and event data files exceeds 400 files are overwritten from the oldest file Display Data Recording Conditions Item Description Channel type You can set the channel type to ...

Страница 38: ...s Time File Trigger condition met Repeat Pressing START STOP puts the MV into a trigger wait state After a trigger event occurs the MV will record data for the set time Data length After that the MV will return to a trigger wait state and will record data for the set time Data length whenever a trigger event occurs To stop the recording of event data press START STOP again Time File File Trigger c...

Страница 39: ...ually Sampled Data Manually sampled data is stored to internal memory When the number of manually sampled data files exceeds 400 the oldest data files are overwritten Time Manually sampled data Report Data Report data is stored to internal memory When the number of report data files exceeds 100 the oldest data files are overwritten Time Report data 1 5 Data Storage Functions ...

Страница 40: ...t file and begins recording to a new file Files can be divided in the following ways Report Type Report File Single File File for Each Type Hourly One day s hourly report data Daily One month s daily report data Hourly and daily One day s hourly and daily report data A file for each daily report One day s hourly report data Daily and weekly One week s daily and weekly report data A file for each w...

Страница 41: ...the destination directory even if there is enough free memory older files will be deleted so that the file number remains at or below 1000 When there are already more than 1000 files in the destination directory one or more files are deleted before the new file is saved In this case the number of files is not kept at or below 1000 Manual Save collectively storing unsaved data Unsaved data in the i...

Страница 42: ...D Day hh Hour mm Minute ss Second Specified string AAAAAAAAA A Up to 16 alphanumeric characters can be used Batch name BBBBBBBBBBB B Up to 40 alphanumeric characters can be used 7 digit 6 digit number A sequence number in the order of occurrence The number ranges from 000001 to 999999 If the number reaches 999999 it returns to 000000 Starts with _ and takes on the following values A to Z and 0 to ...

Страница 43: ...length of the directory names When the specified directory name is five characters long about 170 directories can be created When it is 20 characters long about 120 directories can be created An error will occur if the limit is exceeded Other Types of Saveable Data Setup Data You can save the MV setup data to a CF card or to USB flash memory The setup data is saved to the root directory PDL Specif...

Страница 44: ...Lot number up to eight digits Automatic Lot Number Incrementation The lot number can be automatically incremented when memory sampling is stopped Text Field You can enter eight text fields into a file Each text field consists of the following Field title up to 20 characters Field string up to 30 characters Text fields can be shown on the MV screen with key operations Batch Comment You can enter th...

Страница 45: ...f level and edge see Miscellaneous in this section Timers There are four kinds of timers They are also used with the TLOG computation function M1 and PM1 options Types of Timers Time Relative timer Absolute timer Timer set Timer reset B Interval Timeout Time Timer set Ref time A Interval A B B A A A Absolute Time Mode The timer expires at the times determined by the reference time and the interval...

Страница 46: ...play data currently being recorded to internal memory This is the same as saving data by pressing FUNC SaveEvent Edge Saves the event data currently being recorded to internal memory This is the same as saving data by pressing FUNC Message Edge Writes a message Can be executed during memory sampling Snapshot Edge Saves an image of the screen DisplayRate1 2 Level Switches between the first and seco...

Страница 47: ...utput relay is activated when an internal switch is set to 1 or when an alarm occurs However the number of times the trigger is activated depends on the event data mode Single or Repeat About TimeAdjust TimeAdjust can only be specified as an action when Event is set to Remote TimeAdjust sets the MV internal clock to the closest hour Operation When the MV is Not Memory Sampling Difference from the ...

Страница 48: ...ons as shown below Type Operation Level Level Status 1 Status 2 Operation executed Operation executed Edge Edge Edge Event Action Level and Edge of the Remote Control Input Signal Level Edge ON OFF 250 ms or more For contact inputs the remote signal rises when the contact switches from open to closed and falls when the contact switches from closed to open For open collector signals the remote sign...

Страница 49: ...a files The listing of files stored to memory The deletion of files stored to memory The formatting of memory devices PanelLoad Only prohibits the loading of a setup file from a media device Action of Function The following FUNC key operations can be locked independently AlarmACK Message Free message Batch Add message Add free message and Text field Math start Math stop Math reset and Math ACK Sav...

Страница 50: ...while in Basic Setting Mode Operations Available while Logged Out When logged out you can switch operation screens by using DISP ENTER and HISTORY User Levels There are two user levels Admin and User Administrator Administrators can perform all operations on the MV At least one administrator must be registered to use the login function Item Description Number of users that can be registered 5 Limi...

Страница 51: ... logarithm LN 001 Determines the natural logarithm of 001 y lnx Exponent EXP 001 Determines e to the power of 001 y e x Relational computation 001 LT 002 The result is 1 when 001 is less than 002 and 0 otherwise 001 LE 002 The result is 1 when 001 is less than or equal to 002 and 0 otherwise 001 GT 002 The result is 1 when 001 is greater than 002 and 0 otherwise 001 GE 002 The result is 1 when 001...

Страница 52: ...1 Under normal conditions TLOG SUM 001 is carried out to derive the computed value When 101 exceeds K01 the previous computed value is reset and TLOG SUM 001 is carried out K01 Reset Explanation RESET a b When a is zero b is carried out to derive the computed value Otherwise the previous computed value is reset and b is carried out to derive the computed value CARRY K01 TLOG SUM 001 Under normal c...

Страница 53: ...ecify 102 101 103 the value of the previous scan interval is used for the 103 value How Computation Functions Handle Units In computations measured values are handled as values without units For example if the measured data from channel 001 is 20 mV and the measured data from channel 002 is 20 V the computed result of 001 002 is 40 How Computed Data Is Displayed You can set a span for the computed...

Страница 54: ...ed for the channel The number of samples and the sampling interval can be specified for each computation channel The rolling average is applied over the time corresponding to the number of data samples the sampling interval The maximum sampling interval is 1 hour and the maximum number of samples is 1500 Starting Computation Operations You can configure the MV to start computation operations when ...

Страница 55: ...esults in the actual value not matching the computed result because the scan interval and the time unit of the input value are different In such cases set the sum unit the Sum scale parameter in the MV interface to match the unit of the input value so that a sum with the same unit as the input value is calculated For example if the scan interval is 2 s and the input value is 100 m3 min a simple su...

Страница 56: ...owing result in abnormal data When channels are set to Skip or Off When an error value is returned as a measured result on a measurement channel A D converter failure etc When a measurement channel is in a burnout condition When an error value is returned as the computed result on a computation channel When an external input channel is Off or when data is not being received from it in cases such a...

Страница 57: ...l and de energizes when a CPU failure occurs Therefore relay output is carried out when the power is turned OFF or when there is a power failure You cannot change this behavior Relay Operation NO C NC During normal operation NO C NC When a failure occurs NO C NC When power is turned OFF NO Normally Opened C Common NC Normally Closed If a failure occurs contact your nearest YOKOGAWA dealer for repa...

Страница 58: ...in internal memory for which Auto Save to the CF card has not been completed has exceeded 390 Insert a CF card When the auto save to the CF card function is Off 10 MB or less of available space remaining in internal memory The number of files in internal memory that have not been manually saved has exceeded 390 Save the data in the internal memory to the CF card Measurement error A D converter err...

Страница 59: ...s corrected immediately The maximum value of time deviation referred to as tm in the figure below can be selected from within the range of 10 s to 5 min Time specified manually or retrieved from an SNTP server Range in which the time is gradually adjusted Nearest hour Time deviation Time when a remote control signal is applied Time on the MV tm tm Range in which the time is gradually adjusted Time...

Страница 60: ...ory Connectable devices 109 104 keyboards and USB flash memory For configuration instructions see sections 4 10 and 9 7 24 VDC Transmitter Power Supply TPS2 or TPS4 option Provides 24 VDC power to up to two TPS2 or four TPS4 two wire system transmitters Transmitters output 4 to 20 mA current signals You can connect these signals to an MV input terminal and display measured values Transmitter Curre...

Страница 61: ...ical vibration will not only put added stress on its components it may also impede ordinary measurement Flat surface Install the MV on a flat surface neither leaning to the left nor to the right The MV can be tilted if the stand is used Do not install the MV in the following places Outdoors In an environment with flammable or explosive gases steam or dust dangerous places In direct sunlight or nea...

Страница 62: ...a stack You can put rubber feet on the bottom of the MV2000 Please use the ones that come with the MV2000 Using the stand When using the stand push it out until it locks into place When retracting the stand on the MV2000 fold the stand back while pushing inward on it 2 1 Where and How to Install ...

Страница 63: ...cal stand sold separately The appropriate screw tightening torque is 0 6 N m Be sure to support the instrument from the bottom when attaching the stand Attaching the stand Instrument placement Installing on a panel The MV can be installed on a panel by using the rack mount kit sold separately See the external dimensions for the installation procedure 2 1 Where and How to Install ...

Страница 64: ...use the following kind of cable Conductive cross sectional area 0 08 mm2 to 1 5 mm 2 AWG28 to 16 Stripped section Approx 7 mm Take measures to prevent noise from entering the measurement circuit Move the measurement circuit away from the power cable power circuit and ground circuit Ideally the object being measured should not generate noise However if this is unavoidable isolate the measurement ci...

Страница 65: ... terminal arrangement on it 1 Turn the MV OFF and remove the terminal cover 2 Connect the signal wires to the terminals Recommended torque for tightening the screws Screw terminals 0 9 to 1 0 N m Clampted terminals 0 22 to 0 25 N m 3 Replace the terminal cover and fasten it with screws The appropriate tightening torque for the screws is 0 6N m Note It may be difficult to firmly secure input signal...

Страница 66: ... picture shows where the channel inputs are located on each terminal block A b CH1 CH2 CH3 CH4 CH1 CH2 CH3 CH4 CH5 CH6 B A b B CH5 CH3 CH1 CH6 CH4 CH2 CH3 CH1 CH4 CH2 b A B b A B Screw terminal Input terminal block of the MV1004 MV1008 and MV2008 MV1006 input terminal block Clamp terminal CH1 CH2 CH3 CH4 CH5 CH6 CH7 CH8 CH9 CH11 CH10 CH12 A b B CH5 CH3 CH1 CH6 CH4 CH2 CH9 CH7 CH10 CH11 CH12 CH8 b ...

Страница 67: ...ire First loosen the screw at the front using a flat blade screwdriver Insert the input signal wire into the slit on the left side of the terminal block and fasten the screw at the front Recommended wire size 0 08 to 1 5 mm2 AWG28 to 16 Recommended length of stripped wire 7 mm Connect the wires Flat blade screwdriver Hold both ends of the terminal block align it with the connector and then push it...

Страница 68: ...150 V or less When the connection is to circuits derived from Mains Circuits secondary circuits 250 V or less keep the Mains Circuit voltage at less than 300 V and use an isolation transformer To prevent fire only use signal cables with a temperature rating of 70 C or above Exposing the input and output signal cables connected to the MV to high tension may damage the cables and the MV terminals Do...

Страница 69: ... installed There is a terminal cover screwed onto the optional terminal block It has a label indicating the terminal arrangement on it 1 Turn OFF the MV and remove the terminal cover 2 Connect the signal wires to the terminals The recommended torque for tightening the screws is 0 9 to 1 0 N m 3 Replace the terminal cover and fasten it with screws The appropriate tightening torque for the screws is...

Страница 70: ...ls 02 01 04 03 NC C NO NC C NO NC C NO NC C NO NC C NO NC C NO NC C NO NC C NO NC C NO NC C NO NC C NO NC C NO NC C NO NC C NO NC C NO NC C NO NC C NO NC C NO NC C NO NC C NO NC C NO NC C NO NC C NO NC C NO NC C NO NC C NO NC C NO NC C NO NC C NO NC C NO NC C NO NC C NO 02 01 02 01 04 03 06 05 C 1 2 8 7 6 5 4 3 C 1 2 8 7 6 5 4 3 C 1 2 8 7 6 5 4 3 02 01 04 03 06 05 02 01 Remote Remote Remote C 1 2 ...

Страница 71: ...trol input Pulse input Remote control input Remote control input Remote control input NC C NO NC C NO NC C NO NC C NO FAIL FAIL Status output FAIL Status output Status output F1 R1 A1 PM1 A2 PM1 A1 F1 PM1 PM1 F1 PM1 A1 TPS2 A1 R1 TPS2 TPS2 R1 TPS2 02 01 C 1 2 8 7 6 5 4 3 C 1 2 8 7 6 5 4 3 NC C NO NC C NO NC C NO NC C NO 02 01 C 02 01 NC C NO NC C NO 02 01 H L H L H L 1 2 5 4 3 Transmitter power su...

Страница 72: ... C NO 12 11 14 13 16 15 Alarm A3 F1 NC C NO NC C NO FAIL Status output NC C NO NC C NO NC C NO NC C NO NC C NO NC C NO 12 11 14 13 16 15 Alarm A3 F1 R1 NC C NO NC C NO FAIL Status output NC C NO NC C NO NC C NO NC C NO NC C NO NC C NO 12 11 14 13 16 15 Alarm NC C NO NC C NO NC C NO NC C NO NC C NO NC C NO 12 11 14 13 16 15 Alarm NC C NO NC C NO NC C NO NC C NO NC C NO NC C NO C 1 2 8 7 6 5 4 3 02 ...

Страница 73: ...ute between input terminals and the ground terminal Input format Photocoupler isolation Shared common C Allowable input voltage 5 VDC 5 V Contact closed at 200 Ω Contact open at 100 kΩ or greater ON voltage 0 5 V or less 30 mADC Leakage current when turned OFF 0 25 mA or less Pulse Input Terminal PM1 H L H L H L H L H L H L H 8 7 6 6 7 8 L Withstand voltage 1000 VDC for one minute between input te...

Страница 74: ...ansmitter as shown below Transmitter Current MV Transmitter power supply output terminal Input terminal Shunt resistor 250 Ω Note To reduce noise use a shielded cable for wiring Connect the shield to the functional ground terminal or to the ground terminal of the MV 2 3 Optional Terminal Wiring ...

Страница 75: ...t the desktop power cord into a grounded 3 prong outlet Do not use an ungrounded extension cord If you do the device will not be grounded Use a power supply that meets the following conditions Item Condition Rated supply voltage 100 to 240 VAC Operating supply voltage range 90 to 132 180 to 264 VAC Rated supply frequency 50 60 Hz Power supply frequency range 50 60 Hz 2 Maximum power consumption MV...

Страница 76: ...ources When removing the plug from the power outlet do not pull on the cord Pull from the plug If the power cord is damaged contact your nearest YOKOGAWA dealer Use a power supply that meets the following conditions Item Condition Rated supply voltage 100 to 240 VAC Operating supply voltage range 90 to 264 VAC Rated supply frequency 50 60 Hz Power supply frequency range 48 to 62Hz Maximum power co...

Страница 77: ...ith insulation sleeves to connect both the power cord and the protective ground To prevent electric shock be sure to attach the electrical wiring cover transparent Use a power supply that meets the following conditions Item Specification Rated supply voltage 12 or 24 VDC Operating supply voltage range 10 to 28 8 VDC Maximum power consumption MV1000 24 VA MV2000 35 VA Wiring Procedure 1 Make sure t...

Страница 78: ...s ON If you leave the MV1000 in this condition for an extended time the battery may over discharge due to the minute consumption of power by the internal circuit operation If the MV1000 automatically turns OFF after the ALARM LED turns ON make sure to turn the power switch of the MV1000 to the OFF position Charging of the battery starts when the AC adapter is connected to the MV1000 In this case t...

Страница 79: ...MV1008 MV1024 9 hours 7 hours 5 hours MV1012 13 hours 9 hours 4 hours 1 Reference values when operated at room temperature 2 See Power Supply in the specifications for the instrument s operating conditions Battery Life The number of times the battery can be recharged is approximately 300 depends on the condition in which it is used If the operation time is short even when it is fully charged the b...

Страница 80: ...with the connector on the MV1000 then connect the battery box to the MV1000 POWER 7 Fasten the battery box in using four screws The appropriate screw tightening torque is 0 6 N m POWER Do not disassemble the battery box WARNING 2 4 Connecting the Power Supply ...

Страница 81: ...MV2030 MV2040 MV2048 Fast sampling mode is not available on models equipped with external input channels MC1 For details see section 1 2 Scan interval Scan interval The selectable settings appear Scan interval A D integrate When the scan mode is set to Normal select an appropriate A D integration time Only the selectable settings are displayed Setting Description Auto The MV automatically detects ...

Страница 82: ... by 10 of the scale width Example With a scale of 0 to 100 burnout is detected at values above 110 Down When the MV detects a burnout it sets the measured result to Over The measured value is displayed as Burnout For 1 5V input the MV detects a sensor burnout when the measured value goes below the scale lower limit by 5 of the scale width Example With a scale of 0 to 100 burnout is detected at val...

Страница 83: ...t CH Select the target channels Range Mode Setting Description Skip Not measured Volt TC RTD DI 1 5V Input type Represents DC voltage thermocouple RTD ON OFF input and 1 5V inputs respectively Delta Scale Sqrt Difference computation linear scaling and square root computation Select the checked settings for the modes listed below Setting Mode Volt TC RTD DI Delta Scale Sqrt 1 5V Skip Type Range Spa...

Страница 84: ...t range The range of available settings will be displayed on the screen Note You cannot set Span Lower and Span Upper to the same value When Mode is set to 1 5V or Sqrt you can only set Span Lower to a value that is less than Span Upper Range Scale Lower Scale Upper The input range after unit conversion You can set the scale values to anywhere from 30000 to 30000 The decimal place is determined by...

Страница 85: ...Range Ref CH The reference channel for difference computation Range Low cut Select On to use the low cut function The low cut value for 1 5 V input is fixed at 0 of the input span Range Low cut value With square root computation set the low cut value in the range of 0 0 to 5 0 of the input span Input value Low cut value Result of square root computation Measured value ...

Страница 86: ...For an explanation of this function see section 1 2 Display Press MENU and then select Menu tab Meas channel Moving average Settings Average value Scan Interval Count Average value First CH Last CH Select the target channels Moving average On Off Select On to use the moving average function Moving average Count Set the number of moving average data points from within the range of 2 to 400 ...

Страница 87: ...planation of these functions see section 1 3 Display MV1000 Press MENU and then select Menu tab Basic setting mode Menu tab Alarm settings Basic setting Switch Relay or Hysteresis MV2000 Press MENU and then select Menu tab Basic setting mode Menu tab Hysteresis Settings Basic setting Reflash To set the reflash operation on alarm output relays select On The reflash function affects the first three ...

Страница 88: ...01 and I02 I01 I03 I01 to I03 etc Only alarm output relays that are installed are valid Note When reflash is turned ON the operation of the first three output relays is fixed to OR logic Specifying AND produces no effect Relay Action Select whether to energize or de energize the alarm output relay when an alarm occurs This setting applies to all alarm output relays Relay Hold You can choose to mak...

Страница 89: ...lay Alarm 2 Alarm 1 Activated Alarm occurrence Alarm occurrence Deactivated Hysteresis Meas CH High Low The hysteresis width for alarm occurrence release of the high low limit alarm that is set for measurement channels Selectable range 0 0 to 5 0 of the span or scaling width Delta High Low The hysteresis width for alarm occurrence release of the difference high low limit alarm that is set for meas...

Страница 90: ... Basic setting mode Environment tab Input Alarm MV2000 Press MENU and then select Menu tab Basic setting mode Environment tab View Message Input Alarm Settings Alarms No logging Select On to hide alarm indication Detect will appear in the alarm setting screen see section 3 7 This function disables the alarm indicator and the logging of alarm events to the alarm summary How to set for each channel ...

Страница 91: ...ed When the upper or lower limit of the span or scale is changed on channels that are set to linear scaling square root computation or 1 5V input this includes changes in the decimal place For an explanation of this function see section 1 3 Display Alarms for Each Channel Press MENU and then select Menu tab Meas channel Range Alarm Alarm Delay MV1000 Press MENU and then select Menu tab Meas channe...

Страница 92: ...ressible given the decimal place Max The value that is equal to the width of the measurable range but cannot exceed 30000 after removing the decimal point 0 0001 to 3 0000 V for 2 V range 0 1 to 1760 0 C for type R thermocouples T t Same as H and L Same as H and L When the Channel Mode Is Delta Type Alarm Value Alarm Value Range Example H L Within the measurable range 2 0000 to 2 0000 V for 2 V ra...

Страница 93: ...00 s Note The alarm delay time takes on a value that is an integral multiple of the scan interval For example if the alarm delay time is set to 5 s when the scan interval is 2 s the actual delay time is 6 s The delay alarm has the following special operations If a delay alarm is set on a computation channel and computation is stopped when the computed value exceeds the alarm setting the alarm is t...

Страница 94: ...Reset in Basic Setting Mode For Hold and Relay Action on ACK configuration instructions see section 3 5 Procedure Perform this operation after an alarm occurs 1 In Operation Mode press FUNC The function menu appears 2 Press the AlarmACK soft key The alarm output is released Explanation Alarm Output Release AlarmACK When an AlarmACK operation is carried out the indications and outputs relays and sw...

Страница 95: ...ab Meas channel Calibration correction Settings True val Number of set points Calibration set points Y5 Y4 Y3 Y2 Y1 MES val X1 X2 X3 X4 X5 Condition X1 X2 X3 X4 X5 First CH Last CH Select the target channels You can set consecutive channels whose range is set to the same value as that of the first channel Number of set points Select the number of points including the start and end points that will...

Страница 96: ...the measured value of the channel set to First CH is used as the Mes val for all channels Range of Selectable Values for Mes val and True val On Channels Set to Linear Scaling 30000 to 30000 decimal place is the same as that set for the scale On All Other Channels The measurable range Example If the range is 2 V 2 0000 to 2 0000 Note If you change the Mode or Range settings calibration correction ...

Страница 97: ...lect Menu tab Math channel Calculation expression Alarm Settings First CH Last CH Select the target channels Math range Math On Off Select On Math range Calculation expression You can use the following variables in equations Q01 to Q08 The number of pulses per second P01 to P08 The number of pulses per scan interval The numbers 01 to 08 refer to the pulse input terminal numbers For computation cha...

Страница 98: ...f pulses per second 101ch 102ch Number of pulses per minute Pulse input Sampling interval 250 ms Time Moving average over a minute 60x Calculation Expression This table shows which calculation expressions to assign to which channels Set an appropriate Span Lower Span Upper and Unit Channel Calculation Expression Description 101 Q6 Number of pulses per second 102 101 K01 Number of pulses per minute...

Страница 99: ...t Calculates the number of pulse sum resets 102 P01 GE K01 returns a value of 1 when the value of the previous pulse sum 102 the current pulse count P01 is greater than or equal to the reset value K01 Otherwise it returns a value of zero The value of Channel 101 increases by 1 whenever the pulse sum exceeds the reset value Channel 102 Pulse Sum Calculates the pulse sum This channel normally calcul...

Страница 100: ...l point less than 30000 is a negative range out and above 30000 is a positive range out They are displayed as Over and Over Over A value less than 5 of the scale is a negative range out and a value greater than 105 of the scale is a positive range out They are displayed as Over and Over Example If the scale is 0 0 to 200 0 a value less than 10 0 is a negative range out and a value greater than 210...

Страница 101: ...data For an explanation of the recording function see section 1 5 Display Data Type Press MENU and then select Menu tab Basic setting mode A D Memory Measurement Channels MV1000 Press MENU and then select Menu tab Meas channel Tag Memory Delay MV2000 Press MENU and then select Menu tab Meas channel Tag Memory sample Alarm delay Trend Storage interval and Save interval for display data Press MENU a...

Страница 102: ...rded data is divided into files of the size specified here The values that you can set here vary depending on the Trend Storage interval setting Trend Storage interval1 5s2 10s2 15s3 30s 1min Sampling interval 125ms 250ms 500ms 1s 2s Selectable Save Interval Values 10 min to 12 h 10 min to 1 day 10 min to 3 days 10 min to 7 days 10 min to 14 days Trend Storage interval1 2min 5min 10min 15min 20min...

Страница 103: ...Sample rate1 2s 5s 10s 30s 1min Selectable data lengths 10 min to 14 days 10 min to 31 days 10 min to 31 days 1 h to 31 days 1 h to 31 days Sample rate1 2min 5min 10min Selectable data lengths 1 h to 31 days 1 h to 31 days 1 h to 31 days 1 You cannot choose an interval that is faster than the scan interval 2 Only available on high speed input models of the MV Pre trigger Select the amount of data ...

Страница 104: ...save function see section 1 5 Display Auto save MV1000 Press MENU and then select Menu tab Basic setting mode Environment tab Security Media save MV2000 Press MENU and then select Menu tab Basic setting mode Environment tab Security Media save Batch Display Event Data File format File header and Data file name Press MENU and then select Menu tab Data save File settings ...

Страница 105: ...to a CF card or to USB flash memory Save Media FIFO The Media FIFO box appears when you set Auto save to On Setting Description On Uses Media FIFO With this save method the newest data files are always kept Off Does not use Media FIFO If the free space on the CF card is low you will need to change to a different CF card Disp Event File File format Select either Binary or Text as the format for sav...

Страница 106: ...h function Data file name Identified strings Set the user specified character string up to 16 characters A a 1 You can use these symbols _ For an explanation of the file naming function see section 1 5 Save directory Directory name Set the name of the directory to be saved to up to 20 characters A a 1 You can use these symbols _ You cannot use these character combinations AUX CON PRN NUL CLOCK COM...

Страница 107: ...he batch function For an explanation of this function see section 1 6 Display Batch Function MV1000 Press MENU and then select Menu tab Basic setting mode Environment tab Batch MV2000 Press MENU and then select Menu tab Basic setting mode Environment tab Security Media save Batch Data file name Press MENU and then select Menu tab Data save File settings ...

Страница 108: ...rent lot number 1 Off Turns auto increment off Data file name Structure Batch Creates display and event data filenames by combining the batch number with the serial number For an explanation of the file naming function see section 1 5 Data file name Identified strings For an explanation of the file naming function see section 4 2 Text field number Select a number from 1 to 8 Text field number Titl...

Страница 109: ...R Note After memory sampling begins the batch number and lot number cannot be changed You can change comments freely before memory sampling starts After memory sampling starts you can only set comments that have not yet been set While the window for entering comments is displayed you can change the comments freely but after the window is closed the comments are fixed When memory sampling stops com...

Страница 110: ...rding begins Activating Triggers with Events The event action function must be set See chapter 7 Recording will start when an event occurs Saving Automatically Automatic saving takes place when Auto save is set to On see section 4 2 for details Data is saved to the CF card Leave the CF card in its slot During memory sampling measured data in the internal memory will be automatically saved to the C...

Страница 111: ... display the Function menu Media eject soft key CF soft key When the message Media can be removed safely appears remove the storage medium Note If there is not enough space on the storage medium the message Not enough free space on media appears and the data is not saved When this message appears switch to another external storage medium and try saving again You cannot cancel a data save operation...

Страница 112: ... If these problems arise the storage media access indicator will light frequently External storage media file save error Access timeout These problems can be dealt with in the following ways If you are using the event action function and saving small consecutive files increase the size of the files being saved If you are saving multiple files to the same directory on an external storage medium cha...

Страница 113: ...etails Saving to a CF Card If Auto save is set to On manually sampled data will be automatically saved to a CF card when manual sampling takes place If Auto save is set to Off use a manual save operation see section 4 4 for details to save manually sampled data to a CF card or to USB flash memory No matter what Auto save is set to you can always save manually sampled data to a CF card or to USB fl...

Страница 114: ...urrent channel values will be saved in this order Manual Sample On Off To assign a channel to the set Manual Sample number select On Channel Enter the channel number of a measurement computation M1 and PM1 options or external input MC1 option channel 4 5 Saving Measured Data Manually ...

Страница 115: ...5 Procedure 1 In Operation Mode press FUNC The function menu appears 2 Press the Snap shot soft key The MV saves a snapshot data file to the CF card Displayed soft keys and message windows will not be saved Note If you assign the Snapshot function to the USER key you can take snapshots in all modes Operation Mode Setting Mode and Basic Setting Mode However error messages will not be saved Explanat...

Страница 116: ...he files in the directory will appear in a list is the root directory Changing Files and Directory Display Order You can arrange files by the date when they were last updated Pressing the Sort soft key will switch between displaying files or directories in ascending or descending order A marker indicating the sort order is displayed next to Date Time Deleting Files Use the arrow keys to select a f...

Страница 117: ...t Press the CF or USB soft key then DISP ENTER When using a CF card and USB flash memory 2 Enter the Volume name up to 11 characters 1 A and press DISP ENTER A confirmation window appears 3 Select Yes and press DISP ENTER The storage device will be formatted Explanation Format Types Memory Size Type Storage media with less than 512 MB of memory FAT16 Storage media with more than 512 MB of memory F...

Страница 118: ... display Press MENU and then select File tab Load display data or Load Event data Press the CF or USB soft key and then DISP ENTER When using a CF card and USB flash memory 2 Use the arrow keys to select a directory and then press DISP ENTER The files in the directory will appear in a list is the root directory 3 Select a file using the arrow keys and then press DISP ENTER The MV loads the file an...

Страница 119: ...characters A a 1 You can use these symbols _ You cannot use these character combinations AUX CON PRN NUL CLOCK COM1 to COM9 and LPT1 to LPT9 To cancel the operation press ESC 3 Press DISP ENTER The setup data is saved Loading Setup Data The MV loads all Setting Mode and Basic Setting Mode settings When setup data is loaded the previous settings are erased and the MV restarts with the loaded settin...

Страница 120: ...e size is about 200 KB The following settings are also saved The current monitor display condition The Jump default display setting Favorite display key data Loading Setup Data The monitor display condition Jump default display setting and favorite display key settings are also loaded If the loaded setup data is not applied check the error log see section 5 10 While setup data is being loaded key ...

Страница 121: ...y For instructions on how to save internal memory data to an external storage medium see section 5 9 This option is only displayed when it is available You can use DATA SAVE MODE when there is display event report or manually sampled data You can change the option that is displayed here with the menu customize function Displayable options DATA SAVE MODE SELECT SAVE M SAMPLE SAVE REPORT SAVE ALL SA...

Страница 122: ...ting a USB flash memory device be sure to follow the procedure listed above If you remove the USB memory without performing the above procedure the data stored on it could be damaged Saving and Loading Data For information on Saving and loading setup data files see section 4 9 Saving display and event data files see sections 5 9 and 4 4 Loading display and event data files see section 4 8 Listing ...

Страница 123: ...Web log e mail log SNTP log DHCP log and Modbus status log ALARM SUMMARY MESSAGE SUMMARY MEMORY SUMMARY REPORT DATA MODBUS MASTER MODBUS CLIENT RELAY GROUP 1 DISP ENTER key and arrow keys Section 5 2 Sec 5 2 Sec 5 2 Section 5 5 Display selection menu Submenu Section 5 7 Section 5 8 Section 5 9 Section 5 5 Section 5 5 COLUMN BAR Section 5 6 Section 5 11 Section 5 4 Section 5 3 Section 5 10 About ta...

Страница 124: ...ion 6 15 FUNC key Section 6 17 MENU key ESC key USER key Section 7 4 T DIV key Sections 5 2 and 5 3 Soft key MV2000 START STOP key Section 4 4 HISTORY key Section 6 15 FUNC key Section 6 17 MENU key ESC key USER key Section 7 4 T DIV key Sections 5 2 and 5 3 Soft key 5 1 Switching Between Displays ...

Страница 125: ... soft key for the operation you want to perform Function menu Select using the soft keys Next soft key MV1000 MV2000 Communication Interface User s Manual Sec 5 1 Sec 6 4 Sec 6 4 Sec 4 4 Sec 4 6 Sec 4 5 Sec 3 8 Sec 9 8 Sec 4 4 Sec 4 4 Sec 4 4 Sec 5 9Sec 10 4Sec 10 4Sec 10 4 Sec 7 2 Sec 7 3 Sec 8 1 Sec 8 3 Sec 8 3 Sec 9 3 Sec 9 3 Comm Comm Comm Sec 6 3Sec 4 3Sec 4 3Sec 6 15Sec 5 11 Comm Sec 5 11 On...

Страница 126: ... display Log Login Error Communication FTP Mail WEB SNTP DHCP MODBUS Procedure Press the Pause Display soft key listed under FUNC Key Operations in this section The screen display will pause and an icon will appear in the status display section To unpause the display press any key other than the USER key If you are using a USB keyboard press any key besides the key corresponding to the USER key Ct...

Страница 127: ...NE GRID OFF Clears the fine grid EXPAND Enlarges one of the four panels in the 4 panel display MV2000 only AUTOZONE ON Displays trend waveforms separately by assigning each channel in the group its own display area zone AUTOZONE OFF Displays trends using the set range ALL CHANNEL Displays the waveforms of all channels GROUP CHANNEL Displays the waveforms of the channels registered to groups DIGITA...

Страница 128: ...T STOP Recording Measured Values and Displaying Waveforms on the Trend Display Press START STOP to start recording measured values and displaying waveforms on the trend display Press START STOP again to stop recording measured values and updating waveforms Writing Messages For details see section 6 4 Switching Display Groups Using the Arrow Keys Press the right arrow key to switch from group 1 to ...

Страница 129: ...y area but the scales current value marks and digital values of the channels are not displayed On the MV2010 MV2020 MV2030 MV2040 and MV2048 if the device is equipped with external input channels MC1 option all channel display is not possible with trend update rates of 15 s div or 30 s div AUTO ZONE Displays trend waveforms separately by evenly dividing display areas zones among a group s channels...

Страница 130: ...display method to use Conditions for Changing the Trend Update Rate When the displayed trend data type is Display or Event the trend update rate can be changed It cannot be changed when the displayed data type is E D Event Display The trend interval can be changed regardless of memory sampling conditions The trend update rate can be changed on the following kinds of displays A display with an open...

Страница 131: ...ed to an external storage medium For details see section 4 8 Procedure Displaying Previously Measured Data by Using the Display Selection Menu Perform this operation during memory sampling or when there is measured data 1 Press DISP ENTER to open the display selection menu 2 Select TREND HISTORY using the arrow keys and then press DISP ENTER The TREND HISTORY display appears Opening the Display Re...

Страница 132: ...to the specified display Returns to the display that was shown before the historical trend Adjusts the display span of the selected channel MESSAGE SUMMARY Displays the message summary in the loaded data file INFORMATION Displays the information of the loaded data file TREND HISTORY submenu MESSAGE DISP2 Switches to message display 2 MESSAGE DISP1 Switches to message display 1 SCALE ON Displays a ...

Страница 133: ...press the arrow key again to shift half a page and display the continuing data Use the up and down arrow keys on the vertical trend display Displayed Selecting What Portion of the Data to Display Perform the following operations to select what data to display Use the items in parenthesis if you are using vertical display 1 Press the up right arrow key At the top right of the display a complete dat...

Страница 134: ...e left down arrow key to move the frame that represents the portion of the data that will be displayed to the beginning of the complete data waveform Press the left down arrow key to move the frame beyond the edge of the waveform The message Overwrite old data will appear 3 Select Yes using the arrow keys and then press DISP ENTER The 4 MB worth of memory used for the display will be overwritten a...

Страница 135: ... the selected group s channels and displaying the waveforms of all channels that have been set to be recorded The waveforms of channels that are not registered to the group are displayed without any additional information in the waveform display area SCALE ON OFF Select whether or not to display the scale The scale s current value mark indicates the value at the cursor location MESSAGE DISP 1 MESS...

Страница 136: ...me when recording started stopped User name The name of the user that operated the MV This item is displayed if the login function was used Note If you display the measured data from an external storage medium the serial number displayed will be that of the MV that saved the data Historical Trend Background Color You can change the background color of the historical trend display For configuration...

Страница 137: ...ected with the cursor JUMP TO DIGITAL Switches to the digital display of the smallest group number that includes the channel selected with the cursor JUMP TO BAR Switches to the bar graph display of the smallest group number that includes the channel selected with the cursor JUMP TO ALM SUM Switches to the alarm summary CURSOR ON Displays the cursor CURSOR OFF Clears the cursor Not displayed with ...

Страница 138: ...submenu item with the up and down arrow keys To close the menu without changing the display press ESC INFORMATION submenu MODBUS CLIENT Displays the Modbus client status MODBUS MASTER Displays the Modbus master status RELAY Displays the relay status REPORT DATA Displays report data COLUMN BAR Displays the report in a stacked bar graph Section 5 6 ALARM SUMMARY Displays an alarm summary Section 5 7...

Страница 139: ...hat is greater than the current number by 10 Right arrow key Switch to the report number that is lower than the current number by 10 Note The display will not be updated while a report is displayed even if new report data is created You can update the display by performing one of the following operations Holding the left arrow key until the display is updated Pressing DISP ENTER and reselecting RE...

Страница 140: ...tions in this display Red ON Green OFF Modbus Status Display Displays a list of Modbus client or Modbus master command statuses For configuration instructions see the Communication Interface User s Manual IM MV1000 17E Communication conditions Status Command Communication destination MV channels 5 5 Displaying Various Information ...

Страница 141: ...AL GRAPH Displays two graphs Display name Switches to the specified display 4 Press DISP ENTER to change the display setting To close the menu without changing the display press ESC Changing Groups Selecting Bar Graphs and Moving the Cursor The amount of data that the up and down arrow keys scroll through depends on the type of report data For example with an hourly daily Hour Day report you can u...

Страница 142: ...rom two consecutive periods at the top and bottom of the display Channel number or tag name Numbers are abbreviated Display area 1 Display area 3 Display area 4 Display area 2 The data type shown in display areas 1 2 3 and 4 are determined based on the report type Report kind set in the report function Display areas 1 and 2 contain the same report data listed above for SINGLE GRAPH display Report ...

Страница 143: ...lays the sums of all channels at the cursor position Cursor Power Failure and Time Adjustment Indication Indicates a power failure Time adjustment is indicated by a C Power Failure A P indicates when a power failure occurred and a report was supposed to be filed A P also indicates when the MV recovered from a power failure and the next report was filed Time Adjustment When a time adjustment causes...

Страница 144: ...e overview display 4 Press DISP ENTER to change the display setting To close the menu without changing the display press ESC Moving the Cursor and Scrolling through Alarms Scrolls the alarm information up by half a page Moves the cursor up Scrolls the alarm information down by half a page Moves the cursor down Opening the Historical Trend of an Alarm Occurrence 1 Select the alarm with the cursor 2...

Страница 145: ...name Switches to the specified display Sort symbol Ascending sort Descending sort 4 Press DISP ENTER to change the display setting To close the menu without changing the display press ESC Moving the Cursor and Scrolling through Messages Scrolls the message list up by half a page Moves the cursor up Scrolls the message list down by half a page Moves the cursor down Opening the Historical Trend of t...

Страница 146: ...is indicated with a green mark 4 Press DISP ENTER to change the display setting To close the menu without changing the display press ESC Moving the Cursor and Scrolling through Memory Information Scrolls the memory information up by half a page Moves the cursor up Scrolls the memory information down by half a page Moves the cursor down Opening the Historical Trend of the Specified Data 1 Select th...

Страница 147: ... data and event data REPORT SAVE Saves all report data SELECT SAVE Saves the selected file 7 Use the up and down arrow keys to select SELECT SAVE ALL SAVE M SAMPLE SAVE or REPORT SAVE If you are using a CF card and USB flash memory the message Which media do you want save to appears Use the arrow keys to select which medium you want to save to and press DISP ENTER The measured data is saved ALL SA...

Страница 148: ...e structure is Specified character string_YYMMDD_HHMMSS The values of YY to SS are determined by the date and time of operation Save directory File list example You cannot save display or event data when it is being recorded The save operation simply copies the data in the internal memory It does not change the classification of data in the internal memory from unsaved to saved see section 1 5 Sav...

Страница 149: ... ERROR COMMUNICATION FTP MAIL WEB SNTP DHCP MODBUS 5 Press DISP ENTER The selected display appears Explanation LOGIN Log The log number of the last line and the total number of logs User name Operation method see the table below Operation see the table below Date and time Action Description Login Login Logout Logout NewTime Time adjustment while memory is stopped TimeChg Time adjustment through ke...

Страница 150: ...00 17E FTP Log File name FTP connection destination P Primary S Secondary Error message detail code Date and time For details see section 12 1 List of Messages Web Log Operation see the table on the next page Error code Requested operation see the table below Date and time For details see section 12 1 List of Messages Request Description Screen Screen switch Key Key operation Message Message assig...

Страница 151: ...lection Messages Written message character strings E mail Log Recipient mail address message Recipient 1 Recipient 1 2 Recipient 2 Error code E mail type see the table below Date and time For details see section 12 1 List of Messages Type Description Alarm Alarm e mail Time Scheduled e mail Report Report timeout mail Fail Power failure recovery e mail Full Memory full e mail Test Test e mail Error...

Страница 152: ...e For details see section 12 1 List of Messages Modbus Status Log Command number command type R Read W Write Communication status Communication type C Client M Master Date and time See the Communication Interface User s Manual IM MV1000 17E 5 10 Viewing an Operation History Log ...

Страница 153: ...to see Changing the 4 Panel Display Configuration Names on the next page for details Changing the 4 Panel Display Configurations Perform these operations while in the 4 panel display 1 Press DISP ENTER The title of one of the four displays will turn blue 2 Use the arrow keys to move to the display you want to change the display with the blue title is the selected display The selected area s headin...

Страница 154: ...section 6 17 6 Press DISP ENTER to view the single selected display To close the menu without expanding the display press ESC Changing the 4 Panel Display Configuration Names If you change a display configuration s name the new name will appear in the display selection menu Perform these operations while in the 4 panel display 1 Press FUNC to open the function menu 2 Press the 4Panel soft key to o...

Страница 155: ...ct On to use the group Group name Set the group name up to 16 characters A a 1 CH set Select measurement channels computation channels M1 and PM1 options and external input channels MC1 option that you want to assign to the group You can set up to 6 channels on the MV1000 and up to 10 channels on the MV2000 Enter channel numbers using two or three digits Separate each channel number with a period ...

Страница 156: ...ngs are pasted Trip line You can set lines at specified positions in the waveform display range of the trend display 1 2 3 and 4 Select On for the trip lines you want to display Position Set the position in the range of 0 to 100 of the display width Color The default colors for 1 2 3 and 4 are red green blue and yellow respectively To change a color select from the 24 available colors Width Set th...

Страница 157: ...nt Tag MV1000 Press MENU and then select Menu tab Meas channel Tag Memory Delay MV2000 Press MENU and then select Menu tab Meas channel Tag Memory sample Alarm delay Settings Operating environment Tag Channel Setting Description Tag Displays tags Channel numbers are displayed for channels that do not have tags set Channel Displays channel numbers First CH Last CH Select the target channels The set...

Страница 158: ...erval is switched For an explanation of these functions see section 1 4 Display Switching the Trend Interval and Writing a Message when using the secondary trend interval MV1000 Press MENU and then select Menu tab Basic setting mode Environment tab View Message MV2000 Press MENU and then select Menu tab Basic setting mode Environment tab View Message Input Alarm Second interval div MV1000 Press ME...

Страница 159: ...itched Trend Second interval div Select the time corresponding to a division of the time axis on the trend display from below You cannot set a trend interval that is faster than the scan interval 5s 10s 15s 30s 1min 2min 5min 10min 15min 20min 30min 1h 2h 4h 10h Available on high speed input models Available on high speed input models and on medium speed input models set to fast sampling mode If t...

Страница 160: ...ormal speed soft key The trend display update interval is changed A message appears on the trend display when the MV is configured to write a message Display example 10 53 1min div Note You can also switch the trend interval by using the event action function For event action configuration instructions see chapter 7 6 3 Setting the Secondary Trend Interval ...

Страница 161: ...how to write a message in the trend display Display Message Write Group MV1000 Press MENU and then select Menu tab Basic setting mode Environment tab View Message MV2000 Press MENU and then select Menu tab Basic setting mode Environment tab View Message Input Alarm Registering Messages Press MENU select the Menu tab Message ...

Страница 162: ...the spot Message Characters Set the message up to 32 characters A a 1 Procedure Writing a Message You cannot write a message when memory sampling has stopped 1 Display the group that you want to write a message to Even when Write group is set to Separate a message is written to all groups if the MV is showing a display unrelated to a group such as the overview display When the MV is showing a 4 pa...

Страница 163: ... a 1 6 Press DISP ENTER A message mark time and message appear on the trend display Writing an Add Message You can add a message to a previously measured data You can do this on a previously measured portion of a waveform that is currently being memory sampled 1 Carry out the procedure below to display the historical trend of the data that is currently being memory sampled Press DISP ENTER and sel...

Страница 164: ...or messages 11 to 100 are repetitions of the colors above Add Message The message timestamp is the time when the message was written It is not the timestamp at the data position Added message displayed in blue Message summary display example You can write up to 50 messages You cannot add messages to data in the internal memory that has been saved to a file or to data that has been loaded from an e...

Страница 165: ...o the trend and bar graph displays Display Press MENU and then select Menu tab Meas channel Color Settings Group of channel Select the target channels Color To change a color select from the following 24 colors Red green blue blue violet brown orange yellow green light blue violet gray lime cyan dark blue yellow light gray purple black pink light brown light green dark gray olive dark cyan and spr...

Страница 166: ... Zone Scale MV2000 Press MENU and then select Menu tab Meas channel Zone Scale Bar graph Settings First CH Last CH Select the target channels The settings selected here will be applied to these channels Zone Lower Zone Upper Set the zone where waveforms will be displayed Set Lower and Upper as percentages of the maximum display width Set Upper to a value greater than Lower and set the zone width U...

Страница 167: ...to display a scale on the trend display For an explanation of the trend display see section 1 4 Display Scale Division Scale Division MV1000 Press MENU and then select Menu tab Meas channel Zone Scale MV2000 Press MENU and then select Menu tab Meas channel Zone Scale Bar graph Scale Digit Value Indicator MV1000 Press MENU select Menu tab Display Trend ...

Страница 168: ...nels Position Select the scale display position on the trend display from 1 to 6 with the MV1000 or from 1 to 10 with the MV2000 Select Off to not display a scale Scale Division Select the number of main scale marks on the trend display from 4 to 12 and C10 C10 The scale is equally divided into 10 sections by main scale marks and scale values are indicated at 0 30 50 70 and 100 positions on the tr...

Страница 169: ...ale divisions 10 Number of scale divisions 11 Number of scale divisions 12 Number of scale divisions C10 Scale display position MV2000 10 9 8 7 6 5 4 3 2 1 Number of scale divisions 4 Number of scale divisions 5 Number of scale divisions 6 Number of scale divisions 7 Number of scale divisions 8 Number of scale divisions 9 Number of scale divisions 10 Number of scale divisions 11 Number of scale di...

Страница 170: ... Number of scale divisions 12 Number of scale divisions C10 Scale display position 1 2 3 4 5 6 7 8 9 10 Note If the scales of multiple channels are set to the same position the scale of the channel assigned to the group first is displayed Example If the channel assignment order to a group is 003 002 001 and the scale display position is set to 1 for all channels the scale of channel 3 is displayed...

Страница 171: ...e If the scale is 0 05 to 0 50 the lower limit will be 0 0 and the upper limit will be 0 5 If the integer part of either end of the scale is two or three digits the fractional part is truncated Example If the scale is 0 1 to 100 0 the lower limit will be 0 and the upper limit will be 100 If the integer part of either end of the scale is four or more digits the value is displayed using a 3 digit ma...

Страница 172: ...ge For an explanation of these functions see section 1 4 Display MV1000 Press MENU and then select Menu tab Meas channel Alarm mark or Color scale band MV2000 Press MENU and then select Menu tab Meas channel Alarm mark Color scale band Settings Alarm value mark Color scale band First CH Last CH Select the target channels All of the other settings selected here will be applied to these channels ...

Страница 173: ... mark Alarm mark color Alarm 1 Alarm 2 Alarm 3 and Alarm 4 If Mark kind is set to Fixed specify the alarm value mark colors Color scale band Displays a color band on the scale for a specified section of the measurement range These settings are shared with the bar graph display Color scale band Band area Setting Description In Displays a color band for the area inside the range Out Displays a color...

Страница 174: ...unction see section 1 4 Display Turning ON OFF the Partially Expanded Display Function MV1000 Press MENU and then select Menu tab Basic setting mode Environment tab View Message MV2000 Press MENU and then select Menu tab Basic setting mode Environment tab View Message Input Alarm Partially Expanded Display Settings Press MENU and then select Menu tab Meas channel Partial ...

Страница 175: ...ndary value between the reduced section and the expanded section from within the range of the minimum span value the smallest number expressible given the decimal place to the maximum span value the smallest number expressible given the decimal place For channels that are set to scaling the selectable range is the minimum scale value the smallest number expressible given the decimal place to the m...

Страница 176: ...b Display Trend MV2000 Press MENU and then select Menu tab Display Trend Bar graph LCD Monitor Settings Trend Direction Set the trend waveform display direction to Horizontal Vertical Wide or Split Trend Trend clear Setting Description On Clears the displayed waveforms when memory sampling starts Off Does not clear the displayed waveforms when memory sampling starts Trend Message direction Sets th...

Страница 177: ... Setting Description 4 to 12 Displays a grid that divides the display width into 4 to 12 sections Auto Displays the same number of grids as the number of scale divisions of the first assigned channel of a group Second interval See section 6 3 for details 6 10 Changing the Display Layout Clearing of the Waveform at Start Message Display Direction Waveform Line Width and Grid ...

Страница 178: ...n explanation of the bar graph display see section 1 4 Display Display Direction MV1000 Press MENU and then select Menu tab Display Bar graph MV2000 Press MENU and then select Menu tab Display Trend Bar graph LCD Monitor Base Position and the Number of Scale Divisions MV1000 Press MENU and then select Menu tab Meas channel Bar graph ...

Страница 179: ...lect the target channels All of the other settings selected here will be applied to these channels Bar graph Base position Set the base position of bar graphs to Normal Center Lower or Upper A description of how the MV displays bar graphs depending on this setting is given on the following pages This setting is applied to the bar graph display and to the bar that indicates the current value on the...

Страница 180: ...m of the bar graph Span lower limit or scale lower limit The value at the top of the bar graph Span upper limit or scale upper limit Starting point of the bar Bottom edge Upper The value at the bottom of the bar graph Same as with Lower The value at the top of the bar graph Same as with Lower Starting point of the bar Top edge Normal Center Lower Upper VS VL VS VL Vlower Vupper Vlower Vupper Vuppe...

Страница 181: ...Vlower Vlower Vupper Vlower Vupper Vupper Vlower Vupper Vlower Vupper Vlower Vupper Vupper Span upper limit or scale upper limit Vlower Span lower limit or scale lower limit Starting point of the bar Center Normal Upper Lower 0 0 100 0 0 0 100 0 0 0 100 0 0 0 100 0 Example When the input range s span lower limit is 0 0 and the span upper limit is 100 0 When Displaying a Bar That Indicates the Curr...

Страница 182: ...then select Menu tab Display Monitor MV2000 Press MENU and then select Menu tab Display Trend Bar graph LCD Monitor Settings Monitor Background Display Set the background color of the operation screen to White default setting or Black Monitor Background Historical trend Select the background color of the historical trend display from the following Settings White Black default setting Cream and Lig...

Страница 183: ...ntervals Display MV1000 Press MENU and then select Menu tab Display Monitor MV2000 Press MENU and then select Menu tab Display Trend Bar graph LCD Monitor Settings Monitor Scroll time Select a switching interval from 5 s to 1 min from the available choices The displayed group switches in ascending order Use the display selection menu to select whether or not to automatically switch the display See...

Страница 184: ...and then select Menu tab Display Trend Bar graph LCD Monitor Settings Monitor Jump default display The MV will return to a specified display if there is no key operation within a set time period Setting Description 1min to 1h The time interval for switching the display Off Disables this function Procedure Specifying the Display 1 Switch to the operation screen that you want to register 2 In Operat...

Страница 185: ...t Favorite if you want to register favorite displays and switch to them HISTORY key action Group display Setting Description Current Displays a favorite display in the current group Saved Displays a favorite display in the group that was selected when you registered the favorite display HISTORY key action Time axis zoom Setting Description Current Displays a favorite display at the current time ax...

Страница 186: ...stration press the Delete soft key 5 Enter the display name up to 16 characters A a 1 6 Press DISP ENTER The display is registered Switching the Display Press the HISTORY key to switch the displays in the order of their registration Pressing the history key after switching to the last registered display will switch the display back to the original display 6 15 Registering Favorite Displays ...

Страница 187: ...ing memory sampling Display Power Recovery Message MV1000 Press MENU and then select Menu tab Basic setting mode Environment tab View Message MV2000 Press MENU and then select Menu tab Basic setting mode Environment tab View Message Input Alarm Settings Message Power fail message Setting Description On Automatically writes a message when the MV recovers from a power failure that occurs during memo...

Страница 188: ...layed when you press the FUNC key and the display selection menu which is displayed when you press the DISP ENTER key Display Function Menu Press MENU and then select Menu tab Menu customize Function menu Number indicating the display order Menu name White Used Gray Not used Display Selection Menu Press MENU and select Menu tab Menu customize Display menu Separator ...

Страница 189: ...nation 4 Press the Transfer soft key The menu item moves to the selected number position Description of the Function Menu Items For a description of each item see the respective section Sec 5 1 Sec 6 4 Sec 6 4 Sec 4 4 Sec 4 6 Sec 4 10 Sec 4 5 Sec 3 8 Sec 9 8 Sec 4 4 Sec 4 4 Sec 4 4 Sec 5 9 Sec 10 4 Sec 10 4 Sec 10 4 Sec 7 2 Sec 7 3 Sec 8 1 Sec 8 3 Sec 8 3 Sec 6 3 Sec 4 3 Sec 4 3 Sec 6 15 Sec 5 11 ...

Страница 190: ...erisk are set to Hide by default Display Selection Menu Submenu Reference Section Trend GROUP 1 to GROUP 101 GROUP 362 Section 5 2 6 12 ALL CHANNEL GROUP CHANNEL Section 5 2 6 13 AUTO ZONE ON OFF Section 5 2 SCALE ON OFF Section 5 2 6 12 FINE GRID ON OFF Section 5 2 DIGITAL ON OFF Section 5 2 6 12 MESSAGE DISP 1 2 Section 5 2 TREND SPACE ON OFF Sections 5 2 and 6 12 AUTO SCROLL ON OFF Sections 5 2...

Страница 191: ...MODE Section 5 9 SELECT SAVE Section 5 9 M SAMPLE SAVE Section 5 9 REPORT SAVE Section 5 9 ALL SAVE Section 5 9 CHANGE DISP ITEM Section 5 8 CHANGE DATA KIND Section 5 9 FILENAME TIME DISPLAY Section 5 9 CHANGE REPORT CH Section 5 5 DUAL SINGLE GRAPH Section 5 6 SELECT COLUMN Section 5 6 REPORT GROUP1 to REPORT GROUP41 REPORT GROUP62 Section 5 6 EXPAND2 Section 5 11 LOG LOGIN Section 5 10 ERROR Se...

Страница 192: ...te Select a remote control input terminal number Relay Select an alarm output relay number Switch Select an internal switch number Timer Select a timer number Match T A match time timer Select a match timer number Alarm UserKey Action An action that is executed when an event occurs Setting Description MV1000 MV2000 Memory Memory Memory start stop Start Start Memory start Stop Stop Memory stop Trig...

Страница 193: ...Rate1 2 DisplayRate1 2 A display rate switch You can specify this when trend interval switching is enabled ManualSample ManualSample TimerReset TimerReset A relative time timer reset You cannot specify this when the event is set to Timer Group DisplayGroupChange A display group switch Specify the number of the group you want to display Flag Flag A M1 or PM1 option PanelLoad PanelLoad You can only ...

Страница 194: ...nnot change these settings during memory sampling or computation Timer No You can set four timers 1 to 4 When Using a Relative Timer Mode Select Relative Interval Set the interval in the range of 00 01 1 minute to 24 00 24 hours Reset at Math Start On Resets the timer when computation is started The resetting of the timer is not considered a timeout Even if the timer is used as an event the action...

Страница 195: ...t you want to reset Select All to reset all timers The relative timer is reset Explanation Resetting a Relative Timer Restart the timer The resetting of the timer is considered a timeout If the timer is used as an event the action is executed If the timer is used in TLOG computation M1 and PM1 options and MathReset is specified the computed result is reset 7 2 Setting Timers ...

Страница 196: ...Setting Description Day Sets the time match condition for a day Week Sets the time match condition for a week Month Sets the time match condition for a month Year Sets the time match condition for a year Set the items with check marks in the following table according to the Kind setting Settings Kind Day Week Month Year Month ü Day ü ü Day of the week ü Hour Minute ü ü ü ü Month Set the month Day ...

Страница 197: ...xplanation Resetting a Match Time Timer A match time timer becomes inactive after it times out You can reset an inactive match time timer to activate it again The resetting of the timer is not considered a timeout Resetting of a timer affects a match time timer whose time action is set to Single If the timer is used in TLOG computation M1 and PM1 options and MathReset is specified the computed res...

Страница 198: ...sing the Remote Control Function R1 option and the USER Key You can use the event action function to set remote control and USER key inputs as events that will trigger actions For event action configuration instructions see section 7 1 For a configuration example see appendix 2 ...

Страница 199: ...lay or Internal Switch You can use the event action function to set alarms output relays or internal switches as events that will trigger actions For event action configuration instructions see section 7 1 For a configuration example see appendix 2 ...

Страница 200: ... this function see section 1 8 Display Selecting the Key Lock Function MV1000 Press MENU and then select Menu tab Basic setting mode Environment tab Security Media save MV2000 Press MENU and then select Menu tab Basic setting mode Environment tab Security Media save Batch Disabling Keys MV1000 Press MENU and then select Menu tab Basic setting mode Menu tab Keylock Password Key action Media or Acti...

Страница 201: ...appears in the Basic Setting Mode menu Login Enables the login function See section 8 2 for details Password The password used to release the key lock Up to eight characters A a 1 The MV displays for the password Key action External Media and Action of Function Select whether or not to lock each item Setting Description Free Does not lock the item Lock Locks the item 8 1 Disabling the Keys key loc...

Страница 202: ...function is enabled The key lock icon appears in the status display section Releasing the Key Lock Function 1 In Operation Mode press FUNC The function menu appears 2 Press the Keylock soft key A window prompting for the password opens 3 Enter the password and press DISP ENTER The key lock is released The key lock icon disappears from the status display section 8 1 Disabling the Keys key lock func...

Страница 203: ... MV For an explanation of this function see section 1 8 Display Login Function MV1000 Press MENU and then select Menu tab Basic setting mode Environment tab Security Media save MV2000 Press MENU and then select Menu tab Basic setting mode Environment tab Security Media save Batch Logout Method Press MENU and then select Menu tab Basic setting mode Menu tab Login Basic settings ...

Страница 204: ...nu tab Login Admin settings Registering a User user level user Press MENU and then select Menu tab Basic setting mode Menu tab Login User settings User Privileges MV1000 Press MENU and then select Menu tab Basic setting mode Menu tab Login Authority of user Key action Media or Action of Function 8 2 Allowing Only Registered Users to Operate the MV login function ...

Страница 205: ...ia a communication interface The Login item appears in the Basic Setting Mode menu Off Disables security features User basic settings Auto logout Setting Description Off Does not log out until you manually log out 1min to 10min Automatically logs out when there is no key operation for a specified time User basic settings Operation without login Sets the operations that a user can carry out when lo...

Страница 206: ... you set a password the MV displays a string of asterisks You cannot register quit or a password containing only spaces User number You can register up to 30 users User number Mode The available settings vary depending on the Security setting Setting Description Off No registration Key Allows login through keys Comm Allows login through a communication interface Web Allows login to the MV monitor ...

Страница 207: ... press DISP ENTER A window opens for you to enter the password 3 Enter the password and press DISP ENTER The MV is ready for key operation The status display section shows the logged in user name The password that you enter appears as a string of asterisks Logging Out Logging Out Using Keys 1 In Operation Mode press FUNC The function menu appears 2 Press the Logout soft key The MV logs you out The...

Страница 208: ...Password change soft key A window prompting for the current password opens 3 Enter the current password and press DISP ENTER A window prompting for a new password opens 4 Enter a new password and press DISP ENTER A window opens for re entering the new password 5 Enter the new password and press DISP ENTER The window closes and the new password is activated 8 3 Logging in and Logging Out ...

Страница 209: ... Date and Time Press MENU and then select Menu tab Date Time Settings Time set Enter the date and time and press DISP ENTER Configuring Daylight Saving Time Display DST Press MENU and then select Menu tab Date Time Daylight Saving Time Settings Use Not To enable the DST function select Use Start time Specify the date time to switch from standard time to DST Set the month the nth week the day of th...

Страница 210: ... minute A negative value indicates that the local time is behind GMT Example The standard time in Japan is ahead of GMT by 9 hours In this case enter 900 Time settings Time deviation limit Time deviation limit Current time Specified time When the time deviation between the time on the MV and the specified time is within the value specified here the time on the MV is gradually corrected Otherwise t...

Страница 211: ... M Y 23 01 2008 23 01 07 D M Y 23 01 2008 23 01 07 Only when the trend interval is set to a value greater than or equal to 1h div Where the Date Format Setting Applies The date format is applied to the date shown on the display It does not affect the date format on the date time configuration screen the date in the output data transmitted via a communication interface the date information saved al...

Страница 212: ...on the display and in data files saved to text format Display Press MENU and then select Menu tab Basic setting mode Environment tab Operating environment Settings Temperature Select the temperature unit This setting affects all temperature measurement channels Setting Description C For Celsius F For Fahrenheit Decimal Point Type Setting Display Example Point 1234 56 Comma 1234 56 ...

Страница 213: ...twork Information 1 In Operation Mode press FUNC The function menu appears 2 Press the Network info soft key The network information is displayed Explanation System Information Screen ANALOG Number of measurement channels C denotes the clamped input terminals H2 option MATH Number of math channels M1 and PM1 options EXTCH Number of external input channels MC1 option MEMORY Internal memory size OPT...

Страница 214: ...ection explains how to select the displayed language Display Press MENU and then select Menu tab Basic setting mode Environment tab Operating environment Settings Operating environment Language Set the language to English Japanese German French Chinese or Korean ...

Страница 215: ...ption Clear settings and data Initializes the settings in Basic Setting Mode and Setting Mode to their default values and clears the data in the internal memory Clear data only Clears the data in the internal memory Data in the Internal Memory That Is Cleared Display data event data manually sampled data report data M1 and PM1 options and log information Procedure 1 Select Clear settings and data ...

Страница 216: ...u tab Status relay Settings Memory Media status On Transmits the internal memory and CF card statuses to a relay Measurement error On Transmits a relay signal when a measurement error occurs Communication error On Transmits a relay signal when a communication error occurs Memory stop On Outputs a relay signal when memory sampling is stopped Procedure FAIL Output No settings or operations are requi...

Страница 217: ...cted appears on the screen and the keyboard is ready for use Front panel USB port Rear panel USB port Removing the Keyboard Remove the keyboard connector from the MV USB port Note You can connect or remove a keyboard regardless of the MV condition power ON OFF or displayed screen You can connect one keyboard to the MV Use a keyboard appropriate for the MV language setting The CapsLock and NumLock ...

Страница 218: ... item or Shift Tab to move to the previous item This does not work in the following screens Operation screens the Setting mode and Basic setting mode menus screens for entering values and characters the Menu customize and Save Load screens in Setting mode and the Load setting Initialize screen in Basic setting mode Entering Alphabetical Characters Numbers and Symbols When alphabetical characters n...

Страница 219: ...LCD backlight Display MV1000 Press MENU and then select Menu tab Display LCD MV2000 Press MENU and select Menu tab Display Trend Bar graph LCD Monitor Settings Brightness The larger the value the brighter the display becomes Setting Model 1 to 8 MV1000 1 to 6 MV2000 Backlight saver Mode Setting Description Off Disables the backlight saver Dimmer Dims the display if there is no operation for a give...

Страница 220: ...e backlight is dimmed or turned OFF by the backlight saver function pressing any key on the MV will cause the backlight to return to the original brightness In this instance the key does not perform its intended function A higher brightness level tends to lead to faster screen discoloration yellowing and brightness degradation Avoid extended use at an unnecessarily high setting We also recommend t...

Страница 221: ...u cannot set expressions or constants during memory sampling or computation For an explanation of these functions see section 1 9 Display Expressions and Alarms Press MENU and then select Menu tab Math channel Expression Alarm Constants Used in Expressions Press MENU and then select Menu tab Math channel Constant Computation Channel Tag Memory Sampling On Off Alarm Delay MV1000 Press MENU and then...

Страница 222: ...el TLOG Rolling average Computation Error Display Overflow Data Handling in Statistical Computation MV1000 Press MENU and then select Menu tab Basic setting mode Environment tab Math MV2000 Press MENU and then select Menu tab Basic setting mode Environment tab Math Report 10 1 Configuring Computation Channels ...

Страница 223: ... Press the Input soft key to open a window for entering an expression Press the M1 M2 soft key to switch between a screen used to enter values and characters and a screen used to enter operators and functions Use soft keys arrow keys and DISP ENTER to enter an expression MV2000 Press the Input soft key to open a window used to enter an expression Note You cannot simultaneously use a USB keyboard a...

Страница 224: ...e tag name up to 16 characters A a 1 Constant Number of constant Select the constant K01 to K60 you want to set Value The selectable range is as follows 9 9999E 29 to 1 0000E 30 0 1 0000E 30 to 9 9999E 29 The number of significant digits for constants is five If you are setting a constant in exponential notation use up to five digits for the mantissa and up to two digits for the exponent TLOG Time...

Страница 225: ...ted data exceeds the upper or lower limit the data is clipped at the upper or lower limit and the rolling average is computed The upper and lower limits are 100000000 ignoring the decimal point The decimal place is the same as that of the span lower limit Memory sample On Off Select On to record the computed data of the target channels Math Value on Error Specify whether to display a computation e...

Страница 226: ... MIN CLOG AVE CLOG SUM CLOG P P Special computations and conditional expressions PRE HOLD RESET CARRY a b c Power Logical negation NOT Multiplication and division Addition and subtraction Greater than and less than GT LT GE LE Equal and not equal EQ NE Logical product AND Logical sum and exclusive logical sum OR XOR Low order of precedence Limitations Expressions have these limitations Expression ...

Страница 227: ...hm LN 001 Determines the natural logarithm of the measured value of channel 1 Exponent EXP 001 Determines e to the power of the measured value of channel 1 Relational Computation Expression Example 002 LT 003 If the measured value of channel 2 is less than the measured value of channel 3 the computed result is 1 Otherwise the result is zero 002 GT 003 If the measured value of channel 2 is greater ...

Страница 228: ... both zero the computed result is zero Otherwise it is 1 Explanation e1 0 e2 0 e1ORe2 0 e1 0 e2 0 e1ORe2 1 e1 0 e2 0 e1ORe2 1 e1 0 e2 0 e1ORe2 1 XOR Exclusive OR Syntax e1XORe2 Condition If the two data values e1 and e2 are zero and nonzero or nonzero and zero the computed result is 1 Otherwise it is zero Explanation e1 0 e2 0 e1XORe2 0 e1 0 e2 0 e1XORe2 1 e1 0 e2 0 e1XORe2 1 e1 0 e2 0 e1XORe2 0 N...

Страница 229: ...l e1 TLOG MIN Minimum value Syntax TLOG MIN e1 Condition Determines the minimum value of channel e1 TLOG AVE Average value Syntax TLOG AVE e1 Condition Determines the average value of channel e1 TLOG SUM Sum value Syntax TLOG SUM e1 Condition Determines the sum of channel e1 TLOG P P Maximum minimum value Syntax TLOG P P e1 Condition Determines the maximum minimum value of channel e1 Expression Ex...

Страница 230: ... time from channels e1 e2 e4 e5 and e6 CLOG MIN Minimum value Syntax CLOG MIN e1 e2 e5 e7 Condition Returns the minimum measured data value at a given point in time from channels e1 e2 e5 and e7 CLOG AVE Average value Syntax CLOG AVE e1 e6 Condition Returns the average of the measured data values of channels e1 to e6 at a given point in time CLOG P P Maximum minimum value Syntax CLOG P P e1 e2 e5 ...

Страница 231: ...reshold value Expression Example Expression that sums the values of channel 1 and resets the value when it reaches or exceeds 10000 K01 10000 CARRY K01 TLOG SUM 001 Examples of Invalid Expressions 002 HOLD K01 TLOS SUM 001 HOLD is not at the beginning of the expression RESET 101 GT K01 TLOG SUM 001 RESET 101 GT K01 002 Reason RESET appears twice in one expression Conditional Expression a b c Synta...

Страница 232: ...nnels For an explanation of these functions see section 1 9 Display Color Press MENU and then select Menu tab Math channel Color Showing the Zone Display Scale Display and Bar Graph display MV1000 Press MENU and then select Menu tab Math channel Zone Scale or Bar graph MV2000 Press MENU and then select Menu tab Math channel Zone Scale Bar graph ...

Страница 233: ...nel Partial The Partial command appears in the menu if you set Partial to On in Basic Setting Mode For configuration instructions see section 6 9 Alarm Mark and Color Scale Band MV1000 Press MENU and then select Menu tab Math channel Alarm mark or Color scale band MV2000 Press MENU and then select Menu tab Math channel Alarm mark Color scale band 10 3 Displaying Computation Channels ...

Страница 234: ...channel range Color See section 6 5 for details Zone See section 6 6 for details Partial See section 6 9 for details Bar graph See section 6 11 for details Scale See section 6 7 for details Alarm Mark and Color Scale Band See section 6 8 for details 10 3 Displaying Computation Channels ...

Страница 235: ...utation when the START STOP key is pressed Reset Start Starts computation when the START STOP key is pressed and resets the computed result up to that point Procedure Starting Computation Starting Computation and Memory Sampling at the Same Time Press START STOP Computation starts at the same time as memory sampling The computation icon appears in the status display section Math start must be set ...

Страница 236: ...ation is in progress 1 In Operation Mode press FUNC The function menu appears 2 Press the Math reset soft key The computed results of all computation channels are reset Releasing the Computation Data Dropout Display You can carry out this operation when a computation data dropout occurs When a computation data dropout occurs the computation icon turns yellow 1 In Operation Mode press FUNC The func...

Страница 237: ...neration For an explanation of these functions see section 1 9 Display Report Computation Type MV1000 Press MENU and then select Menu tab Basic setting mode Environment tab Report MV2000 Press MENU and then select Menu tab Basic setting mode Environment tab Math Report Report Type and Time of Generation Press MENU and select Menu tab Basic setting mode Menu tab Report Basic settings ...

Страница 238: ...uts the instantaneous value Report File type Set this item to generate two types of reports such as daily and monthly reports Setting Description Separate Saves each type of report to a separate file Combine Saves two types of report data to a single file Overflow Data Handling Overflow data is handled in the same way as it is in statistical computations TLOG and CLOG See section 10 1 for details ...

Страница 239: ... CH Channel Set the channel to be assigned to the report channel All channels can be assigned but reports are not generated for channels set to Skip or Off even if they are assigned In a stacked bar graph display see section 5 6 for details the MV shows report data for each group indicated below However the MV displays only channels with the same unit as the first channel in the group Report Group...

Страница 240: ...on MV2000 medium speed input models With communication functions you can load data from other devices and display and save the loaded data on the MV Display Configuring the Input Press MENU and then select Menu tab Basic setting mode Menu tab Communication Ethernet or Communication Serial Modbus client or Modbus master Command settings Input Range and Alarm Press MENU and then select Menu tab Ext ...

Страница 241: ... channels Ext range Span Lower Span Upper The measurement range Selectable range of values 30000 to 30000 Decimal place Up to four fractional digits Ext range Unit Set the unit up to six characters A a 1 Ext alarm The available alarm types are high limit alarm low limit alarm delay high limit alarm and delay low limit alarm The range of alarm values is as follows Type Alarm Values Example of Alarm...

Страница 242: ... 7 8 9 10 11 12 13 App Index Alarm delay Time For instructions on how to set the alarm delay see section 3 7 Tag For information on how to set the tag name see section 6 2 Memory sample On Off Select On for the target channels 11 1 Configuring External Input Channels ...

Страница 243: ... to groups and display them just like measurement channels See chapter 6 for details Display Channel Display Color Press MENU and then select Menu tab Ext channel Color Showing the Zone Display Scale Display and Bar Graph display Press MENU and then select Menu tab Ext channel Zone Scale Bar graph ...

Страница 244: ...nnels Partially Expanded Display Press MENU and then select Menu tab Ext channel Partial The Partial command appears in the menu if you set Partial to On in Basic Setting Mode For configuration instructions see section 6 9 Alarm Mark and Color Scale Band Press MENU and then select Menu tab Ext channel Alarm mark Color scale band ...

Страница 245: ...elect the target channels Channel numbers are from 201 to 440 Color See section 6 5 Zone See section 6 6 Partial See section 6 9 Bar Graph See section 6 11 Scale See section 6 7 Alarm Mark and Color Scale Band See section 6 8 11 2 Displaying External Input Channels ...

Страница 246: ... value See section 3 3 23 The upper and lower scale limits are equal Cannot be set to the same value See section 3 3 24 The lower limit of the span band is greater than the upper limit Set the lower limit less than the upper limit See section 3 3 25 The lower limit of the scale band is greater than the upper limit Set the lower limit less than the upper limit See section 3 3 30 The partial boundar...

Страница 247: ...me See section 8 2 81 All space or quit string cannot be specified Change the character string See section 8 2 84 The login password has not been set up Set a password See section 8 2 85 The login password is incorrect Check the password If you lost the password ask your administrator to reset it See sections 8 2 and 8 3 86 The key lock release password is incorrect Check the password If you lost ...

Страница 248: ...t Set the MV IP address Section 2 2 in the communication manual 131 You have exceeded the available channel capacity You cannot connect more than 240 channels Section 2 9 in the communication manual 132 You have exceeded the available number of commands The maximum number of commands that can be sent is 16 The modules that can be set with a single command are consecutive modules that can be automa...

Страница 249: ...not accepted because message limit was reached The limit is 50 messages See section 6 4 155 The message is not written while sampling is stopped Start memory sampling and then execute See section 4 4 156 There are no channels to be saved to the memory Set the channels to be saved See sections 4 1 and 10 1 157 This function is not possible at this time If the data type to be recorded is set to E D ...

Страница 250: ...ch data is being added Tried to save a file which does not exists in the internal memory 215 Exceeded the allowable number of directories or files Replace with another storage medium Delete unneeded files and directories See section 4 7 216 The file or directory name is incorrect Use alphanumeric characters See section 4 2 217 Unknown file type Check the extension See section 13 3 218 This directo...

Страница 251: ...ork failure cable problems duplicate addresses network device failure and so on occurs in the middle of the e mail transmission 266 Ethernet cable is not connected Check the cable connection Section 2 2 in the communication manual 267 Could not connect to SMTP server Check to see that the SMTP server is connected to the network If the SMTP server name is specified using an IP address check to see ...

Страница 252: ...rror 1 PRIORITY Internal processing error 1 NVRAM Internal processing error 1 282 FTP control connection error Further details are provided by the character string that appears after error code 282 Character String and Details HOSTNAME Failed the DNS lookup search the IP address corresponding to the host name Check the DNS setting and the destination host name TCPIP Internal processing error 1 UNR...

Страница 253: ...de CWD Failed to change the directory Check the initial path setting PORT Failed to set the transfer connection Check that the security function is disabled PASV Failed to set the transfer connection Check that the server supports PASV commands SCAN Failed to read the transfer connection settings Check that proper response to the PASV command is received from the server 284 FTP transfer setting er...

Страница 254: ...tring and Details DORMANT Internal processing error 1 LINK Data link is disconnected Check the cable connection 291 SNTP server does not respond Further details are provided by the character string that appears after error code 291 Character String and Details TIMEOUT Check that the server is running 2 292 Incorrect SNTP server setting Further details are provided by the character string that appe...

Страница 255: ...VFAIL No response from the DHCP server ERENEWED Address renewal rejected EEXTENDED Address lease extension rejected EEXPIRED Address lease period expired 297 Registration of the hostname to the DNS server failed Further details are provided by the character string that appears after error code 297 Character String and Details INTERNAL Failed to register the host name transmission error reception t...

Страница 256: ...name exists YXRRSET Failed to delete the host name RR set exists NXRRSET Failed to delete the host name RR set does not exist NOTAUTH Failed to delete the host name not authoritative for zone NOTZONE Failed to delete the host name different from zone section NOTLINKED 4Physical layer was disconnected when removing the host name 1 Contact your nearest YOKOGAWA dealer 2 These errors may occur if the...

Страница 257: ...e enumerated with sub delimiter 350 Command is not permitted to the current user level 351 This command cannot be specified in the current mode 352 The option is not installed 353 This command cannot be specified in the current setting 354 This command is not available during sampling or calculating Memory Access Errors during Setting and Basic Setting Modes and Output Communication Command Execut...

Страница 258: ... Failed to disconnect 397 No TCP control block 398 Format error Other Communication Errors An English error message is returned via the communication interface It is not displayed on the screen Code Message 400 Input username 401 Input password 402 Select username from admin or user 403 Login incorrect try again 404 No more login at the specified level is acceptable 410 Login successful The specia...

Страница 259: ...ocess in progress 514 Now loading historical data 515 Data save is completed 516 Files are now being sorted 520 Connecting to the line 521 The data file is being transferred 530 Media can be removed safely 531 Media was removed compulsorily 532 USB device has been connected 533 USB device cannot be recognized 534 There was no data which is not saved to media 535 Media was recognized 536 Media is n...

Страница 260: ... Address release extension request complete RELEASED Address release complete 565 IP address was set Further details are provided by the character string that appears after error code 565 Character String and Details IPCONFIG Assigned the IP address 566 It is a setting that doesn t register hostname to the DNS server Further details are provided by the character string that appears after error cod...

Страница 261: ...ng is required when a system error occurs If this happens contact your nearest YOKOGAWA dealer for repairs Code Message 901 ROM failure 902 RAM failure 910 A D memory failure for all input channels 911 Channel 1 A D memory failure 912 Channel 2 A D memory failure 913 Channel 3 A D memory failure 914 Channel 4 A D memory failure 921 Channel 1 A D calibration value error 922 Channel 2 A D calibratio...

Страница 262: ...y NO NO NO YES YES YES Does not function at all nothing is displayed Is the power switch turned ON Does the switch work properly Connect the power supply properly Make sure that the power is turned ON properly Contact your nearest YOKOGAWA dealer to have your MV serviced Section 2 2 Section 2 2 F S G F S G First Step Guide Use a power supply of the specified voltage and frequency ...

Страница 263: ... the environmental temperature constant TC input Separate the input wiring from the noise source Ground the recorder Ground the measured object Insulate the TC from the measured object Use shielded cables for input Change the integration time of the input A D converter section 3 1 Use the moving average of the input section 3 4 Wire correctly Section 2 3 Install the terminal block correctly Fasten...

Страница 264: ... surge suppressor in the line Contact your nearest YOKOGAWA dealer to have your MV serviced Display and other functions do not work properly Are all of the typical conditions for displaying the item satisfied NO YES Make sure that the menu item is set to be displayed using the customize menu function If the item is not set to be displayed then set it to be displayed see section 6 17 Confirm that t...

Страница 265: ...king order Perform the following checks and replace worn parts as needed Is the display and storage functioning properly If not see section 12 2 Troubleshooting Has the brightness of the LCD backlight deteriorated If replacement is necessary see section 12 5 Recommended Replacement Periods for Worn Parts ...

Страница 266: ...05 C For information on purchasing the calibration instruments contact your nearest YOKOGAWA dealer Calibration Procedure 1 Wire the MV and the calibration instrument as shown in the following figure and adequately warm up the instruments the warm up time of the MV is at least 30 minutes 2 Check that the operating environment such as ambient temperature and humidity is within the standard operatin...

Страница 267: ...e MV is generally at room temperature the actual output of the thermocouple is different from the values given on the thermoelectromotive force table based on 0 C The MV performs compensation by measuring the temperature at the input terminal and adding the corresponding thermoelectromotive force to the actual output of the thermocouple Therefore when the measurement terminal is shorted equivalent...

Страница 268: ...odel Replacement period when used at the upper limit of the normal operating temperature 40 C The replacement period varies depending on the operating temperature and the MV specifications If the operating temperature is 30 C it may be possible to use the part for more than 10 years MV2000 Item Replacement Period Name Quantity Used Notes LCD 5 years Bezel Assembly 1 Battery 10 years Battery Assemb...

Страница 269: ...1 5V 1 5 V6 0 800 to 5 200 V Thermocouple R1 0 0 to 1760 0 C S1 0 0 to 1760 0 C B1 0 0 to 1820 0 C K1 200 0 to 1370 0 C E1 200 0 to 800 0 C J1 200 0 to 1100 0 C T1 200 0 to 400 0 C N1 0 0 to 1300 0 C W2 0 0 to 2315 0 C L3 200 0 to 900 0 C U3 200 0 to 400 0 C WRe4 0 0 to 2400 0 C RTD Pt Pt100 5 200 0 to 600 0 C JPt JPt100 5 200 0 to 550 0 C DI Voltage 0 Less than 2 4 V 1 2 4 V or higher judged at t...

Страница 270: ...to the span lower limit Range out detection Same as linear scaling In fast sampling mode the MV cannot detect burnouts on all measurement channels within a scan interval The MV may not detect a burnout for the following number of measurements if measurement is started in a burnout condition or after a burnout condition occurs MV1004 MV1008 MV2008 a maximum of four measurements MV1006 MV1012 MV1024...

Страница 271: ... min 30 min 1 h 2 h 4 h 10 h div Switchable to the secondary trend interval Scale Displays a scale for each channel Current value bar graph color scale band and alarm value marks can be displayed on the scale Miscellaneous Grid divisions 4 to 12 trip line line width 1 2 or 3 dots message zone display partially expanded display auto zone display Digital display Displays measured values numerically ...

Страница 272: ...isplays the login log error log communication log FTP log Web log e mail log SNTP log DHCP log and Modbus status log 4 panel display only with the MV2000 Divides the display into quadrants and shows four different display formats Four display combinations can be registered Display pause You can pause the display using keys Other Displayed Information Item Specifications Tag display Up to 16 alphan...

Страница 273: ...ls available options remote controller ID MAC address firmware version and internal memory capacity Network information display Displays the MV network configuration information Display selection menu customization You can show hide and change the positions of each item in the display selection menu and submenus You can insert or delete separators Function menu customization You can show hide and ...

Страница 274: ...ct from 5 s 10 s 15 s 30 s 1 min 2 min 5 min 10 min 15 min 20 min 30 min 1 h 2 h 4 h 10 h div MV1006 MV1012 MV1024 MV2010 MV2020 MV2030 MV2040 MV2048 Select from 15 s only for fast sampling mode 30 s 1 min 2 min 5 min 10 min 15 min 20 min 30 min 1 h 2 h 4 h 10 h div Contents The maximum and minimum values within the data update interval among the data values sampled at the scan interval Data size ...

Страница 275: ...a sampling operation at a specified time Set by Data length Manually sampled data When you execute manual sampling Report data When reports are generated Auto saving operation Select save data only if there is sufficient free space on the CF card or constantly retain the most recent data files in the CF card media FIFO File name Select from serial number user assigned string date sequence number u...

Страница 276: ...Item Specifications Clock With a calendar function Accuracy 10 ppm excluding a delay of 1 second maximum that results each time the power is turned ON Time setting Using key operation communication command event action function or SNTP client function Time adjustment method While memory sampling Corrects the time by 40 ms for each second Limit by which the time is gradually adjusted Select from th...

Страница 277: ...r Operate set and transmit data from the MV using a dedicated protocol Maintenance test server Transmits connection information and network information Instrument information server Transmits the connected MV information serial number model name etc Batch Function Item Specifications Function Data management using batch names You can enter text fields and batch comments in the data file Batch name...

Страница 278: ...col or Modbus protocol Synchronization Start stop synchronization Transmission mode RS 422 485 Four wire half duplex multi drop connection 1 N N 1 to 32 Data rate 1200 2400 4800 9600 19200 or 38400 bps Data length 7 or 8 bits Stop bit 1 bit Parity Odd even or none Handshaking Off Off XON XON XON RS and CS RS Communication distance RS 422 485 1200 m Modbus communication Operation modes Master or sl...

Страница 279: ...ls Data saving Same as the measurement channels Report function Number of report channels same as the number of computation channels Operations Average maximum minimum sum instantaneous value Report types Hourly daily hourly daily daily weekly daily monthly Cu10 Cu25 RTD Input Three Wire Isolated RTD Input N1 Item Specifications Function In addition to the standard input the MV can also receive Cu...

Страница 280: ... rdg 15 0 C 0 9 of rdg 6 0 C 0 9 of rdg 3 0 C 0 5 of rdg 3 5 C 30 0 C 0 4 of rdg 4 0 C 0 5 of rdg 7 0 C 0 6 of rdg 3 0 C 0 3 of rdg 2 0 C 0 3 of rdg 2 0 C 0 3 of rdg 2 0 C Within 9 0 K Within 3 0 K 0 3 of rdg 4 0 C 0 4 of rdg 5 0 C 0 3 of rdg 3 0 C 0 1 K 0 1 C 0 1 K 0 1 C A D integration time 16 7 ms or more A D integration time 1 67 ms Input source resistance Thermocouple input 2 kΩ or less RTD i...

Страница 281: ...or less sink current 30 mA or more leakage current when OFF 0 25 mA or less Counting Counts the rising edges of pulses For voltage free contact input Contact open to contact close For open collector The H terminal voltage level changing from high to low Allowable input voltage 30 VDC Max sampling pulse period 100 Hz Minimum detected pulse width 5 ms or more for both low closed and high open Pulse ...

Страница 282: ...r supply frequency 50 Hz 2 60 Hz 2 Ambient temperature 0 to 40 C 10 to 40 C Rechargeable battery model power supply suffix code is 3 Ambient humidity 20 to 80 RH at 5 to 40 C Vibration 10 to 60 Hz 0 2 m s2 Shock Not allowed Magnetic field 400 A m or less DC and 50 60 Hz External noise Normal mode 50 60 Hz DC voltage The peak value including the signal must be less than 1 2 times the measuring rang...

Страница 283: ...ximum input power consumption MV1000 60 VA MV2000 90 VA Rated power supply frequency 48 to 62 Hz Power consumption MV1000 MV2000 Supply voltage LCD backlight off Normal Maximum MV1000 100 VAC 15 VA 30 VA 45 VA 240 VAC 25 VA 40 VA 60 VA MV2000 100 VAC 28 VA 40 VA 65 VA 240 VAC 38 VA 54 VA 90 VA Dielectric strength 1500 VAC 50 60 Hz for one minute between the AC adapter power supply terminal and ear...

Страница 284: ...one minute Between the pulse input terminal and earth 1000 VDC for one minute Ground Grounding resistance 100 Ω or less Transporting and Storage Conditions Item Specifications Ambient temperature 25 to 60 C Ambient humidity 5 to 95 RH no condensation Vibration 10 to 60 Hz 4 9 m s2 or less Shock 392m s2 or less in packaged condition Compliant Standards Item Specifications CSA CSA22 2 No 61010 1 ins...

Страница 285: ...0 C 0 15 of rdg 0 7 C 0 15 of rdg 0 7 C 0 15 of rdg 1 C 0 15 of rdg 0 5 C 200 to 100 C 0 15 of rdg 0 7 C 0 2 of rdg 2 5 C 0 to 200 C 4 0 C 0 15 of rdg 0 3 C A D integration time 1 67 ms 0 1 of rdg 40 digits 0 1 of rdg 15 digits 0 1 of rdg 40 digits 0 1 of rdg 15 digits 0 2 of rdg 4 C R S 0 to 100 C 10 C 100 to 300 C 5 C B 400 to 600 C 7 C Accuracy not guaranteed for values less than 400 C 0 2 of r...

Страница 286: ...us Input resistance 200 mV range or less and TC 10 MΩ or more 2 V range or higher Approx 1 MΩ Input source resistance Volt TC 2 kΩ or less RTD input Pt100 10 Ω or less per wire The resistance of all three wires must be equal Bias current 10 nA or less except when burnout detection function is enabled Maximum common mode noise voltage 250 VACrms 50 Hz 60 Hz Maximum noise voltage between channels 25...

Страница 287: ...e range With a variation of source signal resistance 1 kΩ 200 mV range or less 10 µV or less 2 V range or higher 0 15 of rdg or less TC range With a variation of signal source resistance 1 kΩ 10 µV or less RTD range Pt100 With a variation of 10 Ω per wire same resistance for all three wires 0 1 of rdg 1 digit or less With a maximum difference of 40 mΩ between wires Approx 0 1 C Effects of vibratio...

Страница 288: ... External Dimensions MV1000 If not specified the tolerance is 3 However in cases of less than 10 mm the tolerance is 0 3 mm REAR VIEW 189 259 10 20 162 4 7 44 6 39 191 1 1 232 177 7 52 9 13 6 97 TM TM POWER Unit mm approx inch ...

Страница 289: ...5 6 7 8 9 10 11 12 13 App Index With vertical stand attached 189 305 177 POWER DISP ENTER If not specified the tolerance is 3 However in cases of less than 10 mm the tolerance is 0 3 mm Unit mm approx inch 7 44 12 0 6 97 13 7 External Dimensions ...

Страница 290: ... 7 482 6 7 If not specified the tolerance is 3 However in cases of less than 10 mm the tolerance is 0 3 mm Unit mm approx inch 8 98 1 18 0 41 0 54 19 0 19 0 18 3 6 97 4 00 1 25 0 23 Rechargeable Battery Model Power supply suffix code is 3 DC INPUT 19 5VDC 50VA MAX 259 10 20 166 5 6 55 26 5 1 04 186 7 32 189 7 44 REAR VIEW POWER DISP ENTER ALARM CHARGE 10Base T USB RS 422 A 485 FG SG SDB SDA RDB RD...

Страница 291: ...9 10 11 12 13 App Index MV2000 Unit mm approx inch REAR VIEW 307 12 09 281 11 06 260 10 24 334 13 15 273 10 75 283 11 14 1 0 5 TM TM If not specified the tolerance is 3 However in cases of less than 10 mm the tolerance is 0 3 mm 13 7 External Dimensions ...

Страница 292: ... two each Use the included M4 screw Appropriate tightning torque 0 9 N m Distance between mounting holes Panel 36 5 217 482 6 1 465 310 37 3 44 45 146 05 44 45 10 3 13 7 7 482 6 19 0 19 0 18 31 1 44 8 54 0 54 0 41 12 2 5 75 1 75 1 75 1 47 If not specified the tolerance is 3 However in cases of less than 10 mm the tolerance is 0 3 mm Unit mm approx inch 13 7 External Dimensions ...

Страница 293: ...of this item even if there is no alarm Message information Up to 104 1050 varies depending on the number of messages Alarm information Up to 32 5000 varies depending on the number of alarms N is the number of channels measurement channels external input channels computation channels Example 1 When recording measured data of 30 measurement channels 240 external input channels and 10 computation cha...

Страница 294: ...r sample data length sample rate Example 3 When recording the event data of 30 measurement channels 240 external input channels and 10 computation channels with the sample rate set to 1 s and the data length set to 2 h 30 2 bytes 240 2 bytes 10 4 bytes 8 bytes 2h 60 60 1 s 588 bytes 2h 60 60 1 s 4 233 600 bytes Size of a File The size of a file is the sum of the sampled data related information si...

Страница 295: ... 125 h 5 2 days Note If you format a 256 MB CF card you will be able to use approximately 246 MB Internal Memory Recording Length If you are manually saving measured data to the internal memory old data will be overwritten when the internal memory becomes full You must save the measured data to a CF card before the data is overwritten Display Data Internal memory recording length estimate Internal...

Страница 296: ...2 the MV will start memory sampling if it isn t already If you turn OFF the input the MV will stop memory sampling Example 2 To Write a Message When an Alarm Occurs We will configure the MV so that it will write the message Channel 1 Alarm to group 1 when an alarm occurs on channel 1 We will use event action number 2 Display and Settings Press MENU and then select Menu tab Timer Event action Event...

Страница 297: ...s MENU and then select Menu tab Timer Event action Event action To Configure Match Timer Number 1 Press MENU and then select Menu tab Timer Event action MatchTimeTimer Other Settings Configure the MV to automatically save display data and set the file save interval to 1day or longer If you set the file save interval shorter than 1day the MV also saves data at the file save interval For instruction...

Страница 298: ...n number 4 Display and Settings Press MENU and then select Menu tab Timer Event action Event action Operation Pressing USER releases an active alarm indication and relay output Other Settings Set the alarm indication and alarm output relay operation to Hold For instructions on how to configure the alarm indication and alarm output relay operation see section 3 5 Appendix 2 Event Action Configurati...

Страница 299: ...or computation or external input channels set to Off Format YRECCRLF Measure Data Version 1 00 00CRLF Model MV1000CRLF Language Code Shift_JISCRLF Serial No III ICRLF File Header HHH HCRLF File ID N1 N2CRLF Time Correction TTTTCRLF Start Info FFF F SSS S JJJ JCRLF End Info FFF F SSS S JJJ JCRLF Extra Data PPPP KKKK Q1Q1Q1 Q1 Q2Q2Q2 Q2 CRLF Sampling Interval SI UNCRLF Trigger Point TPCRLF Batch Inf...

Страница 300: ...ent channel data Math Computation channel data Ext External input channel data KKKK Maximum minimum value Max Maximum value Min Minimum value Inst Instantaneous value Q1Q1Q1 Q1 Error data handling PlusOver Positive range out MinusOver Negative range out BurnOutUp Positive range out due to burnout BurnOutDown Negative range out due to burnout Error Computation error NoData Undefined Q2Q2Q2 Q2 Error...

Страница 301: ... Time Format yyyy mo dd hh mi ss_bbb Year month day and time of sampling 23 characters yyyy Year mo Month dd Day hh Hour mi Minute ss Second bbb Millisecond Event Data If you set the event data file format to text the MV generates a tab separated text file that contains numeric values and text The MV does not generate values for measurement channels set to Skip or for computation or external input...

Страница 302: ...0CRLF Language Code shift JISCRLF File Status ffffffffCRLF Serial No III ICRLF File Header HHH HCRLF Ch ccccc ccccc cccccCRLF Tag ttt t ttt t ttt tCRLF Unit uuuuuu uuuuuu uuuuuuCRLF yyyy mo dd hh mi ss nnn n nnn n nnn nCRLF ffffffff File status eight characters Complete Completed Progress Data being added Decrease Defective III I MV serial number 16 characters HHH H File header 50 characters ccccc...

Страница 303: ...etected Channel Data Output Measurement channels and Error Space external input channels Positive range out includes burnout detection 99999 Negative range out includes burnout detection 99999 Computation channels Error 999999999 Positive computation range out when the value exceeds approx 3 4E 38 999999999 Negative computation range out when the value is less than approx 3 4E 38 999999999 The MV ...

Страница 304: ...RLF Tag ttt t ttt t ttt tCRLF Unit uuuuuu uuuuuu uuuuuuCRLF Data Type sss sCRLF Time yyyy mo dd hh mi ssCRLF Status eeeeeeeeeeCRLF Ave nnn n nnn n nnn nCRLF Max nnn n nnn n nnn nCRLF Min nnn n nnn n nnn nCRLF Sum nnn n nnn n nnn nCRLF ffffffff File status eight characters Complete Completed Progress Data being added Decrease Defective III I MV serial number 16 characters HHH H File header 50 chara...

Страница 305: ...kly Monthly yyyy mo dd hh mi ss Report year month day and time 19 characters nnn n Average maximum minimum sum or instantaneous value 13 characters File Output Example Below is an example of an hourly report for four channels with the report type set to Hourly Daily reports and the file type set to Separate YREC Report Data Version 1 00 00 Model MV2000 Language Code shift JIS File Status Complete ...

Страница 306: ...ut detection 99999 Sum When all of the data are errors or range outs Space When the sum value exceeds approx 3 4E 38 9 999999E 99 When the sum value is less than approx 3 4E 38 9 999999E 99 Item Data Condition of Computation Channels Report Output Value Ave When all of the data are errors or computation range out Space Max When all of the data are errors Space Min When the maximum value or instant...

Страница 307: ...length App 3 change message 6 5 CHARGE LED 2 18 clock gradual correction 1 50 CLOG computation 10 10 color scale band 1 11 6 19 communication errors 12 12 communication log 5 28 computation order of precedence 10 6 computation starting 10 15 computation usable data 1 44 computation channels 10 1 computation data dropout 1 44 10 16 computation error 10 5 computation function 1 42 computation type 1...

Страница 308: ...ialization 9 7 input processing 1 4 input range 3 3 input type 1 3 installing on a panel 2 3 integration time 1 3 3 1 interface 1 51 internal memory 1 27 1 28 internal memory recording length App 3 internal switch 1 36 interval for rate of change alarm 1 6 3 8 invalid keys 9 10 J Jump default display 6 30 K keyboard 9 9 key lock 1 40 8 2 key lock release 8 3 keys 1 36 6 31 7 1 L language 1 51 9 6 ...

Страница 309: ...attery 2 19 report channels changing 5 17 report data 1 22 1 26 1 30 report display 5 17 report file date when divided 10 19 report file division 1 31 report file format App 12 report function 1 46 report generation 10 17 report group 10 19 RESET 10 11 reset computation 10 16 reset timer 7 4 7 6 reset start 10 15 revisions ii rolling average 1 45 10 5 S sample rate 4 3 sampling count 3 6 scale 6 1...

Страница 310: ...te rate changing 5 7 trend waveform display direction 6 22 trigger 4 10 trigger source 4 3 trip line 6 2 troubleshooting 12 17 type range 3 4 U unit 3 5 unit handling 1 44 unsaved data saving collectively 1 32 user 1 41 8 7 V version 9 5 vertical stand 2 3 W warning messages 12 16 waveform clear when starting 6 22 waveform updating 1 12 Web log 5 28 wide display 1 11 X XOR 10 8 Z zone display 1 13...

Отзывы: