


2-42
IM 04L57B01-01EN
2.8.2
Adjusting the Universal Inputs and Built-in Humidity Sensor
This section explains how to adjust the universal input and built-in humidity sensor
operation.
Built-in Humidity Sensor Adjustment Procedure
Procedure
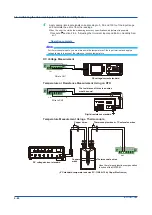
1
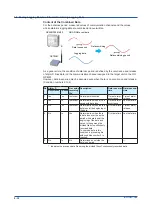
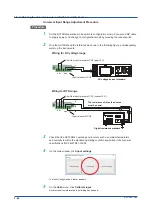
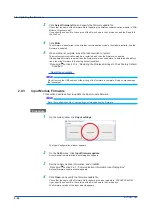
In an environment where the temperature and humidity do not drastically change, such
as in a thermostat chamber, arrange the reference and the GX70SM’s built-in humidity
sensor close to each other as shown in the following figure. Then leave them until the
temperature and humidity of the instruments balance with the environment.
Do not connect a USB cable to the GX70SM yet.
Calibration is possible when the humidity of the reference is within the 35 to 75%RH range and
the humidity difference between the reference and the built-in humidity sensor is within ±7%RH.
2
Set the GX70SM operation mode to configuration mode.
For details on operation mode, see section 1.5.1, “Setting the Operation Mode”.
3
Connect a USB cable to the GX70SM to supply power, and press the reboot switch to
restart the GX70SM.
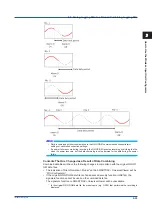
In measurement mode, the operation is intermittent, but in configuration mode, it is continuous. In
configuration mode, the internal temperature rises slightly, and this difference causes an increase
in error. Therefore, adjust the built-in humidity sensor quickly after starting to supply power.
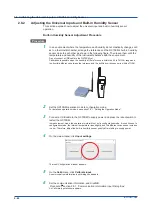
4
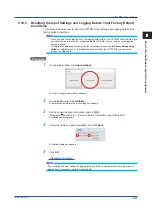
On the main window, click
Input settings
.
The Input Configuration window appears.
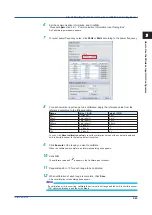
5
On the
Calib
menu, click
Calibrate input
.
A communication information input dialog box appears.
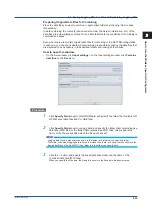
6
Set the communication information, and click
OK
.
Procedure: section 2.6.1, “Communication Information Input Dialog Box”
An Calibrate input window appears.
2.8 Calibrating the Universal Inputs and Built-in Humidity Sensor
Содержание GX70SM
Страница 1: ...User s Manual IM 04L57B01 01EN 1st Edition Model GX70SM Wireless Input Unit User s Manual ...
Страница 2: ......
Страница 12: ...Blank ...
Страница 148: ...Blank ...
Страница 168: ...Blank ...