background image

INST

ALLER'S 

INSTRUCTION

INST

ALLER'S 

INSTRUCTION

P19 OF 36

P20 OF 36

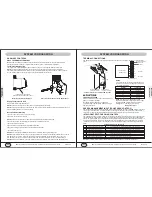
INSTALLATION

UNIT MODEL

CODE OF POWER SUPPLY KIT

30A 

20A 

15A

208-230 VOLT

N/A*

PWRCORD-

230V-20A

PWRCORD-

230V-30A

265-277 VOLT

N/A*

PWRCORD-

265V-20A

N/A*

N/A*

PWRCORD-

265V-30A

PTAC-07K-12B(43)

PTHP-07K-14B(43)

PTAC-09K-12B(43)

PTHP-09K-14B(43)

PTAC-12K-12B(43)

PTHP-12K-14B(43)

PTAC-12K-12B(45)

PTHP-12K-14B(45)

PTAC-15K-12B(45)

PTHP-15K-14B(45)

* Using these cords could result in damage to your unit.

Accessory
Power Supply Cord
or Hard Wire

Wire Clamp

SYSTEM CONFIGURATION

VENTILATION CONTROL

The ventilation control lever is located at left side of
unit, behind front panel.

NOTE: 

The vent door shipping hardware must be

removed before using vent control lever. See
Installation Instructions.

When set at CLOSE, only the air inside the room is
circulated and filtered.

When set at OPEN, some outdoor air will be drawn
into room. This will reduce heating or cooling 
efficiency.
Energy Tip: Keep the vent control at CLOSE. Room
air will be filtered and circulated.

Ventilation Control Location

ADJUSTING AIR DIRECTION

To adjust air direction:
1) Remove front panel.
2) Remove louver screws that hold louver insert in place (from back side of front panel).

O

3) Turn louver insert and rotate 180 .
4) Replace louver insert.
5) Replace screws and front panel.

Vent Control

(Pull lever 

through label

to operate.)

PTAC-07K-12D(43)

PTHP-07K-14D(43)

PTAC-09K-12D(43)

PTHP-09K-14D(43)

PTAC-12K-12D(43)

PTHP-12K-14D(43)

PTAC-12K-12D(45)

PTHP-12K-14D(45)

PTAC-15K-12D(45)

PTHP-15K-14D(45)

N/A*

N/A*

INSTALLATION

HOW TO CONNECT

IMPORTANT: Please read following electrical safety data carefully.

ELECTRICAL SHOCK AND/OR UNIT OPERATION AND DAMAGE HAZARD

Failure to follow this warning could result in personal injury or death and/or unit operation and damage.

* Follow the National Electrical Code (NEC) or local codes and ordinances.

* For personal safety, this unit MUST BE properly grounded.

* Protective devices (fuses or circuit breakers) acceptable for unit installations are specified on the nameplate of 
  each unit.

* Do not use an extension cord with this unit.

* Aluminum building wiring may present special problems -- consult a qualified electrician.

* When unit is in STOP position, there is still voltage to electrical controls.

* Disconnect power to unit before servicing by:

1) Removing power cord (if it has one) from wall receptacle.
2) Removing branch circuit fuses or turning circuit breakers off at panel.

1) Remove front panel.

2) Remove junction box.
    Remove junction box cover by removing three screws from front. Remove junction box by taking out top, rear 
    and side screws.

3) Connect accessory power supply cord or hard wire connector to unit connector.
    Units must be installed using the appropriate 
    power supply kit. See Table 4 - POWER 
    CONNECTION CHART. 
    These connections must be followed.

4) Reinstall junction box and cover.
    * Use wire clamp to attach power cord to basepan. 
       Secure with screws (included).
    * Relace junction box and cover with screws 
       removed from Step 2. Tighten securely.

5) Replace front panel.

6) Connect power to unit.

Remove shipping

screw if present

Shipping Screw Location

Replacing Front Panel

Place tabs over top rail (1). Push Inward at
bottom until panel snaps into place (2).

YMGI, Engineered Comfort Products for A Sustainable and Efficient Green World !

YMGI, Engineered Comfort Products for A Sustainable and Efficient Green World !

Содержание PTAC Series

Страница 1: ...ONDITIONER PTAC PACKAGED TERMINAL HEAT PUMP PTHP INSTALLATION OPERATION MANUALS Literature Part No Lit PTAC 0201 20140505 Subject to Continuous Engineering Change and Product Improvement without Notic...

Страница 2: ...cident or consequence of improper or faulty transportation installation operation maintenance or service Damage caused by frozen or broken water hoses or refrigeration pipes in the event of equipment...

Страница 3: ...it for condensate leakage and refrigerant leakage before and after connecting them 28 Do you list the working details in the invoice and leave a copy to the customer 19 Did you charge the inter connec...

Страница 4: ...roperly can be more expensive than spending the little extra money that hiring the right contractor will cost Protect your investment and warranty eligibility by doing it right the first time THE FOLL...

Страница 5: ...ity to claim freight damage is lost and YMGI will not replace the unit on this basis Contact the distributor or YMGI report the damage by forwarding the marked delivery receipt copy and pictures Only...

Страница 6: ...ip Products to YMGI Service Center for Inspection and Repair and Authorization to Charge form 2 You will review the form and fill all fields appropriately sign and send back to the YMGI Group 3 Once t...

Страница 7: ...Instructions for Removal and Repairs If the unit needs to be removed to somewhere else or needs repair contact your dealer or an authorized technician In the case of occurrence of abnormal operation b...

Страница 8: ...e Weight Net Gross Weight Refrigerant Name Charge Outdoor Side Loading Quantity Fan Type Fan Wheel Dia x Length Fan Motor Speed H ML Output of Fan Motor Fan Motor RLA Fan Motor Capacitor Input of Heat...

Страница 9: ...ed Limit the Set point Range The unit can be configured to limit the controlling set point range The display will always show the complete set point range but the controlling set point will be limited...

Страница 10: ...lure to follow this warning could result in personal injury or death Disconnect all power to unit to avoid possible electrical shock during installation Remove any existing foam baffles that are insta...

Страница 11: ...owing electrical safety data carefully ELECTRICAL SHOCK AND OR UNIT OPERATION AND DAMAGE HAZARD Failure to follow this warning could result in personal injury or death and or unit operation and damage...

Страница 12: ...eating and cooling modes regardless of what the real temperature is in the room If AA mode is selected the room temperature will be displayed during heating cooling and fan only modes If the mode butt...

Страница 13: ...required for digital thermostats NOTE Any illegal input combinations will be captured as thermostat wiring failures and will light the STATUS LED indicator on main board see Intelligent Self Checking...

Страница 14: ...d Room humidity will decrease and moisture will evaporate NOTE In case of a power failure the unit will remember the last programmed settings and will restart to those settings 1 TEMP CONTROL Temp Con...

Страница 15: ...TAC 07K 12B 43 PTAC 09K 12B 43 PTAC 12K 12B 43 PTAC 07K 12D 43 PTAC 09K 12D 43 PTAC 12K 12D 43 PTHP 07K 14B 43 PTHP 09K 14B 43 PTHP 12K 14B 43 PTHP 07K 14D 43 PTHP 09K 14D 43 PTHP 12K 14D 43 Symbol Sy...

Страница 16: ...connected and check if power supply failed or cut off Replace fuse Check power voltage If it is 10 below rated voltage inspect and repair line Check if option switch ON OFF is disconnected with line h...

Страница 17: ...is running but there is no cooling effect or no heating effect Protector is activated due to too overheat of compressor Adjust the volume of refrigerant Change capillary Change compressor Check with...

Страница 18: ...0 577 0 561 0 547 0 532 0 519 0 505 0 492 0 48 0 467 0 456 0 444 0 433 0 422 0 412 0 401 0 391 0 382 AMBIENT AIR TEMPERATURE SENSOR S INDOOR AND OUTDOOR TUBE TEMPERATURE SENSOR S 19 18 17 16 15 14 13...

Страница 19: ...ler or current service contractor should be contacted first of all since they installed the unit and or know more details than anybody else They will check the unit and find out the problems with the...

Отзывы: