background image

 | Getting Started | 

19

Icons

Description

Icons

Description

The shared line registers successfully.

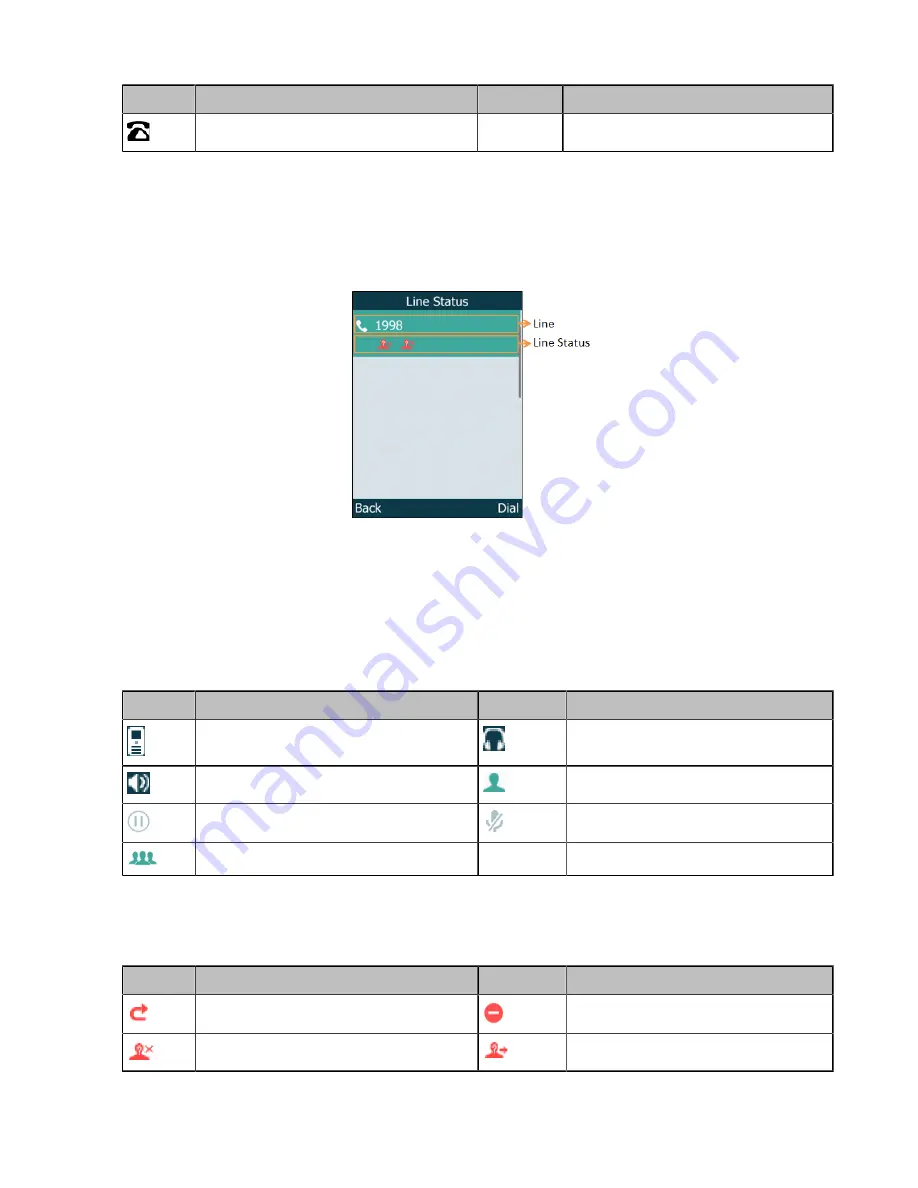
W56H/W53H Line Status Screen

The line status screen is made up of the line and line status.
When the handset is idle, you can press 

Line

 to enter the line status screen. The line status screen is

displayed below:

Line

: Display the corresponding line (display user name by default).

Line Status

: Display the icon of line status. The icon indicates the corresponding feature assigned to the

line.

W56H/W53H Icons on the Calls Screen

By viewing the icons in the calls screen, you can easily get the current call status, such as audio output

mode status.

Icons

Description

Icons

Description

Receiver Mode On

Headset Mode On

Handsfree Mode On

Contact

Call Hold

Call Mute

Conference Call

W56H/W53H Icons on the Line Status Screen

Each icon in the line status screen indicates the corresponding feature assigned to the line.

Icons

Description

Icons

Description

Call Forward

Do Not Disturb (DND)

Anonymous call rejection is enabled

Anonymous call is enabled

Содержание W56H

Страница 1: ...Yealink DECT IP Multi Cell System User Guide...

Страница 2: ...aracters 20 Setting the Input Modes 20 Entering Data on the W56H W53H 20 Entering Data on the CP930W DD Phone 21 Registering the Handset 22 Possible Reasons for Registration Failure 22 Registering the...

Страница 3: ...Advanced Call Features 38 Call Park and Call Retrieve 38 Parking or Retrieving a Call in the FAC Mode 39 Parking or Retrieving a Call in the Transfer Mode 39 Retrieving a Call with a Retrieve Key 40...

Страница 4: ...ecords 52 Deleting a Call Record 52 Deleting All Call Records 52 Customizing Your Phone 52 Turning Handset On 53 Turning Handset Off 53 Changing the Wallpaper 53 Setting the Screen Saver 54 Changing t...

Страница 5: ...64 Deleting the Paired Bluetooth Device 64 Disconnecting the Bluetooth Device 65 Deactivating the Bluetooth Mode 65 Using Your Phone with PC 65 Connecting the PC to the Phone 66 Setting the Phone as...

Страница 6: ...Overview Menu on the W56H W53H Screen and Icons Rechargeable Battery Entering Characters Hardware Overview Understanding the phone hardware helps you easily use the phone s features W80B Hardware W56...

Страница 7: ...s the connection status to the DECT manager DM W56H Hardware No Item Description 1 Receiver Receives audio in receiver mode 2 Power LED Indicator Indicates call status message status and charging stat...

Страница 8: ...ong press to return to the idle screen Press to turn the handset on Long press on the idle screen to turn the handset off Cancels actions or ends a call Rejects an incoming call 10 Off hook Key Answer...

Страница 9: ...information 4 Soft Keys Access the function directly It depends on the operating situation 5 Message Key Accesses the voice mail or missed call 6 Speakerphone Key Switches among the receiver headset a...

Страница 10: ...ons or ends a call Rejects an incoming call 10 Off hook Key Answers an incoming call Enters the redial calls list Places a call in receiver or headset mode 11 Keypad Provides digits letters and specia...

Страница 11: ...6 On hook Key Ends a call returns to the idle screen or turns off the phone 7 Touch Keypad Provides the digits letters and special characters in context sensitive applications It is possible to open a...

Страница 12: ...rt Allows you to connect a PC and turn your phone into an external speaker and microphone for your PC 17 Micro SD Slot Allows you to connect an SD card to record calls and play recordings on the phone...

Страница 13: ...alls 9 Soft Keys Access the function displayed on the screen above the soft keys The soft keys change depending on what you are doing at the time 10 Speaker Provides ringer and speakerphone audio outp...

Страница 14: ...s an active call on the phone Flashing green The call is placed on hold or is held Flashing orange The phone prompts low battery or is charging Off The phone is powered off The phone is idle Menu on t...

Страница 15: ...o view the features Procedure Press the OK key when the handset is idle The main menus are displayed on the screen as icons Accessing the Main Menu Feature After entering the main menu you can use the...

Страница 16: ...On hook key to quickly exit the menu and return to the idle screen Screen and Icons The user screens and icon indicators can help you navigate and understand the important information on the phone s...

Страница 17: ...H CP930W DD phone Battery Status Low to full W56H W53H CP930W Need Charging W56H W53H CP930W Status Bar Displays the feature status icons The status icons are displayed when features are activated Han...

Страница 18: ...failed to register to a base station The phone is in the Speakerphone hands free mode The Bluetooth enabled mobile phone is paired and connected to the phone The phone has registered to a base station...

Страница 19: ...he icon indicates the corresponding feature assigned to the line W56H W53H Icons on the Calls Screen By viewing the icons in the calls screen you can easily get the current call status such as audio o...

Страница 20: ...andset provides you with 12 input modes and different input mode provides different characters The default input modes are Abc 123 ABC and abc You can enable the input modes used frequently About this...

Страница 21: ...itch the input modes Enter alphas Select ABC abc 2aB or Abc mode On the DD phones press the keys labeled with letters until your desired letter appears On the CP930W press a keypad key repeatedly to v...

Страница 22: ...ing of system deployment Before you begin The W80B device role is DM Base and no handsets have been registered to the device Long press the device key on the W80B till the DECT LED indicator flashes t...

Страница 23: ...e 1 Navigate to OK Settings Registration Select Base The phone screen displays all DMs base stations that the handset is registered to and the Bestbase option 2 Select the desired DM base station or B...

Страница 24: ...r current call and place a new call Procedure 1 Select New Call On the CP930W DD phone select Hold New Call 2 Enter the contact number and press the OK key Note You can select Options Directory to sel...

Страница 25: ...n displays all available speed dial keys 2 9 2 Highlight the desired digit key and then press Assign 3 Select the desired contact from the directory 4 Press OK to assign the number to the selected Spe...

Страница 26: ...e number you want to dial out in the Value field 6 Confirm the action Redial You can redial a call from the redial list For W56H W53H the redial list stores the last twenty dialed phone numbers For DD...

Страница 27: ...corresponding fields 6 Confirm the action Note You can select Add To Local Update Existing to add the number to an existing contact or update the existing contact information Deleting a Redial Record...

Страница 28: ...r it manually or automatically Answering a Call Answering a Call When in a Call Answering a Call Automatically Answering a Call When you receive an incoming call the phone rings and the screen display...

Страница 29: ...avigate to OK Call Features Call Waiting On the CP930W DD phone navigate to Menu Features Call Waiting 2 Disable call waiting 3 Confirm the action Silencing or Rejecting Incoming Calls When you receiv...

Страница 30: ...ore you begin Check with your system administrator to find out if the DND feature is available on your phone Procedure 1 Navigate to OK Call Features Do Not Disturb On the CP930W DD phone navigate to...

Страница 31: ...on the phone Procedure Select Resume If multiple calls are placed on hold select the desired call first Note When you have multiple calls on the phone and the current call is active you can press the...

Страница 32: ...Transfer You can transfer a call to another contact immediately without consulting with her him first Procedure 1 Select Options Transfer or press the TRAN key during a call On the CP930W DD phone se...

Страница 33: ...e 1 Place a call to the first party 2 When the first party answers the call select Options Conference On the CP930W DD phone select Conf The active call is placed on hold 3 Dial the second party s num...

Страница 34: ...econd party answers the call select Conf 6 Repeat steps 4 5 to invite more parties up to 4 parties Creating a Hybrid UC Meeting with PC When you are talking with your contact on the PC and want to inv...

Страница 35: ...e second party s number 4 When the second party answers the call select Conf to add the second party to the conference 5 Select Conf to place a new call The conference call is placed on hold 6 Enter t...

Страница 36: ...record your calls into an SD card so that you can listen to them later For more information on how to attach an SD card please refer to the Quick Start Guide for your phone on Yealink Support It is o...

Страница 37: ...a message that the call is recorded successfully Select End Call The recording icon and recording duration disappears and the phone returns to the idle screen The screen prompts a message that the cal...

Страница 38: ...Highlight the desired recording and select Delete The phone prompts you whether to delete the audio 3 Confirm the action Viewing the Available Recording Time To avoid the recording failed due to timeo...

Страница 39: ...wing If you want to park the call against the local extension press the key If you want to park the call against the desired extension enter the extension for example 4606 where you want to park the c...

Страница 40: ...ure Dial the park retrieve code The phone will retrieve the parked call from the shared parking lot Note When the W56H W53H DD phone is idle you can use a Retrieve key to retrieve a parked call direct...

Страница 41: ...ctive Call on a Shared Line Pulling a Shared Call on a Shared Line W56H W53H State Indicator of Shared Line If your system administrator assigns the shared line to your handset the SCA with an icon is...

Страница 42: ...users on the shared line cannot resume your held call Retrieving a Held Call on a Shared Line If you place a call on hold on a shared line you can resume this call at any time When the shared line ke...

Страница 43: ...this feature Setting the Voice Mail Code Leaving Voice Mails Listening to Voice Mails Setting the Voice Mail Code If you want to connect to the message center you need to set the voice mail code on y...

Страница 44: ...Contacts Viewing Contacts Editing Contacts Deleting Contacts Searching for Contacts Adding Contacts When you add a contact to your Local Directory you can choose how much information you want to ente...

Страница 45: ...a Contact You can delete any contact from the Local Directory Procedure 1 Navigate to OK Directory or OK Directory Local Directory On the CP930W DD phone select Directory or navigate to Directory Loc...

Страница 46: ...All Shared Contacts Searching for Shared Directory Contacts Saving a Shared Contact to the Local Directory Adding Shared Contacts When you add a contact to your Shared Directory you can choose how mu...

Страница 47: ...the Shared Directory you can enter search criteria to find your desired contact quickly Procedure 1 Navigate to OK Directory Shared Directory On the CP930W navigate to Directory Shared Directory 2 Ent...

Страница 48: ...ct Add 3 Enter the contact s information 4 Confirm the action Viewing Blacklist Contacts You can view the blacklist contacts from the Blacklist on your phone Procedure 1 Navigate to OK Settings Teleph...

Страница 49: ...Telephony Blacklist On the DD phone navigate to Menu Directory Blacklist On the CP930W navigate to Menu Settings Basic Settings Blacklist 2 Highlight the desired blacklist contact and select Options O...

Страница 50: ...e navigate to Directory Remote Phone Book 2 Select the desired remote phone book 3 Highlight the desired contact and select Options Add To Local New Entry On the DD phone select Option Add to Contact...

Страница 51: ...Directory To identify someone s call the next time you can save a history record to the Local Directory Procedure 1 Press History 2 Select the desired list 3 Highlight the desired entry and select Opt...

Страница 52: ...and select Options Delete On the DD phone highlight the desired entry and select Delete The selected entry is deleted successfully Deleting All Call Records You can delete all call records from the ca...

Страница 53: ...key The mute touch key glows red and then the handset screen lights up Place the handset to the charging cradle Turning Handset Off The handset will be turned off automatically when the battery runs...

Страница 54: ...930W the backlight automatically turns off when the phone is charging and inactive for a specified time Note When the CP930W is not in charging its backlight will be turned off after the phone is inac...

Страница 55: ...the CP930W DD phone navigate to Menu Settings Basic Settings Language 2 Select the desired language The phone prompts you whether to change the language 3 Confirm the action The phone language is chan...

Страница 56: ...this task It is only applicable to the CP930W DD phone Procedure 1 Navigate to Menu Settings Advanced Settings default PIN 0000 Softkey Label 2 Select the desired soft key 3 Select the desired key ty...

Страница 57: ...mize the function of the shortcuts to make your handset more personalized Procedure 1 Navigate to OK Settings Shortcut 2 Select the desired shortcut and select Change The feature currently assigned to...

Страница 58: ...ey it prevents unauthorized users from accessing the menu changing the personal settings for your phone Function key it only allows users to use the keypad for placing a call answering or rejecting an...

Страница 59: ...in the Unlock PIN field 3 Confirm the action The lock icon disappears from the phone screen Changing Your Phone Unlock PIN The default unlock PIN is 123 For security reasons you should change the defa...

Страница 60: ...he Advisory Tone Setting the Key Tone Adjusting the Volume You can adjust the volume of the ringer media and audio during a call Procedure Do one of the following Press the left or right navigation ke...

Страница 61: ...s changed or the handset is placed in the charger cradle Low Battery plays when the battery s remaining capacity is low and the handset needs charging Note If the silent mode is activated the advisory...

Страница 62: ...a Mobile Phone Call on the Phone Editing Device Name of Your Phone Making the Phone Discoverable Deleting the Paired Bluetooth Device Disconnecting the Bluetooth Device Deactivating the Bluetooth Mode...

Страница 63: ...firm the action Enabling the Phone Media You can enable the media audio feature to use the phone as a Bluetooth speaker for your mobile phone PC to play music Procedure 1 Select Paired Bluetooth Devic...

Страница 64: ...nfirm the action Related tasks Activating the Bluetooth Mode Making the Phone Discoverable If you make your phone discoverable to other Bluetooth devices other Bluetooth devices can scan and find your...

Страница 65: ...d and you can reconnect it to your phone Procedure 1 Tap or navigate to Menu Settings Basic Settings Bluetooth 2 Select Off from the Bluetooth field 3 Confirm the action Using Your Phone with PC When...

Страница 66: ...matically selects the connected phone as the audio device If not you may have to set the phone as a PC audio device via softphone or PC Setting the Phone as PC Audio Device via Softphone When your PC...

Страница 67: ...ivated on your phone 2 End the call on the softphone The phone now only functions as a speaker for the PC Holding Resuming the PC Audio When you place the PC audio on hold you cannot hear any audio on...

Страница 68: ...cedure 1 Navigate to OK Settings System Settings Handset Reset On the CP930W navigate to Menu Settings Advanced Settings default PIN 0000 Handset Reset On the DD phone navigate to Menu Settings Advanc...

Страница 69: ...Menu Structure Appendix B Input Modes and Characters Appendix A Menu Structure For W56H W53H For CP930W For DD Phone For W56H W53H Note The menus in the gray box are not available when the handset is...

Страница 70: ...Appendix 70 For CP930W Note The menus in the gray box are not available when the handset is not registered to a base station...

Страница 71: ...in capitals 123 ABC abc A a S s 1 1 1 1 1 1 1 1 1 1 1 1 ABCabc2 2 ABC2 abc2 2 A BC 2 a bc 2 A B C 2 a b c 2 2 2 DEFdef3 3 DEF3 def3 3 DE F3 de f3 D E F3 d e f3 3 3 GHIghi4 4 GHI4 ghi4 4 G HI 4 g hi 4...

Страница 72: ...tuv8 8 TU V8 tu v8 T U V8 t u v8 8 8 WXYZ wxyz9 9 WXYZ9 Wxyz9 9 W X Y Z9 w x y z9 WXY Z 9 wxy z 9 9 9 space 0 0 0 space 0 space space 0 space 0 space 0 space 0 space 0 0 0 space 0 space space _ space...

Отзывы: