background image

Advanced  Phone  Features


183 

4.


Click 

Confirm 

to accept the change. 

Note


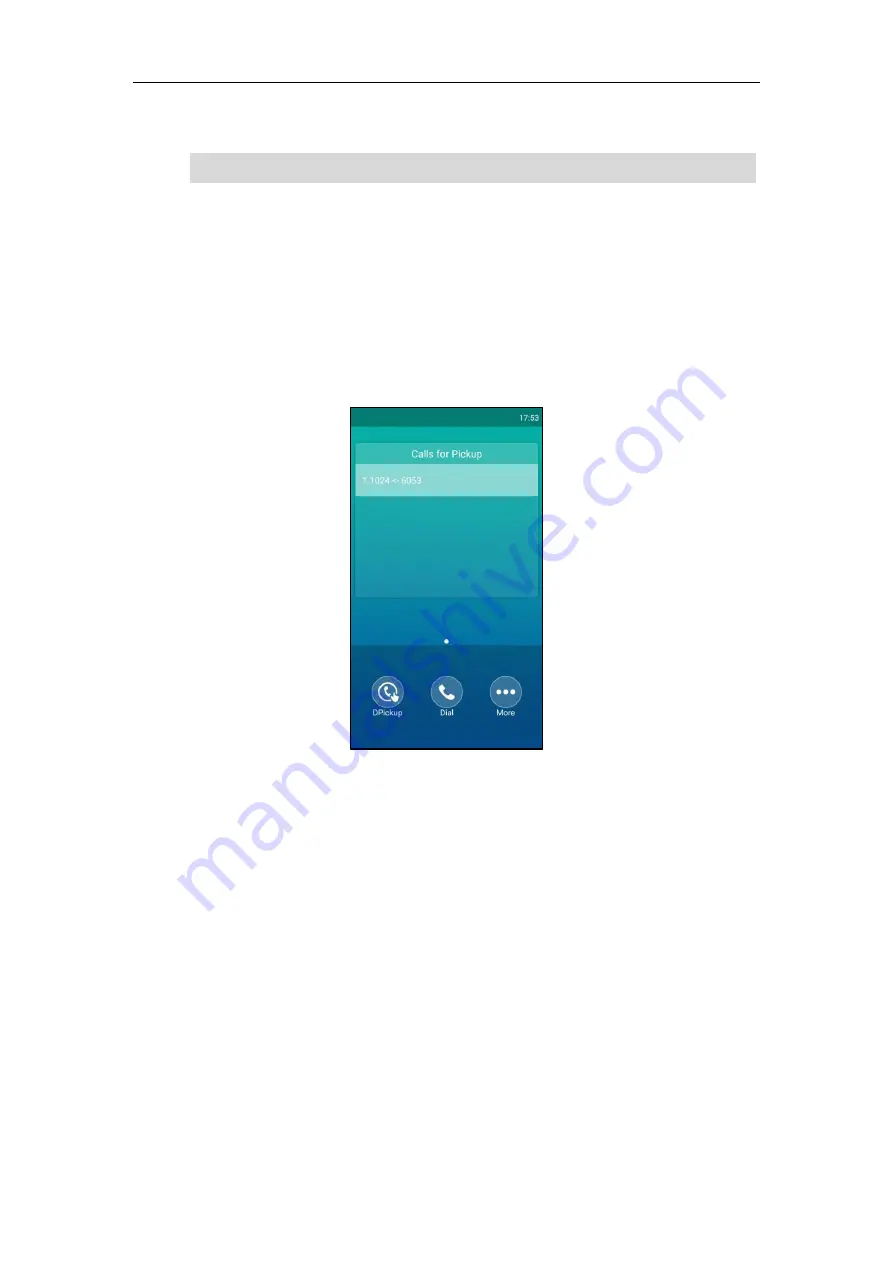
When the monitored line receives an incoming call, the following occurs on your phone: 


The phone plays a warning tone (if enabled). 


The BLF key icon flashes red. 


The caller ID appears on the touch screen (if enabled). 

In the following figure, the touch screen shows an incoming call from 6053 on the monitored 
line. 


You can do the following actions: 

-


Tap 

DPickup

 to pick up the call. 

-


Tap

 Dial

 to dial out the monitored phone number. 

-


Tap 

More

->

NewCall

 to place a new call. 

-


Tap 

More

->

Cancel

 to exit this screen. 

Configuring Transfer Mode via DssKey 

When there is an active call on the IP phone, you can handle the active call differently 
depending on the configuration of the transfer mode via Dsskey with the BLF key. 

To configure the transfer mode via Dsskey via web user interface:


1.


Click on 

Features

->

Transfer


Visual and audio alert features are configurable via web user interface only. 

Содержание One Talk CP960

Страница 1: ......

Страница 2: ...in any form or by any means with any purpose other than personal use Warranty 1 Warranty THE SPECIFICATIONS AND INFORMATION REGARDING THE PRODUCTS IN THIS GUIDE ARE SUBJECT TO CHANGE WITHOUT NOTICE AL...

Страница 3: ...roduct is available on the Yealink Support page for the product Patent Information China the United States EU European Union and other countries are protecting one or more patents of accompanying prod...

Страница 4: ...alink uses software under the specific terms of the GPL Please refer to the GPL for the exact terms and conditions of the license The original GPL license source code of components licensed under GPL...

Страница 5: ...on microphones for wider voice pickup range This guide provides everything you need to quickly use your new phone First verify with your system administrator that the IP network is ready for phone con...

Страница 6: ...User Guide for CP960 IP Phone vi...

Страница 7: ...3 Getting Started 25 Packaging Contents 25 Optional Accessories 26 Phone Installation 27 Connect the Power and Wired Network 28 Connect the CP Wired Expansion Mic CPE90 28 Connect the Optional PC 29 C...

Страница 8: ...ving 62 Backlight 65 Language 67 Input Method 68 Time Date 69 Administrator Password 71 Phone Lock 72 Audio Settings 76 Volume 76 Ring Tones 78 Key Tone 81 Touch Sounds 81 Notification Sound 82 Silent...

Страница 9: ...ing Browser Settings 136 Clock 136 Basic Phone Features 139 Placing Calls 140 Placing a Call 140 Placing Multiple Calls 141 Placing a Mobile Call over Bluetooth 141 Answering Calls 143 Answering When...

Страница 10: ...Local 189 Call Recording Server Side 192 Hot Desking 194 Intercom 196 Configuring the Intercom Feature on the Phone 196 Using Intercom Feature on the Phone 198 Multicast Paging 199 Sending RTP Stream...

Страница 11: ...ng the IP Phone as PC Audio Device 239 Removing the PC Audio 240 Using the CP Wired Expansion Mic CPE90 241 Placing the CPE90 241 Muting or Unmuting the CPE90 241 CPE90 LED Instructions 242 Using the...

Страница 12: ...User Guide for CP960 IP Phone xii...

Страница 13: ...Component Instructions Icon Instructions LED Instructions User Interfaces Documentations If you require additional information or assistance with your new phone contact your system administrator Hardw...

Страница 14: ...uch screen with two idle screens Tap to select items and navigate menus Shows information about calls messages time date and other relevant data Call information caller ID call duration Icons for exam...

Страница 15: ...nect a PC and turn CP960 into an external speaker and microphone for your PC Icon Instructions Feature Status Icons Icons appearing on the status bar are described in the following table Icons Descrip...

Страница 16: ...sociated with line key features Icons Description Hold Public Hold Private Hold DND Voice Mail Direct Pickup Group Pickup DTMF Prefix LDAP Local Group XML Group Forward ReCall Record URL Record Record...

Страница 17: ...ount Icons Description Mobile Account Bluetooth Enabled mobile phone is both paired and connected Mobile Account Bluetooth Enabled mobile phone fails to connect Flashing Mobile Account Bluetooth Enabl...

Страница 18: ...associated with a shared line The local SCA phone indicates the phone is involved in an SCA call while the monitoring SCA phone indicates the phone is not involved in the SCA call Icon Description The...

Страница 19: ...conversation on hold Other Icons Icon indicator associated with call recording Icons Description Recording box is full Using a record key A call cannot be recorded Using a record key Recording starts...

Страница 20: ...erface in a web browser on your PC You can perform all call operation tasks and configure basic settings directly on the phone In addition you can use the web user interface to access all configuratio...

Страница 21: ...tor user name and password are both admin case sensitive Note The main options you can use to customize the IP phone via phone user interface and or via web user interface are listed in the following...

Страница 22: ...International System Applications Recorder Browser Clock Basic Call Features Auto Answer Speed Dial Recent Call In Dialing Auto Redial Call Completion ReCall Do Not Disturb DND Call Forward Call Trans...

Страница 23: ...r the CP960 IP phone Name Contents Where found Language Quick Start Guide Basic call features and phone customizations In the package On the website English Chinese User Guide Phone Web user interface...

Страница 24: ...User Guide for CP960 IP Phone 24...

Страница 25: ...Packaging Contents Phone Installation Phone Initialization Registration Using the Touch Screen Entering Data and Editing Fields Phone Status Basic Network Settings Wireless Network Settings If you req...

Страница 26: ...ng missing contact your system administrator Optional Accessories The following items are optional accessories for your CP960 IP phone You need to purchase them separately if required PoE Adapter PSE...

Страница 27: ...troduces how to install the phone 1 Connect the power and wired network 2 Connect the CP Wired Expansion Mic CPE90 3 Connect the optional PC 4 Connect the optional USB flash drive 5 Connect the option...

Страница 28: ...end of the CPE90 cable to one of the Mic ports on the phone Note The IP phone should be used with Yealink original PoE adapter 54V 0 56A only The use of the third party PoE adapter may cause the dama...

Страница 29: ...using a micro USB cable Connect the Optional USB Flash Drive To connect a USB flash drive 1 Insert a USB flash drive into the USB port on the phone Note The USB port can also be used to connect CPW90...

Страница 30: ...amic Host Configuration Protocol The phone attempts to contact a DHCP server in your network to obtain valid IPv4 network settings e g IP address subnet mask default gateway address and DNS address by...

Страница 31: ...isplayed on the left of the status bar For more information refer to Icon Instructions on page 15 3 Current Account The label of the current account is displayed on the middle of the status bar If the...

Страница 32: ...e voice mails for someone For more information refer to Message on page 222 History Tap to enter the History screen and view call history For more information refer to Call History Management on page...

Страница 33: ...ne s line keys For more information refer to Line Keys on page 105 No Application Description 1 Tap to add a line key 2 Line Key List This area shows the line key labels You can customize the line key...

Страница 34: ...account 2 Time The phone s time is displayed on the right of the status bar For more information refer to Time Date on page 69 3 Call multiple members Click here Tap to initiate a conference call For...

Страница 35: ...can tap to display the dial pad again 11 Tap to go back to the idle screen Calls Screen The Calls screen is displayed when you have more than one call in progress The following shows an example of the...

Страница 36: ...tion refer to Rejecting Calls with Do Not Disturb DND on page 145 8 More Tap to bring up more keys Hold Resume Tap to hold resume the call NewCall Tap to place a new call Transfer Tap to transfer the...

Страница 37: ...he switch button to turn the feature on or off Enter the data using the onscreen keyboard 4 Tap to go back to previous screen Control Center Notification Center Control center or notification center a...

Страница 38: ...Tap to enter the wireless microphone settings screen For more information refer to Using the CP Wireless Expansion Mic CPW90 on page 243 3 Control Center Backlight Slider Drag the slider to adjust th...

Страница 39: ...r off quickly For more information refer to Silent Mode on page 82 4 Notification Center Tap the desired notification message to view the details Swipe left or right to delete a specific notification...

Страница 40: ...towards each other pinch Entering Data and Editing Fields CP960 IP phone provides onscreen keyboard and onscreen dial pad to enter data Onscreen dial pad provides standard key layout which enable user...

Страница 41: ...e the entered characters one by one Long tap to delete two or more characters 3 Label automatically to identify the context sensiti ve features Next Key Tap to go to the next field Done Key Tap to con...

Страница 42: ...oose one of the options to enter an alternate character 3 Delete Key Tap to delete the entered characters one by one Long tap to delete two or more characters 4 Label automatically to identify the con...

Страница 43: ...ly to identify the context sensiti ve features Next Key Tap to go to the next field Done Key Tap to confirm the settings Send Key Tap to dial out the number Go Key Tap to browse the web page 4 Space K...

Страница 44: ...een keyboard 3 Tap Done or the blank area of the screen to hide the onscreen keyboard The other things you need to know If you want to Action Position the cursor Tap to position Select all characters...

Страница 45: ...ace Available information of phone status includes General information IP address MAC address and firmware version Network status IPv4 status or IPv6 status IP mode and MAC address IPv4 uses a 32 bit...

Страница 46: ...r on your computer 2 Enter the IP address in the browser s address bar and then press the Enter key e g http 192 168 0 10 for IPv4 or http 2005 1 1 1 215 65ff fe64 6e0a for IPv6 3 Enter the user name...

Страница 47: ...both IPv4 and IPv6 addresses To configure the IP mode via phone user interface 1 Tap Settings from the Home screen 2 Enter the admin password default password admin from the Advanced block 3 Tap Netwo...

Страница 48: ...sure that the IP mode is configured as IPv4 or IPv4 IPv6 To configure a static IPv4 address via phone user interface 1 Tap Settings from the Home screen 2 Enter the admin password default password adm...

Страница 49: ...sired value in the IP Address IPv6 IP Prefix Gateway Primary DNS and Secondary DNS field respectively 7 Tap to accept the change or to cancel If you are using an xDSL modem for IPv4 network connection...

Страница 50: ...e ways to connect CP960 IP phone to the wireless network Manually connect to an available wireless network Wi Fi Protected Setup WPS Manually add a wireless network The wrong network settings may resu...

Страница 51: ...You can manually connect your phone to a wireless network To manually connect to an available wireless network via phone user interface 1 Tap Settings from the Home screen 2 Tap Wi Fi from the Basic b...

Страница 52: ...ss network in your area and try to connect the wireless network that you have connected last time If there are no available wireless networks or the phone cannot connect the wireless network that you...

Страница 53: ...en 2 Tap Wi Fi from the Basic block 3 Turn on Wi Fi The phone will automatically search for available wireless networks in your area 4 Tap and then tap WPS The touch screen prompts Press the Wi Fi Pro...

Страница 54: ...reless devices by a PIN 8 Click the corresponding button in the gateway router s web interface to search WPS clients Once WPS setup is established successfully the touch screen will prompt Connected N...

Страница 55: ...ialog box If you select PEAP TTLS a Tap the Phase 2 authentication field b Tap the desired Phase 2 authentication method in the pop up dialog box c Enter the identity username in the Identity field d...

Страница 56: ...eless Network Information To view the connected wireless network information 1 Tap Settings from the Home screen 2 Tap Wi Fi from the Basic block 3 Tap Wireless Status to view the detailed information...

Страница 57: ...sable Wi Fi feature do one of the following Tap Settings from the Home screen Tap Wi Fi from the Basic block Turn off Wi Fi Swipe down from the top of the screen to enter the control center and then t...

Страница 58: ...User Guide for CP960 IP Phone 58...

Страница 59: ...Settings Contact Management Call History Management Search Source List in Dialing System Customizations If you require additional information or assistance with your new phone contact your system admi...

Страница 60: ...e file The uploaded custom picture appears in the pull down lists of Wallpaper You can only delete the custom wallpaper by clicking Del when selecting the desired custom wallpaper in the Wallpaper fie...

Страница 61: ...ed to blank the screen or fill it with moving images or patterns The screen saver will be stopped when Tap any touch key Tap the touch screen There is an incoming call A new prompt e g missed call new...

Страница 62: ...reen Saver 4 Tap the Screen Saver Wait Time field 5 Tap the desired time in the pop up dialog box 6 Tap the radio box after desired screen saver type 7 Tap to accept the change or to cancel Note Power...

Страница 63: ...l occur You can configure the following power saving settings Office Hour Idle TimeOut minutes Note Configuring the Office Hour Office Hour specifies the starting time and ending time in the office ea...

Страница 64: ...s much longer than the Off Hour Idle TimeOut If you use the IP phone the idle timeout that applies User Input Extension Idle TimeOut or Office Hour Off Hour Idle TimeOut is the timeout with the highes...

Страница 65: ...anently 15s 30s 60s 120s 300s 600s or 1800s Backlight is changed when the phone is inactive after the designated time in seconds To configure the backlight via phone user interface 1 Tap Settings from...

Страница 66: ...e of the following Drag the backlight slider When dragging the slider the control center except the backlight slider and notification center will be hidden You can view the intensity changes of the to...

Страница 67: ...efault You can change the language for the phone user interface and the web user interface respectively To change the language for the phone user interface 1 Tap Settings from the Home screen 2 Tap La...

Страница 68: ...selected language Input Method CP960 IP phone supports two kinds of input methods Android Keyboard AOSP English US and Google Pinyin The default input method is English US You can change the current...

Страница 69: ...er automatically or configure the time and date manually If the phone cannot obtain the time and date from the Simple Network Time Protocol SNTP server contact your system administrator for more infor...

Страница 70: ...box The default time zone name is China Beijing 13 Tap to accept the change or to cancel Note To configure the time and date manually via phone user interface 1 Tap Settings from the Home screen 2 Ta...

Страница 71: ...May 16 DD MMM YY 16 May 17 YYYY MM DD 2017 05 16 DD MM YYYY 16 05 2017 MM DD YY 05 16 17 DD MMM YYYY 16 May 2017 WWW DD MMM Tue 16 May To configure the date and time format via phone user interface 1...

Страница 72: ...accept the change or to cancel Administrator password is configurable via web user interface at the path Security Password Phone Lock You can lock your phone temporarily when you are not using it This...

Страница 73: ...e the phone lock via phone user interface 1 Tap Settings from the Home screen 2 Enter the admin password default password admin from the Advanced block 3 Tap Phone Lock 4 Tap the Lock Enable field 5 T...

Страница 74: ...one user interface 1 Tap the screen or tap the Mute touch key the touch screen prompts Unlock PIN 2 Enter the PIN in the Unlock PIN field 3 Tap OK to unlock the phone The icon disappears from the stat...

Страница 75: ...t the change or to cancel Note Deactivating the Phone Lock To deactivate the phone lock via phone user interface 1 Tap Settings from the Home screen 2 Enter the admin password default password admin f...

Страница 76: ...Tap the Volume touch key to adjust the receiver volume of speakerphone when the phone is in use Key tone volume Tap the Volume touch key to adjust the key tone volume when the phone is on the dialing...

Страница 77: ...one of the Volume touch key to increase or decrease the volume of speakerphone You can also drag the volume slider to adjust the talking volume To adjust the key tone volume When the phone is on the d...

Страница 78: ...also drag the volume slider to adjust the media volume Ring Tones Ring tones are used to indicate incoming calls You can select different ring tones to distinguish your phone from your neighbor s you...

Страница 79: ...or to cancel A ring tone for the phone is configurable via web user interface at the path Settings Preference Ring Type To select a ring tone for the account via phone user interface 1 Tap Settings f...

Страница 80: ...he change or to cancel A ring tone for the account is configurable via web user interface at the path Account Basic Ring Type To upload a custom ring tone for your phone via web user interface 1 Click...

Страница 81: ...nterface at the path Features Audio Touch Sounds If you enable touch sounds the phone will produce a sound when you tap an option on the touch screen To enable touch sounds via phone user interface 1...

Страница 82: ...al Tap one of the Volume touch key to increase or decrease the notification sound 6 Tap OK to accept the change or Cancel to cancel Note Silent Mode If you turn on the silent mode the IP phone won t p...

Страница 83: ...of the screen to enter the control center and toggle Silent on Note Contact Management This section provides the operating instructions for managing contacts Topics include Local Directory Blacklist R...

Страница 84: ...phone s local directory You can add new groups and contacts edit delete or search for a contact or simply dial a contact number from the local directory Adding Groups To add a group to the local dire...

Страница 85: ...Adding Contacts Account ring tone refer to Ring Tones Phone ring tone refer to Ring Tones If a specific ring tone is selected this group will use the ring tone according to the priority Contact ring t...

Страница 86: ...t the group name in the highlighted field 5 Tap OK to accept the change Deleting Groups To delete a group from the local directory 1 Tap 2 Tap 3 Tap after desired group and then tap Delete 4 Tap OK to...

Страница 87: ...ffice mobile or other numbers in the corresponding fields 4 Tap the Account field 5 Tap the desired account in the pop up dialog box If Auto is selected the phone will use the default account when pla...

Страница 88: ...y saved to the local directory Adding Contacts from a remote phone book To add a contact to the local directory from a remote phone book 1 Tap 2 Tap and then tap Remote Phone Book 3 Tap the desired re...

Страница 89: ...ok on page 98 Editing Contacts To edit a contact in the local directory 1 Tap 2 Tap after the desired contact If the contact was added to a specified contact group you can tap and then tap the contact...

Страница 90: ...lete 4 Tap OK to accept the change or Cancel to cancel To delete all contacts 1 Tap 2 Long tap a contact 3 Tap the radio box on the top right of the screen 4 Tap and then tap Delete contacts 5 Tap OK...

Страница 91: ...and upload a photo file from your local computer The web user interface prompts Upload success You can click Delete Photo to delete the custom photo Note To change the custom photo for the contact via...

Страница 92: ...Edit to accept the change When you place a call to the contact or receive a call from the contact the touch screen will display the contact photo Placing Calls to Contacts To place a call to a contact...

Страница 93: ...the desired number to dial out Searching for Contacts To search for a contact in the local directory 1 Tap 2 Do one of the following Tap Enter a few continuous characters of the contact name or contin...

Страница 94: ...u can manage your phone s local directory via phone user interface or web user interface But you can only import or export the contact list via web user interface To import an XML contact list file vi...

Страница 95: ...k on Directory Local Directory 2 Click Import CSV to locate and upload a contact list file the file format must be csv from your local system 3 Optional Check the Show Title checkbox It will prevent i...

Страница 96: ...e built in phone directory can store names and phone numbers for a blacklist You can store up to 30 contacts add edit delete or search for a contact in the blacklist directory and even call a contact...

Страница 97: ...cted the phone will use the default account when placing calls to the contact from the blacklist directory 7 Tap to accept the change or tap and then tap Discard to cancel To add a contact to the blac...

Страница 98: ...mber from the remote phone book You can configure your new phone to access up to 5 remote phone books The phone supports up to 5000 remote phone book entries For the access URL of the remote phone boo...

Страница 99: ...e Remote Phone Book To access your remote phone book via phone user interface 1 Tap 2 Tap and then tap Remote Phone Book 3 Tap the desired remote phone book The phone then connects to the remote phone...

Страница 100: ...The CP960 IP phone maintains call history lists of Missed calls Placed calls Received calls and Forwarded calls Each call history list supports up to 100 entries You can view call history place a cal...

Страница 101: ...records 2 Drag up and down to scroll You can tap and then tap Missed Calls Placed Calls Received Calls or Forwarded Calls to view entries in each call list directly 3 Do one of the following Tap the d...

Страница 102: ...values in the corresponding fields 6 Tap to accept the change or tap and then tap Discard to cancel For more information refer to Blacklist on page 96 Deleting History Records To delete an entry from...

Страница 103: ...touch screen displays all call records 2 Drag up and down to scroll You can tap and then tap Missed Calls Placed Calls Received Calls or Forwarded Calls to view entries in each call list directly 3 Lo...

Страница 104: ...ists can be Local Directory History Remote Phone Book and LDAP To configure search source list in dialing via web user interface 1 Click on Directory Setting 2 In the Search Source List In Dialing blo...

Страница 105: ...o place a call to the entry System Customizations Line Keys The CP960 IP phone supports 30 line keys You can assign predefined functionalities to line keys You can also define a label for a line key f...

Страница 106: ...ld 4 Optional Select the desired line from the Account ID field 5 Optional Enter the string that will appear on the touch screen in the Label field 6 Optional Enter the corresponding value in the Valu...

Страница 107: ...e locations of line key 1 and line key 2 Deleting a Line Key To delete a line key 1 Tap the desired page key if required 2 Drag the desired line key to the Delete field 3 Tap OK to accept the change o...

Страница 108: ...key and the page icon disappears Note The following figure shows that there is a status change on the line key of first page To configure the page tips feature via web user interface 1 Click on DSSKey...

Страница 109: ...Dependencies Type Line Account ID the account this feature will be applied to Label key label displayed on the touch screen Usage When the phone receives an incoming call 1 Tap the line key to accept...

Страница 110: ...ncoming calls in a group that is associated with their own group Dependencies Type Key Event Key Type GPickup Account ID the account this feature will be applied to Label key label displayed on the to...

Страница 111: ...access a remote group in your remote phone book You should configure a remote phone book in advance For more information refer to Remote Phone Book on page 96 Dependencies Type Key Event Key Type XML...

Страница 112: ...ouch screen Usage When DND is in phone mode 1 Tap the DND key to enable DND 2 Tap the DND key again to disable DND When DND is in custom mode 1 Tap the DND key to access the custom DND screen You can...

Страница 113: ...lock key to immediately lock your phone Directory You can use this key feature to easily access frequently used lists For more information refer to Local Directory on page 84 Dependencies Type Key Ev...

Страница 114: ...p the desired account 5 Tap the Activation field 6 Tap Enabled in the pop up dialog box 7 Enter the desired value in the Label Display Name Register Name User Name Password and SIP Server1 2 field res...

Страница 115: ...pop up dialog box 7 Tap to accept the change or to cancel Account registration is configurable via web user interface at the path Account Register Multiple Line Keys per Account You can configure mult...

Страница 116: ...characters Example 91 5 7 1234 would match 9151234 9161234 9171234 The parentheses can be used to group together patterns for instance to logically combine two or more patterns Example 1 9 2 7 3 woul...

Страница 117: ...gs Dial Plan Replace Rule 2 Enter the string e g 1 in the Prefix field 3 Enter the string e g 1234 in the Replace field 4 Enter the desired line ID in the Account field or leave it blank 5 Click Add t...

Страница 118: ...n Settings Dial Plan Dial now 2 Enter the desired value e g 2xx in the Rule field 3 Enter the desired line ID in the Account field or leave it blank For more information on the valid values for the Ac...

Страница 119: ...phone number outside the code area For example an area code is configured as Code 0592 Min Length 1 Max Length 15 When you dial out the number 56789 the length of the number is between 1 and 15 the p...

Страница 120: ...hone the dialing will fail and the touch screen will prompt Forbidden Number To add a block out number via web user interface 1 Click on Settings Dial Plan Block Out 2 Enter the desired value in the B...

Страница 121: ...k on page 72 Note To specify emergency numbers via web user interface 1 Click on Features Phone Lock 2 Enter the emergency number in the Emergency field For multiple emergency numbers enter a comma be...

Страница 122: ...ote Hotline You can dial a hotline number immediately upon tapping desired line key You can also configure a delay where the phone will dial out the hotline number automatically after a designated per...

Страница 123: ...prefix is 00 For more information on call forward refer to Forwarding Incoming Calls on page 147 To configure the FWD international via phone user interface 1 Tap Settings from the Home screen 2 Ente...

Страница 124: ...User Guide for CP960 IP Phone 124...

Страница 125: ...card You can connect a USB flash drive to your phone and save the recorded audios to it For more information on how to connect a USB flash drive refer to Connect the Optional USB Flash Drive on page...

Страница 126: ...an incoming call while playing a recording the recording is paused automatically If you do not answer or reject the incoming call or if you answer the incoming call and end the call the recording will...

Страница 127: ...USB Flash Drive Before copying recorded audios to USB flash drive you should connect a USB flash drive first For more information on how to connect a USB flash drive refer to Connect the Optional USB...

Страница 128: ...o the USB flash drive appears under the corresponding recorded audio To copy all recorded audios to USB flash drive 1 Tap to launch Recorder application 2 Tap Edit 3 Tap the radio box on the top left...

Страница 129: ...ed in USB flash drive tap 3 Tap after the desired recorded audios 4 Tap Rename 5 Enter the desired file name 6 Tap OK to accept the change or Cancel to cancel Deleting the Recorded Audios To delete a...

Страница 130: ...to launch Recorder application 2 If you want to delete the recorded audios saved in USB flash drive tap 3 Tap Edit 4 Tap the radio box on the top left of the screen to select all recordings 5 Tap 6 Ta...

Страница 131: ...corder application 2 If you want to check the storage space of the USB flash drive tap Browser The Browser application could be used in a similar way as a PC based web browser i e browse web pages boo...

Страница 132: ...o visit or enter the full URL then tap Go on the onscreen keyboard to browse the web page 4 You can do the following Scroll up down to view the web page Pinch open or pinch close the web page Managing...

Страница 133: ...Tap OK to accept the change Then the web page is added to the BOOKMARKS list To open a web page from the bookmarks list 1 Tap to launch Browser application 2 Tap on the top right of the screen 3 Tap...

Страница 134: ...K to accept the change or Cancel to cancel To delete a bookmark 1 Tap to launch Browser application 2 Tap on the top right of the screen 3 Tap to access the BOOKMARKS list There are some pre configure...

Страница 135: ...t to set as the home page in the pop up dialog box You can also long tap a web page in BOOKMARKS list and then tap Set as homepage Clearing the Navigation History You can periodically clear your navig...

Страница 136: ...h Browser application 2 Tap 3 Tap Settings 4 Customize the browser style you prefer Clock You can use the Clock application to check the time of other cities in the world To add the clock of other cit...

Страница 137: ...System Applications 137 5 Tap to return to the clock screen The added clock of the desired city displays on the touch screen...

Страница 138: ...User Guide for CP960 IP Phone 138...

Страница 139: ...ll to someone else or conduct a conference call This chapter provides basic operating instructions for the CP960 IP phone Topics include Placing Calls Answering Calls Handling Incoming Calls Ending Ca...

Страница 140: ...7 and Call History Management on page 100 Placing a Call To place a call 1 Tap 2 Enter the desired number using the onscreen dial pad Tap to see the onscreen keyboard and then you can enter the number...

Страница 141: ...a Bluetooth Enabled mobile phone with your IP phone you can place a mobile call on your mobile phone or IP phone The IP phone screen and mobile phone screen both shows the connected call You can use...

Страница 142: ...ide for CP960 IP Phone 142 2 Do one of the following Tap the My Mobile line key Enter the desired number Tap Send Tap Enter the desired number Tap Send Tap the connected mobile phone in the pop up dia...

Страница 143: ...er you hold the call you can resume the call or place a new call Answering Calls You can answer a call no matter whether you are in another call or not If you want to answer a new incoming call when i...

Страница 144: ...Turn on Auto Answer Mute This field appears only if Auto Answer is turned on 6 Tap to accept the change or to cancel The icon will display on the status bar You can also swipe down from the top of the...

Страница 145: ...s with Do Not Disturb DND Enabled You can use DND to reject incoming calls automatically on the phone The prompt message n New Missed Call s n indicates the number of missed calls will appear on the t...

Страница 146: ...ected automatically and n New Missed Call s n indicates the number of missed calls e g 1 New Missed Call s will appear on the touch screen Note To configure the DND authorized numbers via web user int...

Страница 147: ...Swipe down from the top of the screen to enter the control center and toggle DND off Tap Settings from the Home screen Tap DND from the Features block Turn off DND Enable Tap to accept the change For...

Страница 148: ...g call to 3 Tap FWD The touch screen prompts a call forward message Forwarding All Incoming Calls to a Contact You can set up the IP phone to forward all incoming calls to a contact To forward all inc...

Страница 149: ...is enabled If the forward on code or off code is configured the IP phone sends the corresponding code to the server when a certain action takes place For example if you set the Always Forward on code...

Страница 150: ...umbers specified in the Forward Authorized Numbers field Note To disable call forwarding 1 Tap Settings from the home screen 2 Tap Call Forward from the Features block 3 Tap the desired forwarding typ...

Страница 151: ...ld 10 Tap to accept the change or to cancel Speed dial key is configurable via web user interface at the path DSSKey Line key To configure a speed dial key from directory history 1 Tap or 2 Tap after...

Страница 152: ...e Note To view placed calls list when the phone is on the dialing interface 1 Tap The touch screen displays the placed calls list 2 Drag up and down to scroll through placed calls You can also enter a...

Страница 153: ...to redial via phone user interface 1 Tap Settings from the Home screen 2 Tap Auto Redial from the Features block 3 Turn on Auto Redial 4 Enter the desired time in seconds in the Redial Interval field...

Страница 154: ...y times as configured until the called party answers Call Completion You can use call completion to notify the caller who failed to reach a desired party when the party becomes available to receive a...

Страница 155: ...screen of the phone 1 Tap OK to redial the number Note Recall You can use the recall key to place a call back to the last incoming call To configure a recall key via phone user interface 1 Tap Settin...

Страница 156: ...you mute the microphone The other party cannot hear you but you can still hear all other parties You cannot record your voice refer to Call and Conference Recording Local You can mute the microphone i...

Страница 157: ...hone Features 157 Swipe down from the top of the screen to enter the control center and toggle Mute on Note that you cannot enter the control center when calling ringing or in a call When in a call ta...

Страница 158: ...from the top of the screen to enter the control center and toggle Mute off Tap Mute again Call Hold Resume You can place an active call on hold Only one active call can be in progress on the phone at...

Страница 159: ...s 159 To place a call on hold 1 Tap More Hold during a call The phone will beep softly every 30 seconds to remind you that you still have a call on hold To resume a held call do one of the following T...

Страница 160: ...Attended Transfer Transfer a call when the target phone is ringing Attended Transfer Transfer a call with prior consulting Blind Transfer Before performing a blind transfer except you use dial number...

Страница 161: ...umber method make sure that the transfer mode via Dsskey is configured as New Call or Attended Transfer For more information on how to configure it refer to Configuring Transfer Mode via DssKey on pag...

Страница 162: ...he desired contact and tap the desired contact to dial out Tap and then tap Remote Phone Book Search for the contact and tap the desired contact to dial out Remote phone book should be configured in a...

Страница 163: ...the CP960 IP phone to create a conference using the phone s local conference and network conference During a conference you can manage each participant Note Local Conference The CP960 IP phone suppor...

Страница 164: ...ce by Dialing Multiple Numbers To initiate a conference by dialing multiple contacts 1 Tap 2 Tap Call multiple members Click here 3 Enter the number of the first party then tap Add members or select a...

Страница 165: ...by inviting participants 1 Place a call to the first party 2 When the first party answers the call tap Invite 3 Do one of the following Enter the number of the second party and then tap Invite Tap ta...

Страница 166: ...all intended parties Tap Call multiple members Click here Enter the number of the first party then tap Add members or select a contact from Directory or History Repeat the step above until you add al...

Страница 167: ...ence the following shows an example To create a hybrid UC conference 1 Make sure you have connected a mobile phone to your IP phone refer to Pairing and Connecting the Bluetooth Enabled Mobile Phone 2...

Страница 168: ...ll on hold Tap More NewCall to place a new call Tap More Split to split the conference call into individual calls on hold Tap DND to enable or disable the DND mode Tap Mute to mute the conference call...

Страница 169: ...nference feature on the CP960 IP phone to conduct an conference with multiple participants This feature allows you to perform the following Join calls together in a conference call Invite other party...

Страница 170: ...of the new party and then tap Add members Repeat the step above until you add all intended parties Tap to call all intended parties at the same time The procedures to set up a network conference call...

Страница 171: ...Optional Enter the string that will appear on the touch screen in the Label field 11 Enter the call park code in the Value field 12 Tap to accept the change or to cancel Call park key is configurable...

Страница 172: ...lobal or per line basis via web user interface The call pickup code configured on a per line basis takes precedence over that configured on a global basis Note Directed Call Pickup To enable directed...

Страница 173: ...dvanced 2 Select the desired account from the pull down list of Account 3 Enter the directed call pickup code in the Directed Call Pickup Code field 4 Click Confirm to accept the change To pick up a c...

Страница 174: ...formation refer to Line Keys on page 105 Group Call Pickup To enable group call pickup and configure the group call pickup code on a global basis via web user interface 1 Click on Features Call Pickup...

Страница 175: ...in the Group Call Pickup Code field 4 Click Confirm to accept the change To pick up a call in the group 1 Tap GPickup appears on the touch screen 2 Tap GPickup on your phone when a phone in the group...

Страница 176: ...to send anonymous call on off code to the server to activate deactivate anonymous call on the server side Note To configure anonymous call via phone user interface 1 Tap Settings from the Home screen...

Страница 177: ...ccept the change or to cancel Anonymous call is configurable via web user interface at the path Account Basic To place an anonymous call 1 Using the specific line on the phone to place a call to phone...

Страница 178: ...tion via phone user interface 1 Tap Settings from the Home screen 2 Tap Anonymous from the Features block 3 Tap the desired line 4 Turn on Anonymous Rejection 5 Optional Turn on Send Rejection Code 6...

Страница 179: ...Basic Phone Features 179 If phone B has anonymous call feature enabled and places a call to your phone the call will be rejected and the touch screen of the phone B will display the following...

Страница 180: ...User Guide for CP960 IP Phone 180...

Страница 181: ...phone For example you can configure a BLF key on the phone to monitor the status of a friend s line busy or idle The BLF key icon illuminates solid red when the friend s line is in use For more BLF ke...

Страница 182: ...le via web user interface at the path DSSKey Line key Configuring Visual and Audio Alert for BLF pickup You can enable audio alert feature for BLF pickup on the phone This allows the monitoring phone...

Страница 183: ...d line You can do the following actions Tap DPickup to pick up the call Tap Dial to dial out the monitored phone number Tap More NewCall to place a new call Tap More Cancel to exit this screen Configu...

Страница 184: ...when configuring a BLF key For more information refer to Configuring a BLF Key on page 181 You can also configure the directed call pickup code on a global or per line basis via web user interface If...

Страница 185: ...er interface 1 Click on Account Advanced 2 Select the desired account from the pull down list of Account 3 Enter the desired pickup code in the Directed Call Pickup Code field 4 Click Confirm to accep...

Страница 186: ...he IP phone you can do the following 1 Tap More DSS Keys 2 Tap the BLF key of the monitored user which you want to transfer this call to Then the active call is connected to the number of the monitore...

Страница 187: ...reates a BLF List URI e g BLFList example com including a list of user1 user2 on the server The BLF List keys on the IP phone can present the status of user1 and user2 The key icons illuminate flashin...

Страница 188: ...he parked call ensure that the BLF List Retrieve Call Parked Code has been configured in advance If the code is not configured the phone will place a call to the monitored user instead of retrieving t...

Страница 189: ...on that you ll need to reference later The recorded calls saved in aac format and include a date time stamp and the other party s number IP address name or the first person s number IP address name yo...

Страница 190: ...ing is not be paused when the following occurs You place a call on hold You mute a call You set up a conference call You perform the semi attended or attended transfer An incoming calls arrives on you...

Страница 191: ...ere is only a call on the phone tap EndCall The recording will be stored as a new file when the phone starts recording again Conference Recording You can record conference calls in the same way as oth...

Страница 192: ...Features block 3 Tap the desired line key 4 Tap the Type field 5 Tap Key Event in the pop up dialog box 6 Tap the Key Type field 7 Tap Record in the pop up dialog box 8 Optional Enter the string that...

Страница 193: ...ot available when There are no connected calls on your phone You place a new call To record a call 1 Tap More DSS Key during a call 2 Tap the Record key or URL Record key If the recording starts succe...

Страница 194: ...or very long which means that actual personal offices would be often vacant consuming valuable space and resources You can use hot desking on the CP960 IP phone to log out of existing accounts and the...

Страница 195: ...interface at the path DSSKey Line Key To use hot desking 1 Tap the hot desking key from the DSS key screen The following prompt will appear on the touch screen of the phone 2 Tap OK Registration conf...

Страница 196: ...ey via phone user interface 1 Tap Settings from the Home screen 2 Tap DSS Keys from the Features block 3 Tap the desired line key 4 Tap the Type field 5 Tap Intercom in the pop up dialog box 6 Tap the...

Страница 197: ...com Mute is enabled the microphone will be muted for intercom calls If Intercom Mute is disabled the microphone will work for intercom calls Intercom Mute is disabled by default Intercom Tone You can...

Страница 198: ...place an intercom call when the target phone is idle 1 Tap the intercom key The target extension plays a warning tone and automatically answers the call in the hands free speakerphone mode by default...

Страница 199: ...as listening to channel 0 It is the default channel 1 to 25 You can broadcast audio to a specific channel We recommend that you specify these channels when broadcasting with Polycom IP phones which ha...

Страница 200: ...gurable via web user interface at the path DSSKey Line Key To configure a paging list key via phone user interface 1 Tap Settings from the Home screen 2 Tap DSS Keys from the Features block 3 Tap the...

Страница 201: ...n the Address field The valid multicast IP addresses range from 224 0 0 0 to 239 255 255 255 4 Enter the paging group name in the Label field 5 Enter the desired channel in the Channel field The valid...

Страница 202: ...user interface To configure a default codec for multicast paging via web user interface 1 Click on Features General Information 2 Select the desired codec from the pull down list of Multicast Codec T...

Страница 203: ...iority active parameter decides how the phone handles incoming multicast paging calls when there is already a multicast paging call on the phone If enabled the phone will ignore incoming multicast pag...

Страница 204: ...ne is idle 1 Tap the multicast paging key from the DSS key screen The phone sends RTP to a preconfigured multicast address IP Port Both the sender s and receiver s phones play a warning tone and the r...

Страница 205: ...e Tap Mute to mute the multicast RTP session all other participants can hear each other but they cannot hear you Tap EndCall to cancel the multicast RTP session Tap to record a call To stop recording...

Страница 206: ...a call To stop recording tap Music on Hold Music on hold MoH is the business practice of playing recorded music to fill the silence that would be heard by the party placed on hold To use this feature...

Страница 207: ...sic Server URI field 4 Click Confirm to accept the change When you place a call on hold music will be played to the held party Note For this feature to function all involved parties cannot use encrypt...

Страница 208: ...extension will cause both phones to ring simultaneously The incoming call can be answered on either phone but not both This feature is very useful in the boss and secretary scenario For example the s...

Страница 209: ...party B share the account 4603 phone A registers the primary account 4603 and assigns line key 1 and line key 2 for the account 4603 phone B registers the alternate account 4603_1 and assigns line key...

Страница 210: ...d the number of line key on phone A via web user interface 1 Register the primary account 4603 2 Click on Advanced and then select Share Call Appearance from the pull down list of Shared Line 3 Enter...

Страница 211: ...value is 1 In this example the value is set to 2 4 Click Confirm to accept the change The phone A will automatically configure the line keys from the first unused DSS key according to the configured...

Страница 212: ...interface 1 Register the alternate account 4603_1 Enter the primary account 4603 in the Register Name field 2 Click on Advanced and then select Share Call Appearance from the pull down list of Shared...

Страница 213: ...ty to retrieve the held call For example you can retrieve the held call on either phone A or phone B when you place a call on public hold you can retrieve the held call only on phone A when you place...

Страница 214: ...ature access code via web user interface 1 Click on Account Advanced 2 Select the desired account from the pull down list of Account 3 Enter the call pull feature access code e g 11 in the Call Pull F...

Страница 215: ...een dial pad and then tap Send To place multiple calls on the shared line You can have more than one call on the shared line To place a new call when there is an active call on the line key 1 of phone...

Страница 216: ...will become and flash You can answer the incoming call on either phone A or phone B The touch screen of phone A displays the information of the incoming call Note On phone A 1 Tap Phone B stops ringi...

Страница 217: ...become and stay solid indicating that there is the held call on the line key 1 Note Placing a Call on Hold To place a call on public hold 1 Tap More Hold on phone A when party A and party C are talkin...

Страница 218: ...ld The icon indicators of line key 1 on phone B will become when the shared line call is placed on private hold Retrieving a Held Call To retrieve a call placed on public hold You can retrieve the pub...

Страница 219: ...n phone B and phone C phone A disconnects the call And the line key icon on phone A and phone B will become To retrieve a call placed on private hold The private held call can be only retrieved by the...

Страница 220: ...in the conference call taps More Hold two way voice can be heard between the remaining parties If party A or party B taps EndCall the remaining parties are still connected If the other party not the...

Страница 221: ...o the following 1 Long tap the desired line key on phone B 2 Tap CallPull The active call has been retrieved from the phone A successfully If there is a held call between phone A and phone C do the fo...

Страница 222: ...has unread voice mail s Note Leaving Voice Mails To leave a voice mail You can leave a voice mail for someone else when he she is busy or inconvenient to answer the call Follow the voice prompt from t...

Страница 223: ...the voice mail access code 2 Follow the voice prompt to listen to your voice mails Note To view the voice mail via phone user interface 1 Tap to launch Message application 2 Tap View Voice Mail Voice...

Страница 224: ...WI will be indicated in two ways a warning tone and an indicator message including a voice mail icon on the touch screen This will be cleared when you retrieve all voice mails or delete them The MWI s...

Страница 225: ...e desired account from the pull down list of Account 3 Select Enabled from the pull down list of Subscribe for MWI 4 Enter the period time in the MWI Subscription Period Seconds field 5 Click Confirm...

Страница 226: ...ed voice mail number in the Voice Mail field 6 Click Confirm to accept the change The IP phone will subscribe to the voice mail number for MWI service using Subscribe MWI To Voice Mail Note MWI subscr...

Страница 227: ...the IP phone refer to Placing a Mobile Call over Bluetooth Use the IP phone as a Bluetooth speaker for music played on your mobile phone Merge the calls on you IP phone the PC and connected mobile pho...

Страница 228: ...creen displays the Bluetooth icon To deactivate the Bluetooth mode via phone user interface 1 Do one of the following Tap Swipe down from the top of the screen to enter the control center Long tap Blu...

Страница 229: ...line key you may assign it manually Before you pair a mobile phone check the Bluetooth mode on the mobile phone to make sure that the mobile phone is discoverable To pair and connect the Bluetooth En...

Страница 230: ...mobile phone is deactivated you can tap the Mobile Account key try to reconnect Making Receiving a Mobile Call on the IP Phone You can enable the phone audio feature to make receive a mobile call usin...

Страница 231: ...as Bluetooth Speaker You can enable the media audio feature to use the IP phone as a Bluetooth speaker for music played on your mobile phone To configure the media audio feature 1 Pair and connect th...

Страница 232: ...ay in the PARED DEVICES list on your IP phone The mobile phone name displayed in scanning list of other devices will not be changed Note Making the IP Phone Discoverable If you make your IP phone visi...

Страница 233: ...ncel The IP phone will be visible to all Bluetooth devices nearby Editing Device Information To edit device information via phone user interface 1 Activate the Bluetooth mode 2 Tap Edit My Device Info...

Страница 234: ...ter the control center Long tap Bluetooth Tap Settings from the Home screen Tap Bluetooth from the Basic block 2 Tap the connected mobile phone 3 Tap OK to accept the change or Cancel to cancel The mo...

Страница 235: ...ES list Connecting a PC Using a USB Cable You can connect a PC to your IP phone so you can use it as a speaker for calls or media played on your PC For more information on how to connect the PC refer...

Страница 236: ...ing a call After connection you can use the IP phone to play audio from calls and from media including music and videos To connect the PC audio when your IP phone is idle 1 Connect the PC to the IP ph...

Страница 237: ...one s speaker To connect the PC audio when you are placing a call 1 Connect the PC to the IP phone The dialing is canceled The PC audio plays through your conference phone s speaker Managing the PC Au...

Страница 238: ...io on hold 1 Tap More Hold The touch screen indicates that the audio is on hold To resume the PC audio do one of the following Tap Tap More Resume Muting or Unmuting the Microphone The following occur...

Страница 239: ...the PC will use the IP phone to play audio from calls or media by default If not you can set the IP phone as PC audio device You can set the IP phone as PC audio device via softphone or PC Setting th...

Страница 240: ...Save changes Settings the IP Phone as PC Audio Device via PC When your PC is connected to the IP phone you can set the IP phone as the default audio device for your PC and play audio from music and v...

Страница 241: ...Placing the CPE90 The CPE90 has a rubber pads on its base to prevent it from sliding You can place the CPE90 on a stable surface and keep it away from obstacles so that it can effectively pick up sou...

Страница 242: ...dicators LED on the wired expansion microphone CPE90 LED Status Description Solid red The phone is muted Flashing red The phone is ringing Solid green The phone is placing a call Call mute mode is dea...

Страница 243: ...arging the CPW90 CPW90 LED Instructions CPW90 Working Frequency If you require additional information or assistance with the CPW90 contact your system administrator Placing the CPW90 The CPW90 has a r...

Страница 244: ...h works as an audio input device for CP960 IP phone It features superior audio technology and supports 360 degree voice pickup range at a radius of up to 10 feet 3 meters without any wiring troubles T...

Страница 245: ...lashes yellow The CPW90 registers with the IP phone automatically If the registration is successful the mute indicator LED on the CPW90 goes out and the touch screen of IP phone prompts the CPW90 info...

Страница 246: ...o mute the CPW90 during a call 1 Tap to mute the call The mute indicator LED illuminates solid red And the icon appears on the status bar of the IP phone To unmute the CPW90 during a call 1 Tap again...

Страница 247: ...3 Tap Detail from the desired microphone block Finding the CPW90 You can find the CPW90 which has registered with the IP phone To find the registered CPW90 1 Tap Settings from Home screen 2 Tap Wirel...

Страница 248: ...ll Solid red The phone is muted Fast flashing yellow The CPW90 is in the registration mode Slowly flashing yellow The CPW90 has registered with the phone but the CPW90 is out of range The CPW90 has re...

Страница 249: ...tton the battery indicator LED on the CPW90 is still off it means the CPW90 is turned off CPW90 Working Frequency For reference the Frequency Channels of CPW90 used in each Region are tabulated below...

Страница 250: ...0 Freq MHz RF Carrier Index DECT tester Numbering EU Taiwan US LA Korea Brazil Japan 1914 624 8 2 1916 352 7 1 1918 080 6 0 1919 808 5 1921 536 4 4 1923 264 3 3 1924 992 2 2 1926 720 1 1 1928 448 0 0...

Страница 251: ...Dublin Morocco Portugal Lisboa Porto Funchal Spain Canary Islands Las Palmas United Kingdom London 1 Albania Tirane Austria Vienna Belgium Brussels Caicos Chad Croatia Zagreb Czech Republic Prague De...

Страница 252: ...stralia Sydney Melboume Canberra Russia Vladivostok 10 30 Australia Lord Howe Islands 11 New Caledonia Noumea Russia Srednekolymsk Time 11 30 Norfolk Island 12 New Zealand Wellington Auckland Russia K...

Страница 253: ...ry 135 Clock 136 Conference 163 Configuration Screen 36 Configuring an Access URL 98 Configuring the BLF Feature on the Phone 181 Configuring the Intercom Feature on the Phone 196 Configuring SCA Feat...

Страница 254: ...ltiple Line Keys per Account 115 Muting or Unmuting the CPE90 241 Muting or Unmuting the CPW90 246 Muting or Unmuting the Microphone 238 Music on Hold 206 Mute a Call 156 N Navigating Menus and Fields...

Страница 255: ...U Unpairing the Bluetooth Device 234 Uploading Contact Photos 91 Uploading the Custom Picture via Web User Interfaces 20 Using BLF Feature on the Phone 185 Using the CP Wired Expansion Mic CPE90 241 U...

Отзывы: