background image

Customizing  Your  Phone


31 


Always Off: 

Backlight is off permanently. 


15s

,

 30s

1min

,

 2min

,

 5min

,

 10min 

or

 30min: 

Backlight is turned off when the phone is 

inactive after the designated time (in seconds). 

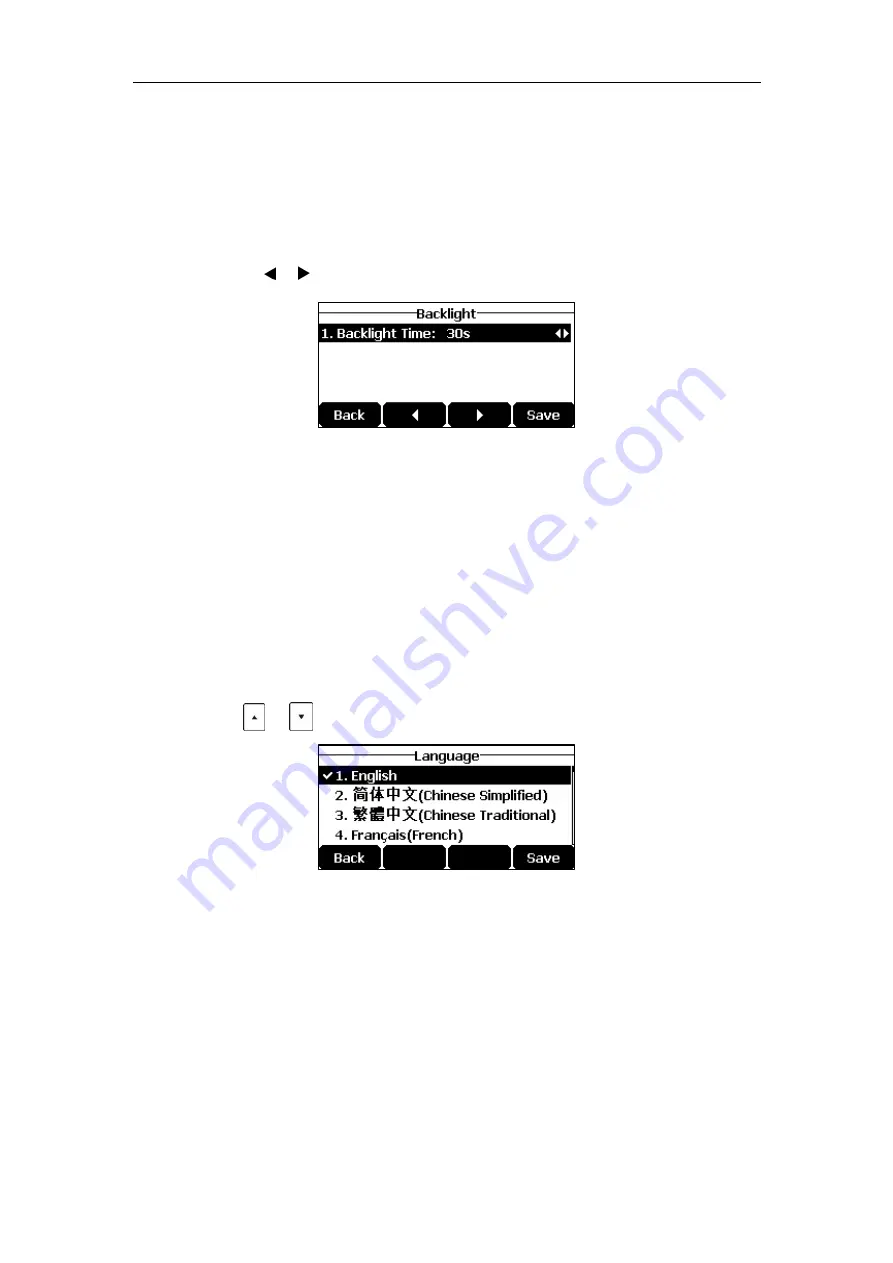
To configure the backlight via phone user interface: 

1.


Tap 

Menu

->

Settings

->

Basic Settings

->

Display

->

Backlight

2.


Tap the      or      soft key to select the desired value from the 

Backlight Time

 field. 


3.


Tap the 

Save

 soft key to accept the change or the 

Back

 soft key to cancel. 

Backlight is configurable via web user interface at the path

 Settings

->

Preference

Language 

The default language of the phone user interface is English. If the language of your web 
browser is not supported by the phone, the web user interface will use English by default. You 
can change the language for the phone user interface and the web user interface respectively. 

To change the language for the phone user interface:


1.


Tap 

Menu

->

Settings

->

Basic Settings

->

Language

2.


Tap          or          to select the desired language. 


3.


Tap the 

Save

 soft key to accept the change. 

Text displayed on the phone user interface will change to the selected language. 


Содержание CP920

Страница 1: ...i CP920 user guide...

Страница 2: ...form or by any means with any purpose other than personal use Warranty 1 Warranty THE SPECIFICATIONS AND INFORMATION REGARDING THE PRODUCTS IN THIS GUIDE ARE SUBJECT TO CHANGE WITHOUT NOTICE ALL STAT...

Страница 3: ...product is available on the Yealink Support page for the product Patent Information China the United States EU European Union and other countries are protecting one or more patents of accompanying pr...

Страница 4: ...alink uses software under the specific terms of the GPL Please refer to the GPL for the exact terms and conditions of the license The original GPL license source code of components licensed under GPL...

Страница 5: ...u need to quickly use your new phone First verify with your system administrator that the IP network is ready for phone configuration Also be sure to read the Packaging Contents in this guide and see...

Страница 6: ...tallation 12 Connecting the Network and Power 13 Connecting the Optional USB Flash Drive 14 Connecting the Optional Expansion PSTN Box CPN10 15 Phone Initialization 15 Phone Status 15 Basic Network Se...

Страница 7: ...ll History Management 55 Viewing History Records 55 Placing a Call from History Records 55 Adding a Contact to the Local Directory Blacklist 56 Deleting History Records 56 Disabling History Record 57...

Страница 8: ...arance BLA 125 Messages 129 Using Your Phone with Bluetooth Devices 133 Activating Deactivating the Bluetooth Mode 133 Pairing and Connecting the Bluetooth Enabled Mobile Phone 134 Making Receiving a...

Страница 9: ...Issues 147 Network Issues 149 Log Issues 151 Reboot Upgrade Reset Issues 153 Regulatory Notices 157 Service Agreements 157 Limitations of Liability 157 Safety Instructions 157 Appendix 161 Appendix A...

Страница 10: ......

Страница 11: ...w of the CP920 IP conference phone Topics include Hardware Component Instructions Icon Instructions LED Instructions User Interfaces Documentations If you require additional information or assistance...

Страница 12: ...User Guide for the CP920 HD IP Conference Phone 2 Hardware Component Instructions The following figure shows the primary hardware component of CP920 IP conference phone...

Страница 13: ...ity their context sensitive features On hook Key Ends a call or returns to the idle screen Touch Keypad Provides the digits letters and special characters in context sensitive applications Volume Key...

Страница 14: ...conveniently in excellent speech quality with PSTN Icon Instructions Certain features and icons do not apply to PSTN Therefore not all icons listed in the table below will display when using PSTN onl...

Страница 15: ...e Wi Fi enabled Bluetooth enabled Bluetooth enabled mobile phone paired and connected LED Instructions Mute key indicators LED on the CP920 IP phone LED Status Description Solid red The phone is initi...

Страница 16: ...ormation on customizing your phone with the available options from the phone user interface refer to Customizing Your Phone on page 27 Note Web User Interface In addition to the phone user interface y...

Страница 17: ...Tones Key Tone Touch Tone Contact Management Directory Local Directory Blacklist Favorite Directory Remote Phone Book x Call History Management Search Source List in Dialing x Logo Customization x Pr...

Страница 18: ...old x Share Call Appearance SCA x Bridge Line Appearance BLA x Messages SIP Account User Options Type Active Line Label Display Name Register Name User Name Password Server Option SIP Server1 2 Regist...

Страница 19: ...ck Start Guide Basic call features and phone customizations In the package On the website English Chinese User Guide Phone Web user interface settings Basic call features and advanced phone features O...

Страница 20: ...User Guide for the CP920 HD IP Conference Phone 10...

Страница 21: ...Packaging Contents Phone Installation Phone Initialization Phone Status Basic Network Settings Wireless Network Settings Registration Idle Screen Entering Data and Editing Fields If you require additi...

Страница 22: ...s are optional accessories for your CP920 IP conference phone You need to purchase them separately if required Expansion PSTN Box CPN10 PSTN Box CPN10 3m PSTN Cable Double side Tape Quick Start Guide...

Страница 23: ...istrator will advise you which one to use AC power Optional Power over Ethernet PoE AC Power Optional To connect the AC power 1 Connect the DC plug on the power adapter to the DC12V port on the phone...

Страница 24: ...port on the in line power switch hub Note Connecting the Optional USB Flash Drive You can connect a USB flash drive to record calls conferences and play back recorded files To connect a USB flash driv...

Страница 25: ...ver in your network to obtain valid IPv4 network settings e g IP address subnet mask default gateway address and DNS address by default Note Phone Status You can view phone status via phone user inter...

Страница 26: ...he phone status via phone user interface 1 Tap or tap Menu from the Idle screen 2 Select Status 3 Tap or to scroll through the list and view the specific information To view the phone status via web u...

Страница 27: ...Advanced Settings default password admin Network WAN Port 2 Tap the or soft key to select IPv4 IPv6 or IPv4 IPv6 from the IP Mode field 3 Tap the Save soft key to accept the change or the Back soft ke...

Страница 28: ...Client and then tap the Enter soft key 4 Enter the desired value in the IP Address IPv6 IP Prefix Default Gateway Pri DNS and Sec DNS field respectively 5 Tap the Save soft key to accept the change or...

Страница 29: ...i Fi Protected Setup WPS Manually add a wireless network Manually Connect to an Available Wireless Network To manually connect to a wireless network via phone user interface 1 Tap Menu Settings Basic...

Страница 30: ...re wireless networks WPS can automatically configure a wireless network with a network name SSID and strong WPA data encryption and authentication Two methods supported by Yealink IP phones in the Wi...

Страница 31: ...prompts Please input below PIN code on your Wi Fi router and tap OK to start connecting xxx 4 Log into your gateway router s web interface and configure it to search the clients For more information r...

Страница 32: ...Settings Wi Fi X available networks X is the numbers of available networks 2 Tap or to highlight the desired wireless network 3 Tap the Detail soft key to view the detailed wireless network informati...

Страница 33: ...y connects to To delete the desired saved wireless network profile 1 Select Delete or Delete All from the prompt list If you delete your wireless network profile from your phone you need to manually c...

Страница 34: ...hone refer to Account Registration on page 63 Idle Screen If the phone has successfully started up the idle LCD screen is displayed as below The idle screen displays the label of the current account t...

Страница 35: ...HI ghi4 ghi4 GHI4 4 5jklJKL jkl5 jkl5 JKL5 5 6mnoMNO mno6 mno6 MNO6 6 7pqrsPQRS pqrs7 pqrs7 PQRS7 7 8tuvTUV tuv8 tuv8 TUV8 8 9wxyzWXY Z wxyz9 wxyz9 WXYZ9 9 0 space space space 0 _ _ _ _ To enter or ed...

Страница 36: ...soft key or lowercase abc soft key input mode is not available Enter special characters Tap the keypad key or or tap For key If it is in the uppercase ABC soft key uppercase and lowercase Abc soft key...

Страница 37: ...omizations If you require additional information or assistance with your new phone contact your system administrator General Settings Power Saving The power saving feature is used to turn off the back...

Страница 38: ...terface 1 Click on Settings Power Saving 2 Select Enabled from the pull down list of Power Saving 3 Click Confirm to accept the change Configuring the Office Hour Office Hour specifies the starting ti...

Страница 39: ...or example tap a key on the phone By default the Office Hours Idle Timeout is much longer than the Off Hours Idle TimeOut If you use the IP phone the idle timeout that applies User Input Extension Idl...

Страница 40: ...ser interface 1 Tap Menu Settings Basic Settings Display Contrast 2 Tap the or soft key to decrease or increase the intensity of contrast The default contrast level is 6 3 Tap the Save soft key to acc...

Страница 41: ...key to cancel Backlight is configurable via web user interface at the path Settings Preference Language The default language of the phone user interface is English If the language of your web browser...

Страница 42: ...strator for more information To configure the SNTP settings via phone user interface 1 Tap Menu Settings Basic Settings Time Date SNTP Settings 2 Tap the or soft key to select the time zone that appli...

Страница 43: ...lect the desired time format 12 Hour or 24 Hour from the Time Format field 3 Tap the or soft key to select the desired date format from the Date Format field 4 Tap the Save soft key to accept the chan...

Страница 44: ...assword in the New PWD field 4 Re enter the new password in the Confirm PWD field 5 Tap the Save soft key to accept the change or the Back soft key to cancel Administrator password is configurable via...

Страница 45: ...e the ringer volume by tapping the Silence soft key Note Activating the Phone Lock To activate the phone lock via phone user interface 1 Tap Menu Settings Basic Settings Phone Lock 2 Enter the desired...

Страница 46: ...ng or the Back soft key to cancel Note Unlocking the Phone To unlock the phone via phone user interface 1 Tap any locked key the LCD screen prompts Unlock PIN 2 Enter the PIN in the Unlock PIN field 3...

Страница 47: ...ld 4 Tap the Save soft key to accept the change Phone lock is configurable via web user interface at the path Features Phone Lock Audio Settings Volume You can tap the volume key to adjust the ringer...

Страница 48: ...g tone for the phone via phone user interface 1 Tap Menu Settings Basic Settings Sound Ring Tones Common 2 Tap or to select the desired ring tone 3 Optional Tap or to adjust the ringer volume 4 Tap th...

Страница 49: ...Ring Type To upload a custom ring tone for your phone via web user interface 1 Click on Settings Preference 2 In the Upload Ringtone field click Browse to locate a ring tone file the file format must...

Страница 50: ...path Features Audio Touch Tone If you enable touch tone and tap the keys except the off hook key the phone will produce a sound when it is not on the dialing pre dialing screen and not in a call To co...

Страница 51: ...ppears in the Enabled column 3 Repeat the step 2 to add more lists to the Enabled column 4 To remove a list from the Enabled column select the desired list and click 5 To adjust the display order of e...

Страница 52: ...2 Select Local Directory If the Local Directory is removed from the directory refer to Directory on page 41 tap Menu Directory Local Directory to enter the local directory 3 Tap the AddGroup soft key...

Страница 53: ...ange or the Back soft key to cancel Editing Groups To edit a group in the local directory 1 Tap Directory from the Idle screen 2 Select Local Directory If Local Directory is removed from the directory...

Страница 54: ...the desired contact group 4 Tap the Option soft key and then select Delete The LCD screen prompts the following warning 5 Tap the OK soft key to confirm the deletion or the Cancel soft key to cancel...

Страница 55: ...ing tone from the Ring field If Auto is selected this contact will use the ring tone according to the priority Group ring tone refer to Adding Groups Account ring tone refer to Ring Tones Phone ring t...

Страница 56: ...ctory on page 41 tap Directory Remote Phone Book to enter the remote phone book 2 Select the desired remote group and then tap the Enter soft key 3 Tap or to highlight the desired entry 4 Tap the Opti...

Страница 57: ...key to cancel Deleting Contacts To delete a contact from the local directory 1 Tap Directory from the Idle screen 2 Select Local Directory If Local Directory is removed from the directory refer to Di...

Страница 58: ...t All Contacts and then tap the Enter soft key 4 Tap or to highlight the desired contact 5 Do one of the following If only one number for the contact is stored in the local directory tap the Send soft...

Страница 59: ...ory via phone user interface or web user interface But you can only import or export the contact list via web user interface To import an XML contact list file via web user interface 1 Click on Direct...

Страница 60: ...n list of Index At least one item should be selected to be imported into the local directory 7 Click Import to complete importing the contact list To export a contact list via web user interface 1 Cli...

Страница 61: ...ocal Directory to enter the local directory 3 Select the desired contact group and then tap the Enter soft key If the contact is not in any group select All Contacts and then tap the Enter soft key 4...

Страница 62: ...tory 3 Select the desired contact group and then tap the Enter soft key If the contact is not in any group select All Contacts and then tap the Enter soft key 4 Tap or to highlight the desired contact...

Страница 63: ...r matches the characters entered will appear on the LCD screen You can dial from the result list Remote Phone Book You can add new contacts to the local directory search for a contact or simply dial a...

Страница 64: ...emote phone book 2 Select the desired remote group and then tap the Enter soft key The phone then connects to the remote phone book and proceeds to load it The contacts in the remote phone book are di...

Страница 65: ...If you don t want to save the call history you can disable the feature History record feature is enabled by default Viewing History Records To view call history 1 Tap the History soft key The LCD scr...

Страница 66: ...or more information on local directory and or blacklist refer to Local Directory on page 42 and or Blacklist on page 50 Deleting History Records To delete an entry from the call history list 1 Tap the...

Страница 67: ...Remote Phone Book and LDAP Note To configure search source list in dialing via web user interface 1 Click on Directory Setting 2 In the Search Source List In Dialing block select the desired list from...

Страница 68: ...ous numbers of the entry s phone number office mobile or other number using the keypad The entries in the enabled search source lists whose name or phone number matches the characters entered will app...

Страница 69: ...tures such as DND The key type N A indicates that this programable key provides no functionality until configuration Details will be introduced in the following Some features listed in this chapter ar...

Страница 70: ...es are explained in the following subchapters in detail Prefix Local Group XML Group Forward DND Phone Lock Directory Local Favorite Speed Dial Direct Pickup Group Pickup XML Browser Zero Touch For th...

Страница 71: ...hould configure remote phone book in advance For more information refer to Remote Phone Book on page 53 Dependencies Type XML Group Line the remote group you want to access if the remote phone book is...

Страница 72: ...er to Favorite Directory on page 52 Dependencies Type Local Favorite Label key label displayed on the LCD screen Usage Tap the Local Favorite key to immediately access favorite directory Speed Dial Yo...

Страница 73: ...age Tap the XML Browser key to access the XML browser specified in the Value field Zero Touch You can use this key feature to configure auto provision and network parameters quickly Dependencies Type...

Страница 74: ...value in the Outbound Proxy1 2 and Proxy Fallback Interval field respectively Contact your system administrator for more information 7 Tap the Save soft key to accept the change or the Back soft key t...

Страница 75: ...re PIN code This method uses PIN code to register the Yealink Cloud account Account This method uses the user s username Cloud number and password to register the Yealink Cloud account You can obtain...

Страница 76: ...ings Advanced Settings default password admin Accounts 2 Tap the Enter soft key 3 Tap the or soft key to select Yealink Cloud from the Type field 4 Tap the or soft key to select Account from the Login...

Страница 77: ...press the Enter soft key 3 Tap the Logout soft key The LCD screen prompts the following warning 4 Tap the OK soft key Dial Plan Dial plan is a string of characters that governs the way your CP920 IP c...

Страница 78: ...fix 9 5 7 Replace 5 2 When you enter 96123 to dial out on your phone the number will be replaced as 5123 and then dialed out 2 means the characters in the second parenthesis that is 123 Note Replace R...

Страница 79: ...e one or more replace rules via web user interface 1 Click on Settings Dial Plan Replace Rule 2 Select the one or more replace rules by checking the checkbox es 3 Click Del to delete the replace rule...

Страница 80: ...erval for dial now rules That is you can configure your phone to automatically dial out the phone number which matches a dial now rule after the designated period of time To configure the time out for...

Страница 81: ...is configured as Code 0592 Min Length 4 Max Length 11 When you dial out the number 56789 the length of the number is between 4 and 11 the phone will add the area code and dial out the number 059256789...

Страница 82: ...rom country to country It is typically a three digit number so that it can be easily remembered and dialed quickly Some countries have a different emergency number for each of the different emergency...

Страница 83: ...lpad on the CP920 IP conference phone which enables the IP phone to automatically dial out a phone number without the tapping of the send key You can also configure a delay where the phone will dial o...

Страница 84: ...time To configure the hotline number via phone user interface 1 Tap Menu Features Hot Line 2 Enter the desired number in the Hotline Number field 3 Enter the delay time in seconds in the Hotline Delay...

Страница 85: ...conduct a conference call This chapter provides basic operating instructions for the CP920 IP conference phone Topics include Placing Calls Answering Calls Ending Calls Recent Call In Dialing Auto An...

Страница 86: ...Send soft key The key is configured as a send key by default You can also set the key as the send key or set neither For more information refer to the Key As Send on page 34 Note Placing multiple cal...

Страница 87: ...irst For more information refer to Making Receiving a Mobile Call on the IP Phone on page 135 To place a mobile call over Bluetooth on your IP phone 1 Connect a Bluetooth Enabled mobile phone with you...

Страница 88: ...call is answered and the original call is placed on hold Tap to access the new call Tap or the Answer soft key The incoming call is answered and the original call is placed on hold Ending Calls To end...

Страница 89: ...ance To enable recent call in dialing via web user interface 1 Click on Directory Setting 2 Select Enabled from the pull down list of Recent Call In Dialing 3 Click Confirm to accept the change Note T...

Страница 90: ...interface 1 Tap Menu Features Auto Answer 2 Tap to select Status and then tap the or soft key to select Enabled from the Status field 3 Tap the or soft key to select Enabled from the Auto Answer Mute...

Страница 91: ...Save soft key to accept the change or the Back soft key to cancel Auto redial is configurable via web user interface at the path Features General Information To use auto redial When the called party...

Страница 92: ...ion is configurable via web user interface at the path Features General Information To use call completion When the called party is busy the following prompt will appear on the LCD screen of the phone...

Страница 93: ...t of Type 4 Click Confirm to accept the change Note Call Mute You can mute the local microphone during an active call so that the other party cannot hear you but you can still hear the other party You...

Страница 94: ...r room when auto answer is enabled on your phone When you mute the phone in an idle state or any other states the icon appears on the status bar Note Mute a Call To mute a call 1 Tap during an active...

Страница 95: ...1 Tap the Hold soft key during a call LED indicators flash green The LCD screen indicates that the call is on hold Note To resume a held call 1 Tap the Resume soft key Multiple Calls on Hold If multi...

Страница 96: ...rge DND icon on the idle screen For more information contact your system administrator To activate DND via phone user interface 1 Tap the DND soft key when the phone is idle The icon appears on the st...

Страница 97: ...numbers specified in the DND Authorized Numbers field Note To deactivate DND via phone user interface 1 Tap the DND soft key when the phone is idle Call Forward You can configure your phone to forward...

Страница 98: ...the Enter soft key 3 Depending on your selection a If you select Always Forward 1 Tap the or soft key to select Enabled from the Always Forward field 2 Enter the destination number you want to forward...

Страница 99: ...ft key to cancel The icon on the idle screen indicates that the call forward is activated Call forward is configurable via web user interface at the path Features Forward DND Note To configure the for...

Страница 100: ...d via phone user interface 1 Tap Menu Features Call Forward 2 Tap or to select the desired forwarding type and then tap the Enter soft key 3 Tap the or soft key to select Disabled to deactivate the ca...

Страница 101: ...ransfer the call to 3 Tap the Transfer soft key to complete the transfer Then the call is connected to the number to which you are transferring To perform a semi attended transfer 1 Tap the Transfer s...

Страница 102: ...the On Code or Off Code field 5 Tap the Save soft key to accept the change or the Back soft key to cancel Call waiting is configurable via web user interface at the path Features General Information...

Страница 103: ...call 2 Tap the Conf soft key to merge the calls into a conference call Joining an Incoming Call to a Conference You can create a conference when the phone receives an incoming call during the call s...

Страница 104: ...e parties in an established conference call Tap the Manage soft key and then tap or to select the desired party Tap the Far Mute soft key to mute the party The muted party can hear everyone but no one...

Страница 105: ...of Conference Type 3 Enter the conference URI e g conference example com in the Conference URI field 4 Click Confirm to accept the change Note To set up a network conference call 1 Place a call to the...

Страница 106: ...call park will receive the call back Note The IP phone supports call park feature under the following modes FAC mode park the call to the local extension or a desired extension through dialing the par...

Страница 107: ...park code is not configured you need to enter the call park code Tap or the Park soft key If the call park code is configured the phone will dial the configured call park code shown as below 2 Do one...

Страница 108: ...oft key on the dialing screen The phone will dial the configured park retrieve code and the Retrieve screen appears as below 2 Follow the voice prompt do one of the following Tap on the phone where th...

Страница 109: ...e g 01 Tap or the Park soft key The call will be transferred to the shared parking lot If the call park code is configured the call will be directly transferred to the shared parking lot Note If the P...

Страница 110: ...call pickup is used for picking up a call that is ringing at any phone number in a certain group The pickup group should be predefined contact your system administrator for more information You can p...

Страница 111: ...he DPickup soft key appears on the LCD screen You may need to tap the More soft key 2 Tap the DPickup soft key on your phone when the target phone receives an incoming call 3 Enter the phone number wh...

Страница 112: ...Confirm to accept the change To configure the group call pickup code on a per line basis via web user interface 1 Click on Account Advanced 2 Enter the group call pickup code in the Group Call Pickup...

Страница 113: ...t key to select the desired value from the Send Anonymous Code field The phone will send the configured on code or off code depending on your selection when you enable or disable anonymous call featur...

Страница 114: ...ion Code field The phone will send the configured reject on code or reject off code depending on your selection when you enable or disable anonymous call rejection feature on the phone 5 Optional Ente...

Страница 115: ...07 1630 111 was created on July07 2017 at 16 30 and you have a call with 111 Note When your phone is idle and you insert a USB flash drive into the USB port on your phone the phone will detect the USB...

Страница 116: ...conference call An incoming calls arrives on your phone Call Recording To record a call 1 Tap the More soft key and then tap the StartREC soft key during a call If automatic recording feature is enab...

Страница 117: ...us screen If there is no free space on the USB flash drive during recording recording is stopped and recorded file is saved automatically The LCD screen prompts the following Note When you end a call...

Страница 118: ...participants taps the Hold soft key only that participant is recorded If one of the participants taps only that participant is not recorded Idle Recording You can insert a USB flash drive into the USB...

Страница 119: ...he call tap the Conference soft key to place a new call Recorded Files Playback If you insert a USB flash drive into the USB port on your phone you can play back recorded files on your phone You can a...

Страница 120: ...lume of the speakerphone tap or To stop the playback tap the Back soft key The phone returns to the Browse Audio screen If you are playing back a recorded call and an incoming call arrives on your pho...

Страница 121: ...he change Incoming Intercom Calls The CP920 IP conference phone supports automatically to answer an incoming intercom call by default The phone automatically plays a warning tone when it receives an i...

Страница 122: ...You can enable or disable the phone to play a warning tone when receiving an intercom call If Intercom Tone is enabled the phone will play a warning tone before answering the intercom call If Interco...

Страница 123: ...Protocol RTP stream to the pre configured multicast address es and channel s without involving SIP signaling You can configure the phone to receive an RTP stream from pre configured multicast listenin...

Страница 124: ...es range from 224 0 0 0 to 239 255 255 255 5 Enter the desired channel in the Extension field The valid channel ranges from 0 to 30 6 Click Confirm to accept the change To configure a paging list key...

Страница 125: ...ses range from 224 0 0 0 to 239 255 255 255 6 Enter the group name in the Label field 7 Enter the desired channel in the Channel field The valid channel ranges from 0 to 30 8 Tap the Save soft key to...

Страница 126: ...formation 2 Select the desired codec from the pull down list of Multicast Codec The default codec is G722 3 Click Confirm to accept the change Note Receiving RTP Stream You can configure the phone to...

Страница 127: ...eady a multicast paging call on the phone If enabled the phone will ignore incoming multicast paging calls with lower priorities otherwise the phone will answer incoming multicast paging calls automat...

Страница 128: ...sion on hold and receiver s phone releases the session To resume the held multicast RTP session tap the Resume soft key The multicast RTP session is established again To end the multicast RTP session...

Страница 129: ...Server account automatically answers the SIP INVITE messages and immediately plays audio from some source located anywhere LAN Internet to the held party Contact your system administrator for the SIP...

Страница 130: ...one but not both This feature is very useful in the boss and secretary scenario For example the secretary can share the boss s extension on her phone When there is an incoming call to the extension of...

Страница 131: ...121 To configure the shared line settings on phone A via web user interface 1 Register the account 4603 2 Click on Advanced and then select Shared Call Appearance from the pull down list of Shared Li...

Страница 132: ...ne settings on phone B via web user interface 1 Register the alternate account 4603_1 Enter the primary account 4603 in the Register Name field 2 Click on Advanced and then select Shared Call Appearan...

Страница 133: ...line To place a new call when there is an active call on phone A do one of the following on phone A 1 Tap the Hold soft key The original call is placed on hold 2 Tap the NewCall soft key to enter the...

Страница 134: ...t key Phone B stops ringing The incoming call is answered and the original call is placed on hold You can also answer the call on phone B 1 Tap or the Answer soft key Phone A stops ringing Placing a C...

Страница 135: ...e registered account is shared Any IP phone can be used to originate or receive calls on the bridged line An incoming call to the BLA number can be presented to multiple phones in the group simultaneo...

Страница 136: ...t and configure BLA feature on phone A via web user interface 1 Register the account 14019833020 2 Click on Advanced and then select Draft BLA from the pull down list of Shared Line 3 Enter the desire...

Страница 137: ...d configure BLA feature on phone B via web user interface 1 Register the account 10462190020 2 Click on Advanced and then select Draft BLA from the pull down list of Shared Line 3 Enter the desired nu...

Страница 138: ...ou can have more than one call on the shared line To place a new call when there is an active call on phone A do one of the following on phone A 1 Tap the Hold soft key The original call is placed on...

Страница 139: ...hat are stored in voice mailbox When receiving a new voice mail the phone will play a warning tone The LCD screen will prompt n New Voice Mail s n indicates the number of unread voice messages e g 47...

Страница 140: ...face 1 Tap Menu Message Voice Mail View Voice Mail The LCD screen displays the amount of new and old voice mails 2 Tap the Connect soft key to listen to voice mails Message Waiting Indicator MWI The C...

Страница 141: ...cription to the voice mail number for MWI service To use this feature you should also configure the voice mail number Note To configure subscribe for MWI via web user interface 1 Click on Account Adva...

Страница 142: ...down list of Subscribe for MWI 3 Select Enabled from the pull down list of Subscribe MWI To Voice Mail 4 Enter the desired voice mail number in the Voice Mail field 5 Click Confirm to accept the chan...

Страница 143: ...phone as a Bluetooth speaker for music played on your mobile phone or PC Merge the calls on you IP phone the PSTN and connected mobile phone into to a hybrid UC conference refer to Creating a Hybrid U...

Страница 144: ...ones with your IP phone however only one mobile phone can be connected at a time Before you pair a mobile phone check the Bluetooth mode on the mobile phone to make sure that the mobile phone is disco...

Страница 145: ...e The call is made through your mobile phone but the audio is present on and the call control is done by the IP phone For more information on how to make receive a mobile call on the IP phone refer to...

Страница 146: ...ption soft key 4 Select Detail then enter Channel Control 5 Tap the or soft key to select Enabled from the Media audio field 6 Tap the Save soft key Making the IP Phone Discoverable If you make your I...

Страница 147: ...Tap the Save soft key to accept the change or the Back key to cancel You should make your IP phone discoverable first and then the pre configured Bluetooth device name will display in scanning list of...

Страница 148: ...User Guide for the CP920 HD IP Conference Phone 138...

Страница 149: ...Connect PSTN1 Go to Setting When the second PSTN box CPN10 is connected to the first PSTN box CPN10 successfully the LCD screen prompts Connect PSTN2 Go to Setting When two PSTN boxes are connected s...

Страница 150: ...a phone user interface 1 Tap Menu Settings Basic Settings Country 2 Tap or to select the desired country 3 Tap the Save soft key to accept the change Flash Time You can configure the flash time to adj...

Страница 151: ...hange Note Basic Call Features The CP920 supports the following basic call feature Placing Calls Answering Calls Ending Calls Recent Call In Dialing Auto Answer Auto Redial ReCall Call Mute Call Hold...

Страница 152: ...have multiple accounts on the phone You can view and manage each participant in the conference call Note To set up a conference call 1 Place a call to the first party 2 When the first party answers th...

Страница 153: ...anced Phone Features Recording Using a USB Flash Drive You can use the recording feature when connecting the PSTN box CPN10 But you need to connect the USB flash drive to the USB port on the PSTN box...

Страница 154: ...User Guide for the CP920 HD IP Conference Phone 144...

Страница 155: ...corresponding PO Purchase Order You can find the MAC address on the label of the carton box You can also find the MAC address from the phone s bar code on the back of the phone What is the difference...

Страница 156: ...nd date from the SNTP server automatically If the phone fails to connect to the SNTP server you need to configure the time and date manually Password Issues How to change the user password To change t...

Страница 157: ...nough free space greater than 2 minutes on the USB flash drive Tap Menu USB Storage Space Audio Issues Why doesn t the phone ring Check the ringer volume on the phone To adjust the ringer volume setti...

Страница 158: ...Click Confirm to accept the change How to make a call using SRTP You can enable SRTP to encrypt the audio stream s of phone calls The parties participating in the call should enable SRTP To enable SR...

Страница 159: ...ct on your network performance In this case you can use the Ping or Traceroute method to check whether the network is connected analyze and judge network fault To check the network using Ping method v...

Страница 160: ...25 50 or 75 packet loss The network connection between you and the target is unstable or faulty 4 packets transmitted 0 packets received 100 packet loss The network connection between you and the targ...

Страница 161: ...n end with one of several error indications indicating why the traceroute cannot proceed The following table shows the possible error messages Error Message Meaning Target unreachable H Host unreachab...

Страница 162: ...og from the pull down list of Export Local Log 5 Click Confirm to accept the change 6 Reproduce the issue 7 Click Export to open the file download window and then save the file to your local system Yo...

Страница 163: ...interface 1 Click on Settings Configuration 2 Click Start to begin capturing signal traffic The local log level will be automatically set to 6 3 Reproduce the issue 4 Click Stop to stop the capture T...

Страница 164: ...he firmware The web user interface prompts Firmware of the SIP Phone will be updated It will take 5 minutes to complete Please don t power off 4 Click OK to confirm upgrading How to reset the phone Re...

Страница 165: ...ts the following warning 3 Tap the OK soft key The LCD screen prompts the following 4 The phone will be reset to factory settings sucessfully after startup Note Welcome Initializing please wait Reset...

Страница 166: ...User Guide for the CP920 HD IP Conference Phone 156...

Страница 167: ...DED HEREIN SHALL FAIL OF ITS ESSENTIAL PURPOSE Safety Instructions Save these instructions Read these safety instructions before use The following basic safety precautions should always be followed to...

Страница 168: ...device must meet the requirements of the input voltage of the device Please use the provided surge protection power socket only Before plugging or unplugging any cable make sure that your hands are c...

Страница 169: ...e cleaning the device stop using it and disconnect it from the power supply Use a piece of soft dry and anti static cloth to clean the device Keep the power plug clean and dry Using a dirty or wet pow...

Страница 170: ...User Guide for the CP920 HD IP Conference Phone 160...

Страница 171: ...Bermuda United Kingdom Falkland Islands Trinidad Tobago 3 30 Canada New Foundland St Johns 3 Argentina Buenos Aires Brazil DST Brazil no DST Denmark Greenland Nuuk 2 30 Newfoundland and Labrador 2 Br...

Страница 172: ...Novosibirsk Omsk 6 30 Myanmar Naypyitaw 7 Russia Krasnoyarsk Thailand Bangkok 8 Australia Perth China Beijing Russia Irkutsk Ulan Ude Singapore Singapore 8 45 Eucla 9 Japan Tokyo Korea Seoul Russia Y...

Страница 173: ...Appendix 163 Appendix B Menu Structure...

Страница 174: ...able for PSTN Call Completion DND Call Forward Call Transfer Call Waiting Call Park Call Pickup Anonymous Call Anonymous Call Rejection Intercom Multicast Paging Music on Hold SCA BLA Messages Program...

Страница 175: ...87 Call Mute 83 Call History Management 55 Call Hold Resume 85 Call Park 96 Call Pickup 100 Call and Conference Recording 105 Call Transfer 91 Call Waiting 92 Conference 92 Configuring the PSTN Accoun...

Страница 176: ...ing Calls 76 Placing Calls to Contacts 48 Power Saving 27 Programable Keys 58 O Outgoing Intercom Calls 111 Overview 1 R ReCall 83 Recent Call In Dialing 79 Recorded Files Playback 109 Registration 24...

Отзывы: