background image

MP Series SIO (Extension) Driver    

GP-Pro EX Device/PLC Connection Manual

6

2

Selection of External Device

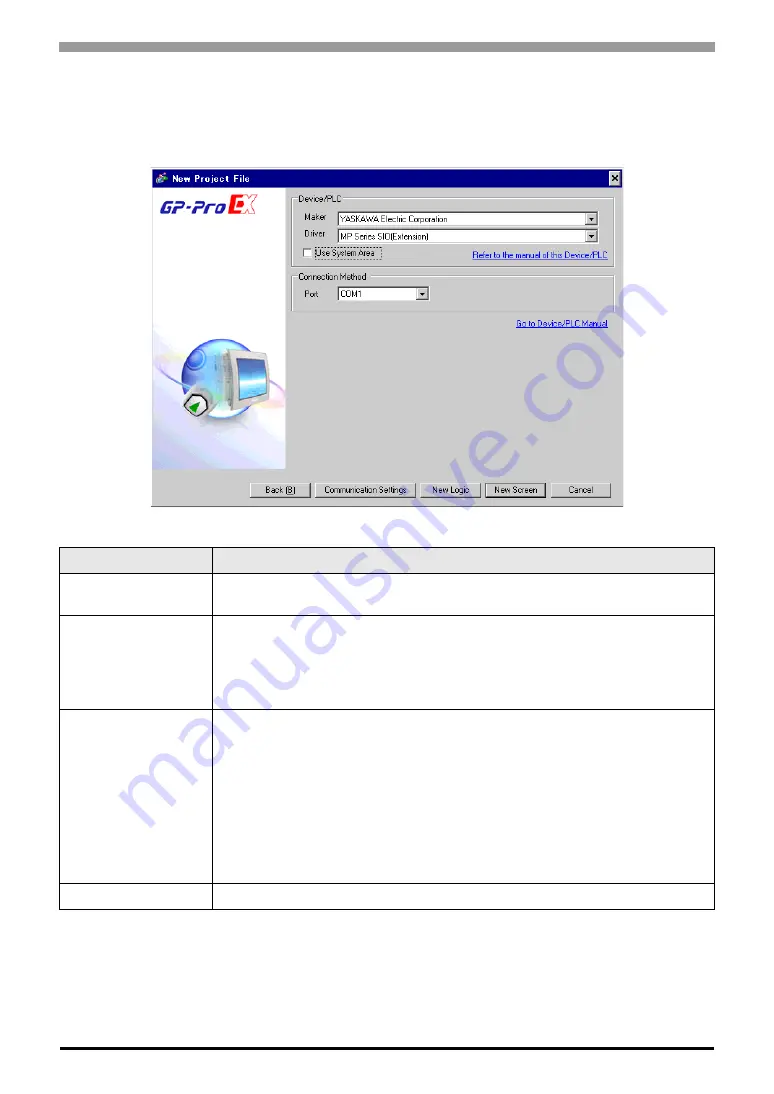
Select the External Device to be connected to the Display.

Setup Items

Setup Description

Maker

Select the maker of the External Device to be connected. Select "YASKAWA Electric 
Corporation".

Driver

Select a model (series) of the External Device to be connected and connection method. 
Select "MP Series SIO (Extension)".
Check the External Device which can be connected in "MP Series SIO (Extension)" in 
system configuration.

)

"1 System Configuration" (page 3)

Use System Area

Check this option when you synchronize the system data area of Display and the device 
(memory) of External Device. When synchronized, you can use the ladder program of 
External Device to switch the display or display the window on the display.

Cf.

GP-Pro EX Reference Manual "Appendix 1.4 LS Area (only for direct 
access method)"

This can be also set with GP-Pro EX or in off-line mode of Display.

Cf.

GP-Pro EX Reference Manual " 5.14.6 Setting Guide of [System Setting 
Window]

„

[Main Unit Settings] Settings Guide

‹

System Area Setting"

Cf.

Maintenance/Troubleshooting "2.14.1 Settings common to all Display  
models 

‹

System Area Settings"

Port

Select the Display port to be connected to the External Device.

Содержание MP Series

Страница 1: ...Series SIO Extension Driver 1 System Configuration 3 2 Selection of External Device 6 3 Example of Communication Setting 7 4 Setup Items 9 5 Cable Diagram 14 6 Supported Device 15 7 Device Code and Ad...

Страница 2: ...Device Select a model series of the External Device to be connected and connection method 2 Selection of External Device page 6 3 Example of Communication Settings This section shows setting examples...

Страница 3: ...uration 1 1 Connection Series CPU Link I F SIO Type Setting Example Cable Diagram MP2000 MP2300 MP2200 Serial port on 218IF 01 RS232C 3 1 Setting Example 1 page 7 Cable Diagram 1 page 14 Serial port o...

Страница 4: ...S 3710A COM1 1 COM2 1 COM3 2 COM4 2 It is necessary to set up the SIO type with the Dip switch Please set up as follows according to SIO type to be used COM3 2 COM3 2 PS 3711A COM1 1 COM2 2 COM2 2 COM...

Страница 5: ...sertion to RD RXD None 7 OFF Short circuit of SDA TXA and RDA RXA Does not Exist 8 OFF Short circuit of SDB TXB and RDB RXB Does not Exist 9 OFF RS RTS Auto control mode Disable 10 OFF Dip switch Sett...

Страница 6: ...Configuration page 3 Use System Area Check this option when you synchronize the system data area of Display and the device memory of External Device When synchronized you can use the ladder program of...

Страница 7: ...ample 1 Settings of GP Pro EX Communication Settings To display the setting screen select Device PLC Settings from System setting window in workspace Device Setting To display the setting screen click...

Страница 8: ...number part at No in Module details Double click the slot number connecting the ethernet unit 6 Double click the No 1 and set serial communication Use serial communication setting to forward communic...

Страница 9: ...h Select data length Parity Select how to check parity Stop Bit Select stop bit length Flow Control Select the communication control method to prevent overflow of transmission and reception data Timeo...

Страница 10: ...MP Series SIO Extension Driver GP Pro EX Device PLC Connection Manual 10 Device Setting Setup Items Setup Description Station No Enter a station number of the External Device using 1 to 63...

Страница 11: ...We cannot guarantee the operation if a communication type that the serial interface does not support is specified For details concerning the serial interface specifications refer to the manual for Dis...

Страница 12: ...m Peripheral Settings Touch the External Device you want to set from the displayed list and touch Device Setup Items Setup Description Device PLC Name Select the External Device for device setting Dev...

Страница 13: ...pheral Settings Touch the External Device you want to set from the displayed list and touch Option Setup Items Setup Description RI VCC You can switch RI VCC of the 9th pin when you select RS232C for...

Страница 14: ...FG are connected inside the Display When connecting SG to the External Device design the system not to form short circuit loop Connect the isolation unit when communication is not stabilized under th...

Страница 15: ...ata area Device Bit Address Word Address 32 bits Notes System registers SB000000 SB08191F SW00000 SW08191 Input registers IB00000 IBFFFFF IW0000 IWFFFF 1 1 As for Input and Output registers device 0x9...

Страница 16: ...vice code and address code when you select Device Type Address for the address type in data displays Device Device Name Device Code HEX Address Code System registers SW SB 0080 Word address Input regi...

Страница 17: ...Initial value PLC1 Error Message Displays messages related to the error which occurs Error Occurrence Area Displays IP address or device address of External Device where error occurs or error codes r...

Страница 18: ...tion RHxx128 Node Name PLC is busy now Error Code Hex PLC is Busy RHxx129 Node Name Option module is not mounted Error Code Hex Option module not mount RHxx130 Node Name Module is not ready Error Code...

Отзывы: