FUEL SYSTEM
TNV IDI Service Manual
7-11
Fuel Injection Lines
6. Finish loosening all the fuel line nuts and
remove the high-pressure fuel lines as an
assembly being careful not to bend any of the
fuel lines. Be sure to protect the fuel system
from contamination by plugging or covering all
open connections.
7. Plug or cap all openings to minimize leakage
and prevent contamination.
Installation of High-Pressure Fuel
Injection Lines
NOTICE
Remove or install the high-pressure fuel injection
lines as an assembly whenever possible.
Disassembling the high-pressure fuel injection lines
from the retainers or bending any of the fuel lines
will make it difficult to reinstall the fuel lines.
Note: To prevent “rounding” the fuel line nuts
always use a “line” or “flare nut” wrench.
1. Start all the fuel line nuts by hand. Then use a
wrench to just “snug” all the fuel line nuts.
2. Tighten the fuel line nuts on the fuel injection
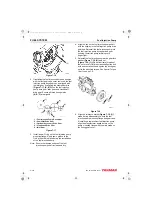
3. When tightening the fuel line nuts on the fuel
injectors, use one wrench to hold the fuel return
line nut and fuel return line from rotating. Use a
second wrench to tighten the fuel line nuts
(Figure 7-5)
.
Figure 7-5
Removal of Fuel Return Line
1. Clean the area to keep contaminants from
entering the fuel system.
2. Remove the high-pressure fuel injection lines
as an assembly.
Fuel Injection Lines on page 7-10.
NOTICE
The fuel return line is a one-piece assembly. Use
care not to bend or twist the fuel return line.
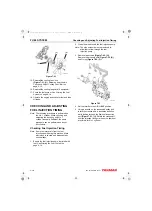
Figure 7-6
3. Remove all fuel return line nuts
(Figure 7-6, (2))
from the injectors
(Figure 7-6, (4))
.
4. Remove the fuel return hose from the fuel
return fitting on the fuel injection pump.
5. Carefully remove the fuel return line assembly
(Figure 7-6, (3))
.
6. Remove and discard the copper gasket
(Figure 7-6, (1))
from each fuel injector.
7. Plug or cap all openings to minimize leakage
and prevent contamination.
00022
3
7
(1)
(2)
(3)
(4)
TNV_IDI_ServiceManual_A4.book 11 ページ 2012年2月24日 金曜日 午前10時24分


