Yamato SM300 Скачать руководство пользователя страница 1


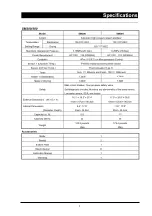
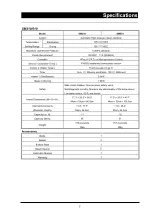
High Pressure Steam Sterilizer 


SM200  SM300 
SM310  SM510 


Second Edition 


● 

Thank you for your Yamato Scientific RE series Rotary Evaporator purchase 

● 

For best test data, we recommend you purchase our BM series Water Bath. 

Please call Yamato Scientific for more details. 


Yamato Scientific America Inc.   

Santa Clara, CA 

(800) 292-6286 


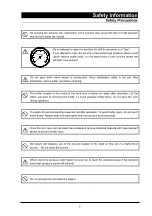
Read and apprehend the important warnings in 

this instruction manual prior to use. 


Содержание SM300

Страница 1: ...ntific RE series Rotary Evaporator purchase For best test data we recommend you purchase our BM series Water Bath Please call Yamato Scientific for more details Yamato Scientific America Inc Santa Cla...

Страница 2: ...rature and Time 26 Special Program Features 27 8 Run MENU 28 33 Selection of Operation 28 STERILIZE Procedure 29 30 STERILIZE DRY Procedure 31 33 9 Special Control Functions 34 35 View Parameter durin...

Страница 3: ...ple Type T Timer 1min 99hours and 59min 100 999hours Heater 1 Sterilization 1 3kW 1 7kW Heater 2 Drying 1 0kW 1 5kW Safety Main circuit breaker Over pressure safety valve Self diagnostic circuitry Mon...

Страница 4: ...1min 99hours and 59min 100 999hours Heater 1 Sterilization 2 0kW Heater 2 Drying 1 5kW Safety Main circuit breaker Over pressure safety valve Self diagnostic circuitry Monitors any abnormality of the...

Страница 5: ...Note 2 or damage Note 3 to the equipment Note 1 Serious injury Bodily harm by electric shock bone fracture or poisoning which may require hospitalization Note 2 Injury Bodily harm by electric shock bo...

Страница 6: ...from this unit turn the breaker off immediately and pull out the main power cord Then contact Yamato Scientific Neglecting this procedure can result in fire or electric shock Never try repairing the...

Страница 7: ...de of the front door contains hot water after operation Let the water cool prior to removing the bottle To avoid possible bodily injury do not open the door during operation The plate lid and surround...

Страница 8: ...rcuit breaker is switched off during operation the sterilizer solenoid exhaust valve will remain closed once power has been restored The solenoid exhaust valve will not open until the chamber temperat...

Страница 9: ...orate Ammonia perchlorate and other perchlorates Potassium peroxide Sodium peroxide Barium peroxide and other inorganic peroxides Potassium nitrate Sodium nitrate Ammonia nitrate and other nitrates So...

Страница 10: ...External Handle Lid Exhaust U shaped Pipe Control Panel Arm Pressure Gauge Door Latch Bottle Water Window Viewer Panel Guard Pressure Relief Switch Circuit Breaker Terminal Optional Power Cord Louver...

Страница 11: ...nsor 1 Sensor 2 Heater 1 Safety Valve Thermal Insulator Solenoid Drain Valve Solenoid Exhaust Valve Bottom Plate Heater 2 Chamber Service Plug Micro Switch Filter For Drying For Water Temperature For...

Страница 12: ...ication of Parts Internal Plug Silencer Drain Valve Micro Switch Exhaust Hose Heater 1 For Sterilization Filter Solenoid Exhaust Port Sensor 1 For Chamber Temperature Sensor 2 For Water Temperature Fl...

Страница 13: ...ows mainly time left and set time Heater lamp Stays lit or blinks when heater is on STERILIZE lamp Stays lit or blinks in sterilization process DRY lamp Stays lit or blinks in drying process END lamp...

Страница 14: ...er on and off Area of installation The sterilizer should not be installed in the following environments Under direct sun In temperatures below 5 or above 35 Where severe changes in temperature occur I...

Страница 15: ...nches or more Space to open door 10 2 inches or more Space for ventilation 5 9 inches or more Do not install under a low ceiling An abundant amount of steam will spout out of the lid just after operat...

Страница 16: ...r source Connect to sufficient power source Type Power Source Necessary Capacity SM200 AC115V single phase 13A or more SM300 AC115V single phase 17A or more SM310 AC220V single phase 11A or more Be su...

Страница 17: ...all the filter prior to operation Install the bottom plate The bottom plate balances the material in the chamber and protects heater 1 and sensor 2 Be sure to install the plate Close the drain valve B...

Страница 18: ...ml of water into the bottle This water is used to cool the hot steam coming out of the chamber The unit drains water forcibly out of the container into the bottle during the STERILIZE DRY process If t...

Страница 19: ...ight for water volume information Using over the maximum level of water will result in hot water spouting from the bottle SM510 2800 3000ml Use distilled water for sterilization Use distilled water to...

Страница 20: ...front door during operation Close the lid Be sure to close the lid completely by turning the handle clockwise in a 1 4 1 2 circle after it touches the chamber If it is not closed properly steam will...

Страница 21: ...water cool before draining Place a drain pan less than 2 inches in height under the drain valve or connect a drain hose Never drain water during operation If you open the drain valve at high pressure...

Страница 22: ...the chamber gray area in illustration on right will allow steam to escape Be sure to keep this area clean and avoid contacting with baskets etc when installing or removing materials from the chamber...

Страница 23: ...addition the bag can easily cover the exhaust in the upper part of the container Set the temperature lower than the heat resisting point of the bag Set time depends on quality and quantity of the mate...

Страница 24: ...reaker on The sterilizer automatically starts in stand by mode and the display show current set point Push the MODE key Main display starts blinking Sterilization Temp Setting other parameters Turn th...

Страница 25: ...tting drying time END End To indicate the end of operation E ERROR Error To indicate the occurrence of trouble OFF Off Signal function is switched off O ON On Signal function is switched on STERILIZE...

Страница 26: ...24 Program MODE Flowchart...

Страница 27: ...ER key At this time you can change the sterilization temperature Input the sterilization temperature desired by pushing the keys key To lower temperature key To raise temperature S Temp Push the ENTER...

Страница 28: ...ER key The changed dry temperature is fixed and the panel blinks the next function dry time set up Push the ENTER key again You can now change the dry time Input the dry time you desire by key key To...

Страница 29: ...al on off Push the MODE key The main display blinks and the sub display blinks sterilization temperature Push either the keys to search the panel display illustrated on left to the desired setting Pus...

Страница 30: ...procedure allows the user to select the desired operation Turn on main circuit breaker Push MENU key to select sterilize Push MENU key again to select sterilize dry Menu change can only be made during...

Страница 31: ...in display blinks the set temperature The sub display blinks the set time The sterilize menu lamp comes on and off Push the ENTER key Operation begins The sterilization heater turns on The solenoid ex...

Страница 32: ...u lamp is lit Natural cooling begins when the set sterilization time is complete At this time the heater will automatically shut off The main display shows chamber temperature The sub display blinks S...

Страница 33: ...Push the MENU key to select STERILIZE DRY See P28 Set the temperature and time you desire See P25 and 26 The main display blinks the set temperature The sub display blinks the set time Sterilize Dry m...

Страница 34: ...Dry menu lamp is lit When forced drainage ends the solenoid drain valve is closed The solenoid exhaust valve opens to exhaust air out of the chamber The main display shows chamber temperature The sub...

Страница 35: ...b display blinks End lamp is lit Sterilize Dry menu lamp is lit Push the ENTER key The ENTER key resets the cycle You may now run another cycle Drain the water bottle after STERILIZE DRY process The r...

Страница 36: ...ly be viewed not changed Push the MODE key The main display blinks set Temp The sub display shows the set temperature Set lamp is lit To check the other set points push key to flash the indication you...

Страница 37: ...sure Relief Switch How to use the pressure relief switch Push the Pressure Relief Switch By pushing this switch open the solenoid exhaust valve opens Steam inside the chamber is exhausted into the bot...

Страница 38: ...nnected heater circuit Exchange sensor etc Triac related trouble Display and buzzer Disconnected heater circuit Exchange triac etc Heater related trouble Display and buzzer Disconnected heater circuit...

Страница 39: ...t go up The pressure does not increase Is the lid securely closed Is the packing or flange damaged The pressure increases when the solenoid valve is not closed Is the exhaust vent clogged The temperat...

Страница 40: ...38 Wiring Diagram SM200 X SM300 Inside of dashed line is option...

Страница 41: ...d X Relay POWER2 Power2 Board CT Current Transformer SW1 Pressure Relief Switch SSR Solid State Relay SW2 Micro Switch MCB Circuit Breaker TC Sensor 2 Thermocouple T Terminal PT Sensor 1 Pt100 resista...

Страница 42: ...40 Piping Chart Chamber Heater 2 Sensor 1 Sensor 2 Heater 1 Drain Valve Silencer Bottle Safety Valve Heater 2 Solenoid Drain Valve MV2 Pressure Gauge Solenoid Exhaust Valve MV1...

Страница 43: ...e filter out located in the bottom center when cleaning the inside of the chamber If cleaned without the filter inside the pipe can get clogged with debris Filter cleaning If the filter in the bottom...

Страница 44: ...up with a silencer at the end of the exhaust hose to reduce noise occurring from air purge Remove the silencer and clean with water once a month A ball is set in the silencer to prevent back flow of...

Страница 45: ...ard for future references Check the name of the distributor date of purchase and any other contents of the warranty The terms of the warranty is two year limited commencing the date of purchase Repair...

Страница 46: ...000 0058 AC115V 1 7kw Heater 1 SM310 510 2 24 000 0059 AC220V 2 0kw Heater 2 SM200 2 26 000 0003 AC115V 500W Heater 2 SM300 310 510 2 26 000 0004 AC115V 750W Sensor 1 1 16 003 0035 Pt100 Resistance Th...

Страница 47: ...hat this document forbids Unexpected accidents or breakdown may result in Note The contents of this document may be changed in future without notice Any books with missing pages or disorderly binding...

Отзывы: