background image

15 

4. Operating procedures


Operating procedures (settings for overheat prevention device)


As a safety measure for preventing overheat, a hydraulic overheat prevention device (manual return) 

is installed.


Temperature setting range and functions


The temperature setting range for the standalone overheat prevention device is “50

℃~

120

.”


When  the  temperature in the  bath keeps  rising beyond  the  controller  set  temperature and  reaches 

the  set  temperature  of  the  overheat  prevention  device,  controller  power  is  shut  off.  (Controller 

display will be eliminated)


When the overheat prevention device is activated, it will not be released until the ELB is turned on.


Change  temperature  setting  to  the  correct  value  (set  temperature  +25

),  turn  the  ELB  OFF  once 

and then turn it ON again.


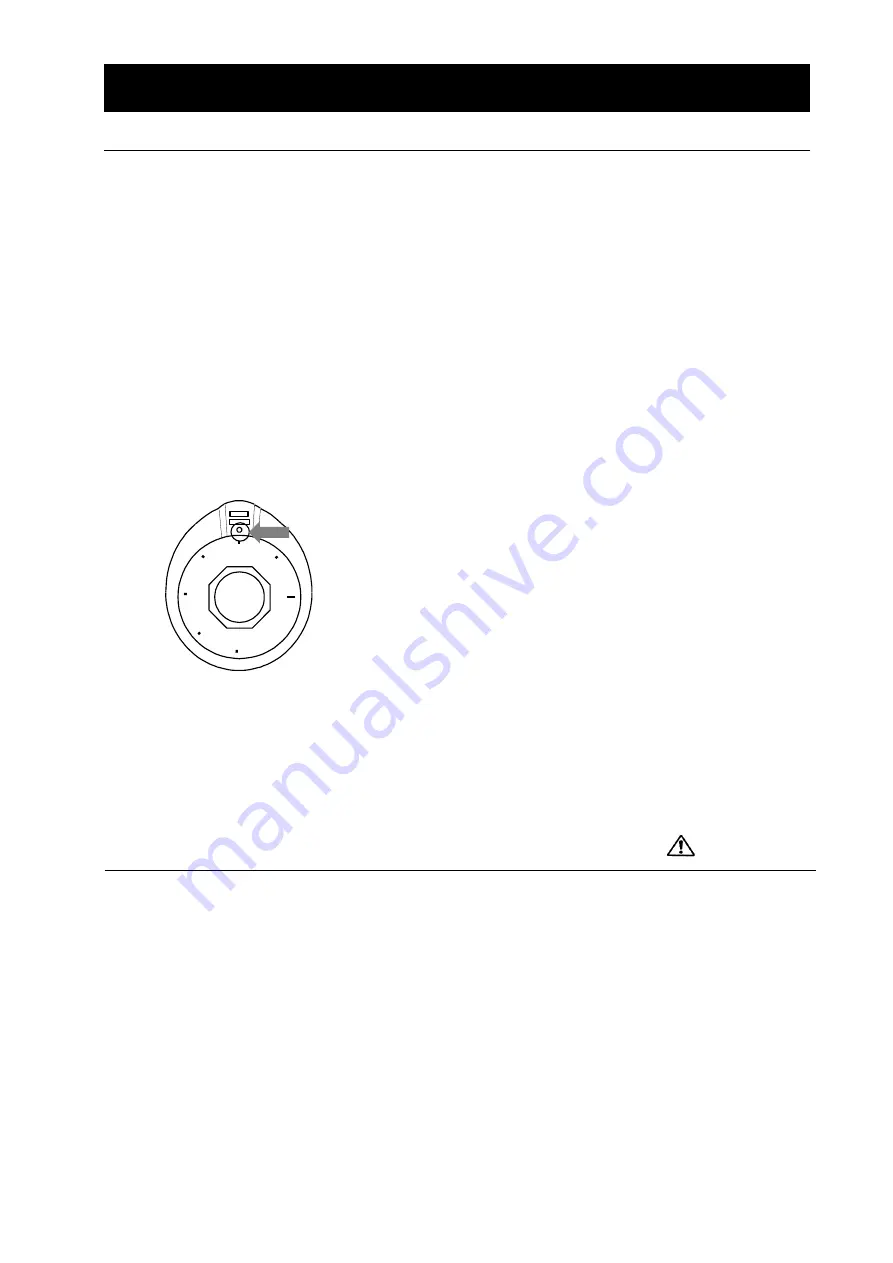
How to set temperature


Setting the overheat prevention temperature


Set  the  temperature  scale  on  the  hydraulic  overheat 

prevention  device  installed  on  the  upper  right  side  of  the 

unit to the arrow in the diagram shown left.


Turn the ELB 

to “OFF” and wait for a while without opening 

the door.


After a while, turn 

the ELB ON (set the ELB “ON”.)


Set the temperature scale   

to the arrow


Caution


Set temperature as “set tempe25

” as a rough standard and add 5

  to the setting if 

the device functions improperly.


The  temperature  setting  range  for  the  s

tandalone  overheat  prevention  device  is  “50

℃~

120

.” Be sure to set the overheat prevention activation temperature correctly otherwise the 

device  may  not  start,  the  overheat  prevention  device  is  activated  before  temperature  in  the 

bath increases completely, or a fire or other unexpected accidents may result.


The temperature is set at 120

  on shipping from the factory.


③  

If the temperature for the standalone overheat prevention device is set at around or below the 

room temperature, the device may be triggered when the door is opened.


④  

The overheat prevention device has been designed to prevent overheating of devices not to 

protect  samples.  The  device  does  not  prevent  accidents  caused  from  use  of  explosive  or 

flammable substances.


Содержание DG-450C

Страница 1: ...fore operating this unit to assure proper operation After reading these documents be sure to store them securely together with the Warranty at a handy place for future reference Warning Before operati...

Страница 2: ......

Страница 3: ...on 17 Operating procedures auto stop operation 19 Operating procedures auto start operation 21 Useful functions calibration offset function 23 Useful function setting lock function 24 Useful function...

Страница 4: ...equire hospitalization or outpatient visits for a long time Note 2 Minor injury means a wound or an electrical shock that does not require hospitalization or outpatient visits for a long time Note 3 P...

Страница 5: ...Hazard of explosion Caution General cautions Electrical shock Burning Caution for no liquid heating Caution for water leak For water only Poisonous material Prohibitions General bans Fire ban Do not d...

Страница 6: ...rds bundled When these are used bundled they might overheat causing a fire Take care not to damage electrical power cords Avoid tightly bend pull with a strong force or twist to prevent electrical pow...

Страница 7: ...s shown below 15cm or more 15cm or more Front 15cm or more 1m or more 2 Install the unit on a level surface Install the unit on a level surface If the whole bottom surface of the unit does not contact...

Страница 8: ...perate the unit at such a place that may subject to splash Liquid entering the inside may cause an accident a malfunction an electrical shock or a fire 6 Never operate the unit in an atmosphere contai...

Страница 9: ...dled they might overheat causing a fire Do not convert forcibly bend twist or pull the power cord Otherwise a fire or an electrical shock may result Do not place the power cord under a desk or a chair...

Страница 10: ...helf pegs at heights you want on the right and left shelf posts in the internal bath of the main body Completely push shelf boards by sliding to the end Take care to put each shelf board on correct pa...

Страница 11: ...major components note that they might corrode with strong acid Note that packings may corrode with acid alkali oil or organic solvents 5 Always operate the unit with the exhaust ports open There are...

Страница 12: ...r panel of DG400 Standalone overheat preventive device hydraulic ELB Observation window Door Drain pan Rating sticker Power cord Exhaust ports Operation panel Aadjusters 2 points Shelf board One of th...

Страница 13: ...r auto start operation can be selected SUB MENU key Long press of the TIMER key Key for setting calibration offset temperature the key lock function or the power outage compensation function RUN lamp...

Страница 14: ...cAL Calibration offset setting Used for inputting a calibration offset temperature See section Using the calibration offset function on page 23 Lock Key lock of settings Key locks settings to prevent...

Страница 15: ...the keys Pressing the RUN STOP key starts quick auto stop operation and activates the timer in the middle of it to automatically stop it after the set period of time P 17 3 Auto stop operation Used w...

Страница 16: ...t preventing device on the right side of the unit to the correct value set temperature 25 turn the ELB OFF once and then turn it ON again P 15 2 Calibration offset function Calibration offset function...

Страница 17: ...r start Auto stop Time setting ASt Automatic stop of operation Long press ELB ON TIMER RUN STOP One sec Time setting RUN STOP One sec AStr Timer start Auto start of operation Time setting RUN STOP One...

Страница 18: ...he upper right side of the unit to the arrow in the diagram shown left Turn the ELB to OFF and wait for a while without opening the door After a while turn the ELB ON set the ELB ON Set the temperatur...

Страница 19: ...ng operation Press the RUN STOP key longer Fixed temperature operation will start and the RUN lamp and the heater lamp come on 4 Stopping operation Press the RUN STOP key longer Operation stops the RU...

Страница 20: ...99 hours 59 minutes time can be set in minutes One hundred hours and over are set only in 10 minutes Keep the keys pressed to continuously change set time and you can quickly reach the time you want P...

Страница 21: ...rom when the set temperature is reached to the time the device shall be stopped When you want to change settings after timer activation press the TIMER key on the current screen to enter the setting m...

Страница 22: ...pressed to continuously change set time and you can quickly reach the time you want Press the keys once at a time for fine adjustment STOP RUN MEASURED TEMP HEATER RUN SET TEMP TIMER SUB MENU 2 Starti...

Страница 23: ...hed to the time the device shall be stopped When you want to change settings after timer activation press the TIMER key on the current screen to enter the setting mode where you can change settings No...

Страница 24: ...to 99 hours 59 minutes time can be set in minutes One hundred hours and over are set only in 10 minutes Keep the keys pressed to continuously change set time and you can quickly reach the time you wa...

Страница 25: ...me with the keys In either case the set temperature screen will stop blinking after a while and switch to the timer count mode and the change made is determined Note however when you change the set ti...

Страница 26: ...ey long to exit the sub menu mode When you want to set the key lock function proceed to character selection process for the key lock function without pressing the TIMER key SUBMENU key long You can se...

Страница 27: ...t indicate the setting lock function STOP RUN MEASURED TEMP HEATER RUN SET TEMP TIMER SUB MENU Off is displayed on the set temperature screen To lock settings change to on using the key Press the TIME...

Страница 28: ...the factory STOP RUN MEASURED TEMP HEATER RUN SET TEMP TIMER SUB MENU Press the TIMER key SUBMENU key long to enter the sub menu mode Press the TIMER key SUBMENU key several times to select the charac...

Страница 29: ...oles are blocked Internal temperature of the unit will rise degrading the performance and an accident a malfunction or a fire may result 4 Do not allow liquid to spill over the unit Do not allow liqui...

Страница 30: ...cally return to the status immediately before the power outage and resumes operation Turn the ELB off if you do not want to resume operation by automatic recovery 6 Always operate the unit at a correc...

Страница 31: ...edures precautions on page 7 If these are not placed correctly the unit will be unable to perform correctly as well as an accident or a malfunction may result 10 Do not attempt to do anything other th...

Страница 32: ...n and press the test button on the device with a ball point pen to check whether it is turned off to indicate that it is in the normal state Maintenance of the internal bath Stop operation and turn th...

Страница 33: ...position Always pay attention to the preservation of the global environment We highly recommend taking the unit apart as far as possible for separation or recycling to contribute to the preservation o...

Страница 34: ...n an abnormality occurs confirm the error code and immediately stop operation Safety device Symptom Possible causes and measures Sensor error appears Error in the temperature input circuit Disconnecti...

Страница 35: ...e power supply voltage has declined If ambient temperature fluctuates widely If load for inside the bath is large Displayed temperature differs from the measurement If the calibration offset setting i...

Страница 36: ...fill in your dealer date of purchase and other information and store securely Warranty period is one full year from the date of purchase Repair service for free is available according to the condition...

Страница 37: ...n lock function power outage compensation function Safety device Self diagnostic function Temperature sensor error memory error auto overheat prevention measured temperature error Protection device EL...

Страница 38: ...t name ELB ELB with an over current protector OH Thermostat Standalone overheat prevention device T Terminal block TH Temperature sensor K H Heater CONT Planar circuit board X1 X2 Relay PIO Display ci...

Страница 39: ...o OH EGO thermostat LT00008745 55 13225 070 E G O PIO Display circuit board LT00007639 CN40B Y Yamato CONT Planar circuit board LT00007640 CN40B Y Yamato Tough card LT00007641 15P 300mm Yamato X1 VC r...

Страница 40: ...perchlorates Potassium peroxide sodium peroxide barium peroxide and other inorganic peroxides Potassium nitrate sodium nitrate ammonium nitrate and other nitrates Sodium chlorite and other chlorites C...

Страница 41: ...ifications Specification power supply P 6 P 6 P 34 2 Operation start Starts operation Performs fixed value opera tion auto stop operation or auto start operation 2 Before operating the unit Installati...

Страница 42: ...truction Never attempt to perform matters prohibited in this operation instruction Otherwise an unexpected accident may result Notice Descriptions in this operating instruction are subject to change w...

Отзывы: