


CHAIN DRIVE
4-65
EAM30075
REMOVING THE DRIVE CHAIN
1. Stand the vehicle on a level surface.
WARNING
EWA13120
Securely support the vehicle so that there is
no danger of it falling over.
TIP
Place the vehicle on a maintenance stand so
that the rear wheel is elevated.
2. Remove:
•
Drive chain
TIP
Cut the drive chain with the drive chain cut & riv-
et tool. (Use goods on the market.)
EAM30076
CHECKING THE DRIVE CHAIN
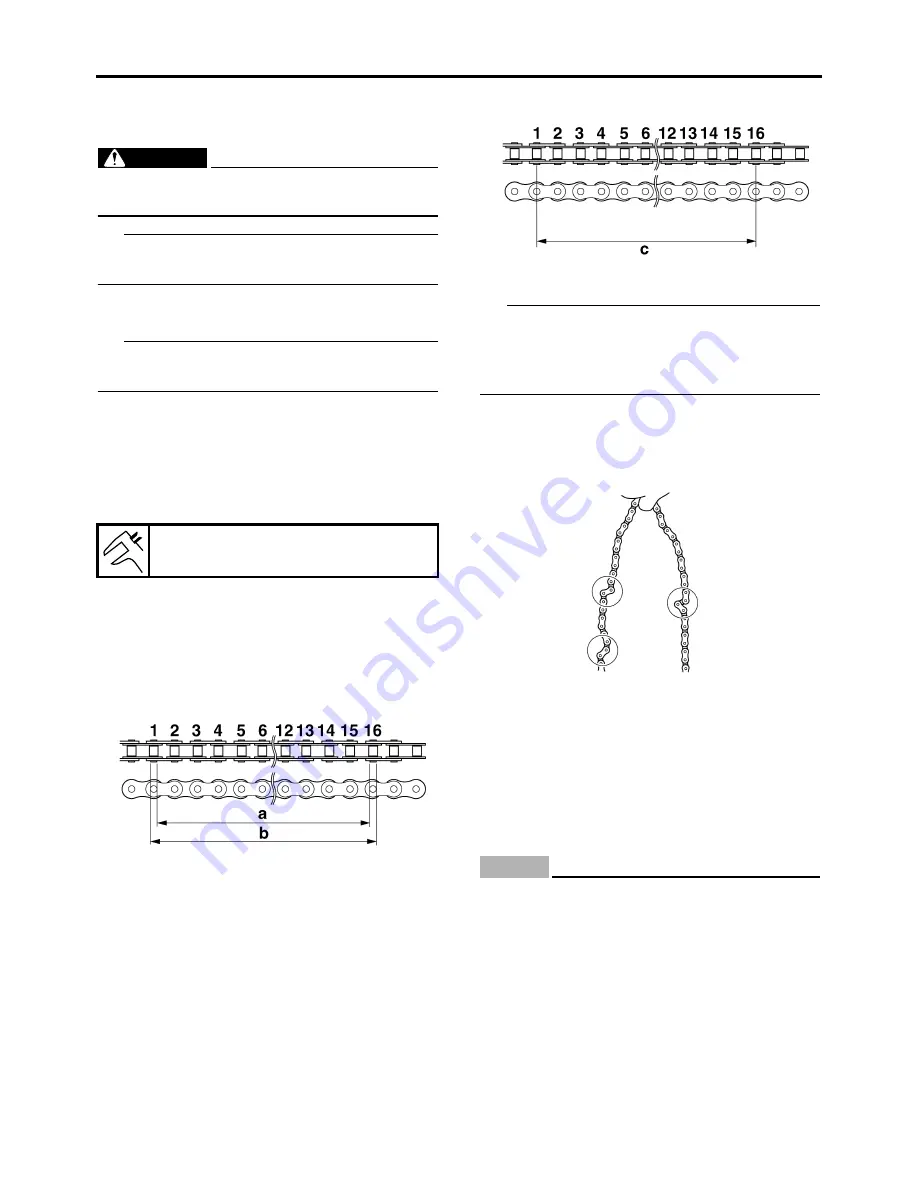
1. Measure:
•
15-link section of the drive chain
Out of specification
Replace the drive
chain.
▼▼▼▼▼▼▼▼▼▼▼▼▼▼▼▼▼▼▼▼▼▼▼▼▼▼▼▼▼▼▼▼
a. Measure the length “a” between the inner
sides of the pins and the length “b” between
the outer sides of the pins on a 15-link section
of the drive chain as shown in the illustration.
b. Calculate the length “c” of the 15-link section
of the drive chain using the following formula.
Drive chain 15-link section length “c” =
(length “a” between pin inner sides + length
“b” between pin outer sides)/2
TIP
•
When measuring a 15-link section of the drive
chain, make sure that the drive chain is taut.
•
Perform this procedure 2–3 times, at a different
location each time.
▲▲▲▲▲▲▲▲▲▲▲▲▲▲▲▲▲▲▲▲▲▲▲▲▲▲▲▲▲▲▲▲
2. Check:
•
Drive chain
Stiffness
Clean, lubricate, or replace.
3. Clean:
•
Drive chain
▼▼▼▼▼▼▼▼▼▼▼▼▼▼▼▼▼▼▼▼▼▼▼▼▼▼▼▼▼▼▼▼
a. Wipe the drive chain with a clean cloth.
b. Put the drive chain in kerosene and remove
any remaining dirt.
c. Remove the drive chain from the kerosene
and completely dry it.
NOTICE
ECA19090
• This vehicle has a drive chain with small
rubber O-rings “1” between the drive chain
side plates. Never use high-pressure water
or air, steam, gasoline, certain solvents
(e.g., benzine), or a coarse brush to clean
the drive chain. High-pressure methods
could force dirt or water into the drive
chain’s internals, and solvents will deterio-
rate the O-rings. A coarse brush can also
damage the O-rings. Therefore, use only
kerosene to clean the drive chain.
• Do not soak the drive chain in kerosene for
15-link length limit
239.3 mm (9.42 in)
Содержание YZ 2019 Series
Страница 6: ...EAM20162 YAMAHA MOTOR CORPORATION U S A YZ MOTORCYCLE LIMITED WARRANTY...
Страница 10: ......
Страница 40: ...MOTORCYCLE CARE AND STORAGE 1 28...
Страница 63: ...LUBRICATION POINTS AND LUBRICANT TYPES 2 22...
Страница 66: ...LUBRICATION SYSTEM CHART AND DIAGRAMS 2 25...
Страница 68: ...LUBRICATION SYSTEM CHART AND DIAGRAMS 2 27...
Страница 69: ...LUBRICATION SYSTEM CHART AND DIAGRAMS 2 28 1 Exhaust camshaft 2 Intake camshaft 3 Oil filter element 4 Oil pump...
Страница 70: ...LUBRICATION SYSTEM CHART AND DIAGRAMS 2 29...
Страница 71: ...LUBRICATION SYSTEM CHART AND DIAGRAMS 2 30 1 Camshaft 2 Oil pressure check bolt 3 Oil filter element 4 Oil pump...
Страница 72: ...CABLE ROUTING DIAGRAM 2 31 EAM20152 CABLE ROUTING DIAGRAM...
Страница 74: ...CABLE ROUTING DIAGRAM 2 33...
Страница 76: ...CABLE ROUTING DIAGRAM 2 35...
Страница 78: ...CABLE ROUTING DIAGRAM 2 37...
Страница 80: ...CABLE ROUTING DIAGRAM 2 39...
Страница 82: ...CABLE ROUTING DIAGRAM 2 41...
Страница 84: ...CABLE ROUTING DIAGRAM 2 43...
Страница 86: ...CABLE ROUTING DIAGRAM 2 45...
Страница 126: ...ELECTRICAL SYSTEM 3 38...
Страница 177: ...FRONT FORK 4 49 1...
Страница 196: ...CHAIN DRIVE 4 68...
Страница 217: ...CAMSHAFT 5 18 Spark plug Spark plug 13 N m 1 3 kgf m 9 6 lb ft T R...
Страница 237: ...ELECTRIC STARTER 5 38...
Страница 256: ...OIL PUMP AND BALANCER GEAR 5 57 a 2 10 b 2 9 1 b 5 3 a 4 10 5 9 3 E c d 6 7 8 8 b 6...
Страница 262: ...GENERATOR AND STARTER CLUTCH 5 63 1 a 3 3 2 4...
Страница 276: ...TRANSMISSION 5 77...
Страница 284: ...WATER PUMP 6 7...
Страница 290: ...FUEL TANK 7 5 A Left B Right 1 1 A 0 mm 0 in B 1 1 15 mm 0 59 in...
Страница 296: ...THROTTLE BODY 7 11...
Страница 299: ......
Страница 313: ...CHARGING SYSTEM 8 14...
Страница 343: ...FUEL INJECTION SYSTEM 8 44...
Страница 347: ...FUEL PUMP SYSTEM 8 48...
Страница 348: ...ELECTRICAL COMPONENTS 8 49 EAM20147 ELECTRICAL COMPONENTS 9 10 1 3 2 4 5 6 7 8...
Страница 350: ...ELECTRICAL COMPONENTS 8 51 11 10 9 2 3 1 6 7 8 4 5...
Страница 352: ...ELECTRICAL COMPONENTS 8 53 EAM30289 CHECKING THE SWITCHES 4 1 3 2 B B Sb B B B B B B B B...
Страница 353: ...ELECTRICAL COMPONENTS 8 54 1 Engine stop switch 2 Neutral switch 3 Clutch switch 4 Start switch...
Страница 368: ...ELECTRICAL COMPONENTS 8 69...
Страница 376: ...LIST OF SELF DIAGNOSTIC AND FAIL SAFE ACTIONS 9 7...