background image

Initial settings

24

 En

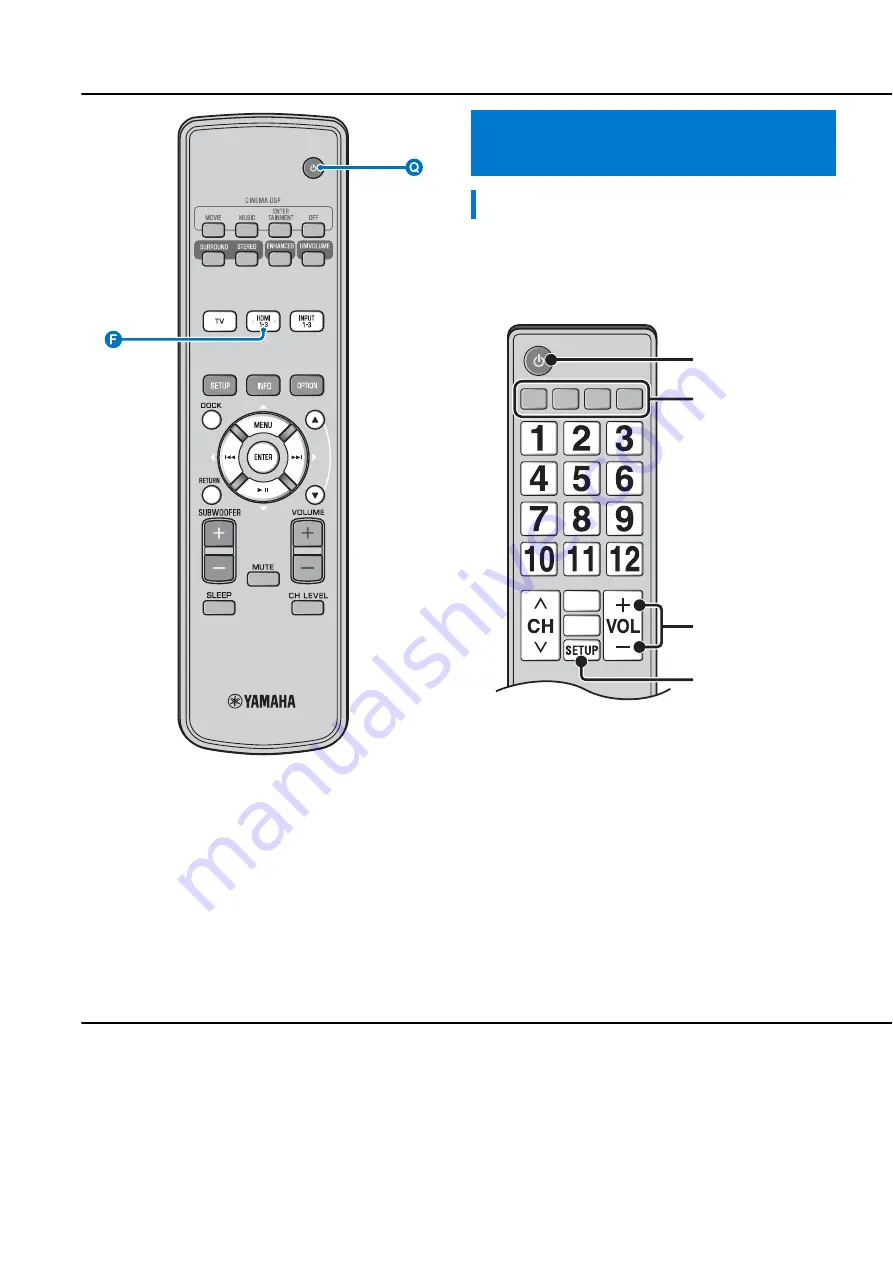
You can use the TV remote control to operate this unit if your TV 
supports the HDMI control function (ex. REGZA Link) and is 
connected to this unit’s HDMI OUT (ARC) jack. 

1)

Operating the unit by TV’s remote 
control

What is the HDMI control function?

Remote control of TV (Example)

Power on/off

Controls the volume

Selects a component to 
reproduce sounds (this 
unit or TV)

Switches input

This unit automatically 
selects the input according to 
the input source setting on the 
TV. Switching input on TV 
menu (ex. selecting Blu-ray 
disc player on TV menu) also 
changes input of this unit.

• Even if your TV supports the HDMI control function, some functions 

may not be available. For details, refer to the manual supplied with 
your TV.

• If you use HDMI to connect this unit to a device such as a Blu-ray 

disc player that supports HDMI control, you can control that device 
using the HDMI control function.

• We suggest that you use products (TV, Blu-ray disc/DVD player, etc.) 

from the same manufacturer.

1)

y

Содержание YSP-2200

Страница 1: ...YSP CU2200 NS SWP600 YSP CU2200 NS SWP600 Digital Sound Projector OWNER S MANUAL English...

Страница 2: ...with chemical solvents this might damage the finish Use a clean dry cloth 12 Only voltage specified on this unit must be used Using this unit with a higher voltage than specified is dangerous and may...

Страница 3: ...es discard the batteries immediately taking care not to touch the leaked material If the leaked material comes into contact with your skin or gets into your eyes or mouth rinse it away immediately and...

Страница 4: ...ng the unit by TV s remote control p 24 When enjoying STB program such as on satellite CATV tuner p 15 Connecting a game console p 15 Playing back a TV Blu ray disc player and game console p 26 PREPAR...

Страница 5: ...en using Yamaha Universal Dock for iPod optional YDS 12 etc 34 When using Wireless System for iPod optional YID W10 34 Playing back Bluetooth components 35 Pairing 35 Connecting 35 SETTINGS Setup menu...

Страница 6: ...l cable 1 5 m 4 9 ft Video pin cable for displaying menu and iPod video 1 5 m 4 9 ft IR Flasher 1 m 3 3 ft Safety and Accessory Information IntelliBeam microphone 6 m 19 7 ft Cardboard microphone stan...

Страница 7: ...when connecting the IR Flasher p 10 7 INPUT key Selects playback component p 15 8 VOLUME key Controls the volume of the unit p 26 9 key Turns on the unit or set it to the standby mode Controls and fu...

Страница 8: ...her supplied p 11 5 COAXIAL digital input 2 jack For connecting digital audio pin cable to the external components p 15 6 OPTICAL digital input 1 jack For connecting optical cable to the external comp...

Страница 9: ...SLEEP indicator Lights up when the sleep timer is set p 32 3 CINEMA DSP indicator Lights up when a sound field program is selected p 28 4 VOL indicator Indicates the current volume level p 26 5 Multi...

Страница 10: ...etup menu p 36 MENU U key ENTER key Y key Z key V key Change the setting p 36 Operate iPod DOCK key Selects iPod iPhone or Bluetooth component p 33 35 RETURN key Returns to the previous menu screen SU...

Страница 11: ...beams off the walls of your listening room The surround sound effects produced by this unit may not be sufficient when this unit is installed in the following locations Rooms with walls inadequate for...

Страница 12: ...e control sensor of your TV The unit receives the signal from the remote control of your TV in front and transmits to your TV by IR Flasher supplied Remove the backing paper on the tip of LED part of...

Страница 13: ...llel installation Install this unit as close to the exact center of the wall as possible Ideal installation condition Install this unit as close to the exact front of your normal listening position as...

Страница 14: ...installed facing the wall reflects sounds In a case of the listening room as right illustration adjusting the position of right channel after auto setup enables to achieve more desired surround sound...

Страница 15: ...ies Battery 2 AA R6 UM 3 Press U Remove the transparent sheet before using Operation range Within 6 m 20 ft Subwoofer connection Make sure to connect the subwoofer supplied Do not connect a subwoofer...

Страница 16: ...y disc player 1 Remove the cap 2 Check the direction of the plug TV Video signals Audio signals 1 2 3 Example 1 4 Subwoofer supplied 5 Connect the center unit with the speaker cable supplied to the su...

Страница 17: ...ported Digital audio pin cable supplied 4 4 HDMI not supported game console Analog audio stereo pin cable optional 4 ANALOG OUTPUT COAXIAL OUTPUT HDMI OUTPUT HDMI OUTPUT VIDEO INPUT VIDEO INPUT VIDEO...

Страница 18: ...TV 4 Press U V key to select the desired language and then press ENTER key Selectable item ENGLISH DEUTSCH FRAN AIS ESPA OL ITALIANO NEDERLANDS SVENSKA Initial setting English YSP 2200 Push SETUP to...

Страница 19: ...mbling the supplied cardboard microphone stand The AUTO SETUP procedure may not be run successfully if this unit is installed in one of the rooms described in Installing this unit on page 11 In such c...

Страница 20: ...Open the curtains to improve sound reflection 2 Run BEAM OPTIMIZE ONLY 3 Close the curtains 4 Run SOUND OPTIMIZE ONLY Notes IntelliBeam microphone When pressing RETURN key displays the setup menu Pres...

Страница 21: ...TO SETUP START RETURN Cancel After 3 min 5 Press ENTER key to confirm the results 5 The measurement result is saved 6 Remove the IntelliBeam microphone Initial screen appears 6 Keep the IntelliBeam mi...

Страница 22: ...d quality so that the parameters best match your listening environment You must optimize the beam angle with BEAM OPTIMIZE ONLY before starting SOUND OPTIMIZE ONLY It is recommended that you should se...

Страница 23: ...ocedure was in progress Do not perform any other operations while the AUTO SETUP procedure is in progress ERROR E 4 Please check MIC position MIC should be set in front of the Sound Projector and re t...

Страница 24: ...ER key 4 Press U V key to select the desired memory number and then press ENTER key 1 Selectable item Memory 1 Memory 2 Memory 3 Memory 1 Save Now is displayed when the memory number is selected 5 Pre...

Страница 25: ...ect MEMORY and press ENTER key 3 Press U V key to select LOAD and press ENTER key 4 Press U V key to select the memory number to be loaded and then press ENTER key Selectable item Memory 1 Memory 2 Me...

Страница 26: ...t This unit automatically selects the input according to the input source setting on the TV Switching input on TV menu ex selecting Blu ray disc player on TV menu also changes input of this unit Even...

Страница 27: ...ol function is enabled on the TV Also check the relative settings such as power interlock function or speaker priority The HDMI control function is not working even checking the above Turn off this un...

Страница 28: ...e volume 1 2 3 Press SUBWOOFER key to adjust the subwoofer 4 6 Select surround mode or stereo mode and set your sound preferences p 27 HDMI1 Input source name Press key to turn this unit to standby mo...

Страница 29: ...ustment 1 Press CH LEVEL key 2 Press U V key to select adjustable channel from the followings Left Lv Front left Right Lv Front right CenterLv Center Sur L Lv Surround left Sur R Lv Surround right SWF...

Страница 30: ...utomatically memorizes the settings assigned to each input source When you select another input the unit automatically recalls the last settings for the selected input 1 y 2 y 3 y Enjoying realistic s...

Страница 31: ...d comedies and offers an optimum 3D feeling reproducing effects tones and background music softly but cubically around clear words Game This program is suitable for role playing and adventure games It...

Страница 32: ...hannels St 3Beam2 St 3Beam Plus2 Outputs normal sound from the front right and left channels and sound beams from the center and surround back right and left channels Surround right and left channel s...

Страница 33: ...ic Movies Music Decoder Recommended source PLIIx Dolby Pro Logic IIx Movie Music Game Movies Music Games Neo 6 DTS Neo 6 Cinema Music Movies Music About the surround decoder Playing back 5 1 channel s...

Страница 34: ...latest operation AutoPowerDown cannot be selected when analog INPUT3 or DOCK is selected TV or HDMI1 3 is selected and HDMI control function is on For details on Interlock refer to Playing back iPod...

Страница 35: ...round LFE low frequency sound effects Display example 3 2 0 1 Front 3ch Surround 2ch LFE for input signal 4 Sampling Sampling frequency for digital input signal Bitrate Bitrate per second of input sig...

Страница 36: ...W10 You can use functions following for iPod iPhone when Interlock is set to On in option menu p 32 When playback starts on iPod iPhone this unit is turned on and DOCK iPod is selected as source autom...

Страница 37: ...on Please read and fully understand all the instructions before starting 6 Check that the Bluetooth components recognize the Bluetooth Wireless Audio Receiver If the Bluetooth component detects the Ya...

Страница 38: ...R key Repeat these step to display desired menu 3 Change setting value of each menu by pressing Y Z key 2 4 Press SETUP key again to exit the setup menu Press RETURN key to return to the previous menu...

Страница 39: ...FER LFE LEVEL DISTANCE Configures the subwoofer settings p 40 AUDIO DELAY AUTO LIP SYNC Adjusts delay in output timing between video signals and audio signals p 40 TV HDMI1 3 INPUT1 INPUT2 INPUT3 Adju...

Страница 40: ...the width of the listening room and the distance between this unit and rear wall FLAT TO WALL ANGLE TO WALL OR CORNER When this unit is installed at the corner of the room specify the width of length...

Страница 41: ...of output for each channel to achieve an expansive feeling for each channel Adjust toward minus to move the focus outward widen the sweet spot and adjust toward plus to move the focus toward the norm...

Страница 42: ...image Sub menu AUTO LIP SYNC Select how to automatically adjust the audio output delay Selectable item ON OFF ON The audio output delay is automatically adjusted This item is available when a TV that...

Страница 43: ...Select the amount of dynamic range applied when this unit is decoding Dolby Digital and DTS signals Selectable items Min Auto Standard Max Max Outputs sound without adjusting the dynamic range of the...

Страница 44: ...nt Input assignment Sub menu Default setting Audio input jack OPTICAL1 TV DIGITAL OPTICAL TV OPTICAL2 INPUT1 DIGITAL OPTICAL 1 COAXIAL INPUT2 DIGITAL COAXIAL 2 ANALOG INPUT3 AUDIO INPUT 3 Set correspo...

Страница 45: ...signals This setting is effective when HDMI CONTROL is set to OFF 5 Selectable item YSP 2200 OTHER YSP 2200 Play back the input sound signal OTHER Play back the equipment connected to HDMI OUT ARC ja...

Страница 46: ...adjust the vertical position of the OSD Adjust toward the minus direction to raise the position of the OSD and adjust toward the plus direction to lower it Adjustable range 5 to 0 to 5 Sub menu OSD B...

Страница 47: ...t is in standby mode R INPUT PW OFF Disables power on R INPUT PW ON Enables power on AC ON STANDBY Sets whether or not this unit returns to its previous state when AC power is restored after a tempora...

Страница 48: ...d iPhone and turn on the unit No sound Incorrect input or output cable connections Connect them with an HDMI connection or a digital connection 14 15 No appropriate input source has been selected Sele...

Страница 49: ...s the surround mode Set HDMI CONTROL to OFF or set the system again by using its remote control 43 The HDMI control function does not work properly HDMI CONTROL is set to OFF Set HDMI CONTROL to ON 43...

Страница 50: ...od iPhone is running low Unknown iPod The iPod iPhone being used is not supported by this unit Connect supported iPod to this unit 34 Connected iPod iPhone is correctly connected to the Yamaha Univers...

Страница 51: ...lable The Yamaha Bluetooth Wireless Audio Receiver such as YBA 10 optional and the Bluetooth component are in the process of the pairing Connected The connection between the Yamaha Bluetooth Wireless...

Страница 52: ...oratories provides completely independent multi channel audio With 3 front channels left center and right and 2 surround stereo channels Dolby Digital provides five full range audio channels By using...

Страница 53: ...s a high resolution audio technology developed for high definition disc based media including Blu ray Disc Selected as an optional audio standard for Blu ray Disc this technology delivers sound that i...

Страница 54: ...he stand is attached Horizontal placement 435 137 350 mm 17 1 8 5 3 8 13 3 4 in Vertical placement 141 430 350 mm 5 1 2 16 7 8 13 3 4 in Weight YSP CU2200 4 3 kg 9 5 lbs NS SWP600 6 0 kg 13 2 lbs Spec...

Страница 55: ...Repeatable video signals 1 This unit is compatible with the video signals of the following resolutions 480i 60 Hz 576i 50 Hz 480p 60 Hz 576p 50 Hz Deep Color x v Color 3D video signal 720p 60 Hz 50 Hz...

Страница 56: ...ray disc player for the settings Playing back the demonstration DVD 1 Select input sources both on this unit and your TV so that audio signal of DVD is input to this unit and video signal is input to...

Страница 57: ...5 Blu ray disc player 26 C Cardboard microphone stand 17 Ch Out 29 Channel ch 50 Channel output 31 CINEMA DSP 28 CINEMA DSP indicator 7 Compressed Music Enhancer 27 D Decoder Mode 33 Deep Color 51 Dig...

Страница 58: ...indicator 7 32 Sleep timer 32 Sound optimization 17 SOUND OPTIMIZE ONLY 20 Sound Out 29 Sound out setting 41 St 3Beam Stereo 3Beam 30 St 3Beam2 St 3Beam Plus2 30 STATUS indicator 5 Stereo mode 27 Sub...

Страница 59: ...YD002A0 OMEN...

Отзывы: