ELECTRICAL COMPONENTS
8-60
Refer to “GENERAL CHASSIS” on page 4-1.
EAM30291
CHECKING AND CHARGING THE BATTERY
WARNING
EWA13290
Batteries generate explosive hydrogen gas
and contain electrolyte which is made of poi-
sonous and highly caustic sulfuric acid.
Therefore, always follow these preventive
measures:
• Wear protective eye gear when handling or
working near batteries.
• Charge batteries in a well-ventilated area.
• Keep batteries away from fire, sparks or
open flames (e.g., welding equipment,
lighted cigarettes).
• DO NOT SMOKE when charging or han-
dling batteries.
• KEEP BATTERIES AND ELECTROLYTE
OUT OF REACH OF CHILDREN.
• Avoid bodily contact with electrolyte as it
can cause severe burns or permanent eye
injury.
FIRST AID IN CASE OF BODILY CONTACT:
EXTERNAL
• Skin — Wash with water.
• Eyes — Flush with water for 15 minutes and
get immediate medical attention.
INTERNAL
• Drink large quantities of water or milk fol-
lowed with milk of magnesia, beaten egg or
vegetable oil. Get immediate medical atten-
tion.
NOTICE
ECA13661
• This is a VRLA (Valve Regulated Lead Acid)
battery. Never remove the sealing caps be-
cause the balance between cells will not be
maintained and battery performance will
deteriorate.
• Charging time, charging amperage and
charging voltage for a VRLA (Valve Regu-
lated Lead Acid) battery are different from
those of conventional batteries. The VRLA
(Valve Regulated Lead Acid) battery should
be charged according to the appropriate
charging method. If the battery is over-
charged, the electrolyte level will drop con-
siderably. Therefore, take special care
when charging the battery.
TIP
Since VRLA (Valve Regulated Lead Acid) bat-
teries are sealed, it is not possible to check the
charge state of the battery by measuring the
specific gravity of the electrolyte. Therefore, the
charge of the battery has to be checked by mea-
suring the voltage at the battery terminals.
1. Remove:
•
Side cover (left/right)
•
Seat
Refer to “GENERAL CHASSIS” on page 4-1.
2. Disconnect:
•
Battery lead
(from the battery terminals)
NOTICE
ECA13700
First, disconnect the negative battery lead,
and then the positive battery lead.
3. Remove:
•
Battery
4. Check:
•
Battery charge
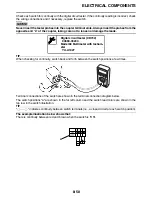
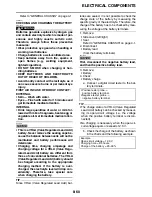
a. Connect a digital circuit tester to the bat-
tery terminals.
TIP
•
The charge state of a VRLA (Valve Regulated
Lead Acid) battery can be checked by measur-
ing its open-circuit voltage (i.e., the voltage
when the positive battery terminal is discon-
nected).
•
No charging is necessary when the open-cir-
cuit voltage equals or exceeds 12.8 V.
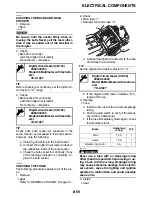
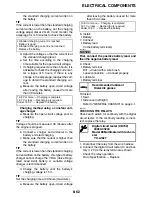
b. Check the charge of the battery, as shown
in the charts and the following example.
•
Positive tester probe
positive battery terminal
•
Negative tester probe
negative battery terminal
Example
Open-circuit voltage = 12.0 V
Charging time = 6.5 hours
Charge of the battery = 20–30 %
Содержание WR250F 2022
Страница 5: ...EAM20093 YAMAHA MOTOR CORPORATION U S A WR MOTORCYCLE LIMITED WARRANTY...
Страница 8: ......
Страница 10: ......
Страница 41: ...MULTI FUNCTION DISPLAY 1 29...
Страница 62: ...ELECTRICAL SPECIFICATIONS 2 9 Radiator fan motor fuse 5 0 A Spare fuse 15 0 A...
Страница 70: ...CABLE ROUTING DIAGRAM 2 17 EAM20152 CABLE ROUTING DIAGRAM Frame and engine left side view...
Страница 72: ...CABLE ROUTING DIAGRAM 2 19 Frame and engine right side view...
Страница 74: ...CABLE ROUTING DIAGRAM 2 21 Handlebar front view...
Страница 76: ...CABLE ROUTING DIAGRAM 2 23 Frame and engine top view...
Страница 78: ...CABLE ROUTING DIAGRAM 2 25 Frame and battery top view...
Страница 80: ...CABLE ROUTING DIAGRAM 2 27 Rear brake right side view...
Страница 82: ...CABLE ROUTING DIAGRAM 2 29 Front brake front view and right side view...
Страница 84: ...CABLE ROUTING DIAGRAM 2 31 Taillight top view and right side view...
Страница 86: ...CABLE ROUTING DIAGRAM 2 33...
Страница 131: ...GENERAL CHASSIS 4 5 a Projection b Slot c Rib side cover d Rib rear fender a a a 1 1 c c b b d d...
Страница 201: ...CHECKING THE SHIFT DRUM ASSEMBLY 5 73 CHECKING THE TRANSMISSION 5 73 INSTALLING THE TRANSMISSION 5 74...
Страница 204: ...LUBRICATION SYSTEM CHART AND DIAGRAMS 5 3 1 Oil filter element 2 Oil pump...
Страница 205: ...LUBRICATION SYSTEM CHART AND DIAGRAMS 5 4 1 Intake camshaft 2 Exhaust camshaft...
Страница 206: ...LUBRICATION SYSTEM CHART AND DIAGRAMS 5 5 1 Camshaft 2 Oil pressure check bolt 3 Oil pump 4 Oil filter element...
Страница 259: ...SHIFT SHAFT 5 58 TIP Align the punch mark a on the shift shaft with the punch mark b in the shift pedal 1 1 2 2 a b...
Страница 265: ...OIL PUMP 5 64 A Primary drive gear side B Crankcase cover side 5 7 mm 0 02 0 28 in 5 c d 6 8 b 8 6 7 E...
Страница 278: ...TRANSMISSION 5 77...
Страница 288: ...WATER PUMP 6 9...
Страница 298: ...THROTTLE BODY 7 9...
Страница 301: ......
Страница 302: ...IGNITION SYSTEM 8 1 EAM20142 IGNITION SYSTEM EAM30277 CIRCUIT DIAGRAM...
Страница 306: ...ELECTRIC STARTING SYSTEM 8 5 EAM20143 ELECTRIC STARTING SYSTEM EAM30279 CIRCUIT DIAGRAM...
Страница 312: ...CHARGING SYSTEM 8 11 EAM20144 CHARGING SYSTEM EAM30282 CIRCUIT DIAGRAM...
Страница 315: ...CHARGING SYSTEM 8 14...
Страница 316: ...SIGNALING SYSTEM 8 15 EAM20154 SIGNALING SYSTEM EAM30348 CIRCUIT DIAGRAM...
Страница 320: ...LIGHTING SYSTEM 8 19 EAM20153 LIGHTING SYSTEM EAM30346 CIRCUIT DIAGRAM...
Страница 323: ...LIGHTING SYSTEM 8 22...
Страница 324: ...COOLING SYSTEM 8 23 EAM20155 COOLING SYSTEM EAM30350 CIRCUIT DIAGRAM...
Страница 327: ...COOLING SYSTEM 8 26...
Страница 328: ...FUEL INJECTION SYSTEM 8 27 EAM20145 FUEL INJECTION SYSTEM EAM30284 CIRCUIT DIAGRAM...
Страница 353: ...FUEL INJECTION SYSTEM 8 52...
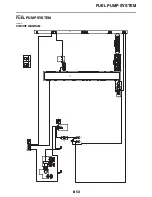
Страница 354: ...FUEL PUMP SYSTEM 8 53 EAM20146 FUEL PUMP SYSTEM EAM30287 CIRCUIT DIAGRAM...
Страница 388: ...SELF DIAGNOSTIC FUNCTION AND DIAGNOSTIC CODE TABLE 9 15...
Страница 398: ...CHASSIS 10 9...
Страница 400: ......
Страница 402: ......


