background image

En

NAMES OF PARTS AND THEIR FUNCTIONS

Eng

lish

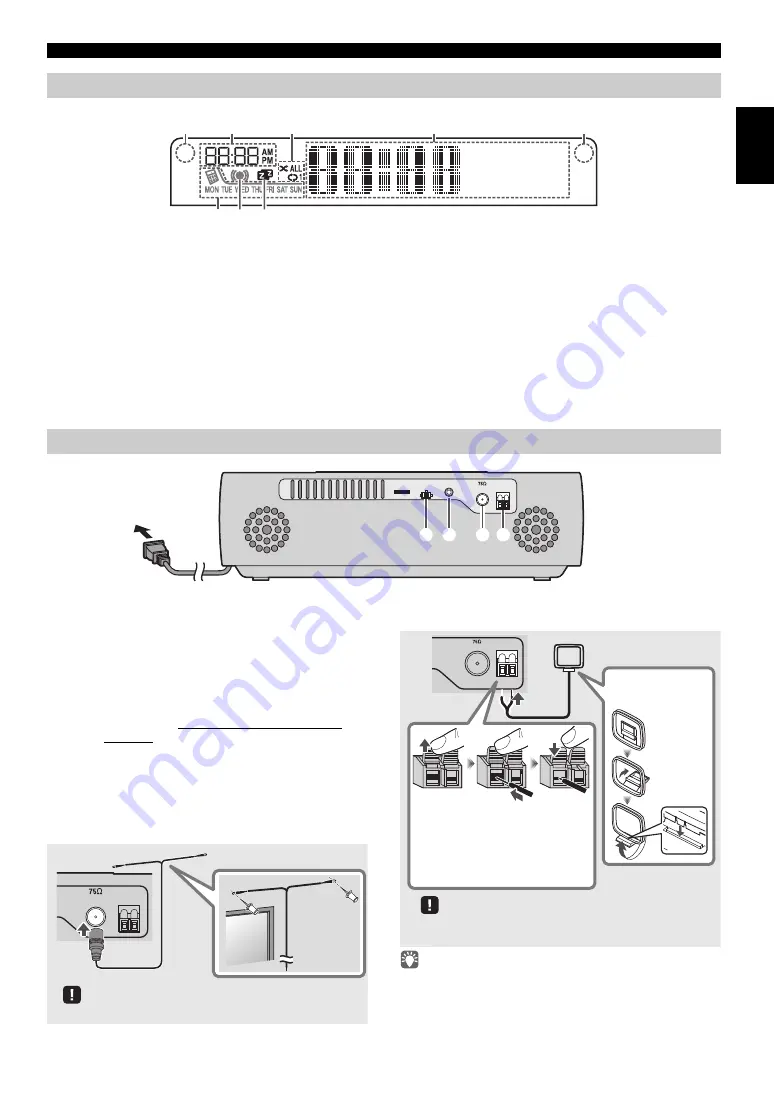
a

Illumination sensor

Detect ambient lighting. Do not cover this sensor.

b

Alarm time

This indicates the alarm time.

c

Repeat/shuffle indicator

Display the playback mode (

 P. 6, 8).

d

Multi-function indicator

Display various information, including the clock time, 
information about the currently-playing track, and the 
frequency of the FM/AM station.

e

Remote control signal receiver

Make sure that this sensor is not obstructed (

 P. 1).

f

Sleep indicator

Turn on if the sleep timer has been set (

 P. 17).

g

Alarm indicator

Turn on if the alarm has been set (

 P. 16).

h

Weekly alarm indicator

Shows alarm information specified using the free “DTA 
Controller” application for the iPod touch/iPhone/iPad 


(

 P. 16).

a

CLOCK switch

Sets the clock and specifies whether the clock will be 
displayed (

 P. 5).

b

AUX

Use a commercially available 3.5 mm mini-plug cable 
to connect your external device here (

 P. 13).

c

FM antenna connector

Connect the FM antenna here.

d

AM antenna connector (U.S.A. model only)

Connect the AM antenna here.

• If reception is poor, try changing the height or direction of the 

antenna, or move the unit to find a location that has better 
reception.

• If you use a commercially available outdoor antenna instead of 

the supplied antenna, reception may be better.

Front panel display

~ ~ ~ ~ ~ ~
~ ~ ~ ~ ~ ~

5

4

8

2

1

7 6

3

Rear panel

AM ANT

FM ANT

ON

CLOCK

AUX

SET

OFF

1 2 3 4

SET:

Set the clock.

ON:

Even when the system is off, the clock will be 
displayed and the alarm function will be available.

OFF:

When the system is off, the clock will not be 
displayed and 

the alarm function will not be 

available

.

AM ANT

FM ANT

Be sure to stretch out the antenna.

AM ANT

FM ANT

Assembling 


AM antenna

If there is a digital device near the antenna, you may 
experience interference.

The AM antenna cable is not 
polarized.
When you've finished making 
connections, pull gently on the cable 
to ensure that the connection is solid.

Содержание TSX-132

Страница 1: ...1 6 M a y ULHV OWNER S MANUAL MODE D EMPLOI MANUAL DE INSTRUCCIONES DESKTOP AUDIO SYSTEM SYSTEME AUDIO DESKTOP TSX B232 ...

Страница 2: ...aged liquid has been spilled or objects have fallen into the apparatus the apparatus has been exposed to rain or moisture does not operate normally or has been dropped Yamaha and the Electronic Industries Association s Consumer Electronics Group want you to get the most out of your equipment by playing it at a safe level One that lets the sound come through loud and clear without annoying blaring ...

Страница 3: ...nd can radiate radio frequency energy and if not installed and used in accordance with the instructions may cause harmful interference to radio communications However there is no guarantee that interference will not occur in a particular installation If this equipment does cause harmful interference to radio or television reception which can be determined by turning the equipment off and on the us...

Страница 4: ...se this unit for long periods of time i e vacation disconnect the AC power plug from the wall outlet 16 Be sure to read the TROUBLESHOOTING section on common operating errors before concluding that this unit is faulty 17 Before moving this unit press to set the system to off and disconnect the AC power plug from the wall outlet 18 Condensation will form when the surrounding temperature changes sud...

Страница 5: ...s via the AUX and listen to the FM AM By the Bluetooth technology you can enjoy clear sound without wire connections Use your favorite music or a beep tone as an alarm When the set time arrives the music you select is played at the volume that you specify giving you the ideal start to your day IntelliAlarm function P 14 By using the free DTA Controller application for the iPod touch iPhone iPad yo...

Страница 6: ...NTER Confirm a selected item or value lDisc slot Insert a CD here P 7 m EJECT Eject the CD n Select an item or value when setting the clock or the alarm oSET Set the alarm P 15 pALARM Switch the alarm on off P 16 q Headphone jack Connect headphones here NAMES OF PARTS AND THEIR FUNCTIONS Top panel Front panel q 3 4 7 8 9 5 6 12 o p k n l m j Stop Play Pause Skip Search backward forward press and h...

Страница 7: ... mm mini plug cable to connect your external device here P 13 cFM antenna connector Connect the FM antenna here dAM antenna connector U S A model only Connect the AM antenna here If reception is poor try changing the height or direction of the antenna or move the unit to find a location that has better reception If you use a commercially available outdoor antenna instead of the supplied antenna re...

Страница 8: ...ying music on data CDs or USB devices P 7 8 Select items or edit numerical values P 6 17 hENTER Confirm a selected item or value iAudio control buttons Use these to operate the iPod CD USB device j Repeat Shuffle Play music on an iPod CD or USB device in repeat shuffle mode P 6 8 kEQ LOW MID HIGH Adjust the bass middle or treble sound quality P 17 lTUNING Tune the FM AM P 11 mPRESET Select a FM AM...

Страница 9: ...nstead of setting time manually by setting the iPod to the iPod dock The time will not be copied if the iPod is already connected On step by pressing SNOOZE SLEEP you can select the time format 12 hour 24 hour 3 When you ve finished making settings set the CLOCK switch to the ON position The moment you set the switch to the ON position the clock will start from 0 second The time settings will be r...

Страница 10: ...Pod In some cases the audio source might not switch automatically if the audio source is USB or if this unit is currently connected via Bluetooth If USB is selected as the audio source the iPod will not be charged You can remove the iPod during playback If iPod is selected as the audio source the system will automatically turn off when 60 minutes have elapsed without a device being connected to th...

Страница 11: ... DEVICES P 21 Listening to a CD 1 Press the CD source button to switch the audio source to CD If a CD is already inserted playback will start 2 Insert a CD into the disc slot Playback starts automatically Playback can be controlled with either the remote control or the unit P 2 4 Insert the CD with the label side facing upward Folders and files on a data CD are played in alphabetical order While a...

Страница 12: ... the folder The folder file number is shown for several seconds when starting playback or skipping tracks If you press DISPLAY on the remote control while a song is playing or paused the information shown on the front panel display will be switched in the order shown at right Shown only if this data is included in the song Using repeat shuffle playback remote control only AUX USB CD iPod RADIO 1 2...

Страница 13: ...ng an iPod touch iPhone iPad If using other than an iPod touch iPhone iPad LISTENING TO MUSIC FROM YOUR Bluetooth COMPONENT Pairing this unit with your Bluetooth component 1 Press the source button to switch the audio source to Bluetooth 2 On your iPod touch iPhone iPad turn Settings General Bluetooth on The Bluetooth connection list will appear in Devices This procedure or display may differ depe...

Страница 14: ...ve elapsed without any Bluetooth connection nor any operation performed Connecting an already paired component via Bluetooth Press the source button to switch the audio source to Bluetooth The Bluetooth indicator will blink in the front panel display this unit will search for the other component that was most recently connected via Bluetooth and will then establish a connection You must first turn...

Страница 15: ...ont panel display will be switched in the following order Disconnecting a Bluetooth connection LISTENING TO FM AM STATIONS Selecting an FM AM station 1 Press the RADIO source button repeatedly to switch the audio source to FM or AM You can also switch the audio source by pressing RADIO on the remote control 2 Tuning FM AM stations Automatic tuning Press and hold TUNING Manual tuning Press TUNING r...

Страница 16: ...ou want to preset and press MEMORY The display will indicate PRESET MEMORY 2 Press PRESET to select the preset number that you want to store The lowest preset number that has not been stored will be selected first If you want to cancel the presetting press If you select a preset number in which a station has already been stored it will be overwritten by the new station 3 Press MEMORY to complete t...

Страница 17: ...STENING TO EXTERNAL SOURCES 1 Using a commercially available 3 5 mm mini plug cable connect your external device to the AUX on the rear panel of this unit Turn off the system before connecting the mini plug cable Turn down the volume of the unit and your external audio device before connection 2 Press to turn the system on 3 Press the AUX source button to switch the audio source to AUX 4 Start pla...

Страница 18: ... source music begins to fade in and the volume gradually increases as the alarm time approaches Alarm time a beeping sound also begins playing SOURCE The selected audio source is played at the set time The volume fades in gradually and increases to the set volume BEEP The beep sound is played at the set time Source Playback method Function iPod Resume The unit resumes play from the last track you ...

Страница 19: ...r proceed to item 2 ONE DAY An alarm that sounds only once at the specified time WEEKLY An alarm whose time can be specified for each day of the week settable only using DTA Controller If you ve chosen WEEKLY this completes the alarm setting 2 ALARM TIME Make settings in the order of hours minutes 3 ALARM TYPE Select from SOURCE BEEP SOURCE or BEEP For details refer to 3 types of alarms P 14 If yo...

Страница 20: ...hown If you press ALARM again the alarm indicator and the alarm will turn off When the unit is in power saving the alarm will not function P 5 Operations while the alarm sound is playing Press SNOOZE SLEEP Snooze will stop the alarm and play it again 5 minutes later If SOURCE BEEP is set as the alarm type you can press SNOOZE SLEEP once to stop the beep sound and twice to stop the audio source Fiv...

Страница 21: ...he tone to be adjusted LOW MID HIGH 2 Press to adjust the tone 3 Press ENTER on the remote control to complete the operation You can also press the EQ button that you pressed in Step to complete the settings If you want to adjust another frequency band return to step and press the EQ button for the frequency band that you want to adjust ADJUSTING THE BRIGHTNESS OF THE FRONT PANEL DISPLAY remote co...

Страница 22: ...ystem turns on but immediately shuts off A digital or high frequency equipment produces noises The unit may be placed too close to the digital or high frequency equipment Place the unit farther away from the equipment The clock setting has been cleared The unit remained unpowered for more than one week If the power supply is interrupted for about one week the time setting may be reset If this occu...

Страница 23: ...he unit adjusts to the room temperature and try again When you insert a disc the front panel display indicates No Disc or CD Unknown The disc loaded into the unit may not be compatible Use a disc supported by the unit P 21 The disc may be dirty or a foreign object may have adhered to it Wipe the disc clean Alternatively remove any foreign object that has adhered to the disc The disc does not conta...

Страница 24: ...t the Bluetooth function of the other component is set properly The pairing setting of the other component is not set to this unit Set the pairing setting of the other component to this unit The other component s volume is set to the minimum Increase the volume level FM AM reception Problem Cause Solution Too much noise The antenna may be connected improperly Make sure the antenna is connected pro...

Страница 25: ...dity or a lot of dust If a disc becomes dirty wipe it with a clean dry cloth from the center out to the edge Do not use record cleaner or paint thinner To avoid malfunction do not use a commercially available lens cleaner This unit supports USB mass storage class devices e g flash memories or portable audio players using FAT16 or FAT32 format Some devices may not work properly even if they meet th...

Страница 26: ...40 V 50 60 Hz Taiwan model AC 110 to 120 V 60 Hz Power consumption 30 W System off consumption 3 5 W or less 0 5 W or less Power saving Dimensions W H D 370 14 5 8 in 110 4 3 8 in 230 9 in mm Weight 3 9 kg 8 6 lbs Specifications are subject to change without notice iPod iPhone iPad Made for iPod Made for iPhone and Made for iPad mean that an electronic accessory has been designed to connect specif...

Страница 27: ...medical facilities The user shall not reverse engineer decompile alter translate or disassemble the software used in this unit whether in part or in whole For corporate users employees of the corporation itself as well as its business partners shall observe the contractual bans stipulated within this clause If the stipulations of this clause and this contract cannot be observed the user shall imme...

Страница 28: ...iquide répandu ou objet tombé à l intérieur de l appareil exposition de l appareil à la pluie ou à l humidité fonctionnement anormal ou chute de l appareil Yamaha et le Groupe des Entreprises Électroniques Grand Public de l Association des Industries Électroniques vous demandent de tirer le meilleur parti de votre équipement tout en écoutant à un niveau non dommageable pour l ouïe c est à dire un ...

Страница 29: ...t dans un environnement domestique Cet appareil produit utilise et peut émettre de l énergie radioélectrique et s il n est pas installé conformément aux instructions peut provoquer des interférences radio Il n est toutefois pas garanti qu aucune interférence ne se produira dans le cas d une installation donnée Si l appareil provoque des interférences nuisibles à la réception de programmes radio ou...

Страница 30: ...quelle que soit la raison 15 Si vous envisagez de ne pas vous servir de l appareil pendant une longue période par exemple pendant les vacances débranchez la fiche du câble d alimentation au niveau de la prise secteur 16 Lisez la section intitulée GUIDE DE DÉPANNAGE où figurent une liste d erreurs de manipulation communes avant de conclure que l appareil présente une anomalie de fonctionnement 17 A...

Страница 31: ...écoute de la radio FM AM La technologie Bluetooth vous permet de bénéficier d un son de qualité sans le moindre fil Réveillez vous avec votre musique préférée ou une sonnerie ou les deux À l heure programmée la plage choisie est lue au volume prédéfini pour le meilleur des réveils fonction IntelliAlarm P 14 Vous pouvez en outre contrôler cet appareil et exploiter d autres réglages d alarme plus so...

Страница 32: ...rme l option ou la valeur choisie lFente pour disque Insérez y un CD P 7 m EJECT Permet d éjecter le CD n Permettent de régler les paramètres valeurs de l horloge et de l alarme oSET Permet de régler l alarme P 15 pALARM Permet d activer de désactiver l alarme P 16 q Prise casque Branchez y votre casque NOM ET FONCTIONS DES ÉLÉMENTS Panneau supérieur panneau avant q 3 4 7 8 9 5 6 12 o p k n l m j ...

Страница 33: ...disponible dans le commerce pour brancher le dispositif externe à cette prise P 13 cPrise pour antenne FM Branchez y une antenne FM dBorne d antenne AM modèle pour les États Unis uniquement Branchez l antenne AM fournie à cette borne Si la réception laisse à désirer changez la hauteur ou l orientation de l antenne ou déplacez l appareil pour essayer d améliorer la réception Si au lieu de l antenne...

Страница 34: ...er lors de la lecture de musique sur CD de données ou dispositifs USB P 7 8 Permettent de sélectionner les options ou de modifier les valeurs numériques P 6 17 hENTER Confirme l option ou la valeur choisie iTouches de réglage audio Commandent l iPod le CD le dispositif USB j répétition lecture aléatoire Lecture de musique sur iPod CD ou dispositif USB en mode répété aléatoire P 6 8 kEQ LOW MID HIG...

Страница 35: ...ous pouvez copier l heure de l iPod plutôt que la régler manuellement en plaçant l iPod sur la station d accueil L heure n est pas copiée si l iPod est déjà branché Lors de l étape SNOOZE SLEEP permet de choisir le format d affichage de l heure 12 heures 24 heures 3 Quand vous avez terminé les réglages placez le sélecteur CLOCK sur ON L horloge commence à compter l heure à partir de 0 seconde quan...

Страница 36: ...il se pourrait que le changement automatique de source audio ne se fasse pas si une source audio USB est active ou si cet appareil est connecté via Bluetooth Si vous avez sélectionné USB comme source audio l iPod ne se chargera pas Vous pouvez retirer l iPod pendant la lecture Si iPod est choisi comme source audio et que la station d accueil reste vide ou que vous n effectuez aucune opération de l...

Страница 37: ...REILS USB P 21 Écoute d un CD 1 Appuyez sur la touche de sélection de source CD pour choisir CD comme source audio Si un CD est déjà chargé la lecture démarre 2 Glissez un CD dans la fente prévue à cet effet La lecture commence automatiquement Vous pouvez piloter la lecture avec la télécommande ou l appareil P 2 4 Chargez le CD en tournant son côté étiquette vers le haut Les dossiers et fichiers d...

Страница 38: ...a lecture ou sautez les plages Si vous appuyez sur la touche DISPLAY de la télécommande pendant qu une plage est en cours de lecture ou en pause les informations sur l afficheur changent dans l ordre indiqué ci contre S affiche uniquement si la plage contient ces données Utilisation des modes de lecture répétée aléatoire télécommande uniquement AUX USB CD iPod RADIO 1 2 Vous pouvez aussi écouter d...

Страница 39: ...areil pour rompre cette connexion Bluetooth avant d effectuer le couplage Si vous utilisez un iPod touch iPhone iPad Si vous utilisez un dispositif autre qu un iPod touch iPhone iPad ÉCOUTE DE MUSIQUE D UN DISPOSITIF Bluetooth Couplage de cet appareil avec un dispositif Bluetooth 1 Appuyez sur la touche de sélection de source pour choisir Bluetooth comme source audio 2 Sur votre iPod touch iPhone ...

Страница 40: ... et que vous n effectuez aucune connexion Bluetooth ni opération pendant 60 minutes l appareil se met automatiquement hors tension le système Connexion d un dispositif déjà couplé via Bluetooth Appuyez sur la touche de sélection de source pour choisir Bluetooth comme source audio Le témoin Bluetooth clignote sur l afficheur cet appareil recherche le dernier dispositif connecté via Bluetooth et éta...

Страница 41: ...la télécommande les informations sur l afficheur changent dans l ordre suivant Rompre une connexion Bluetooth ÉCOUTE DE STATIONS FM AM Sélection d une station FM AM 1 Appuyez plusieurs fois sur la touche de sélection de source RADIO pour choisir FM ou AM comme source audio Vous pouvez aussi changer de source audio en appuyant sur la touche RADIO de la télécommande 2 Choisissez la station FM AM vou...

Страница 42: ...la station que vous voulez mémoriser puis appuyez sur MEMORY PRESET MEMORY apparaît sur l afficheur 2 Appuyez sur PRESET pour choisir le numéro de la présélection où vous voulez mémoriser la station L appareil choisit d abord le plus petit numéro de présélection disponible Pour annuler la procédure de présélection appuyez sur Si vous choisissez un numéro de présélection où une station est déjà mém...

Страница 43: ...morisées ÉCOUTE DE SOURCES EXTERNES 1 Branchez votre dispositif externe à la prise AUX du panneau arrière de cet appareil avec un câble à minifiches jack stéréo de 3 5 mm disponible dans le commerce Mettez l appareil hors tension avant de brancher le câble à minifiches Baissez le volume de cet appareil et de votre dispositif audio externe avant le raccordement 2 Appuyez sur pour mettre ce système ...

Страница 44: ...minutes avant le réveil la lecture commence sur la source musicale choisie et le volume augmente progressivement jusqu à l heure du réveil Heure du réveil la sonnerie retentit en plus de la musique SOURCE La lecture de la source audio choisie démarre à l heure prédéfinie Le volume augmente progressivement jusqu au niveau prédéfini BEEP La sonnerie retentit à l heure réglée Source Méthode de lectur...

Страница 45: ...WEEKLY le réglage de l alarme est terminé 2 ALARM TIME Réglez l heure de l alarme comme suit heures minutes 3 ALARM TYPE Choisissez entre SOURCE BEEP SOURCE ou BEEP Pour plus de détails lisez 3 types d alarmes P 14 Si vous avez choisi BEEP passez à l étape 5 4 ALARM SOURCE Si vous avez choisi SOURCE BEEP ou SOURCE pour ALARM TYPE iPod Lisez les plages de votre iPod lisez Diverses sources audio P 1...

Страница 46: ...icateur d alarme s éteint et l alarme est coupée Quand l appareil est en mode d économie d énergie l alarme ne fonctionne pas P 5 Opérations disponibles quand l alarme retentit Appuyez sur SNOOZE SLEEP La fonction Snooze arrête l alarme et la redéclenche 5 minutes plus tard Si vous avez choisi SOURCE BEEP comme type d alarme vous pouvez appuyer une fois sur SNOOZE SLEEP pour arrêter le son d alarm...

Страница 47: ...ie s affiche sur la face avant Si vous appuyez sur SNOOZE SLEEP quand la minuterie est active le réglage de minuterie est annulé RÉGLAGE DE TIMBRE télécommande uniquement 1 Pendant la lecture d une source appuyez sur la touche LOW MID ou HIGH EQ de la télécommande Choisissez la bande de fréquence à régler LOW MID HIGH 2 Appuyez sur pour régler la bande choisie 3 Appuyez sur la touche ENTER de la t...

Страница 48: ...ondes rebranchez le cordon d alimentation et allumez le système Le système s éteint immédiatement après s être allumez le système Un appareil numérique ou haute fréquence produit des bruits Cet appareil est trop près de l appareil numérique ou haute fréquence Éloignez les deux appareils l un de l autre Le réglage de l horloge a été effacé L appareil est resté débranché du secteur pendant plus d un...

Страница 49: ... que l appareil s acclimate à la température de la pièce puis réessayez Quand vous chargez un disque l afficheur indique No Disc ou CD Unknown Il se peut que le disque inséré dans l appareil ne soit pas compatible Utilisez un disque pris en charge par l appareil P 21 Il se pourrait que le disque soit sale ou qu un corps étranger y soit collé Essuyez le disque Si nécessaire retirez tout corps étran...

Страница 50: ...ement réglée Le couplage de l autre dispositif n est pas réglé sur cet appareil Réglez le paramètre de couplage de l autre dispositif sur cet appareil Le volume de l autre dispositif est réglé sur le minimum Augmentez son volume Réception FM AM Anomalies Causes possibles Solution Bruit excessif L antenne n est pas convenablement raccordée Vérifiez que l antenne est correctement connectée P 3 ou ut...

Страница 51: ...e essuyez le avec un chiffon sec du centre vers la périphérie N utilisez pas d agent de nettoyage ni de diluant Pour éviter tout problème n utilisez pas les nettoyeurs d optique en vente dans le commerce Cet appareil prend en charge les dispositifs de stockage en masse USB ex mémoires flash et lecteurs audio portables conformes au format FAT16 ou FAT32 Certains dispositifs peuvent ne pas fonctionn...

Страница 52: ...dèle pour Taïwan CA 110 à 120 V 60 Hz Consommation 30 W Consommation lorsque le système est désactivé 3 5 W ou moins 0 5 W ou moins Économie d énergie Dimensions L H P 370 110 230 mm Poids 3 9 kg Les caractéristiques peuvent être modifiées sans préavis iPod iPhone iPad Made for iPod Made for iPhone et Made for iPad signifient qu un accessoire électronique a été conçu pour être raccordé à un iPod u...

Страница 53: ...à proximité d équipements médicaux ou à l intérieur d institutions médicales L utilisateur n est pas autorisé à rétro concevoir décompiler modifier traduire ou désassembler le logiciel utilisé dans cet appareil aussi bien dans ses parties que dans sa totalité En ce qui concerne les utilisateurs en entreprise les employés de l entreprise proprement dite ainsi que ses partenaires commerciaux doivent...

Страница 54: ...ija de alimentación se hayan derramado líquidos o hayan caído objetos en el interior del aparato cuando éste haya estado expuesto a la lluvia o a la humedad cuando no funcione normalmente o cuando se haya caído Yamaha y el Grupo de Electrónica de Consumo de la Asociación de Industrias Electrónicas deseamos que saque el mejor partido a su equipo utilizándolo en un nivel seguro Un nivel que permite ...

Страница 55: ...te las pruebas para comprobar los límites de los dispositivos digitales de clase B según el apartado 15 de las normas de la FCC Estos límites están pensados para ofrecer un nivel suficiente de protección contra las interferencias perjudiciales en instalaciones residenciales Este dispositivo genera utiliza y emite energía de radiofrecuencia y si no se instala y se utiliza con arreglo a las instrucc...

Страница 56: ...na reparación La caja no deberá abrirse nunca por ninguna razón 15 Cuando no piense utilizar este aparato durante mucho tiempo cuando se ausente de casa por vacaciones por ejemplo desconecte el cable de alimentación de la toma de corriente 16 Asegúrese de leer la sección SOLUCIÓN DE PROBLEMAS antes de dar por concluido que su aparato está averiado 17 Antes de trasladar este aparato pulse para acti...

Страница 57: ... o bien desde dispositivos externos a través de la entrada AUX y sintonice la FM AM Gracias a la tecnología Bluetooth puede disfrutar de un sonido nítido sin conexiones por cable Use su música favorita o tono de pitido como alarma A la hora programada para la alarma la música seleccionada se reproduce al volumen especificado para iniciar el día de la mejor forma posible función IntelliAlarm P 14 P...

Страница 58: ...R Confirme un elemento o valor seleccionado lRanura para el disco Introduzca un CD aquí P 7 m EJECT Expulsa el CD n Seleccione un elemento o valor al ajustar el reloj o la alarma oSET Ajuste la alarma P 15 pALARM Active o desactive la alarma P 16 q Conector de auriculares Conecte los auriculares aquí NOMBRES DE LAS PARTES Y SUS FUNCIONES Panel superior Panel frontal q 3 4 7 8 9 5 6 12 o p k n l m ...

Страница 59: ... mm de venta en tiendas para conectar el dispositivo externo aquí P 13 cConector de antena FM Conecte la antena FM aquí dTerminal de antena AM solo para el modelo EE UU Conecta la antena AM suministrada Si la recepción es deficiente pruebe a cambiar la altura o la dirección de la antena o bien mueva la unidad para encontrar una ubicación que proporcione una mejor recepción Si utiliza una antena ex...

Страница 60: ...os USB P 7 8 Seleccione elementos o edite valores numéricos P 6 17 hENTER Confirme un elemento o valor seleccionado iBotones de control de audio Utilícelos para hacer funcionar el iPod CD dispositivo USB j Repetición Reproducción Aleatoria Reproduzca música en un iPod CD o dispositivo USB en modo de repetición reproducción aleatoria P 6 8 kEQ LOW MID HIGH Ajuste la calidad de sonido de bajos medio...

Страница 61: ...l iPod en lugar de programarla manualmente Para ello coloque el iPod en la base de iPod La hora no se copiará si el iPod ya está conectado En el paso al pulsar SNOOZE SLEEP puede seleccionar el formato de hora 12 horas 24 horas 3 Cuando haya finalizado la configuración ajuste el conmutador CLOCK en la posición ON En el momento en que ajuste el conmutador en la posición ON el reloj se iniciará desd...

Страница 62: ...s posible que la fuente de audio no cambie automáticamente si la fuente elegida es USB o si esta unidad está actualmente conectada mediante Bluetooth Si se selecciona USB como la fuente de audio el iPod no se cargará Puede retirar el iPod durante la reproducción Si se selecciona iPod como la fuente de audio el sistema se apagará automáticamente cuando hayan transcurrido 60 minutos sin conectar un ...

Страница 63: ...scuchar un CD 1 Pulse el botón de fuente CD para cambiar la fuente de audio a CD Si ya hay un CD insertado se iniciará la reproducción 2 Inserte un CD en la ranura para el disco La reproducción empezará automáticamente La reproducción puede controlarse con el mando a distancia o la unidad P 2 4 Inserte el CD con la etiqueta hacia arriba Las carpetas y archivos de un CD de datos se reproducen en or...

Страница 64: ...empezar a reproducir o saltar pistas Si pulsa DISPLAY en el mando a distancia cuando una canción se está reproduciendo o está en pausa la información que aparece en la pantalla del panel frontal cambiará en el orden que se muestra en la parte derecha Solo se muestra si este dato se ha incluido en la canción Uso de la repetición reproducción aleatoria solo con el mando a distancia AUX USB CD iPod R...

Страница 65: ...tes de realizar la operación de vinculación Si se utiliza un iPod touch iPhone iPad Si se utiliza un dispositivo que no sea iPod touch iPhone iPad ESCUCHAR MÚSICA DESDE EL COMPONENTE Bluetooth Vinculación de esta unidad con su componente Bluetooth 1 Pulse el botón de fuente para cambiar la fuente de audio a Bluetooth 2 En el iPod touch iPhone iPad active Ajustes General Bluetooth La lista de conex...

Страница 66: ...an transcurrido 60 minutos sin realizar ninguna conexión a Bluetooth o sin que se haya realizado ninguna operación Conexión de un componente ya vinculado por Bluetooth Pulse el botón de fuente para cambiar la fuente de audio a Bluetooth El indicador de Bluetooth parpadeará en la pantalla del panel frontal esta unidad buscará el otro componente que se haya conectado más recientemente por Bluetooth ...

Страница 67: ...tal cambiará en el orden siguiente Desconexión de una conexión a Bluetooth PARA ESCUCHAR EMISORAS DE RADIO Selección de una emisora FM AM 1 Pulse el botón de fuente RADIO varias veces para cambiar la fuente de audio a FM o AM También puede cambiar la fuente de audio pulsando RADIO en el mando a distancia 2 Sintonización de emisoras FM AM Sintonización automática mantenga pulsado TUNING Sintonizaci...

Страница 68: ... automática antes de que finalice pulse 1 Seleccione la emisora que desea presintonizar y pulse MEMORY La pantalla indicará PRESET MEMORY 2 Pulse PRESET para seleccionar el número de presintonía que desee guardar El número de presintonía más bajo que no se haya guardado se seleccionará primero Si desea cancelar la presintonización pulse Si selecciona un número de presintonía en el que ya se ha gua...

Страница 69: ...AR UNA FUENTE EXTERNA 1 Con un cable mini de 3 5 mm de venta en tiendas conecte el dispositivo externo a la entrada AUX en la parte posterior de esta unidad Apague el sistema antes de conectar el cable mini Baje el volumen de la unidad y el del dispositivo de audio externo antes de realizar la conexión 2 Pulse para activar el sistema 3 Pulse el botón de fuente AUX para cambiar la fuente de audio a...

Страница 70: ...e y el volumen aumenta gradualmente a medida que se acerca la hora de la alarma Hora de alarma también se empieza a reproducir un pitido SOURCE La fuente de audio seleccionada se reproduce a la hora programada El volumen va subiendo progresivamente hasta alcanzar el volumen definido BEEP Se reproduce el sonido de pitido a la hora programada Fuente Método de reproducción Función iPod Reanudar La un...

Страница 71: ...ma 2 ALARM TIME Realice ajustes en el orden de horas minutos 3 ALARM TYPE Seleccione SOURCE BEEP SOURCE o BEEP Para ver más información consulte 3 tipos de alarmas P 14 Si ha seleccionado BEEP continúe con el elemento 5 4 ALARM SOURCE Si ha seleccionado SOURCE BEEP o SOURCE como ALARM TYPE iPod Reproduce música desde el iPod consulte Diversas fuentes de audio P 14 El iPod conectado por Bluetooth n...

Страница 72: ...minará y la hora de alarma se mostrará Si pulsa ALARM de nuevo se desactivarán el indicador de alarma y la alarma Cuando la unidad se encuentre en modo de ahorro de energía la alarma no funcionará P 5 Operaciones durante la reproducción del sonido de la alarma Pulse SNOOZE SLEEP La repetición detendrá la alarma y la volverá a reproducir tras 5 minutos Si SOURCE BEEP se ha establecido como el tipo ...

Страница 73: ... se muestra en la pantalla del panel frontal Si pulsa SNOOZE SLEEP mientras está activado el temporizador para dormir el ajuste de este se cancelará AJUSTE DEL TONO solo con el mando a distancia 1 Durante la reproducción pulse el botón LOW MID o HIGH EQ del mando a distancia Seleccione el tono que desee LOW MID HIGH 2 Pulse para ajustar el tono 3 Pulse ENTER en el mando a distancia para finalizar ...

Страница 74: ...e de alimentación y encienda el sistema El sistema se enciende pero inmediatamente se apaga Un equipo de alta frecuencia o digital produce ruido Es posible que la unidad esté situada demasiado cerca del equipo de alta frecuencia o digital Aleje la unidad del equipo Se ha borrado el ajuste del reloj La unidad ha permanecido apagada durante más de una semana Si la alimentación se interrumpe durante ...

Страница 75: ...s Espere una hora o dos hasta que la unidad se aclimate a la temperatura de la habitación y vuelva a intentarlo Al insertar un disco la pantalla del panel frontal indica No Disc o CD Unknown Es posible que el disco cargado en la unidad no sea compatible Utilice un disco compatible con la unidad P 21 Es posible que el disco esté sucio o puede haber una sustancia extraña adherida al mismo Limpie el ...

Страница 76: ... ajuste de vinculación del otro componente no está establecido para esta unidad Establezca el ajuste de vinculación del otro componente para esta unidad El volumen del otro componente está al mínimo Aumente el nivel del volumen Recepción de FM AM Problema Causa Solución Demasiado ruido Es posible que la antena esté conectada de forma incorrecta Asegúrese de que la antena se ha conectado correctame...

Страница 77: ...ni limpiadores para discos ni disolventes Para evitar un funcionamiento incorrecto no utilice un limpiador de lentes disponible en el mercado Esta unidad es compatible con dispositivos de almacenamiento masivos USB por ejemplo memorias flash o reproductores de audio portátiles que utilizan el formato FAT16 o FAT32 Es posible que algunos dispositivos no funcionen correctamente aunque cumplan los re...

Страница 78: ...mo del sistema apagado 3 5 W o menos 0 5 W o menos Ahorro de energía Dimensiones An Al Pr 370 110 230 mm Peso 3 9 kg Las especificaciones están sujetas a cambio sin previo aviso iPod iPhone iPad Made for iPod Fabricado para iPod Made for iPhone Fabricado para iPhone y Made for iPad Fabricado para iPad significa que un accesorio electrónico se ha diseñado específicamente para conectarse a un iPod u...

Страница 79: ...cos electrónicos No utilice esta unidad cerca de dispositivos médicos o en el interior de instalaciones médicas El usuario no deberá invertir la ingeniería alterar traducir ni descompilar el software utilizado en esta unidad ya sea en parte o totalmente Los usuarios corporativos los empleados de la propia corporación así como sus socios comerciales deberán cumplir las prohibiciones contractuales e...

Страница 80: ...Printed in Malaysia ZD83560 2012 Yamaha Corporation ...

Отзывы: