background image

PREPARATIONS

Optimizing the speaker settings automatically (YPAO)

En

50

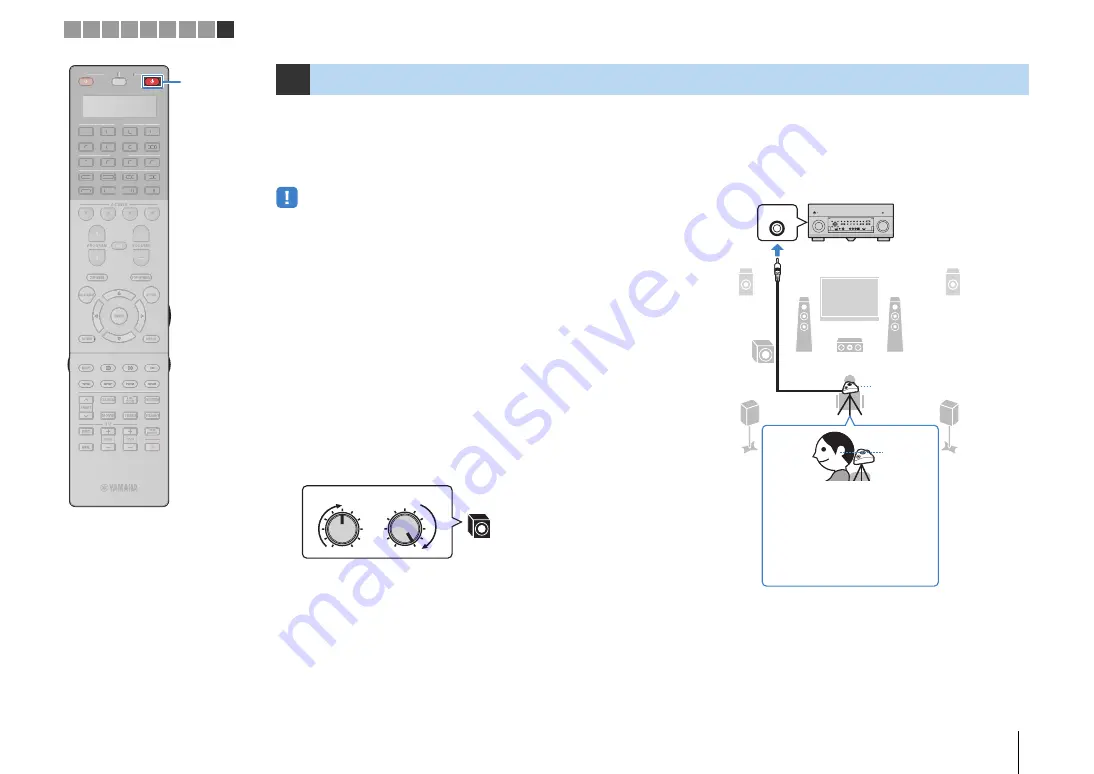
The Yamaha Parametric room Acoustic Optimizer (YPAO) function 
detects speaker connections, measures the distances from them to 
your listening position(s), and then automatically optimizes the 
speaker settings, such as volume balance and acoustic 
parameters, to suit your room.

• Please note the following when using YPAO.

– Use YPAO after connecting a TV and speakers to the unit.

– During the measuring process, test tones are output at high volume. Ensure that 

the test tones do not frighten small children. Also, refrain from using this function 
at night when it may be a nuisance to others.

– During the measuring process, you cannot adjust the volume.

– During the measuring process, keep the room as quiet as possible.

– Do not connect headphones.

1

Press RECEIVER 

z

 to turn on the unit.

2

Turn on the TV and switch the TV input to display 
video from the unit.

3

Turn on the subwoofer and set the volume to half. If 
the crossover frequency is adjustable, set it to 
maximum.

4

According to your speaker configuration, configure 
the “Power Amp Assign” setting (p.114) in the 
“Setup” menu.

For the basic speaker configuration (p.19): set to “Basic” 
(default).

For any of the advanced speaker configurations (p.24): set 
to the appropriate setting.

5

Place the YPAO microphone at your listening 
position (same height as your ears) and connect it 
to the YPAO MIC jack on the front panel.

9

Optimizing the speaker settings automatically (YPAO)

VOLUME

HIGH CUT

CRO

SS

OVER/

MIN

MAX

MIN

MAX

9

YPAO MIC

9

1

2

3

4

5

E

R

The unit (front)

YPAO 
microphone 

Ear height

Place the YPAO microphone at 
your listening position (same height 
as your ears). We recommend the 
use of a tripod as a microphone 
stand. You can use the tripod 
screws to stabilize the microphone. 
(The microphone direction is not 
considered.)

YPAO MIC 

jack

1 2 3 4 5 6 7 8 9

Automatic speaker setup

SOURCE

RECEIVER

AV

AUDIO

1

2

3

4

5

6

7

V-AUX

1

2

3

4

MULTI

PHONO

USB

NET

TUNER

[ C ]

[ A ]

[ B ]

CLASSICAL

LIVE

CLUB

ENTERTAIN

MOVIE

STEREO

STRAIGHT

INPUT

PURE

DIRECT

MUTE

TV

SCENE

1

2

3

4

PROGRAM

VOLUME

TV VOL

MUTE

MODE

TOP MENU

RETURN

DISPLAY

POP-UP/MENU

TV CH

PRESET

ENTER

ON SCREEN

OPTION

SOURCE

RECEIVER

AV

AUDIO

1

2

3

4

5

6

7

V-AUX

1

2

3

4

MULTI

L

L

PHONO

USB

NET

TUNER

[ C ]

[ A ]

[ B ]

RECEIVER 

z


RECEIVER 

z


Содержание RX-A2020

Страница 1: ...English Read the supplied booklet Safety Brochure before using the unit AV Receiver Owner s Manual ...

Страница 2: ... screen menu language 49 9 Optimizing the speaker settings automatically YPAO 50 Measuring at one listening position single measure 52 Measuring at multiple listening positions multi measure 54 Checking the measurement results 56 Reloading the previous YPAO adjustments 57 Error messages 58 Warning messages 59 PLAYBACK 60 Basic playback procedure 60 Selecting an HDMI output jack 60 Selecting the in...

Страница 3: ...rogram menu items 109 Configuring various functions Setup menu 111 Setup menu items 112 Speaker Manual Setup 114 Sound 118 Video 119 HDMI 122 Network 123 Multi Zone 125 Function 127 ECO 130 Language 130 Viewing information about the unit Information menu 131 Types of information 131 Configuring the system settings ADVANCED SETUP menu 132 ADVANCED SETUP menu items 133 Changing the speaker impedance...

Страница 4: ...SB and network 150 Remote control 151 Error indications on the front display 152 Glossary 153 Audio information 153 HDMI and video information 154 Yamaha technologies 155 Video signal flow 156 Multi zone output 157 Information on HDMI 158 HDMI Control 158 HDMI signal compatibility 159 Trademarks 160 Specifications 161 Index 164 ...

Страница 5: ...03 UM 4 Operating range of the remote control Point the remote control at the remote control sensor on the unit and remain within the operating range shown below The illustrations of the main unit and remote control used in this manual are of the RX A3020 U S A model unless otherwise specified Some features are not available in certain regions Due to product improvements specifications and appeara...

Страница 6: ...ur room YPAO p 50 Reproducing stereo or multichannel sounds with the sound fields like actual movie theaters and concert halls CINEMA DSP p 64 Enjoying compressed music with enhanced sound Compressed Music Enhancer p 68 Bi amp connections channel expansion with external power amp and multi zone configurations to enhance your system p 24 Operating external devices with the supplied remote control p...

Страница 7: ...allows you to easily operate the remote control even in a dark home theater room BD DVD player Game console Camcorder Turntable TV CD player HDMI Control TV audio Video from external device Useful tips I want to connect a playback device using HDMI for video and non HDMI for audio Use Audio Select in the Option menu to specify the type of an audio input jack to be used for the corresponding input ...

Страница 8: ...ld with a spatial sense CINEMA DSP HD3 CINEMA DSP HD is Yamaha s flagship 3D sound field playback technology that takes full advantage of the massive amount of acoustic reflection data included in the sound field data With support for rear presence speaker output it delivers more than twice as much capability for generating acoustic reflections as conventional CINEMA DSP 3D in addition to high fre...

Страница 9: ...ion To obtain even high audio quality you can connect front speakers that support power amp expansion or expand your system by adding an external power amp such as a Hi Fi amp For details refer to Advanced speaker configuration p 24 The best expandability in Yamaha By connecting an external power amp you can enjoy the highest peak of CINEMA DSP an 11 2 channel 3 dimensional sound field Example Mul...

Страница 10: ...UT knob Selects an input source 7 Front panel door For protecting controls and jacks p 11 8 VOLUME knob Adjusts the volume Part names and functions INPUT MAIN ZONE VOLUME PURE DIRECT ENTER OPTION ON SCREEN DISPLAY RETURN USB YPAO MIC PHONES TONE BALANCE STRAIGHT PROGRAM MULTI ZONE VIDEO AUX ZONE 2 ZONE 3 ZONE 4 ZONE CONTROL SILENT CINEMA VIDEO 5V 2 1A SCENE 1 2 3 4 R L AUDIO HDMI IN OPTICAL INFO M...

Страница 11: ...ONE keys ZONE 2 4 ZONE 4 RX A3020 only Enables disables the audio output to each zone p 95 ZONE CONTROL Changes the zone that is controlled by the keys and knobs on the front panel p 95 H INFO key Selects the information displayed on the front display p 97 I MEMORY key Registers FM AM radio stations as preset stations p 70 J FM and AM keys Switch between FM and AM p 69 K PRESET keys Select a prese...

Страница 12: ...ADAPTIVE DRC Lights up when Adaptive DRC p 99 is working 9 ENHANCER Lights up when Compressed Music Enhancer p 68 is working 0 CINEMA DSP indicator RX A3020 CINEMA DSP HD lights up when CINEMA DSP p 64 is working CINEMA DSP lights up when CINEMA DSP HD is activated RX A2020 CINEMA DSP lights up when CINEMA DSP p 64 is working CINEMA DSP n lights up when CINEMA DSP 3D is activated A SLEEP Lights up...

Страница 13: ...nent video and outputting video signals p 39 or for connecting to a zone video monitor used in Zone2 or Zone3 p 92 B REMOTE IN OUT 1 2 jacks For connecting to a Yamaha product that supports SCENE link playback p 47 or for connecting to an infrared signal receiver emitter that allows you to operate the unit and other devices from another room p 94 C TRIGGER OUT 1 2 jacks For connecting to devices t...

Страница 14: ... p 18 L AC IN jack For connecting the supplied power cable p 48 NETWORK DC OUT 5V 0 5A 3 NET MONITOR OUT ZONE OUT HDMI OUT ARC ZONE OUT 1 2 HDMI 1 BD DVD AV 1 AV 2 AV 3 AV 4 AV 5 AV 6 AV 7 TRIGGER OUT 1 2 RS 232C Y PB PR Y PB PR Y PB PR MONITOR OUT ZONE OUT IN OUT IN OUT AV 1 AV 3 REMOTE 1 2 COMPONENT VIDEO A AV 2 B C AV 4 D AV OUT R L AV 3 AV 4 AV 2 AV 1 1 BD DVD OPTICAL 4 OPTICAL 3 COAXIAL 2 COA...

Страница 15: ...n standby mode p 61 6 PROGRAM keys Select a sound program p 63 7 External device operation keys Let you play back and perform other operations for external devices p 138 8 ON SCREEN key Displays the on screen menu on the TV 9 Menu operation keys Cursor keys Select a menu or a parameter ENTER Confirms a selected item RETURN Returns to the previous screen 0 MODE key Switches the iPod operation modes...

Страница 16: ...SLEEP key Switches the unit to standby mode automatically after a specified period of time has elapsed sleep timer Press repeatedly to set the time 120 min 90 min 60 min 30 min off Q LEVEL key Adjusts the volume of each speaker p 117 R SETUP key Switches the remote control to the setup mode p 136 To operate external devices with the remote control register a remote control code for each device bef...

Страница 17: ...the unit 3 Connecting playback devices p 41 Connect video devices such as BD DVD players and audio devices such as CD players to the unit 4 Connecting the FM AM antennas p 44 Connect the supplied FM AM antennas to the unit 5 Connecting to a network p 45 Connect the unit to a network 6 Connecting other devices p 46 Connect external devices such as recording devices 7 Connecting the power cable p 48...

Страница 18: ...peakers When connecting 6 ohm speakers set the unit s speaker impedance to 6 Ω MIN In this case you can also use 4 ohm speakers as the front speakers For details see Setting the speaker impedance p 21 Speaker type Abbr Function Front L 1 Produce front right left channel sounds stereo sounds Front R 2 Center 3 Produces center channel sounds such as movie dialogues and vocals Surround L 4 Produce su...

Страница 19: ...neously The unit automatically changes the speakers to be used depending on the selected sound program p 64 RX A3020 only You can make an 11 channel system by using an external power amplifier p 25 9 2 channel system using rear presence speakers This speaker system uses the front and rear presence speakers to produce a highly natural 3 dimensional sound field and is suited for enjoying 5 1 channel...

Страница 20: ...nal sound field and also allows you to enjoy extended surround sounds using the surround back speakers 5 1 channel system This speaker system creates Virtual Presence Speaker VPS using the front center and surround speakers to produce a 3 dimensional sound field and is suited for enjoying 5 1 channel contents 2 1 channel system Even when no surround speakers are connected the unit creates the virt...

Страница 21: ...While holding down STRAIGHT on the front panel press MAIN ZONE z 3 Check that SPEAKER IMP is displayed on the front display 4 Press STRAIGHT to select 6 Ω MIN 5 Press MAIN ZONE z to set the unit to standby mode and remove the power cable from the AC wall outlet You are now ready to connect the speakers MAIN ZONE z STRAIGHT OUT1 IN OUT2 VOLUME MUTE DRC ADAPTIVE 3 ZONE 2 SBL PL SBR SB PR SW1 SL SW2 ...

Страница 22: ...nect it to the SINGLE jack L side Caution Remove the unit s power cable from an AC wall outlet and turn off the subwoofer before connecting the speakers Ensure that the core wires of the speaker cable do not touch one another or come into contact with the unit s metal parts Doing so may damage the unit or the speakers If the speaker cables short circuit Check SP Wires will appear on the front disp...

Страница 23: ...the bare wires of the cable firmly together b Loosen the speaker terminal c Insert the bare wires of the cable into the gap on the side upper right or bottom left of the terminal d Tighten the terminal Using a banana plug U S A Canada China Australia and General models only a Tighten the speaker terminal b Insert a banana plug into the end of the terminal Connecting the subwoofer with built in amp...

Страница 24: ...ur internal amplifiers for front speakers to have more high quality sounds Example Example Example Bi amp connection Combining with an external power amplifier Hi Fi amplifier etc to build an extended system Using the excess internal amplifiers for stereo speakers in another room External power amplifier Main zone Zone2 Bi amp connection Power amp channel expansion Multi zone configuration 1 Speak...

Страница 25: ...and power amp channel expansion for presence channels 9 c Front presence 7ch BI AMP FP 26 11 c Front presence Rear presence 7ch BI AMP FP RP 27 Using power amp channel expansion for front and or presence channels 11 Rear Presence 9ch RP 27 11 Front 9ch FRONT 28 11 Front presence Rear presence 7ch FP RP 28 Using power amp channel expansion for front channels and multi zone speakers 9 Front 1 room 7...

Страница 26: ...9 SUBWOOFER 1 2 1 3 4 5 9 9 2 6 7 E R Bi amp via external amp via external amp When this configuration is applied you cannot utilize the ZONE OUT PRE OUT jacks for connecting an external amplifier for Zone2 p 91 Speaker Connect to 12 FRONT and EXTRA SP 1 bi amp connection 3 CENTER 45 SURROUND 67 SURROUND BACK ER F PRESENCE PRE OUT via external power amplifier TY not used 9 SUBWOOFER 1 2 1 Speaker ...

Страница 27: ...d EXTRA SP 1 bi amp connection 3 CENTER 45 SURROUND 67 SURROUND BACK ER F PRESENCE PRE OUT via external power amplifier TY R PRESENCE PRE OUT via external power amplifier 9 SUBWOOFER 1 2 1 3 4 5 9 9 2 E R 6 7 Y T via external amp via external amp When this configuration is applied you cannot utilize the ZONE OUT PRE OUT jacks for connecting an external amplifier for Zone3 p 91 Speaker Connect to 1...

Страница 28: ...NTER 45 SURROUND 67 SURROUND BACK ER EXTRA SP 1 TY EXTRA SP 2 9 SUBWOOFER 1 2 1 3 4 5 9 9 2 E R 6 7 Y T via external amp via external amp via external amp via external amp When this configuration is applied you cannot utilize the ZONE OUT PRE OUT jacks for connecting external amplifiers for Zone2 and Zone3 p 91 Speaker Connect to 12 FRONT 3 CENTER 45 SURROUND 67 SURROUND BACK ER F PRESENCE PRE OUT...

Страница 29: ...ENTER 45 SURROUND 67 SURROUND BACK ER EXTRA SP 1 TY not used 9 SUBWOOFER 1 2 Zone3 speakers EXTRA SP 2 1 2 3 4 6 9 9 7 5 1 2 1 2 Zone2 Zone3 Main zone via external amp Speaker Connect to 12 FRONT PRE OUT via external power amplifier 3 CENTER 45 SURROUND 67 SURROUND BACK ER not used TY not used 9 SUBWOOFER 1 2 Zone2 speakers EXTRA SP 1 Zone3 speakers EXTRA SP 2 1 Speaker connections 2 3 4 5 6 7 8 9...

Страница 30: ... used TY not used 9 SUBWOOFER 1 2 Zone2 speakers EXTRA SP 1 2 1 1 E 2 3 4 6 9 9 7 5 R Main zone Zone3 When Zone3 output is enabled p 95 the surround back speakers in the main zone do not output sound Speaker Connect to 12 FRONT 3 CENTER 45 SURROUND 67 SURROUND BACK ER EXTRA SP 1 TY not used 9 SUBWOOFER 1 2 Zone3 speakers EXTRA SP 2 1 Speaker connections 2 3 4 5 6 7 8 9 ...

Страница 31: ...ne When Zone3 output is enabled p 95 the surround back speakers in the main zone do not output sound Speaker Connect to 12 FRONT 3 CENTER 45 SURROUND 67 SURROUND BACK ER not used TY not used 9 SUBWOOFER 1 2 Zone2 speakers EXTRA SP 1 Zone3 speakers EXTRA SP 2 1 Speaker connections 2 3 4 5 6 7 8 9 ...

Страница 32: ...ssign p 114 in the Setup menu By default Zone2 is assigned to the EXTRA SP 1 jacks and Zone3 is assigned to the EXTRA SP 2 jacks You can also connect Zone2 and Zone3 speakers using an external amplifier p 91 Caution Before making bi amp connections remove any brackets or cables that connect a woofer with a tweeter Refer to the instruction manual of the speakers for details If you are not making bi...

Страница 33: ...noises or abnormal sounds make sure the followings before making connections Remove the power cable of the unit and turn off the external power amplifier before connecting them When using the PRE OUT jacks do not connect speakers to the corresponding SPEAKERS terminals When using a pre main amplifier that does not have the volume control bypass turn up the volume of the pre main amplifier enough a...

Страница 34: ...s luminance Y chrominance blue PB and chrominance red PR Use a component video cable with three plugs S VIDEO jack Transmits S video signals that include luminance Y and chrominance C components Use an S video cable VIDEO jacks Transmit analog video signals Use a video pin cable Audio jacks OPTICAL jacks Transmit digital audio signals Use a digital optical cable Remove the tip protector if availab...

Страница 35: ... connect a TV that supports HDMI Control to the unit with an HDMI cable you can control the unit s power and volume with the TV s remote control You can also control playback devices such as an HDMI Control compatible BD DVD player connected to the unit with an HDMI cable For details see HDMI Control p 158 About Audio Return Channel ARC ARC allows audio signals to travel both ways under HDMI Contr...

Страница 36: ...s selected If not select the input source manually On the TV The video from the playback device is displayed f Check that the unit is properly synchronized with the TV by turning off the TV or adjusting the TV volume with the TV remote control This completes the necessary settings If you select a TV program with the TV remote control the input source of the unit will be automatically switched to A...

Страница 37: ...evices such as a TV and playback devices and power cable of the unit turn on the unit TV and playback devices 2 Configure the settings of the unit a Switch the TV input to display video from the unit b Press ON SCREEN c Use the cursor keys to select Setup and press ENTER d Use the cursor keys e r to select HDMI e Use the cursor keys q w to select HDMI Control and press ENTER f Use the cursor keys ...

Страница 38: ...V Audio Input p 122 in the Setup menu to change the TV audio input assignment To use the SCENE function p 61 you also need to change the input assignment for SCENE TV Connection Method 3 TV with HDMI input jacks Connect the TV to the unit with an HDMI cable and an audio cable digital optical or stereo pin cable If you select AUDIO 1 as the input source by pressing AUDIO 1 or SCENE TV on the remote...

Страница 39: ...T SURROUND SUR BACK SPEAKERS CE SURROUND BACK SURROUND ZONE 2 ZONE 3 R PRESENCE R 5 COAXIAL 6 L R L R L SINGLE PRE OUT FRONT SURROUND SUR BACK SINGLE EXTRA SP2 OPTICAL AUDIO 1 2 TV 5 AUDIO OPTICAL R L Y PB PR MONITOR OUT ZONE OUT Y PB PR COMPONENT VIDEO O O L R L R PR PB Y PR PB Y The unit rear MONITOR OUT COMPONENT VIDEO jacks Video input component video AUDIO 1 OPTICAL or AUDIO jacks Audio outpu...

Страница 40: ...one2 or Zone4 you can connect a video monitor for Zone2 or Zone4 to the HDMI OUT 2 jack and enjoy videos and audio using the video monitor p 93 NETWORK DC OUT 5V 0 5A 3 NET MONITOR OUT ZONE OUT HDMI OUT ARC ZONE OUT 1 2 1 BD D AV 1 Y PB AV 1 A AV 2 B AV OUT R L AV 3 AV 4 AV 2 AV 1 1 BD DVD OPTICAL 4 OPTICAL 3 COAXIAL 2 COAXIAL 1 PHONO GND OPTICAL AUDIO 4 AUDIO 3 AUDIO 2 AUDIO 1 2 TV FRONT SURROUND...

Страница 41: ... a set of input jacks on the unit depending on the audio output jacks available on your video device If you select the input source by pressing AV 1 4 on the remote control the video audio played back on the video device will be output from the unit 3 Connecting playback devices UT 2 HDMI 1 BD DVD AV 1 AV 2 AV 3 AV 4 AV 5 AV 6 AV 7 TRIG OU Y PB PR Y PB PR Y PB PR MONITOR OUT ZONE OUT IN OUT IN OUT...

Страница 42: ...Digital coaxial AV 1 2 S VIDEO COAXIAL Digital optical AV 3 4 S VIDEO OPTICAL Analog stereo AV 1 4 S VIDEO AUDIO NETWORK DC OUT 5V 0 5A 3 NET AV OUT R L AV 3 AV 4 AV 2 AV 1 1 BD DVD OPTICAL 4 OPTICAL 3 COAXIAL 2 COAXIAL 1 PHONO GND FM 75Ω ANTENNA HD Radio AM 4 RADIO S VIDEO S S R L COAXIAL OPTICAL C C L R L R O O The unit rear AV 1 4 S VIDEO jacks Video output S video Video device Audio output any...

Страница 43: ... device Audio output jacks on the unit Digital optical AV 1 2 COAXIAL AUDIO 2 COAXIAL Digital coaxial AV 3 4 OPTICAL AUDIO 1 OPTICAL Analog stereo AV 1 4 AUDIO AUDIO 1 4 AUDIO Turntable PHONO PHONO When connecting a turntable The PHONO jack of the unit is compatible with an MM cartridge To connect a turntable with a low output MC cartridge use a boosting transformer Connecting the turntable to the...

Страница 44: ...ace the AM antenna on a flat surface ENTER DISPLAY RETURN USB YPAO MIC PHONES PROGRAM MULTI ZONE VIDEO AUX ZONE 2 ZONE 3 ZONE 4 ZONE CONTROL SILENT CINEMA VIDEO 5V 2 1A R L AUDIO HDMI IN OPTICAL FM AM TUNING V R L HDMI O Game console Camcorder The unit front 4 Connecting the FM AM antennas The supplied antennas and the location of the antenna jacks vary depending on the region of purchase NETWORK ...

Страница 45: ... menu Some security software installed on your PC or the firewall settings of network devices such as a router may block the access of the unit to the network devices or the Internet In these cases configure the security software or firewall settings appropriately Each server must be connected to the same subnet as the unit To use the service via the Internet broadband connection is strongly recom...

Страница 46: ...eakers make appropriate settings on the external device such as a DVD player that suit to the speaker configuration When MULTI CH is selected as the input source sound mode selection and tone control adjustment are not available 6 Connecting other devices NETWORK DC OUT 5V 0 5A 3 NET MONITOR OUT ZONE OUT HDMI OUT ARC ZONE OUT 1 2 Y AV 1 A AV 2 B AV OUT R L AV 3 AV 4 AV 2 AV 1 1 BD DVD OPTICAL 4 OP...

Страница 47: ...input selection If you have a Yamaha subwoofer that supports a system connection or a device with a trigger input jack you can use the trigger function by connecting the external device to one of the TRIGGER OUT jacks You can configure the trigger function settings in Trigger Output1 and Trigger Output2 p 128 in the Setup menu HDMI AV 3 AV 4 AV 5 AV 6 AV 7 TRIGGER OUT 1 2 RS 2 Y PB PR PR MONITOR O...

Страница 48: ...wall outlet Improper setting of VOLTAGE SELECTOR may cause damage to the unit and create a potential fire hazard AV 5 AV 6 AV 7 TRIGGER OUT 1 2 RS 232C PR OUT IN OUT IN OUT REMOTE 1 2 AC IN 1 2 CENTER FRONT BI AMP ZONE 2 ZONE 3 F PRESENCE RESENCE R R L L L PRE OUT SUBWOOFER CENTER SURROUND SUR BACK SINGLE FRONT REAR EXTRA SP1 12V 0 1A VOLTAGE SELECTOR 220V 240V 110V 120V The unit rear VOLTAGE SELE...

Страница 49: ...e 6 To confirm the setting press ENTER 7 To exit from the menu press ON SCREEN The information on the front display is provided in English only 8 Selecting an on screen menu language 1 2 3 4 5 6 7 8 Language setting 9 SOURCE RECEIVER AV AUDIO 1 2 3 4 5 6 7 V AUX 1 2 3 4 MULTI PHONO USB NET TUNER C A B CLASSICAL LIVE CLUB ENTERTAIN MOVIE STEREO STRAIGHT INPUT PURE DIRECT MUTE TV SCENE 1 2 3 4 PROGR...

Страница 50: ...ding to your speaker configuration configure the Power Amp Assign setting p 114 in the Setup menu For the basic speaker configuration p 19 set to Basic default For any of the advanced speaker configurations p 24 set to the appropriate setting 5 Place the YPAO microphone at your listening position same height as your ears and connect it to the YPAO MIC jack on the front panel 9 Optimizing the speak...

Страница 51: ...osition you will be seated most frequently Yes Select this option if you will have several listening positions or if you want others to enjoy surround sound You can take measurements at up to 8 different positions in the room The speaker settings will be optimized to suit the area defined by those positions multi measure No default Select this option if your listening position will always be fixed...

Страница 52: ...he measurement immediately To cancel the measurement temporarily press RETURN The following screen appears on the TV when the measurement finishes RX A2020 RX A3020 when angle measurement is disabled Proceed to Step 3 Yes Enables the angle measurement The unit will measure angle of each speaker at the listening position and correct the speaker parameters so that CINEMA DSP can create more effectiv...

Страница 53: ...een appears on the TV when the first angle measurement finishes d In the same way perform the angle measurement for the positions 2 and 3 The following screen appears on the TV when the third angle measurement finishes 3 Use the cursor keys to select Save Cancel and press ENTER To check the measurement results select Result For details see Checking the measurement results p 56 FRONT DIRECTION Micr...

Страница 54: ...ursor keys to select Measure and press ENTER The measurement will start in 10 seconds Press ENTER again to start the measurement immediately To cancel the measurement temporarily press RETURN The following screen appears on the TV when the measurement at the first position finishes 2 Move the YPAO microphone to the next listening position and press ENTER Repeat Step 2 until measurements at all lis...

Страница 55: ...uently and set the YPAO microphone to the position 1 We recommend using a tripod to place the microphone base at ear height Use the tripod screws to fix the microphone base in place Do not move the microphone base until the third angle measurement finishes c Press ENTER to start the first angle measurement The following screen appears on the TV when the first angle measurement finishes FRONT DIREC...

Страница 56: ... After the measurement use the cursor keys to select Result and press ENTER You can also select Result from Auto Setup p 112 in the Setup menu which displays the previous measurement results The following screen appears 1 Measurement result items 2 Measurement result details 3 The number of measured positions when multi measure is performed Caution The YPAO microphone is sensitive to heat so shoul...

Страница 57: ...the correct polarity Reverse The speaker cable may be connected with the reverse polarity Size Size of each speaker cross over frequency of the subwoofer Large The speaker can reproduce low frequency signals effectively Small The speaker cannot reproduce low frequency signals effectively Distance Distance from the listening position to each speaker Level Output level adjustment for each speaker An...

Страница 58: ...ers are connected Surround speakers need to be connected in order to use surround back speakers Follow the on screen instructions to exit YPAO turn off the unit and then reconnect the speakers E 7 No MIC The YPAO microphone has been removed Connect the YPAO microphone to the YPAO MIC jack firmly and follow the on screen instructions to start the measurement again E 8 No Signal The YPAO microphone ...

Страница 59: ...ncorrectly turn off the unit and then reconnect the speaker cable Depending on the type of speakers or room environment this message may appear even if the speakers are connected correctly In this case you can ignore the message W 2 Over Distance A speaker is placed more than 24 m 80 ft from the listening position Select Distance in Result p 56 and move the speaker identified by 24 00m 80 0ft with...

Страница 60: ...select an HDMI output jack by selecting a scene p 61 When OUT 1 2 is selected the unit outputs video signals at the highest resolution supported by both TVs or projectors connected to the unit For example if you have connected a 1080p TV to the HDMI OUT 1 jack and a 720p TV to the HDMI OUT 2 jack the unit outputs 720p video signals RX A3020 only If the HDMI OUT 2 jack is assigned to Zone2 or Zone4...

Страница 61: ...N b Use the cursor keys to select Scene and press ENTER c Use the cursor keys to select a desired scene and press ENTER Selecting the input source and favorite settings with one touch SCENE SCENE SCENE key 1 BD DVD 2 TV 3 NET 4 RADIO Input Input p 60 AV 1 AUDIO 1 NET RADIO TUNER Audio Select p 101 Auto Auto HDMI Output HDMI Output p 60 OUT 1 2 OUT 1 2 OUT 1 2 OUT 1 2 Mode Sound Program p 63 Sci Fi...

Страница 62: ...OTE OUT jack To enable SCENE link playback specify the device type in Device Control p 106 in the Scene menu Selecting setting items to be included as scene assignments In addition to the default scene assignments Input HDMI Output and Mode you can also include the following setting items as the scene assignments in Detail p 107 in the Scene menu OUT1 IN OUT2 VOLUME MUTE DRC ADAPTIVE 3 ZONE 2 SBL ...

Страница 63: ...ogram surround decoder and press ENTER You can also switch the sound programs and surround decoder by pressing PROGRAM You can change the settings of the surround programs and surround decoders in the Sound Program menu p 108 The sound mode can be applied separately to each input source You can check which speakers are currently outputting sound by looking at the speaker indicators on the unit s f...

Страница 64: ...peakers are connected the unit creates Virtual Presence Speaker VPS using the front center and surround speakers to produce stereoscopic sound fields Enjoying sound field effects without surround speakers Virtual CINEMA DSP If you select one of the sound programs when no surround speakers are connected the unit creates the surround sound field using the front side speakers Enjoying surround sound ...

Страница 65: ...naural video sources such as classic movies in an atmosphere of a good old movie theater The program creates a pleasant space with depth by adding breadth and the appropriate reverberation to the original audio Sports This program allows listeners to enjoy the rich vividness of sport broadcasts and light entertainment programs In sports broadcasts the commentators voices are positioned clearly at ...

Страница 66: ... medieval Gothic monastery located in Royaumont on the outskirts of Paris Chamber This program creates a relatively wide space with a high ceiling like an audience hall in a palace It offers pleasant reverberations that are suitable for courtly music and chamber music Village Vanguard The Jazz club is on 7th Avenue New York This small club with the low ceiling makes the powerful reflections conver...

Страница 67: ... or when Surround Back p 115 in the Setup menu is set to None VOLUME SBL SBR SW1 SL SR C L R STRAIGHT bPro Logic Uses the Dolby Pro Logic decoder suitable for all sources bPLIIx Movie Use the Dolby Pro Logic IIx decoder or Dolby Pro Logic II decoder suitable for movies bPLII Movie bPLIIx Music Use the Dolby Pro Logic IIx decoder or Dolby Pro Logic II decoder suitable for music bPLII Music bPLIIx G...

Страница 68: ...dio such as 2 channel PCM and FLAC when Hi Res Mode p 101 in the Option menu is set to On default 1 Press ENHANCER Each time you press the key Compressed Music Enhancer is enabled or disabled Compressed Music Enhancer does not work on signals whose sampling rate is over 48 kHz You can also use Enhancer p 101 in the Option menu to enable disable Compressed Music Enhancer OUT1 IN OUT2 VOLUME MUTE DR...

Страница 69: ...s when you enter a frequency that is out of reception range U S A model only You can switch between Auto stereo and Mono monaural for FM radio reception in Audio Mode p 102 in the Option menu When the signal reception for an FM radio station is unstable switching to monaural may improve it HD Radio programs are not available when the unit is in the monaural reception mode Except for U S A model Yo...

Страница 70: ...atedly to select the desired radio station You can also enter a preset number 01 to 40 directly by using the numeric keys after pressing PRESET once No Presets appears when no radio stations are registered Wrong Num appears when an invalid number is entered Empty appears when a preset number not in use is entered To clear preset stations use Clear Preset or Clear All Preset p 73 p 75 OUT1 IN OUT2 ...

Страница 71: ...ser experience of HD RadioTechnology Presents song name artist station IDs HD2 HD3 Channel Guide and other relevant data streams zAdjacent to traditional main stations are extra local FM channels These HD2 HD3 Channels provide new original music as well as deep cuts into traditional genre zDigital CD quality sound HD Radio Technology enables local radio stations to broadcast a clean digital signal...

Страница 72: ...am category artist name album name and song title are also displayed Use the cursor keys q w to select scrollable information 3 HD indicator Lights up when an HD Radio station signal is received 4 TUNED STEREO indicators TUNED lights up when a signal is received from a radio station STEREO lights up when a stereo signal is received 5 Operation menu Press the cursor key r and then use the cursor ke...

Страница 73: ...registers HD Radio FM AM stations and FM radio stations with strong signals up to 40 stations Clear Preset Clear the preset station selected in the list Clear All Preset Clear all the preset stations 1 Page Up Moves to the previous next page of the list 1 Page Down Now Playing Moves to the playback screen Screen Off Closes the screen display and shows the background Press one of the menu operation...

Страница 74: ...rmation Displays the information of the selected radio station such as the selected band FM AM and frequency U K and Europe models only When tuning into a Radio Data System broadcasting station p 73 the Radio Data System information Program Service Program Type Radio Text and Clock Time is also displayed 2 Band icon Except for U K and Europe models Select this icon and press ENTER to switch betwee...

Страница 75: ... shows the background Press one of the menu operation keys to redisplay it Menu Submenu Function Utility Memory Registers the current station to the preset number selected in the list Auto Preset Automatically registers FM radio stations with strong signals up to 40 stations Clear Preset Clear the preset station selected in the list Clear All Preset Clear all the preset stations 1 Page Up Moves to...

Страница 76: ... USB cable supplied with the iPod 1 Connect the USB cable to the iPod 2 Connect the USB cable to the USB jack The iPod charges while it is connected to the unit If you set the unit to standby mode while the iPod is charging the iPod continues to charge up to 4 hours If Network Standby p 124 in the Setup menu is set to On it continues to charge without limit Disconnect the iPod from the USB jack wh...

Страница 77: ... of iPod content Use the cursor keys q w to select an item and press ENTER to confirm the selection 4 Item number total 5 Operation menu Press the cursor key r and then use the cursor keys q w to select an item Press ENTER to confirm the selection Menu Function 1 Page Up Moves to the previous next page of the list 1 Page Down 10 Pages Up Moves 10 pages forward backward 10 Pages Down Return Returns...

Страница 78: ...lay Control a Resumes playback from pause s Stops playback d Stops playback temporarily f Skips forward backward g h Searches forward backward by holding down j Browse Moves to the browse screen Screen Off Closes the screen display and shows the background Press one of the menu operation keys to redisplay it 1 3 2 Operational remote control keys Function Cursor keys Select an item ENTER Confirms t...

Страница 79: ...tem Setting Function Shuffle Shuffle Off Off Turns off the shuffle function Songs Songs Plays back songs in random order x appears in the TV screen Albums Albums Plays back albums in random order x appears in the TV screen Repeat Repeat Off Off Turns off the repeat function One One Plays back the current song repeatedly c appears in the TV screen All All Plays back all songs repeatedly v appears i...

Страница 80: ...USB jack Disconnect the USB storage device from the USB jack when it is not in use Playback of USB storage device contents Follow the procedure below to operate the USB storage device contents and start playback You can control the USB memory device with the menu displayed on the TV screen 1 Press USB to select USB as the input source The browse screen is displayed on the TV If playback is ongoing...

Страница 81: ... Item number total 5 Operation menu Press the cursor key r and then use the cursor keys q w to select an item Press ENTER to confirm the selection Menu Function 1 Page Up Moves to the previous next page of the list 1 Page Down 10 Pages Up Moves 10 pages forward backward 10 Pages Down Return Returns to the higher level list Now Playing Moves to the playback screen Screen Off Closes the screen displ...

Страница 82: ... r to select a setting 4 To exit from the menu press OPTION Menu Submenu Function Play Control a Resumes playback from pause s Stops playback d Stops playback temporarily f Skips forward backward g Browse Moves to the browse screen Screen Off Closes the screen display and shows the background Press one of the menu operation keys to redisplay it 1 3 2 Item Setting Function Shuffle Shuffle Off Off T...

Страница 83: ...yer 11 or later is installed on your PC 2 In the media sharing settings enable media sharing and allow media to be shared with the device For a PC or a NAS with other DLNA server software installed Refer to the instruction manual for the device or software and configure the media sharing settings Playback of PC music contents Follow the procedure below to operate the PC music contents and start pl...

Страница 84: ...mber total 5 Operation menu Press the cursor key r and then use the cursor keys q w to select an item Press ENTER to confirm the selection Menu Function 1 Page Up Moves to the previous next page of the list 1 Page Down 10 Pages Up Moves 10 pages forward backward 10 Pages Down Return Returns to the higher level list Now Playing Moves to the playback screen Screen Off Closes the screen display and s...

Страница 85: ...es indicators on the front display 3 Use the cursor keys e r to select a setting 4 To exit from the menu press OPTION Menu Submenu Function Play Control a Resumes playback from pause s Stops playback d Stops playback temporarily f Skips forward backward g Browse Moves to the browse screen Screen Off Closes the screen display and shows the background Press one of the menu operation keys to redispla...

Страница 86: ...eatedly to select NET RADIO as the input source The browse screen is displayed on the TV 2 Use the cursor keys to select an item and press ENTER If an Internet radio station is selected playback starts and the playback screen is displayed To return to the previous screen press RETURN Listening to Internet radio SOURCE RECEIVER AV AUDIO 1 2 3 4 5 6 7 V AUX 1 2 3 4 MULTI PHONO USB NET TUNER C A B CL...

Страница 87: ...item Press ENTER to confirm the selection To close the submenu press RETURN You can also use the external device operation key s on the remote control to stop playback Some information may not be available depending on the station Menu Function 1 Page Up Moves to the previous next page of the list 1 Page Down 10 Pages Up Moves 10 pages forward backward 10 Pages Down Return Returns to the higher le...

Страница 88: ... the iPod If the iTunes iPod recognizes the unit the AirPlay icon appears If the icon does not appear check whether the unit and PC iPod are connected to the router properly 2 On the iTunes iPod click tap the AirPlay icon and select the unit network name of the unit as the audio output device 3 Select a song and start playback The unit automatically selects AirPlay as the input source and starts p...

Страница 89: ...ess RETURN You can also use the external device operation keys a s d f g on the remote control to control playback To control iTunes playback with the remote control of the unit you need to configure the iTunes preferences to enable iTunes control from remote speakers in advance Caution When you use iTunes iPod controls to adjust volume the volume may be unexpectedly loud This could result in dama...

Страница 90: ...rs Connections TV for analog video playback p 92 TV for digital video playback RX A3020 only p 93 Speakers connecting to the unit directly p 32 Speakers using an external amplifier p 91 Enjoying videos music using only a TV RX A3020 only Connection TV p 93 Playing back videos audio in multiple rooms multi zone The Zone4 function is available on RX A3020 only Video audio signals that can be output ...

Страница 91: ...mp Assign setting p 114 in the Setup menu Caution Remove the unit s power cable from the AC wall outlet before connecting speakers or an external amplifier Ensure that the core wires of the speaker cable do not touch one another or come into contact with the unit s metal parts Doing so may damage the unit or the speakers If the speaker cables short circuit Check SP Wires will appear on the front d...

Страница 92: ...tions are not available for Zone3 when HDMI OUT2 Assign p 127 in the Setup menu is set to Zone2 To assign the MONITOR OUT ZONE OUT jacks to the video monitor for Zone2 or Zone3 set Monitor Out Assign p 126 in the Setup menu to Zone2 or Zone3 MONITOR OUT ZONE OUT HDMI OUT ARC ZONE OUT 1 2 HDMI 1 BD DVD AV 1 AV 2 AV 3 AV 4 AV 5 A Y PB PR Y PB PR Y PB PR MONITOR OUT ZONE OUT IN AV 1 AV 3 COMPONENT VI...

Страница 93: ...io output from the HDMI OUT 2 jack by setting Audio Output p 127 in the Setup menu to On or Off default You can also use speakers placed in Zone2 to output audio p 32 ETWORK 3 NET MONITOR OUT ZONE OUT HDMI OUT ARC ZONE OUT 1 2 1 BD DVD AV 1 AV 2 A Y PB PR Y PB AV 1 AV 3 COMPONENT VIDEO A AV 2 B AV 4 AV OUT AV 3 AV 4 2 OPTICAL 4 OPTICAL 3 AXIAL OPTICAL AUDIO 4 MULTI CH INPUT AUDIO 3 AUDIO 2 AUDIO 1...

Страница 94: ...signals by connecting the REMOTE IN OUT jacks with monaural mini jack cables and an infrared signal receiver HDMI AV 2 AV 3 AV 4 AV 5 AV 6 AV 7 TRIG O PR Y PB PR Y PB PR MONITOR OUT ZONE OUT IN OUT IN OUT AV 3 REMOTE 1 2 MPONENT VIDEO C AV 4 D 1 2 ULTI CH INPUT ZONE OUT PRE OUT CENTER SUBWOOFER ZONE 2 F PRESENSE ZONE 3 R PRESENSE ROUND SUR BACK SPEAKERS CENTER FRONT SURROUND BACK ZONE 2 ZONE 3 R P...

Страница 95: ...e following operations see the corresponding pages Listening to FM AM radio p 69 Playing back iPod music p 76 Playing back music stored on a USB storage device p 80 Playing back music stored on media servers PCs NAS p 83 Listening to Internet radio p 86 Playing back iTunes iPod music via a network AirPlay p 88 You can also use the web control to control Zone2 Zone3 or Zone4 For details on the web ...

Страница 96: ... TONE BALANCE repeatedly to select Balance c Press PROGRAM to make an adjustment Enjoying the same source in multiple rooms party mode The party mode allows you to play back in all zones the same music that is being played back in the main zone During the party mode stereo playback is automatically selected for all zones Utilize this function when you want to use main zone music as background musi...

Страница 97: ...EP HD PRE AMP PARTY ZONE 3 ZONE 4 HD TAG DOCK Audio Decoder Info Item name OUT1 IN OUT2 VOLUME MUTE DRC ADAPTIVE 3 ZONE 2 SBL PL SBR SB PR SW1 SL SW2 SW SR PL C L R PR SLEEP HD PRE AMP PARTY ZONE 3 ZONE 4 HD TAG DOCK Pro Logic AV1 Information USB SERVER AirPlay Song song title Artist artist name Album album name DSP Program sound mode name Audio Decoder decoder name During simple playback of iPod ...

Страница 98: ...the dynamic range from maximum to minimum is automatically adjusted when the volume is adjusted 99 CINEMA DSP 3D Mode CINEMA DSP 3D Enables disables CINEMA DSP 3D 99 Dialogue Adjust Dialog Adjust Dialogue Level Dialog Lvl Adjusts the volume of dialogue sounds 100 Dialogue Lift Dialog Lift Adjusts the perceived height of dialogue sounds 100 Extended Surround EXTD Surround Selects how to play back 5...

Страница 99: ...ables disables CINEMA DSP HD RX A3020 or CINEMA DSP 3D RX A2020 p 64 If this function is set to On CINEMA DSP HD CINEMA DSP 3D functions with the selected sound programs except 2ch Stereo and 9ch Stereo Settings FM Mode FM Mode Except for U S A model Switches between stereo and monaural for FM radio reception 102 Hold Unhold Hold Unhold U S A model only Enables disables the hold function when the ...

Страница 100: ... set Extended Surround to bPLIIx Movie or EX ES when playing back those sources Volume Trim Volume Trim Fine adjusts volume difference between input sources or subwoofer volume Input Trim In Trim Corrects volume differences between input sources If you are bothered by volume differences when switching between input sources use this function to correct it This setting is applied separately to each ...

Страница 101: ...ing p 119 in the Setup menu Settings Video Adjustment Video Adjust Selects a video adjustment setting from presets you have configured in Adjustment p 120 in the Setup menu This setting is applied separately to each input source Settings 1 to 6 Audio Select Audio Select Selects the audio input jack to use when more than one audio connection is made for one input source This setting is applied sepa...

Страница 102: ...available when the unit is in the monaural reception mode FM Mode FM Mode Except for U S A model Switches between stereo and monaural for FM radio reception Settings Auto Auto default Receives the selected band FM or AM in stereo sounds when the signal reception is good and in monaural sounds when it is not good Mono Mono Receives the selected band FM or AM in monaural sounds Stereo Stereo default...

Страница 103: ...return to the previous screen during menu operations press RETURN 5 Use the cursor keys to select a setting and press ENTER 6 To exit from the menu press ON SCREEN Input menu items Available items vary depending on the selected input source Configuring input sources Input menu Item Function Page Rename Icon Select Changes the input source name and icon 104 Decoder Mode Sets the format of digital a...

Страница 104: ...gital audio playback to DTS For example if the unit does not detect DTS audio and outputs noise set Decoder Mode to DTS Input sources AV 1 7 V AUX AUDIO 1 4 available only when any audio digital input jack is assigned Settings Volume Interlock Enables disables volume controls from iTunes iPod via AirPlay Input sources AirPlay Settings Video Out Selects a video to be output with the audio input sou...

Страница 105: ...ou can control playback of the unit from DMCs such as Windows Media Player 12 on the same network You can change the settings of the SCENE function p 61 using the TV screen 1 Press ON SCREEN 2 Use the cursor keys to select Scene and press ENTER 3 Use the cursor keys e r to select a scene to be configured and press the cursor key q 4 Use the cursor keys q w to select an item and press ENTER Disable...

Страница 106: ...trol link setup p 158 Item Function Page Save Registers the current settings in the selected scene 106 Load Loads the settings registered for the selected scene You can also configure the SCENE link playback setting select items to be included as the scene assignments or view the settings currently assigned to the selected scene 106 Rename Icon Select Changes the scene name and icon 107 Reset Rest...

Страница 107: ... or TV screen Setup procedure 1 Use the cursor keys e r to select an icon and press the cursor key w 2 Press ENTER to enter the name edit screen 3 Use the cursor keys and ENTER to rename and select ENTER to confirm the entry To clear the entry select CLEAR 4 Use the cursor keys to select OK and press ENTER To restore the default setting select RESET 5 To exit from the menu press ON SCREEN Reset Re...

Страница 108: ...und program to be configured and press the cursor key q You can still switch the sound program by using cursor keys e r after Step 3 4 Use the cursor keys q w to select an item and press ENTER To return to the previous screen during menu operations press RETURN To restore the default settings for the selected sound program select Reset 5 Use the cursor keys to select a setting and press ENTER 6 To...

Страница 109: ...adening effect of the surround back sound field Liveness Adjusts the loss of the presence sound field 0 to 10 Higher to enhance the reflectivity and lower to reduce it Surround Liveness Adjusts the loss of the surround sound field Surround Back Liveness Adjusts the loss of the surround back sound field Reverb Time Adjust the decay time of the rear reverberant sound 1 0 s to 5 0 s Higher to enrich ...

Страница 110: ...sound field in combination with the surround sound field Center Width Adjusts the broadening effect of the center sound field 0 to 7 default 3 Higher to enhance the broadening effect and lower to reduce it closer to center Dimension Adjusts the difference in level between the front and surround sound fields 3 to 3 default 0 Higher to strengthen the front sound field and lower to strengthen the sur...

Страница 111: ...EN 2 Use the cursor keys to select Setup and press ENTER 3 Use the cursor keys e r to select a menu 4 Use the cursor keys q w to select an item and press ENTER To return to the previous screen during menu operations press RETURN 5 Use the cursor keys to select a setting and press ENTER 6 To exit from the menu press ON SCREEN Configuring various functions Setup menu ...

Страница 112: ... subwoofers are used 116 Extra Bass Sets the speakers to produce the front channel low frequency components 116 Distance Sets the distance between each speaker and listening position 116 Level Adjusts the volume of each speaker 117 Parametric EQ Adjusts the tone with an equalizer 117 Test Tone Enables disables the test tone output 117 Sound Lipsync Delay Enable Enables disables the Lipsync adjustm...

Страница 113: ...names for Zone2 or Zone3 displayed on the front display or TV screen 126 Zone Rename Changes the zone name for Zone2 or Zone3 displayed on the front display or TV screen 126 Zone4 Set RX A3020 only Zone Scene Rename Changes the scene names for Zone4 displayed on the front display or TV screen 126 Zone Rename Changes the zone name for Zone4 displayed on the front display or TV screen 126 Monitor Ou...

Страница 114: ...n up to 9 channel plus rear presence speakers p 19 7ch 1ZONE Select this when you use 7 channel speakers in the main zone and Zone2 or Zone3 speakers p 30 You can select a zone to be assigned to the EXTRA SP 1 jacks default Zone2 9ch 1ZONE Select this when you use 9 channel speakers in the main zone and Zone3 or Zone2 speakers p 30 You can select a zone to be assigned to the EXTRA SP 2 jacks defau...

Страница 115: ...hannel frequency components Small default Select this option for small speakers The subwoofer or front speakers will produce center channel low frequency components lower than the specified crossover frequency default 80 Hz None Select this option when no center speaker is connected The front speakers will produce center channel audio Large Select this option for large speakers The surround speake...

Страница 116: ...10 0 ft Use default Select this option when front presence speakers are connected None Select this option when no front presence speakers are connected Use Select this option when rear presence speakers are connected None default Select this option when no rear presence speakers are connected Use Normal default Select this option when a subwoofer is connected to the SUBWOOFER 1 or SUBWOOFER 2 jack...

Страница 117: ...EQ Data Copy and then an equalizer type 4 Use the cursor keys e r to select a preset band and the cursor keys q w to adjust the gain Setting range Gain 20 0 dB to 6 0 dB 5 To fine adjust the center frequency or Q factor bandwidth press ENTER repeatedly to select an item Frequency Use the cursor keys e r to adjust the center frequency of the selected band and the cursor keys q w to adjust the gain ...

Страница 118: ...Dynamic Range Selects the dynamic range adjustment method for bitstream audio Dolby Digital and DTS signals playback Settings Max Volume Sets the maximum volume to prevent excessive loudness Setting range 30 0 dB to 15 0 dB 5 0 dB increments 16 5 dB Default 16 5 dB Disable Disable the Lipsync adjustment for the selected input source Enable default Enables the Lipsync adjustment for the selected in...

Страница 119: ... to Direct the unit transmits video signals with the least circuitry in order to reduce video output delay Off default Sets the level to the volume level of the unit when it last entered standby mode On Sets at Mute or the specified volume level 80 0 dB to 16 5 dB 0 5 dB increments Specify a volume level which is lower than the Max Volume setting Auto default Automatically outputs video signals wh...

Страница 120: ...and press ENTER 2 Use the cursor keys q w to select an item 3 Use the cursor keys e r to select a setting and press ENTER 4 To exit from the menu press ON SCREEN Contrast Enhancement Selects whether to automatically enhance the video contrast Settings Resolution Enhancement Selects whether to enhance the video resolution Settings Through Does not convert the resolution Auto default Selects a resol...

Страница 121: ...bit rate videos Settings Temporal NR RX A3020 only Selects the effect of the temporal noise film grain noise and random noise of analog video signals reduction when Noise Reduction NR is set to Manual Settings Brightness Adjusts the video brightness Setting range 100 to 100 Default 0 Contrast Adjusts the video contrast Setting range 100 to 100 Default 0 Saturation Adjusts the video saturation Sett...

Страница 122: ... signals input to the unit via ARC are not supported by the unit set ARC to Off and use the TV s speakers Standby Sync Select whether to use HDMI control to link the standby behavior of the TV and the unit when HDMI Control is set to On Settings Audio Output Selects a device to output audio The Amp and HDMI OUT1 settings are available only when HDMI Control is set to Off RX A3020 only The HDMI OUT...

Страница 123: ...al network settings 1 Set DHCP to Off 2 Use the cursor keys q w to select a parameter type and press ENTER 3 Use the cursor keys e r to move the edit position and the cursor keys q w to select a value 4 To confirm the setting press ENTER 5 To configure another network parameter repeat steps 2 to 4 Off default Disables the audio output from the TV On Enables the audio output from the TV Off default...

Страница 124: ... cursor keys e r to move the edit position and the cursor keys q w to select a value 4 To confirm the setting press ENTER 5 To save the changes use the cursor keys to select OK and press ENTER 6 To exit from the menu press ON SCREEN Network Name Edits the network name the unit s name on the network displayed on other network devices Procedure 1 Press ENTER to enter the name edit screen 2 Use the c...

Страница 125: ... with volume control to the unit disable the volume adjustment for the corresponding zone Settings This setting is not available depending on the Power Amp Assign setting p 114 Max Volume Sets the Zone2 or Zone3 maximum volume to prevent excessive loudness Setting range 30 0 dB to 15 0 dB 5 0 dB increments 16 5 dB Default 16 5 dB This setting is available only when Volume is set to Variable Initia...

Страница 126: ... Set RX A3020 only Configures the Zone4 settings Zone Scene Rename Changes the scene names for Zone4 displayed on the front display or TV screen You can change the scene names in the same manner as Zone Scene Rename in Zone2 Set Zone3 Set p 126 Zone Rename Changes the zone name for Zone4 displayed on the front display or TV screen You can change the zone name in the same manner as Zone Rename in M...

Страница 127: ...Zone2 Target Zone3 Target Zone4 RX A3020 only Settings Function Configures the functions that make the unit easier to use Input Assignment Assigns the COMPONENT VIDEO COAXIAL and OPTICAL jacks to another input source Procedure Example assigning the OPTICAL e jack to the input source AV 2 1 Use the cursor keys to select the cell at the intersection of AV 2 and Optical and press ENTER 2 Use the curs...

Страница 128: ...twork sources USB MULTI CH Settings Manual Switches the output level for electronic signal transmission manually when Trigger Mode is set to Manual This setting can also be used to confirm proper function of the external device connected via the TRIGGER OUT jack Choices On default Displays short messages on the TV screen Off Does not display short messages on the TV screen Picture 1 default Pictur...

Страница 129: ...t to Source electronic signal transmission is synchronized with the input switching in Zone2 Zone3 When Trigger Mode is set to Power electronic signal transmission is synchronized with power status of Zone3 When Trigger Mode is set to Source electronic signal transmission is synchronized with input switching in Zone3 Zone4 RX A3020 only When Trigger Mode is set to Power electronic signal transmiss...

Страница 130: ...umption Settings The new setting will take effect after the unit is restarted When ECO Mode is set to On the front panel display may become dark If you want to play audio at high volume set ECO Mode to Off Language Select an on screen menu language Settings The information on the front display is provided in English only Off Does not set the unit to standby mode automatically 2 hours 4 hours 8 hou...

Страница 131: ... the cursor keys q w to switch between OUT1 and OUT2 Viewing information about the unit Information menu Input Format Audio format of the input signal Channel The number of source channels in the input signal front surround LFE For example 5 1 3 2 0 1 means 5 1ch in total 3 front channels 2 surround channels and LFE Sampling The number of samples per second of the input digital signal Bitrate The ...

Страница 132: ...GHT to select a setting 5 Press MAIN ZONE z to set the unit to standby mode and turn it on again The new settings take effect IP Address IP address Subnet Mask Subnet mask Default Gateway The IP address of the default gateway DNS Server P The IP address of the primary DNS server DNS Server S The IP address of the secondary DNS server MAC Address MAC address Network Name Network name the unit s nam...

Страница 133: ...ontrol sensor on the main unit 133 REMOTE CON AMP Selects the unit s remote control ID 133 TUNER FRQ STEP Asia and General models only Changes the FM AM tuning frequency setting 134 TV FORMAT Switches the video signal type 134 MONITOR CHECK Removes the limitation on HDMI video output 134 RECOV BACKUP Creates backup of the settings of the unit or recovers the settings from the backup 135 INITIALIZE...

Страница 134: ...tion p 120 when the unit cannot detect the TV s resolution or when you want to specify a different resolution than the detected resolution Settings Reset to YES if the unit becomes inoperable because video from the unit cannot be displayed on the TV after MONITOR CHECK has been set to SKIP FM100 AM10 Select this when you want to adjust the FM frequency by 100 kHz steps and AM by 10 kHz steps FM50 ...

Страница 135: ...are currently installed on the unit You can also check the firmware version in System p 132 in the Information menu It may take a while until the firmware version is displayed BACKUP Creates backup of the settings of the unit in the internal memory RECOVERY Recovers the settings of the unit from the backup available only when backup has been created Note Do not turn off the unit during the recover...

Страница 136: ...Press SETUP Perform each of the following steps within 30 seconds Otherwise the setting will be canceled If this happens repeat from Step 2 3 Use the cursor keys q w to select PRESET and press ENTER 4 Press TV z and press ENTER Controlling external devices with the remote control Item Function Page LEARN Assigns a function to each key by learning the code from other remote controls 138 PRESET Regi...

Страница 137: ...e after pressing the key 1 Use Remote Control Code Search in the CD ROM to find the remote control code for your playback device If there are multiple remote control codes register the first code in the list If that does not work try the other codes 2 Press SETUP Perform each of the following steps within 30 seconds Otherwise the setting will be canceled If this happens repeat from Step 2 3 Use th...

Страница 138: ...code use the learning function to assign a function to each key 1 Press SETUP Perform each of the following steps within 30 seconds Otherwise the setting will be canceled If this happens repeat from Step 1 2 Use the cursor keys q w to select LEARN and press ENTER 3 Press one of the following keys depending on the type of your device For playback device press the input selection key corresponding t...

Страница 139: ...ction key corresponding to the input jacks where the device is connected For TV press TV z For AV receiver the unit press RECEIVER z For scene press one of the SCENE keys SOURCE RECEIVER AV AUDIO 1 2 3 4 5 6 7 V AUX 1 2 3 4 MULTI PHONO USB NET TUNER C A B SCENE 1 2 3 4 PROGRAM VOLUME MUTE Remote control of external device 5 to 10 cm 2 to 4 apart Note If you press RECEIVER z in Step 3 you can assig...

Страница 140: ...he CD player sequentially with a single key operation Enabling the macro operations 1 Press SETUP Perform each of the following steps within 30 seconds Otherwise the setting will be canceled If this happens repeat from Step 1 2 Use the cursor keys q w to select MACRO and press ENTER 3 Use the cursor keys q w to select ON and press ENTER 4 To exit from the setup menu press SETUP To disable the macr...

Страница 141: ...lude in the macro operations in sequence To switch the devices the unit or external device to control press SOURCE RECEIVER Example Programming for aturning on the unit bselecting AV1 as the input source cturning on the DVD player assigned to AV1 and dturning on the TV a MACRO 1 Press RECEIVER z b MACRO 2 Press AV1 c MACRO 3 Press SOURCE RECEIVER repeatedly to select AV1 and press SOURCE z d MACRO...

Страница 142: ... input selection key or TV z When RENAME is selected press the input selection key RECEIVER z TV z or SCENE When MACRO is selected press the macro operation key input selection key or RECEIVER z 5 Hold down ENTER until OK appears on the window display If NG or ERROR appears clearing has failed Repeat from Step 2 6 To exit from the setup menu press SETUP LEARN Clears the functions learned from othe...

Страница 143: ...t selection key For TV press TV z 4 Press ENTER 5 Hold down the key to be reset until OK appears on the window display If NG or ERROR appears clearing has failed Repeat from Step 2 6 Repeat Steps 3 to 5 until all desired key assignments are erased 7 To exit from the setup menu press SETUP ERASE 2 3 5 1 4 6 TUN CH ENHANCER SUR DECODE HDMI OUT MEMORY INFO AM PARTY FM 0 10 LEVEL ENT SETUP ZONE 8 7 SL...

Страница 144: ...ete If you want to update the firmware later select CLOSE in Step 2 exclamation mark appears at the upper right of the Information and System icons and a message will be displayed in the System screen p 132 You can update the unit s firmware by pressing ENTER in the System screen Updating the unit s firmware Note Do not operate the unit or disconnect the power cable or network cable during firmwar...

Страница 145: ...all To use HDMI Control you need to perform the HDMI Control link setup p 158 After connecting HDMI Control compatible devices such as BD DVD players to the unit enable HDMI Control on each device and perform the HDMI Control link setup This setup is required every time you add a new HDMI Control compatible device to your system For information on how HDMI Control works between your TV and playbac...

Страница 146: ...for more than 10 seconds to initialize and reboot the unit If the problem persists disconnect the power cable from the AC wall outlet and plug it again The power turns off standby mode immediately The unit was turned on while a speaker cable was shorted Twist the bare wires of each speaker cable firmly and reconnect to the unit and speakers p 23 The unit enters standby mode automatically The sleep...

Страница 147: ...speaker volume p 117 The speaker cable connecting the unit and the speaker is defective If there is no problem with the connection replace with another speaker cable The speaker is malfunctioning To check it replace with another speaker If the problem persists the unit may be malfunctioning No sound is coming from the surround back speaker The extended surround is disabled Use Extended Surround in...

Страница 148: ...e HDMI OUT 2 ZONE OUT jack is assigned to Zone2 or Zone4 HDMI audio output may be interrupted during some zone operations due to internal circuitry switching For details see Connecting an HDMI compatible device to play back videos audio p 93 Problem Cause Remedy Problem Cause Remedy No video Another input source is selected on the unit Select an appropriate input source with the input selection ke...

Страница 149: ...ical equipment It is difficult to completely eliminate noise It may be reduced by using an outdoor AM antenna Radio stations cannot be selected automatically Your area is too far from the FM station transmitter Select the station manually p 69 Use an outdoor antenna We recommend using a sensitive multi element antenna The AM radio signal is weak Adjust the AM antenna orientation Select the station...

Страница 150: ...ing the access of the unit to your PC Check the settings of security software installed on your PC The unit and PC are not in the same network Check the network connections and your router settings and then connect the unit and the PC to the same network The files in the PC cannot be viewed or played back The files are not supported by the unit or the media server Use the file format supported by ...

Страница 151: ...not be controlled using the remote control The remote control is set to control the unit Press SOURCE RECEIVER to set the remote control to control external devices the key lights up in green The corresponding remote control code is not set properly Set the remote control code again p 136 Even if the remote control code is registered properly some products may not respond to the remote control The...

Страница 152: ...en turn it on again Please wait The unit is preparing for connecting to the network Wait until the message disappears If the message stays more than 3 minutes turn off the unit and turn it on again RemID Mismatch The remote control IDs of the unit and the remote control are not identical Change the remote control ID of the unit or the remote control p 133 Remote Off The unit cannot be operated fro...

Страница 153: ... DTS Express is a compressed digital audio format that supports 5 1 channel audio and allows a higher compression rate than the DTS Digital Surround format developed by DTS Inc This technology is developed for audio streaming services on the Internet and secondary audio on BD Blu ray discs DTS HD High Resolution Audio DTS HD High Resolution Audio is a compressed digital audio format developed by D...

Страница 154: ...y of signal processing caused by an increase in video signal capacity Lip sync is a technique for automatically correcting the timing lag between audio and video output HDMI and video information Component video signal With the component video signal system the video signal is separated into the Y signal for luminance and the Pb and Pr signals for chrominance Color can be reproduced more faithfull...

Страница 155: ... fields in a listening room CINEMA DSP HD The actually measured sound field data contain the information of the height of the sound images CINEMA DSP HD feature achieves the reproduction of the accurate height of the sound images so that it creates the accurate and intensive stereoscopic sound fields in a listening room Compressed Music Enhancer The Compressed Music Enhancer feature compensates fo...

Страница 156: ... VIDEO HDMI PR PB Y COMPONENT VIDEO HDMI S VIDEO VIDEO VIDEO VIDEO VIDEO S VIDEO S VIDEO S VIDEO PR PB Y COMPONENT VIDEO PR PB Y COMPONENT VIDEO HDMI out COMPONENT VIDEO out S VIDEO out VIDEO out Resolution 480i 576i 480p 576p 720p 1080i 1080p 4K 480i 576i 480p 576p 720p 1080i 1080p 480i 576i 480i 576i HDMI in 480i 576i m m m m m m 480p 576p m m m m m 720p m m m m m 1080i m m m m m 1080p 50 60 Hz ...

Страница 157: ...pin cable Video output m Available To watch videos in Zone2 or Zone3 set Monitor Out Assign p 126 in the Setup menu is set to Zone2 or Zone3 Using the unit s internal amplifier p 32 Using an external amplifier p 91 Out In EXTRA SP 1 2 jacks ZONE OUT PRE OUT jacks HDMI OUT 2 ZONE OUT jack Zone2 Zone3 Zone2 Zone3 Zone2 1 Zone4 2 Digital audio HDMI m 3 m 3 m 3 m 4 Digital audio COAXIAL OPTICAL m 5 m ...

Страница 158: ...rolling the playback device playback and menu operations without registering remote control codes p 137 Example To use HDMI Control you need to perform the following HDMI Control link setup after connecting the TV and playback devices This setup is required every time you add a new HDMI Control compatible device to your system 1 Turn on the unit TV and playback devices 2 Enable HDMI Control on the...

Страница 159: ...k video audio signals may not be output depending on the type of the DVD player The unit is not compatible with HDCP incompatible HDMI or DVI devices For details refer to the instruction manual for each device To decode audio bitstream signals on the unit set the input source device appropriately so that the device outputs the bitstream audio signals directly does not decode the bitstream signals ...

Страница 160: ...aunhofer IIS and Thomson This receiver supports network connections HD Radio Technology manufactured under license from iBiquity Digital Corporation U S and Foreign Patents HD Radio and the HD HD Radio and Arc logos are proprietary trademarks of iBiquity Digital Corp HDMI the HDMI logo and High Definition Multimedia Interface are trademarks or registered trademarks of HDMI Licensing LLC x v Color ...

Страница 161: ...R SURROUND L R SURROUND BACK L R ZONE OUT x 2 ZONE2 ZONE3 Digital Audio Optical x 1 AV OUT Video MONITOR OUT ZONE OUT Composite x 1 S video x 1 Component x 1 AV OUT Composite x 1 S video x 1 HDMI Output HDMI OUT x 2 HDMI OUT 1 2 5 5 RX A3020 only barter to ZONE OUT ZONE2 ZONE4 Other jacks REMOTE IN x 2 REMOTE OUT x 2 TRIGGER OUT x 2 RS 232C x 1 DC OUT x 1 HDMI HDMI Specification Deep Color x v Col...

Страница 162: ...er 1 channel driven RX A3020 1 k Hz 0 9 THD 8 Ω Front L R 185 W ch Center 185 W ch Surround L R 185 W ch Surround Back L R 185 W ch Front Presence L R 185 W ch 1 k Hz 0 9 THD 4 Ω Front L R U K and Europe models 230 W ch RX A2020 1 k Hz 0 9 THD 8 Ω Front L R 175 W ch Center 175 W ch Surround L R 175 W ch Surround Back L R 175 W ch Front Presence L R 175 W ch 1 k Hz 0 9 THD 4 Ω Front L R U K and Eur...

Страница 163: ...7 Vp p 75 Ω Video Maximum Input Level Video Conversion Off 1 5 Vp p or more Signal to Noise Ratio Video Conversion Off 60 dB or more Monitor Out Frequency Response Video Conversion Off Component MONITOR OUT ZONE OUT 5 Hz to 100 MHz 3 dB FM Section Tuning Range U S A and Canada models 87 5 MHz to 107 9 MHz Asia and General models 87 5 87 50 MHz to 108 0 108 00 MHz Other models 87 50 MHz to 108 00 M...

Страница 164: ...nu 115 7ch BI AMP FP speaker configuration 26 7ch BI AMP FP RP Power Amp Assign Setup menu 115 7ch BI AMP FP RP speaker configuration 27 9 2 2 channel system speaker configuration 19 9 2 channel system speaker configuration 19 9ch 1ZONE Power Amp Assign Setup menu 114 9ch 1ZONE speaker configuration 30 9ch FRONT Power Amp Assign Setup menu 114 9ch FRONT speaker configuration 28 9ch RP Power Amp As...

Страница 165: ...ault Gateway 123 Default Gateway Network Information menu 132 Delay Enable Lipsync Setup menu 118 Detail Scene menu 107 Detail Enhancement Adjustment Setup menu 121 Device Control Scene menu 106 DHCP IP Address Setup menu 123 Dialogue Audio Signal Information menu 131 Dialogue Adjust Option menu 100 Dialogue Level Option menu 100 Dialogue Lift Option menu 100 Dialogue normalization level 131 Digit...

Страница 166: ...ection 43 H Hall in Amsterdam sound program 66 Hall in Munich sound program 66 Hall in Vienna sound program 66 HD Radio audio program selection 71 HD Radio information 71 HDMI Setup menu 122 HDMI cable 34 HDMI Control 158 HDMI Control HDMI Setup menu 122 HDMI jack 34 HDMI Monitor Information menu 131 HDMI OUT1 Audio Output Setup menu 123 HDMI OUT2 Audio Output Setup menu 123 HDMI OUT2 Assign Multi...

Страница 167: ...i Zone Setup menu 126 Mono Zone2 Set Zone3 Set Setup menu 126 Mono Movie sound program 65 Mosquito NR Adjustment Setup menu 121 MOVIE sound program category 65 MOVIE THEATER sound program subcategory 65 MULTI CH INPUT jacks 46 Multi measurement YPAO 54 Multi Zone Setup menu 125 Multi zone 90 Multi zone output 157 MUSIC sound program category 66 Music Video sound program 65 MUTE key 15 Muting 60 N ...

Страница 168: ...peat iPod Option menu 79 Repeat PC NAS Option menu 85 Repeat USB storage device Option menu 82 Reset remote control 142 Reset Scene menu 107 Resolution Video Mode Setup menu 120 Resolution Enhancement Adjustment Setup menu 120 Reverb Delay Sound Program menu 109 Reverb Level Sound Program menu 109 Reverb Time Sound Program menu 109 Roleplaying Game sound program 65 Room Size Sound Program menu 109...

Страница 169: ...tem ID System Information menu 132 T Target Zone Trigger Output Setup menu 129 Temporal NR Adjustment Setup menu 121 Test Tone Speaker Setup menu 117 The Bottom Line sound program 66 The Roxy Theatre sound program 66 Tone Control Option menu 99 Traffic information 74 Traffic Program Option menu 74 Trigger function 47 Trigger Mode Trigger Output Setup menu 128 TRIGGER OUT jacks 47 Trigger Output1 F...

Страница 170: ...maha Parametric room Acoustic Optimizer 50 YPAO MIC jack 50 YPAO microphone 50 Z Zone Information menu 132 Zone Rename Main Zone Set Setup menu 125 Zone Rename Zone2 Set Zone3 Set Setup menu 126 Zone Rename Zone4 Set Setup menu 126 Zone Scene Rename Zone2 Set Zone3 Set Setup menu 126 Zone Scene Rename Zone4 Set Setup menu 126 Zone2 90 Zone2 Set Multi Zone Setup menu 125 Zone3 90 Zone3 Set Multi Zo...

Страница 171: ... 2012 Yamaha Corporation YE450A0 EN ...

Отзывы: