Setup
Reference Manual
199
*1) QL5: CH1-CH64, QL1: CH1-CH32, ST IN 1L-ST IN 8R, MIX1-MIX16, MTRX1-MTRX8, ST L, ST R, MONO
*2) QL5: CH1-CH64, QL1: CH1-CH32, ST IN 1-ST IN 8, MIX1-MIX16, MTRX1-MTRX8, STEREO, MONO(C)
*3) MIX1-MIX16, MTRX1-MTRX8, ST L, ST R, MONO
*4) QL5: CH1-CH64, QL1: CH1-CH32, ST IN 1-ST IN 8, MIX1-MIX16, MTRX1-MTRX8, STEREO, MONO(C),
DCA1-DCA16
*5) QL5: INPUT25/26-31/32, QL1: INPUT9/10-15/16
SELECTED CH, QL5: CH1-CH64, QL1: CH1-CH32, ST IN 1L-ST IN 8R
*6) MIX1-6, EXT5.1 1, EXT5.1 2, EXT5.1 3, EXT ST 1, EXT ST 2, EXT ST 3, EXT ST 4, MIX1/2, MIX3/4, MIX5/6,
MIX7/8, MIX9/10, MIX11/12, MIX13/14, MIX15/16, MATRIX1/2, MATRIX3/4, MATRIX5/6, MATRIX7/8, STEREO,
MONO, PB OUT
USER DEFINED knobs
This section explains how to assign the desired functions to the USER DEFINED knobs in the
lower part of the touch screen, and to press these knobs to execute the defined function.
If you are logged-in as a user, you can make USER DEFINED knob settings for the user. If
you are logged-in as the Administrator, you can also make the USER DEFINED knob settings
for the Guest account.
NOTE
For details on the assignable functions and their parameters, refer to “
assigned to USER DEFINED knobs
.
TALKBACK
DIRECT ASSIGN WITH
ON
*3)
The operations performed when this key is
pressed are as follows.
- Assignments other than for the channel
selected in list 3) are removed.
- If a channel is assigned and TALKBACK is ON at
the same time, TALKBACK is turned OFF and
the channel assignment is removed.
- Otherwise, TALKBACK will be ON and the
channel assignment will be ON.
At this time, the LED display is as shown below.
- If the channel is assigned and TALKBACK is ON
at the same time, the LED will be on.
- Otherwise, the LED will be off.
TAP TEMPO
CURRENT PAGE
—
Use the tap tempo function in the displayed
screen.
EFFECT RACK1-8
WITH POPUP
Use the tap tempo function for the specified
effect. If WITH POPUP is selected, the Tap
Tempo screen is displayed. If WITHOUT POPUP
is selected, the Tap Tempo screen is not
displayed.
WITHOUT POPUP
USER
DEFINED
KEYS
BANK SELECT
BANK A
When selected, the lamp for the corresponding
key comes on.
BANK B
When selected, the lamp for the corresponding
key comes on.
BANK C
When selected, the lamp for the corresponding
key comes on.
BANK D
When selected, the lamp for the corresponding
key comes on.
PREVIOUS BANK
Switches to the previous bank. If the current
bank is BANK A, it switches to BANK D.
NEXT BANK
Switches to the next bank. If the current bank is
BANK D, it switches to BANK A.
FUNCTION
PARAMETER 1
PARAMETER 2
Explanation
STEP
1.
In the Function Access Area, press the SETUP button.
2.
In the SETUP screen, press the USER SETUP button.
3.
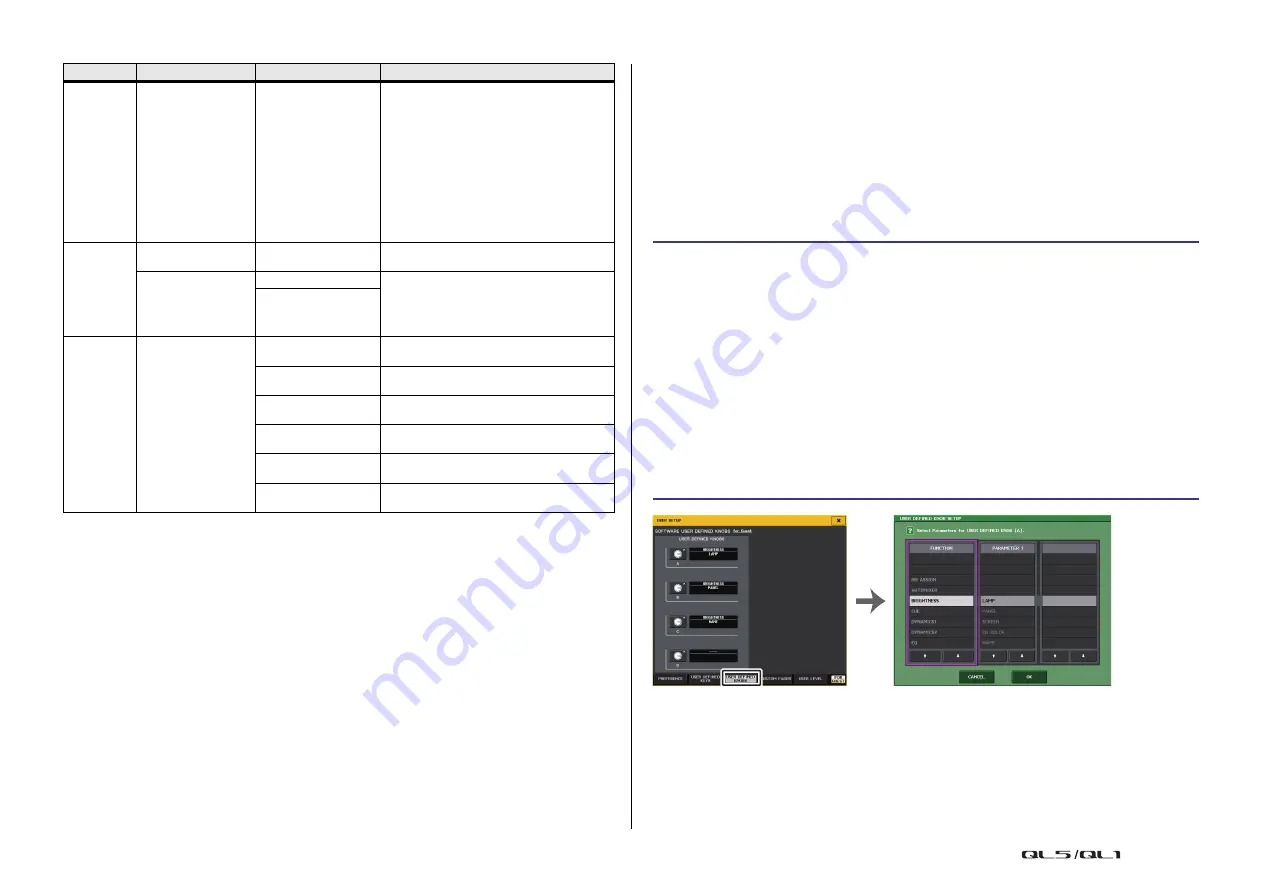
In the USER SETUP window, press the USER DEFINED KNOBS tab.
4.
Press the button corresponding to the USER DEFINED knob to which you want to
assign a function.
5.
In the USER DEFINED KNOB SETUP window, make sure that the FUNCTION field is
enclosed by a frame, then select the function that you want to assign.
6.
If the selected function has parameters, press the PARAMETER 1 or 2 field to move
the frame, then select parameters 1 and 2 in the same way.
7.
Press the OK button to close the USER DEFINED KNOB SETUP window.
8.
To execute an assigned function, press the corresponding USER DEFINED [1]-[4]
knob in the lower part of the touch screen, then operate the [TOUCH AND TURN]
knob.
USER SETUP window
(USER DEFINED KNOBS page)
USER DEFINED KNOB SETUP window


