background image

PSR-SX900/SX700  Owner’s Manual

73

4

Sin
g

ing wit

h So
ng 
Playba

ck—

O

perat

ion

s Wh

ile 
Per
fo

rming

Playback Operations exclusively for MIDI Song

Synchro Start

You can conveniently start playback of a MIDI Song as soon as you start playing the keyboard. Touching 

 (Synchro 

start) puts Synchro Start in standby status, regardless of whether the Song is currently playing or stopped. To cancel the 
Synchro Start function, repeat the same operation.

Playback Using Song Position Markers ([M], [1]–[4], [Loop])

Using Song Position markers, you can not only navigate quickly and easily through the MIDI Song data, but also set up 
convenient playback loops, for ease in song arranging. For details, refer to “Using Song Position Markers” (page 75).

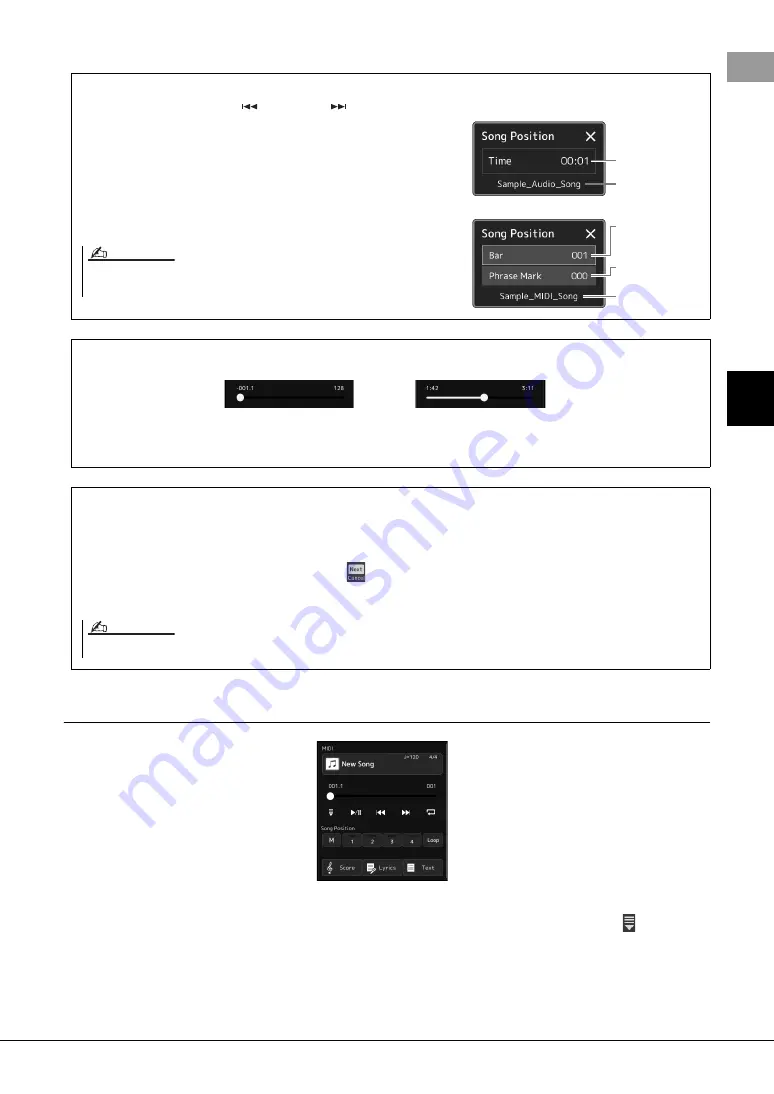
Moving the Song Playback Position (Song Position pop-up window)

When you press and hold the [

] (PREV) or [

] (NEXT) button, a 

setting display appears showing the current position of the Song. When 
the window is shown on the display, you can also use the Data dial to 
move backward/forward continuously through the current file.
The Phrase Mark number appears only when a MIDI Song containing 
Phrase Marks is selected. You can select whether the Song playback 
position moves backward or forward in Bar or Phrase Mark units by 
touching the setting display beforehand.

For MIDI Songs

For Audio Songs

Elapsed time

Current measure 
number

Phrase Mark num-
ber (if the MIDI 
Song contains 
Phrase Mark data)

Current Song 
name

Current Song 
name

Phrase Mark is a pre-programmed marker in certain MIDI Song data, which specifies a specific 
location in the Song.

NOTE

Moving the Song Playback Position (progress bar on the display)

In each Song area, the current position of the Song playback is shown. This can be moved forward or backward by 
moving the slider on the display.

Queuing the next Song for playback

While a MIDI Song is playing back, you can queue up the next MIDI Song for playback. This is convenient for chain-
ing it to the next Song smoothly during live performance. To queue up, select the Song you want to play next in the 
Song Selection display, while a Song is playing back. The “Next” indication appears at the upper right of the corre-
sponding Song name. To cancel this setting, touch 

 (Next Cancel) on the Song Selection display.

You can also queue up the next Audio Song for playback while a Audio Song is playing back, in the same way as for a 
MIDI Song.

When the Recording function is used, the queue for playback is canceled.

NOTE

Содержание PSR-SX900

Страница 1: ...nual in a safe and handy place for future reference Before using the instrument be sure to read PRECAUTIONS on pages 5 6 Merci d avoir choisi ce Clavier Arrangeur Professionnel Yamaha Ce clavier lectr...

Страница 2: ...how a function or effect works when the unit is operating as designed are not covered by the manufacturer s warranty and are therefore the owners responsibility Please study this manual carefully and...

Страница 3: ...e try to elimi nate the problem by using one of the following measures Relocate either this product or the device that is being affected by the interference Utilize power outlets that are on different...

Страница 4: ...ord from being walked on or pinched particularly at plugs convenience receptacles and the point where they exit from the apparatus 11 Only use attachments accessories specified by the manufacturer 12...

Страница 5: ...dirt or dust which may have accumulated on it This instrument contains no user serviceable parts Do not open the instrument or attempt to disassemble or modify the internal components in any way If i...

Страница 6: ...oss If you experience any hearing loss or ringing in the ears consult a physician Always turn the power off when the instrument is not in use Even when the Standby On switch is in standby status displ...

Страница 7: ...ounds and styles is virtually unlimited Audio Function Audio files WAV or MP3 format can be played back on the instrument You can also record your performance as audio files WAV or MP3 format to the i...

Страница 8: ...pre installed in this instrument Perfect Words and Music by Ed Sheeran Copyright c 2017 Sony ATV Music Publishing UK Ltd All Rights Administered by Sony ATV Music Publishing LLC 424 Church Street Sui...

Страница 9: ...related Operations page 110 Includes instructions on connecting the instrument to a computer and operations related to transferring song data To obtain these materials access the Yamaha Downloads webs...

Страница 10: ...Using the PSR SX900 SX700 by itself Understanding the basic features and workflow of this instrument Key Functions and Terms Panel Controls and Terminals Display Structure Basic Operations Workflow Gu...

Страница 11: ...ng Expansion Pack data to the instrument Creating your own original Expansion Packs Creating your own original contents Creating new Voices from scratch using your own recorded waveform files Installi...

Страница 12: ...on the PSR SX900 SX700 38 Operation Guide 1 Playing with Styles Setting Up 40 Setting up Styles 40 Optimum Panel Settings for the Current Style One Touch Setting 43 Setting up Keyboard Parts 44 Selec...

Страница 13: ...tions or Shortcuts to the ASSIGNABLE Buttons 94 Making Global Settings Utility 95 Adjusting the Sound at the Final Output Master Compressor Master EQ 96 Adding New Contents Expansion Packs 97 Operatio...

Страница 14: ...s instrument the term Song refers to MIDI or audio data such as preset songs commercially available files etc Not only can you play back a Song and listen to it but you can also play the keyboard alon...

Страница 15: ...ings The Playlist function makes it easy to manage and call up your songs and the related settings no matter how numerous The Playlist allows you to recall a specific song from more than eight songs b...

Страница 16: ...lection buttons Page 40 Selects a Style category iTRANSPOSE buttons Page 55 Transposes the entire pitch of the instrument in semitone steps oTEMPO buttons Page 42 Controls the tempo for Style Song and...

Страница 17: ...R SX900 MIC SETTING button PSR SX700 Pages 70 101 Calls up the display from which you can make settings for the microphone guitar and on the PSR SX900 Vocal Harmony settings 1 MENU button Pages 25 29...

Страница 18: ...UT jack y MIC GUITAR INPUT jack Page 100 For connecting a microphone or guitar Attaching the Music Rest Insert the music rest into the slots as shown q w e r t y u Rear Panel 8REGISTRATION MEMORY butt...

Страница 19: ...O DEVICE terminals Page 107 For connecting USB devices such as a USB flash drive or an optional wireless LAN adaptor etc The PSR SX900 has two terminals and the PSR SX700 has one terminal 1 USB TO HOS...

Страница 20: ...reverse when disconnecting the AC adaptor 3 1 2 AC adaptor DC IN jack page 18 AC outlet The shape of the plug and outlet differs depending on your area Power cord WARNING CAUTION NOTE Turning the Powe...

Страница 21: ...will be lost if the power automatically turns off Make sure to save your data before this happens When a USB flash drive containing a large number of files is connected to the instrument the executio...

Страница 22: ...lay display Touch Touch Screen Display on the display 3 Change the settings by touching the display For information on the other items in this display refer to the Reference Manual on the website page...

Страница 23: ...r function you can call up the File Selection display to select desired files On the next page you can see an overview of how to call up each key function display Main Display Structure LCD Main Displ...

Страница 24: ...ion display One of the File Selection displays page 28 for selecting Styles Song Playback display This is for controlling Song playback pages 66 72 Song Recording display For recording your perfor man...

Страница 25: ...page 48 Playlist display This is for selecting and editing Playlists page 90 Mic Setting dis play This is for making set tings for the micro phone or the guitar sound page 101 Vocal Harmony display PS...

Страница 26: ...t and Right 1 3 and the on off status of the four parts Touching a Voice name calls up the Voice Selection display for the corresponding part wSong area Indicates information related to Song playback...

Страница 27: ...ccessed the network via the USB Wireless LAN Adaptor the current time is shown here rRegistration Memory Bank Indicates the currently selected Registration Memory Bank name and Registration Memory num...

Страница 28: ...lectable data files The files that can be selected are shown If two or more pages are available you can call up another page by touching the desired page tab at the bottom of this area rFolder Path Th...

Страница 29: ...lay or window or Close at the lower right of pop up displays When a message information or confirmation dialog appears touching the appropriate item such as Yes or No closes the message If you want to...

Страница 30: ...d it for a while When setting values by using the buttons a slider or a knob you can restore the default value by touching and holding the value on the display Display based Controls Do not use any sh...

Страница 31: ...ng it use the Data dial or the DEC INC buttons to adjust the value This is useful if you have difficulty adjusting by touching on the display or want finer control over the adjustment Selecting an ite...

Страница 32: ...Press the button or move the knob joystick or connected pedal corresponding to the desired setting display to instantly call up that display For example pressing one of the REGISTRATION MEMORY 1 8 but...

Страница 33: ...call up the File Edit pop up window For example the display shown below Voice Selection is called up via the PART SELECT RIGHT 1 button 2 Touch Save to call up the display for selecting the saving des...

Страница 34: ...isplay for selecting the desired file folder 4 Select the desired file or folder by touching it 5 Touch Rename at the top of the display to call up the Character Entry window 6 Input the name of the s...

Страница 35: ...e desired files folders 4 Select the desired files folders by touching each item One or more files folders can be selected highlighted To cancel the selection touch the same item again Touch Select Al...

Страница 36: ...the space key indicated in the illustration above 4 Touch OK to finalize the characters name keywords etc you have input Entering Characters 2 3 1 Depending on the display for charac ter entry you ar...

Страница 37: ...splay then input the same PIN code you entered in step 2 The metronome provides a click sound giving you an accurate tempo guide when you practice or letting you hear and check how a specific tempo so...

Страница 38: ...ttings Keyboard Parts Harmony Arpeggio or Multi Pads for the selected Style Setting up the Voices p 44 Setting up keyboard parts Making Song playback settings p 66 Setting up Harmony Arpeggio p 50 Sto...

Страница 39: ...egistering the Registration Memory to a Playlist p 90 Creating a Playlist Record as a shortcut to the Reg istration Memory Editing the Playlist for your live performance set list p 90 Creating a new P...

Страница 40: ...to Accompaniment When the button is turned on both the rhythm part and auto accompaniment can be played back during Style playback At the same time the specific left hand section of the keyboard can b...

Страница 41: ...at the Styles may not necessarily be appropriate or even harmonically correct for all songs and for all chord playing In some cases for example playing a simple major triad for a country song may resu...

Страница 42: ...eyboard while the instrument supplies appropriately orchestrated rhythm bass and chord accompaniment in the selected Style The Fingered type recognizes the various chord types which are listed on the...

Страница 43: ...As soon as you play a chord with your left hand the selected Style starts Each Style has four One Touch Setting setups Press any other of the ONE TOUCH SETTING 1 4 buttons to try out other setups Opti...

Страница 44: ...ft hand sections of the keyboard Split Turn on the LEFT part and at least one of the RIGHT 1 3 parts The F 2 and lower keys are used for the LEFT part while the upper keys excluding F 2 are used for t...

Страница 45: ...up the Split Point Fingering window MENU Split Fingering 2 Set the Split Point Holding the LEFT part Voice Left Hold By turning on the PART ON OFF LEFT HOLD button when the LEFT part is ON the LEFT pa...

Страница 46: ...d pressing the desired key on the keyboard w Split Point Style Left Right 3 Sets each Split Point individually Specify the Split Point directly from the keyboard by simultaneously holding the correspo...

Страница 47: ...e is set to Fingered automatically Manual Bass When this is set to On the bass part of the current Style is muted and the Voice of the muted bass part is assigned to the left part Split Point Right 3...

Страница 48: ...specially provided for playing music suitable in your area are installed User Voices Voices created with the Voice Set function refer to the Reference Manual on the web site or Voices copied to the Us...

Страница 49: ...saving refer to File Management page 33 Creating Original Organ Flutes Voices The term footage is a reference to the sound generation of traditional pipe organs in which the sound is produced by pipes...

Страница 50: ...gs calls up the detailed settings popup window For more information refer to the Reference Manual on the web site 5 Play the keyboard The effect selected in step 4 is applied to the right hand melody...

Страница 51: ...of the ACMP and the LEFT part on off status Keep in mind that Trill works only when you hold down two notes on the keyboard simultaneously or the last two notes if more than two notes are held and it...

Страница 52: ...f By using the Arpeggio Quantize function Arpeggio playback can be synchronized with Song Style play back allowing any slight imperfec tions in the timing to be corrected This can be set in the displa...

Страница 53: ...lti Pad playback control refer to Controlling Multi Pad Playback page 64 Setting up Multi Pads You can also call up the Multi Pad Selection display via the Home display page 26 NOTE For basic operatio...

Страница 54: ...to memorize your panel settings A message appears prompting you to save the panel settings at this time To go on and memorize various panel settings to other buttons touch No and then repeat steps 2...

Страница 55: ...eset the octave value to 0 press the and buttons simultaneously Changing the Pitch of the Keyboard If you want to transpose the pitch of the Audio Song use the Pitch Shift parameter on page 74 The Tra...

Страница 56: ...of assigned parameters for knobs is called Knob Assign Type There are three Knob Assign Types 1 3 and they can be switched in sequence by pressing the LIVE CONTROL ASSIGN button The selected Assign T...

Страница 57: ...arious functions to optional footswitches foot controllers 1 To call up the Edit display touch MENU Assignable 2 Double tap touch twice the desired item in the Foot Pedals area shown above The functio...

Страница 58: ...on of the keyboard Make sure that the ACMP button is on press the SYNC STOP button and then play the keyboard INTRO I III buttons The instrument features three different Intro sections that let you ad...

Страница 59: ...to which this function has been assigned Then press the START STOP button for Style or the PLAY PAUSE button for MIDI Song To stop playback with a fade out During playback press the button to which t...

Страница 60: ...e REC STOP button is turned on and the recording starts 2 Enter the chords on the keyboard according to the playback tempo of the Style Chord sequence is recorded until you stop recording in step 3 3...

Страница 61: ...l return to normal playback The ON OFF button lights blue to indicate the chord sequence has been recorded and loop playback stops Pressing the ON OFF button starts again loop playback of the chord se...

Страница 62: ...d parts RIGHT 1 2 3 have a longer sustain Expressively Controlling Your Performance X X Y Y The maximum pitch bend range can be changed on the display called up via MENU Keyboard Joystick Joystick The...

Страница 63: ...with great playability and expressive real time control Example Saxophone Voice If you play a C note and then an adjacent D in a very legato way you will hear the note change seamlessly as though a s...

Страница 64: ...button starts playback immediately While the Style or MIDI Song is play ing back pressing the STYLE CON TROL START STOP or MIDI PLAY PAUSE button also stops playback of the Multi Pad s While both the...

Страница 65: ...hen ACMP is off press any note or play back a Style When ACMP is on play a chord in the chord section or play back a Style If you enable standby for a Multi Pad during Style or Song playback pressing...

Страница 66: ...d ing of the actual sound itself The performance information refers to which keys are played at what timing and at what strength just as in a musical score Based on the recorded performance informatio...

Страница 67: ...play or press the PLAYER button to switch the Song playback mode Song File Compatibility You can play back the following types of Songs Preset Songs MIDI Songs Your own recorded Songs for instructions...

Страница 68: ...asic operations of the Song Selection display refer to File Selection Display page 28 You can call up the display of Song playback related settings via Menu Song Setting You can adjust the volume bala...

Страница 69: ...new Song List For details on how to edit the Song List refer to the Reference Manual on the web site When selecting an existing Song List 2 1 Call up the Song List File Selection display by touching t...

Страница 70: ...instructions on connect ing a microphone and making neces sary settings refer to page 100 NOTE The display can also be called up by pressing the MIC SETTING VOCAL HARMONY button several times NOTE 2 3...

Страница 71: ...he words you say and applies them to the pitch of the instrument sounds Using Synth Vocoder These are special effects that graft the characteristics of your voice onto synthesizer and other sounds for...

Страница 72: ...next Song PREV or NEXT button Press the PREV or NEXT button or touch or to select the previ ous next Song In the Song player mode this operation selects the previous next Song file in the same folder...

Страница 73: ...d You can select whether the Song playback position moves backward or forward in Bar or Phrase Mark units by touching the setting display beforehand For MIDI Songs For Audio Songs Elapsed time Current...

Страница 74: ...pitch of an Audio Song in semitone steps from 12 to 12 A B Repeat Playback This lets you repeatedly play back a specified range between points A and B 1 Touch Play Pause to start playback 2 Specify th...

Страница 75: ...e Song name to call up the Song Selection Display 5 2 Save the Song file page 33 Jumping to a Song Position Marker during playback Simply touching the one of the Song Position 1 4 during Song playback...

Страница 76: ...start playback from the top of the Song 2 After passing the 1 point touch Loop to turn the loop function on The Song plays back up to the 2 point then goes back to 1 and loops between the two points...

Страница 77: ...via MENU Score The instrument can display the music notation of commercially available music data or your recorded Songs The displayed notation is generated by the instrument based on the Song data A...

Страница 78: ...details on the Lyrics display refer to the Reference Manual on the website Displaying Text Regardless of whether a Song is selected or not you can view computer created text files txt on the instrumen...

Страница 79: ...Mic Setting 2 Touch Talk on the display to turn on the Talk function To turn the function off touch Vocal on the display You can also change the Talk settings to suit your preferences For details ref...

Страница 80: ...balance among the entire Style part entire Multi Pad part Left part Right 1 3 parts entire MIDI Song part Audio Song part Mic part Aux In Audio part Bluetooth Audio part 1 and the Wireless LAN Audio p...

Страница 81: ...d then save the Song to the User drive or USB flash drive If you want to recall the settings for future use select the Song file saved here 1 Call up the operation display via RECORDING MIDI Multi Rec...

Страница 82: ...ngs then save them as a Style file or Song file step 5 on page 81 Turning Each Channel of the Style or MIDI Song On Off Style Channels Each Style contains the channels listed below Rhythm 1 2 These ar...

Страница 83: ...y 1 In the Mixer display touch the Style tab or Song tab 2 Touch the instrument icon below the channel name to call up the Voice Selection display then select the desired Voice 3 As necessary make oth...

Страница 84: ...able music players by using a computer It can also be recorded in MP3 format 44 1 kHz sample rate 128 256 320 kbps bit rate stereo This instrument allows you to record up to 80 minutes per single reco...

Страница 85: ...ti pad playback 2 Touch Play Pause to start recording Immediately after this operation start and record your performance 3 After you finish performance touch Stop to stop recording Recorded data is au...

Страница 86: ...el You can save all eight registered panel setups as a Sin gle Registration Memory Bank file Playlist The Playlist function allows you to create your own live performance set list You can select only...

Страница 87: ...Custom Panel Setups with Registration Memory The list of items to be registered to Registration Memory Selecting the items to be registered The Registration Memory window contains the list for selecti...

Страница 88: ...also use the REGIST BANK buttons to select a Bank 3 Press one of the blue lit numbered buttons 1 8 in the Regis tration Memory section The selected button lights in orange 2 You can tag Registration M...

Страница 89: ...on is auto matically loaded 3 Press the EXIT button to close the information display Editing a Registration Memory Bank You can edit a Registration Memory Bank delete or rename each Registration Memor...

Страница 90: ...ppears The sample preset Play list will appear for the first time 2 Add a Record to the Playlist To add a Record via the Registration Bank Selection display 2 1 Touch Add Record List on the display Th...

Страница 91: ...Save to save the added Record to the current Play list file To recall the registered Record touch the desired Record on the Playlist display File path of the Registration Memory Bank file linked to t...

Страница 92: ...registered as the Playlist Record is recalled and the Action you ve made is executed page 90 Copying the Playlist Records Append Playlist Append Playlist allows you to copy the existing Playlist file...

Страница 93: ...of the Records 2 1 Touch the desired Record you want to move 2 2 Touch Up Down to move the Record you selected in Step 2 1 3 Touch Save to save the edited Playlist file Deleting the Playlist Record f...

Страница 94: ...l up the Assignable display via MENU Assignable 2 Double tap touch twice the desired item from the six locations of the Home Shortcuts area The function selection pop up window appears 3 Touch the des...

Страница 95: ...ity PSR SX900 Speaker PSR SX700 Determines how the sound is output from the speaker On the PSR SX900 it also determines the display out setting when a USB display adaptor is connected Touch Screen Dis...

Страница 96: ...USER30 then touch Save to call up the Character Entry window 5 3 In the Character Entry window change the name as necessary then touch OK to save the data Adjusting the Sound at the Final Output Maste...

Страница 97: ...d by Yamaha or create your own original Expansion Pack data by using the Yamaha Expansion Manager software on your computer For instructions on how to install the Expansion Packs refer to the Referenc...

Страница 98: ...ding the right most key on the keyboard turn the power on This restores all set tings to the factory default Confirming the Firmware Version and Hardware ID Restoring the Factory programmed Settings Y...

Страница 99: ...this touch Restore in step 3 above When the operation is complete the instrument will be restarted automatically Data Backup and Restore Before using a USB flash drive be sure to read Connecting USB D...

Страница 100: ...it to MIC When connecting a guitar set it to GUITAR Before connecting the instrument to other electronic components turn off the power of all components Also before turning any components on or off m...

Страница 101: ...re that the meter does not light in orange or red since this indi cates that the input level is too high 4 Adjust the volume balance between the microphone or guitar sound and the instrument sound on...

Страница 102: ...ument Since this instrument s power may automatically be turned off due to the Auto Power Off function page 21 turn off the power to the external device or disable Auto Power Off when you do not inten...

Страница 103: ...o Audio Playback by the External Device through the Instru ment s Speaker The volume of the audio input can be adjusted from the external device You can adjust the volume balance among the sounds of t...

Страница 104: ...by state Popup window is shown that means the instrument is waiting for paring process 4 On your Bluetooth equipped device set the Bluetooth function to on and select this instrument the device name i...

Страница 105: ...hen pairing with the 9th device has succeeded pairing data for the device with the oldest connection date will be deleted NOTE About Bluetooth Bluetooth is a technology for wireless communication betw...

Страница 106: ...PEDAL 2 Controls the Super Articulation Voices page 63 You can also change the function assignments to the pedals as desired Example Controlling MIDI Song Start Stop by footswitch Connect a footswitch...

Страница 107: ...of USB flash devices that can be used simultane ously with musical instruments even when a USB hub is used is a maximum of four Formatting a USB flash drive You should format the USB flash drive only...

Страница 108: ...of the following methods Connect to the USB TO DEVICE terminal via the USB wireless LAN adaptor UD WL01 Connect to the USB TO HOST terminal via a Wireless MIDI Adaptor UD BT01 Connect to the MIDI term...

Страница 109: ...ite https download yamaha com Set the display content that is to be output via MENU Utility Speaker Connectiv ity Viewing the Instrument s Display on an External Monitor PSR SX900 When connecting the...

Страница 110: ...MIDI For details refer to the Reference Manual on the website Connecting to a Computer USB TO HOST terminal Use an AB type USB cable of less than 3 meters USB 3 0 cables cannot be used When using a U...

Страница 111: ...Memory Banks 88 Registration Memory window MEMORY For registering the current panel settings 87 Menu Description Pages Reference Manual Channel On Off For turning on and off the each channel of the St...

Страница 112: ...g For making Style playback related settings such as OTS Link timing Dynamics Control etc Song Setting For making Song playback related settings such as Guide function Channel settings etc Chord Tutor...

Страница 113: ...START STOP Style Setting Setting STYLE STYLE category selection buttons Mixer SONG PLAYER Menu Song Setting RECORDING Guide MIDI SONG PLAY PAUSE Score PREV Lyrics NEXT Text Viewer AUDIO SONG PLAY PAUS...

Страница 114: ...tration Bank Selection Menu Regist Bank Edit FREEZE Registration Freeze MEMORY Registration Sequence 1 4 Registration Bank Selection Regist Bank Information Voice 5 8 Style ONE TOUCH SETTING 1 4 Style...

Страница 115: ...connected disabling the speaker output Unplug the headphones Connect the footswitch to the appropriate jack Make sure that the Speaker setting is set to On or Headphone switch MENU Util ity The sound...

Страница 116: ...ng MIDI Songs cannot be selected If the size of the Song data is large about 3 MB or greater the Song cannot be selected because the data is too large to be read by the instrument MIDI Songs cannot be...

Страница 117: ...olume Style volume or Song volume control pages 20 80 PSR SX900 The Vocal Harmony effect is not applied even when it is turned on In the Chordal mode Vocal Harmony is added only when chords are detect...

Страница 118: ...Gate Compressor 3 Band EQ Vocal Harmony 54 Preset 60 User The number is the total of Vocal Harmony and Synth Vocoder Synth Vocoder 20 Preset 60 User The number is the total of Vocal Harmony and Synth...

Страница 119: ...1 GB External Drives USB flash drive USB flash drive Connectivity DC IN 16 V 16 V Headphones Standard stereo phone jack Standard stereo phone jack Microphone Guitar Yes Yes MIDI IN OUT IN OUT AUX IN S...

Страница 120: ...er 81 Fingered 42 Fingering type 42 Firmware Version 98 Folder 34 Foot Controller 57 106 Footage 49 Footswitch 57 106 Format 108 Function 111 G GM 7 GS 7 Guitar 14 100 H Hardware ID 98 Harmony Keyboar...

Страница 121: ...File Compatibility 67 Song List 14 67 69 72 Song Player 14 67 68 72 Song Position 73 Song Position Marker 73 75 Specifications 118 Split 44 Split Point 44 45 Style 14 40 58 Style Section Reset 42 59...

Страница 122: ...You may charge a fee for the physical act of transferring a copy and you may at your option offer warranty protection in exchange for a fee 2 You may modify your copy or copies of the Program or any p...

Страница 123: ...hed by the Free Software Foundation 10 If you wish to incorporate parts of the Program into other free programs whose distribution conditions are different write to the author to ask for permission Fo...

Страница 124: ...competing non free programs These disadvantages are the reason we use the ordinary General Public License for many libraries However the Lesser license provides advantages in certain special circumsta...

Страница 125: ...o the Sections above you may also combine or link a work that uses the Library with the Library to produce a work containing portions of the Library and distribute that work under terms of your choice...

Страница 126: ...STRIBUTE THE LIBRARY AS PERMITTED ABOVE BE LIABLE TO YOU FOR DAMAGES INCLUDING ANY GENERAL SPECIAL INCIDENTAL OR CONSEQUENTIAL DAMAGES ARISING OUT OF THE USE OR INABILITY TO USE THE LIBRARY INCLUDING...

Страница 127: ...st not be misrepresented as being the original source 3 This Copyright notice may not be removed or altered from any source or altered source distribution The Contributing Authors and Group 42 Inc spe...

Страница 128: ...ISING IN ANY WAY OUT OF THE USE OF THIS SOFTWARE EVEN IF ADVISED OF THE POSSIBILITY OF SUCH DAMAGE libss2 libcomerr2 Copyright 1987 1988 by the Student Information Processing Board of the Massachusett...

Страница 129: ...e Inc nor the names of their contributors may be used to endorse or promote products derived from this software without specific prior written permission THIS SOFTWARE IS PROVIDED BY THE COPYRIGHT HOL...

Страница 130: ...130 PSR SX900 SX700 Owner s Manual...

Страница 131: ...of purchase documents will cause this warranty to be void This warranty covers only the Original Owner and is not transferable In Order to Obtain Warranty Service Warranty service will only be provid...

Страница 132: ...quipements lectriques et lectroniques veuillez contacter votre municipalit votre service de traitement des d chets ou le point de vente o vous avez achet les produits Pour les professionnels dans l Un...

Страница 133: ...ietn https europe yamaha com en support compliance doc html LT Lithuanian SUPAPRASTINTA ES ATITIKTIES DEKLARACIJA A Yamaha Music Europe GmbH patvirtinu kad radijo rengini tipas PSR SX900 PSR SX700 ati...

Страница 134: ...maha Music Europe GmbH Tyskland Generatorvej 8C ST TH 2860 S borg Denmark Tel 45 44 92 49 00 FINLAND F Musiikki Oy Antaksentie 4 FI 01510 Vantaa Finland Tel 358 0 96185111 NORWAY Yamaha Music Europe G...

Страница 135: ......

Страница 136: ...Yamaha Global Site https www yamaha com Yamaha Downloads https download yamaha com VAZ2410 Manual Development Group 2019 Yamaha Corporation Published 03 2019 POMA A0...

Отзывы: