background image

Reference Manual

46

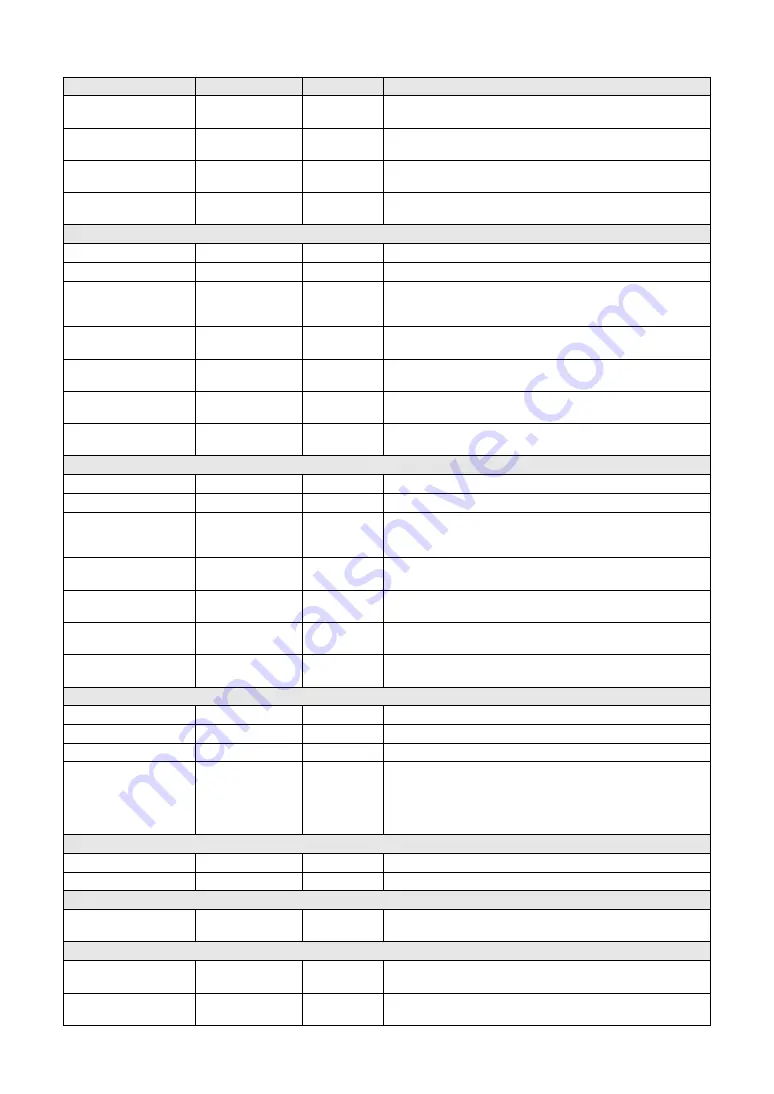
The Functions

Main Reverb Level

000–127

*

Determines how much of the Main Voice’s signal is sent to the Reverb 
effect.

Main Chorus Level

000–127

*

Determines how much of the Main Voice’s signal is sent to the Chorus 
effect.

Main DSP Level

000–127

*

Determines how much of the Main Voice’s signal is sent to the DSP 
effect.

Main Dry Level

000–127

*

Determines how much of the Main Voice’s unprocessed signal 
sounds (no Reverb, Chorus or DSP effect processing).

DUAL VOICE

Dual Volume

000–127

*

Determines the volume of the Dual Voice.

Dual Octave

-2–+2

*

Determines the octave range for the Dual Voice.

Dual Pan

000–64–127

(Left - Center - Right)

*

Determines the pan position of the Dual Voice in the stereo image. 
A value of “0” results in the sound being panned full left, while “127” 
results in the sound being panned full right.

Dual Reverb Level

000–127

*

Determines how much of the Dual Voice’s signal is sent to the Reverb 
effect.

Dual Chorus Level

000–127

*

Determines how much of the Dual Voice’s signal is sent to the Chorus 
effect.

Dual DSP Level

000–127

*

Determines how much of the Dual Voice’s signal is sent to the DSP 
effect.

Dual Dry Level

000–127

*

Determines how much of the Dual Voice’s unprocessed signal sounds 
(no Reverb, Chorus or DSP effect processing).

LEFT VOICE

Left Volume

000–127

*

Determines the volume of the Left Voice.

Left Octave

-2–+2

*

Determines the octave range for the Left Voice.

Left Pan

000–64–127

(Left - Center - Right)

*

Determines the pan position of the Left Voice in the stereo image. 
A value of “0” results in the sound being panned full left, while “127” 
results in the sound being panned full right.

Left Reverb Level

000–127

*

Determines how much of the Left Voice’s signal is sent to the Reverb 
effect.

Left Chorus Level

000–127

*

Determines how much of the Left Voice’s signal is sent to the Chorus 
effect.

Left DSP Level

000–127

*

Determines how much of the Left Voice’s signal is sent to the DSP 
effect.

Left Dry Level

000–127

*

Determines how much of the Left Voice’s unprocessed signal sounds 
(no Reverb, Chorus or DSP effect processing).

EFFECT

Reverb Type

01–36

**

Determines the Reverb type, including off (36).

Chorus Type

01–45

**

Determines the Chorus type, including off (45).

DSP Type

001–239

*

Determines the DSP type, including off (239).

Master EQ Type

1 (Speaker 1), 
2 (Speaker 2), 
3 (Headphones), 
4 (Line Out 1), 
5 (Line Out 2)

1 (Speaker 1)

Selects one of five Master equalizer (EQ) settings which are provided 
to give you the best possible sound when listening through different 
reproduction systems: the instrument’s built-in speakers, headphones 
and external speakers.

HARMONY

Harmony Type

01–26

*

Determines the Harmony type.

Harmony Volume

000–127

*

Determines the volume of the Harmony effect.

PC

PC Mode

PC1/PC2/OFF

OFF

Optimizes the MIDI settings for transmitting/receiving performance 
data (MIDI) in one convenient operation.

MIDI

Local

ON/OFF

ON

Determines whether the instrument’s keyboard controls the internal 
tone generator (ON) or not (OFF). 

External Clock

ON/OFF

OFF

Determines whether the instrument synchronizes to the internal clock 
(OFF) or an external clock (ON).

Item (Display)

Range/Settings

Default setting

Description

Содержание PSR-S650

Страница 1: ...TAL WORKSTATION Reference Manual Explains advanced features of the PSR S650 After reading the Owner s Manual and you want more detailed information about PSR S650 features refer to the Reference Manua...

Страница 2: ...37 Chorus Level 37 Recording part 38 Rhythm Part recording 38 Bass Chord Pad and Phrase Part recording 39 Editing Quantize and part clear 40 Quantize 40 Clearing a recorded Part 41 Saving the data 42...

Страница 3: ...ons repeatedly to select the item you want to change You can individually adjust the Voice setting Volume Octave Pan Reverb Level Chorus Level DSP Level and Dry Level that is applied to the Main Dual...

Страница 4: ...measure of your playing strength has a completely different sound For example a guitar Mega Voice includes the sounds of various perfor mance techniques In conventional instruments different Voices h...

Страница 5: ...ure 1 Press the FUNCTION button 2 Press the CATEGORY and buttons repeatedly to call up Metronome category function Bell You can also call up Metronome category function display easily by holding the M...

Страница 6: ...e Related Settings and Functions Adjusting the Metronome Volume 1 Press the FUNCTION button 2 Press the CATEGORY and buttons repeatedly to call up Metronome Volume 3 Use the dial to set the Metronome...

Страница 7: ...tes will be played at the same volume no matter how hard or softly you play the keys 2 Press and hold the TOUCH button for longer than a second to call up Touch Sensitivity 3 Use the dial to select a...

Страница 8: ...or optimum sound when using the built in speak ers of the instrument Setting 1 provides balanced reproduction throughout the frequency spectrum low to high Setting 2 has a more powerful sound than 1 a...

Страница 9: ...display The currently selected Harmony type will be displayed 3 Use the dial to select a Harmony type Refer to the Effect Type List in the separate Data List for information about the available Harmo...

Страница 10: ...to call up Reverb Type The currently selected Reverb type will be displayed 3 Use the dial to select a Reverb type Refer to the Effect Type List in the separate Data List for information about the av...

Страница 11: ...uttons repeatedly to call up Chorus Type The currently selected Chorus type will be displayed 3 Use the dial to select a Chorus type Refer to the Effect Type List in the separate Data List for informa...

Страница 12: ...types Try playing the keyboard with the DSP function Adjusting the DSP Level You can individually adjust the amount of DSP that is applied to the Main Dual and Left Voices see page 3 4 Memorize the se...

Страница 13: ...ecause the DSP type is automatically selected according to the currently selected Main Voice and the same effect is applied to the Dual Voice or Left Voice as well as the Main Voice If you want to enh...

Страница 14: ...the volume balance between Style playback and the sound you play on the keyboard 1 Press the FUNCTION button 2 Press the CATEGORY and buttons repeatedly to call up Style Volume 3 Use the dial to set...

Страница 15: ...he REGIST PART MIXER button REGIST ACMP TR In this state you can use eight buttons as the Style track buttons 2 Press the desired Track button s to set the mute track s To cancel the mute press the ap...

Страница 16: ...e default Fingering type is Multi Finger AI stands for Artificial Intelligence Selecting Chord Fingering Type 1 Multi Finger Recognizes the various chord types which are listed on page 17 2 FullKeyboa...

Страница 17: ...mM7 Minor major seventh ninth mM7 9 1 2 b3 5 7 CmM7 9 Minor seventh flatted fifth m7b5 1 b3 b5 b7 Cm7 b5 Minor major seventh flatted fifth mM7b5 1 b3 b5 7 CmM7 b5 Diminished dim 1 b3 b5 Cdim Diminishe...

Страница 18: ...RIATION A D buttons before starting Style playback to select the desired Main section for playing Play the Ending Press one of the ENDING rit I III buttons to begin playing an ending section Playback...

Страница 19: ...layed in the right hand section The initial default Split Point is key number 54 the F sharp 2 key but you can change it to another key using the procedure described below 1 Press the FUNCTION button...

Страница 20: ...eration flow for using the preset Styles User Styles loaded Styles and USB Styles from storage to playback Stop Accompaniment function Style Types Preset Styles Styles built into the instrument User S...

Страница 21: ...s one of the ONE TOUCH SETTING 1 4 buttons to memorize the panel settings to the One Touch Setting contained in the selected Style When the display prompts you whether you want to overwrite the existi...

Страница 22: ...n Song playback and the sound you play on the keyboard 1 Press the FUNCTION button 2 Press the CATEGORY and buttons repeatedly to call up Song Volume 3 Use the dial to set the Song Volume Adjusting th...

Страница 23: ...en press and hold the REGIST PART MIXER button until the desired track is shown on the display The following items are alternately selected on the display when you press the REGIST PART MIXER button R...

Страница 24: ...up is set to Demo 1 Press the FUNCTION button 2 Press the CATEGORY and buttons repeatedly to call up Demo Play Mode 3 Use the dial to select Random If you want to restore the normal playback mode sele...

Страница 25: ...instrument Preset Song numbers 001 009 User Song Songs you record yourself User Song numbers 001 005 Songs transferred from a computer Songs loaded from the USB flash memory User Song numbers 006 USB...

Страница 26: ...ired track for editing 4 Edit the track selected in step 3 then press the EXECUTE button You can change the Voice Ch Transpose and Quantize parameters for the selected track Use the CATEGORY buttons a...

Страница 27: ...are the shortest in the track you should use eighth note as the Quantize size Make sure not to transpose channels 9 and 10 In gen eral Drum kits are assigned to these channels If you transpose the ch...

Страница 28: ...repeatedly to select Save To USB or Save to USER Then press the USB button to switch the save destination as desired You can select a file save destination between USB flash memory and the instru men...

Страница 29: ..._ The Registration Memory 8 button deletes the character at the cursor loca tion 10 Press the EXECUTE button When the display prompts you for confirmation press the YES button to execute the save oper...

Страница 30: ...ill play back from the next repetition loop letting you record while hearing previously recorded material Overdub Recording This method records new material to a channel already containing recorded da...

Страница 31: ...32 A confirmation message appears asking if you want to create a Style from scratch Call up the Style Creator page 32 Beat 2 4 3 4 4 4 5 4 If you want to change the beat settings you should clear all...

Страница 32: ...scratch press the YES button If you are creating a Style by using data from a specified Style step 1 press the NO button The Style Creator display will be shown Calling up the Style Creator If there...

Страница 33: ...ting is necessary go on to Section Setting 1 Press the CATEGORY buttons repeatedly until Beat appears in the display 2 Rotate the dial and select the Beat number Range 2 4 3 4 4 4 5 4 3 Press the EXEC...

Страница 34: ...is function when you want to create your own section by changing an existing section or by assembling sections from other existing Styles 1 Press the CATEGORY buttons repeatedly until Section Copy app...

Страница 35: ...ess the EXIT button 7 Press the EXECUTE button to execute the Section Copy opera tion 8 Press the EXIT button to exit from the Section Copy function The display returns to the one in step 2 above If t...

Страница 36: ...tton flashes Setting the Measure Length Make sure to set the measure length when you want to create a Style from scratch When using an existing Style set as necessary You cannot set the measure length...

Страница 37: ...hen RHY 2 is selected as the Part drum Voices can be selected When other Part is selected all Voices excepting drums can be selected Part Volume 1 Press the CATEGORY buttons repeatedly until Part Vol...

Страница 38: ...condition the PART button also changes from green to unlit If you want to rehearse a part before recording press the EXECUTE button The REC mark for the Part in the display will turn off In this situ...

Страница 39: ...recording to non rhythm Parts For information on recording to parts other than the rhythm parts RHY1 2 refer to the section below and perform using notes that match the chord CM7 4 Press the START STO...

Страница 40: ...1 32 3 Press the EXECUTE button The UNDO message appears 4 Press the EXECUTE button again if you want to replace with the previous Quantize value Editing Quantize and part clear 1 2 3 4 1 4 1 4 1 8 1...

Страница 41: ...ATEGORY buttons repeatedly until Part Clear appears in the display 2 To select a Part for clearing press and hold the desired part but ton for longer than a second A confirmation message appears 3 Pre...

Страница 42: ...tween USB flash memory and internal memory If you want to save to USB flash memory select Save To USB if you want to save to internal memory select Save To USER in the display A default file name will...

Страница 43: ...want to exit from the Style Creator without saving the data Press the YES button if it is OK to exit or the NO button to cancel If you select a User Style Number that already con tains data an Overwr...

Страница 44: ...nd the name of the next item in the list appears to the upper right of the currently selected item 3 Use the dial or the NO and YES buttons to set the parame ters The NO and YES buttons are used to ma...

Страница 45: ...detected in the AI Finger mode SCALE TUNE Scale EQUAL PURE MAJOR PURE MINOR PYTHAGOREAN MEAN TONE WERCKMEISTER KIRNBERGER ARABIC1 ARABIC2 EQUAL Sets the Scale Details for each Scale are explained in...

Страница 46: ...tion of the Left Voice in the stereo image A value of 0 results in the sound being panned full left while 127 results in the sound being panned full right Left Reverb Level 000 127 Determines how much...

Страница 47: ...should set this value to eighth note Any notes or rests shorter than this value will not be shown in the score Right Part GuideTrack 1 16 OFF CH1 Determines the guide track number for the right hand p...

Страница 48: ...ng multiple MIDI set tings in one convenient operation Three settings are available PC1 PC2 and OFF 1 Press the FUNCTION button 2 Press the CATEGORY and buttons repeatedly to select PC Mode 3 Use the...

Страница 49: ...cal ON OFF Local control determines whether or not notes played on the instru ment are sounded by its internal tone generator system the internal tone generator is active when local control is on and...

Страница 50: ...ation running on your computer it is a good idea to first send and record the panel setup data before the actual performance data This makes it possible to restore the instrument panel setup and ensur...

Страница 51: ...ase mfd The number of files that can be shown on the display is as follows Songs 100 Styles 50 Music Database 50 The SMF Standard MIDI File format is one of the most common and widely compatible seque...

Страница 52: ...the same operation as in Transferring Styles and Songs you have recorded on the instrument to a computer above The backup file is transmit ted received as a single file with the same name As a result...

Страница 53: ...Metronome Volume 6 MIDI settings 49 Multi Finger 16 17 Mute 15 23 O Octave 3 One Touch Setting 21 P Pan 3 Part 37 Part Clear 41 Part Recording 38 Pattern 18 PC Mode 48 Q Quantize 27 40 R Random Song P...

Отзывы: