background image

PSR-E360 Owner’s Manual

30

Re
fe

re

n

c

e

Connecting to Other Devices

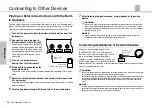
Playing an External Audio Device with the Built-
in Speakers

You can output the sound of an external audio device, such as a portable music 
player, with the built-in speakers of this instrument by connecting it via a cable. 
This lets you play the keyboard along with playback of your music player.

1

Turn off the power for both the external audio device and this 
instrument.

2

Connect the audio device to 
the instrument’s [AUX IN] jack.

Use an audio cable with no resistance 
having a stereo-mini plug on one side 
for connecting to this instrument, and 
a proper plug to match the output jack 
of the external audio device on the 
other side.

3

Turn on the external audio 
device, then this instrument.

4

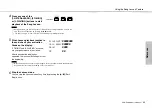
Play back the connected exter-
nal audio device.

The sound of the audio device is output through the speakers of this instru-
ment.

5

Adjust the volume balance between the external audio device and 
this instrument.

If possible, adjust the playback level of the external audio device first, to achieve 
optimum balance. 

6

Play the keyboard along with the sound of the audio device.

7

After finishing the performance, stop playback of the audio 
device.

Connecting Headphones or External Speaker

Connect a pair of headphones to the 
[PHONES/OUTPUT] jack. This jack also 
functions as an external output. By connect-
ing to a computer, keyboard amplifier, 
recorder, or other audio device, you can out-
put the audio signal of this instrument to that 
external device. The speakers of this instrument are automatically shut off when 
a plug is inserted into this jack.

Stereo-mini 
plug

Audio device

(Portable audio player, etc.)

• Before connecting, turn off the power of both this instrument and the external audio 

device. Also, before turning the power on or off, make sure to set all volume levels to 
minimum (0). Otherwise, damage to the devices, electrical shock, or even permanent 
hearing loss may occur.

• After connecting, first turn on the power to the external audio device then to this 

instrument. Reverse this order when you turn the power off.

• Do not use the instrument or headphones for a long period of time at a high or uncomfort-

able volume level, since this can cause permanent hearing loss. 

• Before connecting the instrument to other electronic components, turn off the power of all 

the components. Also, before turning any components on or off, make sure to set all vol-
ume levels to minimum. Otherwise, damage to the components or electrical shock may 
occur.

• To avoid possible damage to the external device, first turn on the power to the instrument, 

then to the external device. When turning off the power, do so in reverse order: first turn off 
the power to the external device, then to the instrument.

CAUTION

NOTICE

Standard stereo 
phone plug

CAUTION

NOTICE

Содержание PSR-E360

Страница 1: ...Before using the instrument be sure to read PRECAUTIONS on pages 5 7 Setting Up Appendix Reference DIGITAL KEYBOARD Owner s Manual EN ...

Страница 2: ...ing to how a function or effect works when the unit is operating as designed are not covered by the manufacturer s warranty and are therefore the owners responsibility Please study this manual carefully and consult your dealer before requesting service ENVIRONMENTAL ISSUES Yamaha strives to produce products that are both user safe and environmentally friendly We sin cerely believe that our product...

Страница 3: ...it OFF and ON please try to eliminate the problem by using one of the fol lowing measures Relocate either this product or the device that is being affected by the interference Utilize power outlets that are on different branch circuit breaker or fuse circuits or install AC line filter s In the case of radio or TV interference relocate reorient the antenna If the antenna lead in is 300 ohm ribbon l...

Страница 4: ...caution when moving the cart apparatus combination to avoid injury from tip over 13 Unplug this apparatus during lightning storms or when unused for long periods of time 14 Refer all servicing to qualified service personnel Servicing is required when the apparatus has been damaged in any way such as power supply cord or plug is damaged liquid has been spilled or objects have fallen into the appa r...

Страница 5: ...o not excessively bend or otherwise damage the cord or place heavy objects on it Only use the voltage specified as correct for the instrument The required voltage is printed on the name plate of the instrument Use the specified adaptor page 35 only Using the wrong adaptor can result in damage to the instrument or overheating Check the electric plug periodically and remove any dirt or dust which ma...

Страница 6: ...ctor Doing so can result in lower sound quality or possibly cause overheating in the outlet When removing the electric plug from the instrument or an outlet always hold the plug itself and not the cord Pulling by the cord can damage it Remove the electric plug from the outlet when the instrument is not to be used for extended periods of time or during electrical storms Location Do not place the in...

Страница 7: ... available musical data including but not limited to MIDI data and or audio data is strictly prohibited except for your personal use This product incorporates and bundles contents in which Yamaha owns copyrights or with respect to which Yamaha has license to use others copyrights Due to copyright laws and other relevant laws you are NOT allowed to distribute media in which these contents are saved...

Страница 8: ... as Voices Styles and Effects Online Materials Downloadable from the web Drum Kit List This contains detailed information of the Drum Kit Voices page 15 Voice No 321 336 When selecting these Voices various drum percussion and SFX sounds listed here are assigned to each key To obtain these manuals access the Yamaha Downloads enter the model name for searching the desired files Song Book only in Eng...

Страница 9: ...Song 19 BGM Playback 19 Song Fast Forward Fast Reverse and Pause 20 Changing the Tempo 20 A B Repeat 20 Changing the Melody Voice 21 Turning Each Part On Off 21 Using the Song Lesson Feature 22 Listening Timing and Waiting 22 Practicing with Song Lesson 22 Hearing and Experiencing the Sound of the Chords Chord Study 24 Hear and experience a sound of a single chord 24 Hear and experience basic chor...

Страница 10: ... E360 Owner s Manual 10 Setting Up q w e r u i o 1 2 3 4 5 7 6 9 8 0 2 3 1 0 t y Front Panel Song List page 40 Style List page 41 Display page 14 Voice List page 37 Setting Up Panel Controls and Terminals ...

Страница 11: ...FF button page 25 2 INTRO ENDING rit button page 26 3 MAIN AUTO FILL button page 26 4 SYNC START button page 25 5 START STOP button page 25 6 SONG button page 19 7 VOICE button page 15 8 STYLE button page 25 9 Number buttons 0 9 page 14 0 PORTABLE GRAND button page 15 1 ULTRA WIDE STEREO button page 16 2 SUSTAIN button page 16 3 FUNCTION button page 32 4 AUX IN jack page 30 5 PHONES OUTPUT jack pa...

Страница 12: ...eep the plug attached to the AC adaptor Using the plug alone can cause electric shock or fire If the plug is accidentally removed from the AC adaptor slide it back in until it clicks into place taking care to avoid touching any internal metal parts To avoid electric shock short circuit or dam age also be careful that there is no dust between the AC adaptor and plug When setting up the product make...

Страница 13: ...also can be disabled by selecting Off in Function number 021 page 33 This instrument cannot charge the batteries Use only the specified charger device when charg ing Power will be automatically drawn from the AC adaptor if an AC adaptor is connected while bat teries are installed in the instrument Failure to set the battery type may shorten the amount of the battery life Make sure to set the batte...

Страница 14: ...on 003 022 Indicates the on off status of Song playback or target Track of Song recording page 21 Lit Track contains data Unlit Track is muted or con tains no data Indicates the current beat of playback Song Track status Beat Indicates notes currently being played Indicates the melody and chord notes of a Song when the Song lesson function is in use Also indicates the notes of a chord when using t...

Страница 15: ... TEMPO TAP button to call up the Tempo value then use the number but tons 0 9 or buttons Press the and buttons simultaneously to instantly reset the value to the default tempo To set the Time Signature Press and hold the METRONOME button to call up TimeSig Functions 016 page 33 then use the number buttons To set the Metronome Volume This can be set via Function number 017 page 33 001 320 Instrumen...

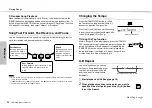
Страница 16: ... the number buttons Applying Effects to the Sound This instrument can apply various effects as listed below to the instrument s sound Reverb Adds the ambience of a club or concert hall to the sound Although the best suited Reverb type is called up by selecting a Song or Style you can select another one via Function number 010 page 33 You can also set the Reverb depth via Function number 011 page 3...

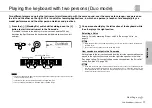
Страница 17: ...o mode Notes played in the left section sound from the left side speaker while notes played in the right section sound from the right side speaker in the initial Duo mode setting This output setting can be changed from the VoiceOut setting Function 015 page 33 The left section and the right section of the keyboard are both set to the same Voice except for Voice numbers 386 400 In the Duo mode the ...

Страница 18: ...ted to the SUSTAIN jack Sustain is applied only when pressing the footswitch Style Playback in the Duo mode Although full Style features accompaniment cannot be used in the Duo mode the rhythm part of a Style can be played back while playing the left right sections normally Phrase recording in the Duo mode The notes played in the left and right sections are recorded on the same track 3 To exit fro...

Страница 19: ...rd you can adjust the Song Volume This can be set via Function number 002 page 32 BGM Playback With the default setting pressing the DEMO button will play back only three internal Demo Songs repeatedly This setting can be changed so that for exam ple all internal Songs automatically play back letting you use the instrument as a background music source 1 Hold down the DEMO button for longer than a ...

Страница 20: ...ng or Style playback is stopped tap the TEMPO TAP button several times to start playback at the tapped tempo four times for a 4 beat Song or Style or three times for a 3 beat Song or Style A B Repeat You can play back only a specific section of a Song repeatedly by set ting the A point start point and B point end point in one measure increments 1 Start playback of the Song page 19 2 When playback ...

Страница 21: ...pressing the corresponding button L or R By turning the left and right hand parts on or off during playback you can listen to the Part that is turned on or practice the other part that is turned off on the keyboard You can also set the A B Repeat function when the Song is stopped Simply use the Fast Reverse and Fast Forward buttons to select the desired measures pressing the A B button for each po...

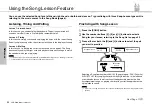
Страница 22: ...k tempo will change to match the speed at which you are playing Practicing with Song Lesson 1 Press the SONG button 2 Use the number buttons 0 9 or buttons to select a Song for your lesson referring to the Song List on page 40 3 Press either or both the R and L buttons to select the part you want to practice Selecting a Song from numbers 080 100 Song category FAV Favorite WITH STYLE lets you play ...

Страница 23: ...isplay has appeared the lesson will start again from the beginning 6 Stop the Lesson mode You can stop the Lesson mode at any time by pressing the Start Stop button During playback you can change the Lesson mode by pressing this button and you can stop the Lesson at any time by pressing the button The Voice changes to 000 One Touch Setting page 15 during the lesson When the melody Voice of the Son...

Страница 24: ...n 2 Use the number buttons to select a Song from Song numbers 101 107 in the CHORD STUDY category page 40 3 Press the Start Stop button to play back the selected Song 4 Play the keyboard while looking at the notes shown on the dis play If you find it difficult for you to play the notes use the Waiting function page 22 by pressing the 3 WAITING button Hear and experience basic chord progressions 1 ...

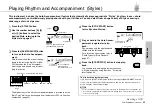
Страница 25: ... on 5 Play a chord in the Auto Accom paniment range to start play back Play a melody with the right hand and chords with the left hand For information about chords refer to Chord Types for Style Playback page 27 6 Press the START STOP button to stop play back You can add intro ending and rhythm variations to Style playback by using Sections For details refer to page 26 BritRock 001 Style Number Th...

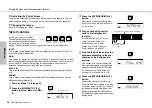
Страница 26: ...ng to Main A or B ENDING This is used for the ending of the Song When the Ending finishes the Style playback stops automatically 1 Same as Steps 1 4 in page 25 2 Press the MAIN AUTO FILL button to select Main A or Main B 3 Press the INTRO ENDING rit button Now you re ready to start Style play back of the Intro and then the Main A or B section 4 Play a chord with your left hand to start playback of...

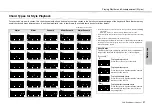
Страница 27: ...m7b5 m7 11 6 m6 sus4 aug dim7 7b5 6 9 sus2 Inversions of the 7sus4 chords are not recognized if the notes are omit ted Sus2 chords are indicated by the root name only When playing a chord which cannot be recognized by this instrument nothing is shown on the display In such a case only the rhythm and bass parts will be played Easy Chords This method lets you easily play chords in the accompaniment ...

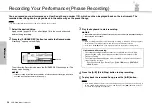
Страница 28: ... over and erased you will record over and erase previous data in User Song UserSong 001 Flashes NOTICE Never attempt to turn the power off or connect or disconnect the AC adaptor Doing so can result in a loss of data When recording capacity becomes full during recording a Mem Full message appears on the display recording is stopped and the Song select display is shown If you press the button even ...

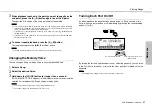
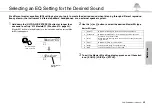
Страница 29: ...rent Mas ter EQ type appears 2 Use the or button to select the desired Master EQ type Master EQ types 3 To exit the Master EQ setting display press one of these but tons SONG VOICE or STYLE 013 013 MasterEQ Speaker 1 Current Master EQ type Hold for longer than a second 1 Speaker Optimum for listening via the instrument s built in speakers 2 Headphone Optimum for headphones or for listening via ext...

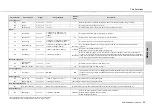
Страница 30: ...UT jack This jack also functions as an external output By connect ing to a computer keyboard amplifier recorder or other audio device you can out put the audio signal of this instrument to that external device The speakers of this instrument are automatically shut off when a plug is inserted into this jack Stereo mini plug Audio device Portable audio player etc Before connecting turn off the power...

Страница 31: ... footswitch is held NOTE Backup and Initialization Backup Parameters The following Backup parameters will be maintained even if the power is turned off Initialization You can initialize the backup data via the following method While holding down the highest white key press the Standby On switch to turn the power on Backup parameters User Songs page 28 FUNCTION Settings page 32 Tuning Your Tempo Ma...

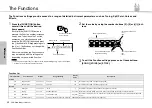
Страница 32: ... during Song Style or metronome playback The beat value appears instead StyleVol 100 001 Press several times as necessary Current value Function name Function number NOTE Direct numeric entry Increment value by 1 Yes On Press simultaneously to recall the default setting Decrement value by 1 No Off Function Number Function name Display Range Settings Default Value Descriptions Volume 001 Style Volu...

Страница 33: ... page 17 is on this function is effective If Normal is selected the performance sounds of the left section and the right section will sound from both the left and right speakers If Separate is selected the performance sound of the left section will sound from the left speaker and the performance sound of the right section will sound from the right speaker Metronome page 15 016 Time Signature Numer...

Страница 34: ...lit Point to an appropriate key page 32 Function 005 Is the ACMP ON indicator showing in the dis play If it is not showing press the ACMP ON OFF button so that it does show The Style does not sound as you play a chord The auto accompaniment will sometimes not change when related chords are played in sequence e g some minor chords followed by the minor seventh Two note fingerings will produce a cho...

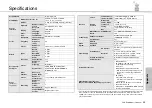
Страница 35: ...set Songs 112 including Chord Study 12 Recording Number of Songs 1 Number of Tracks 1 Data Capacity Approx 300 notes CompatibleData Format Original File Format Function Lesson Yamaha Educa tion Suite YES 1 LISTEN LEARN 2 TIMING 3 WAITING A B A B Repeat Overall Controls Metronome Yes Tempo Range 11 280 Transpose 12 to 0 0 to 12 Tuning 427 0 440 0 453 0 Hz approx 0 2Hz increments Duo Yes Miscellaneo...

Страница 36: ... Lesson 22 Listen Learn 22 M MAIN 26 Master EQ Type 29 33 Master Volume 13 MasterEQ 29 Measure 14 Metronome 15 Metronome Volume 15 33 Music Rest 8 N Notation 14 O One Touch Setting 15 P Panel Sustain 16 Part 21 Pause 20 Pedal 31 Phrase Recording 28 Playback 19 Power Requirements 12 R Recording 28 Reverb 16 Reverb Level 33 Reverb Type 33 Rhythm 25 rit 26 S Song 19 Song Book 8 Song List 40 Song Volu...

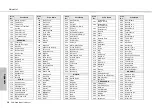
Страница 37: ...ylon Guitar 54 Steel Guitar 55 Nylon Steel Guitar 56 Steel Guitar with Body Sound Voice No Voice Name 57 Muted Steel Guitar 58 12 string Guitar 59 Jazz Guitar 60 Jazz Amp 61 Jazz Man 62 Clean Guitar 63 Chorus Guitar 64 Funk Guitar 65 Guitar Pinch 66 Muted Guitar 67 Overdriven Guitar 68 Distortion Guitar 69 Feedback Guitar 1 70 Feedback Guitar 2 71 Guitar Feedback 72 Guitar Harmonics 1 73 Guitar Ha...

Страница 38: ...ls 233 Soft Crystal 234 Air Bells 235 Warm Atmosphere 236 Hollow Release 237 Nylon Electric Piano 238 Nylon Harp 239 Harp Vox 240 Atmosphere Pad 241 Goblins Synth 242 Creeper 243 Ritual 244 To Heaven 245 Night 246 Glisten 247 Bell Choir 248 Bell Harp WORLD 249 Banjo 250 Muted Banjo 251 Fiddle 252 Bagpipe 253 Dulcimer 1 254 Dulcimer 2 255 Cimbalom 256 Santur 257 Kanoon 258 Oud 259 Rabab 260 Kalimba...

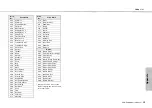
Страница 39: ...tch Cut 361 Scratch Split 362 Wind Chime 363 Car Engine Ignition 364 Car Tires Squeal 365 Car Passing 366 Car Crash 367 Siren 368 Train 369 Helicopter 370 Jet Plane 371 Starship Voice No Voice Name 372 Burst 373 Roller Coaster 374 Submarine 375 Laugh 376 Scream 377 Punch 378 Heartbeat 379 Footsteps 380 Applause 381 Gunshot 382 Machine Gun 383 Laser Gun 384 Explosion 385 Firework DUAL 386 Octave Pi...

Страница 40: ...ie Lorelei 045 Home Sweet Home 046 Scarborough Fair 047 My Old Kentucky Home 048 Loch Lomond 049 Silent Night 050 Deck the Halls 051 O Christmas Tree 052 Sonata Pathétique 2nd Adagio Cantabile 053 Ave Maria J S Bach Gounod 054 Jesus bleibet meine Freude 055 Prelude op 28 15 Raindrop 056 Nocturne op 9 2 057 Etude op 10 3 Chanson de L adieu 058 Romanze Serenade K 525 059 Arabesque 060 La Chevaleresq...

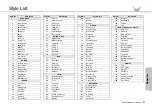
Страница 41: ...59 BossaNova 60 Forro 61 Sertanejo 62 Joropo 63 Parranda 64 Reggaeton 65 Tijuana 66 PasoDuranguense 67 CumbiaGrupera 68 Mambo Style No Style Name 69 Salsa 70 Beguine 71 Reggae WORLD 72 CountryPop 73 CountrySwing 74 Country2 4 75 Bluegrass 76 ScottishReel 77 Saeidy 78 WehdaSaghira 79 IranianElec 80 Emarati 81 IndianPop 82 Bhangra 83 Bhajan 84 BollyMix 85 Tamil 86 Kerala 87 GoanPop 88 Rajasthan 89 D...

Страница 42: ...l reverb 04 05 Room 1 2 Small room reverb 06 07 Stage 1 2 Reverb for solo instruments 08 09 Plate 1 2 Simulated steel plate reverb 10 Off No effect No Chorus Type Description 1 3 Chorus 1 3 Conventional chorus program with rich warm chorusing 4 5 Flanger 1 2 This produces a rich animated wavering effect in the sound 6 Off No effect ...

Страница 43: ...f proof of purchase documents will cause this warranty to be void This warranty covers only the Original Owner and is not transferable In Order to Obtain Warranty Service Warranty service will only be provided for defective products within the Warranted Area Contact your local authorized Yamaha dealer who will advise you of the procedures to be followed If this is not successful contact Yamaha at ...

Страница 44: ...dfaerahusid Ehf Sidumula 20 IS 108 Reykjavik Iceland Tel 354 525 5050 CYPRUS Nakas Music Cyprus Ltd Nikis Ave 2k 1086 Nicosia Tel 357 22 511080 Major Music Center 21 Ali Riza Ave Ortakoy P O Box 475 Lefkoşa Cyprus Tel 392 227 9213 RUSSIA Yamaha Music Russia LLC Room 37 entrance 7 bld 7 Kievskaya street Moscow 121059 Russia Tel 7 495 626 5005 OTHER EUROPEAN COUNTRIES Yamaha Music Europe GmbH Siemen...

Отзывы: