background image

DGX-670 Owner’s Manual

24

7

Bar/Beat

Displays the current position (bar/beat) in Style playback or Song playback.

8

Microphone indicator

Indicates the input level of the connected microphone (page 77).

9

Transpose

Displays the amount of transposition in semitone units (page 44).

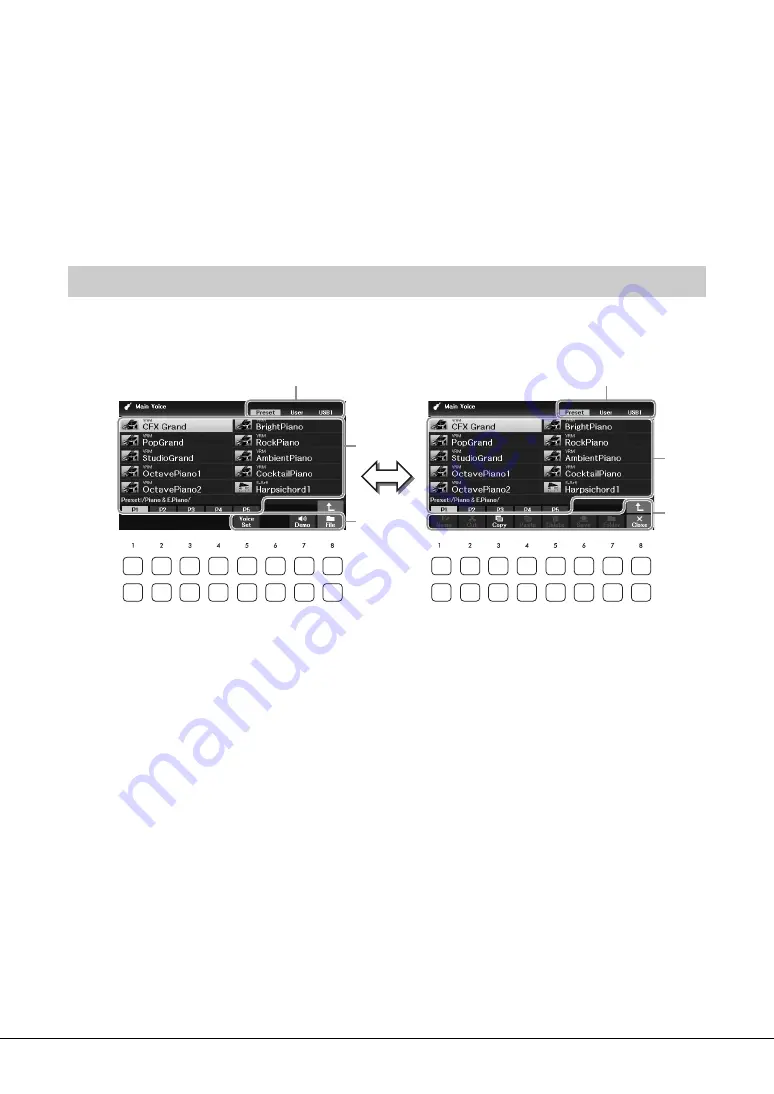
The File Selection display is for selecting Voice, Styles, and other data (files). The File Selection display 
appears when you press one of the VOICE or STYLE category selection buttons, SONG [SELECT] button, 
etc. 

1

Location (drive) of data

• 

Preset

.... Location where pre-programmed (preset) data is stored.

• 

User

....... Location where recorded or edited data is saved.

• 

USB1

..... Location where data on USB flash drive is saved. This appears only when a USB flash drive is 

connected to the [USB TO DEVICE] terminal.

NOTE

Before using a USB flash drive, be sure to read “Connecting USB Devices” on page 91.

2

Selectable data (files)

The files that can be selected on this display are shown. If more than 10 files exist, the page numbers 
(P1, P2 ...) are shown below the files. Pressing one of the [1

U

] – [7

U

] buttons corresponding to the 

page numbers changes the display page. For pages that follow, “→” appears, and for previous pages, “←” 
appears.

3

File

/

Close

At the bottom of the File Selection display, you can toggle the indication between 

File

 and 

Close

 by 

pressing the [8

D

] button. Pressing the [8

D

] button while 

File

 is shown calls up the File Management 

menu (page 26), while pressing the [8

D

] button while 

Close

 is shown closes the File Management menu 

and calls up the function names related to the current file (Voice, Style, Song, etc.).

File Selection Display Configuration

1

2

3

2

3

1

Содержание Portable Grand DGX-670

Страница 1: ... EN ...

Страница 2: ...vides a reasonable level of assurance that your use of this product in a residential environment will not result in harmful interference with other elec tronic devices This equipment generates uses radio fre quencies and if not installed and used according to the instructions found in the users manual may cause inter ference harmful to the operation of other electronic devices Compliance with FCC ...

Страница 3: ...d from being walked on or pinched particularly at plugs convenience receptacles and the point where they exit from the apparatus 11 Only use attachments accessories specified by the manufacturer 12 Use only with the cart stand tripod bracket or table specified by the manufacturer or sold with the apparatus When a cart is used use caution when moving the cart apparatus combination to avoid injury f...

Страница 4: ...e of the instrument Use the specified adaptor page 107 only Using the wrong adaptor can result in damage to the instrument or overheating Use only the supplied power cord plug Check the electric plug periodically and remove any dirt or dust which may have accumulated on it This instrument contains no user serviceable parts Do not open the instrument or attempt to disassemble or modify the internal...

Страница 5: ...le or malfunction occurs immediately turn off the power switch and disconnect the plug from the outlet Even when the power switch is turned off electricity is still flowing to the product at the minimum level When you are not using the product for a long time make sure to unplug the power cord from the wall AC outlet Use only the stand specified for the instrument page 15 When attaching it use the...

Страница 6: ...on mistake etc save your important data to a USB flash drive To protect against data loss through USB flash drive damage we recommend that you save your important data onto spare USB flash drive or an external device such as a computer as backup data Information About copyrights Copying of the commercially available musical data including but not limited to MIDI data and or audio data is strictly ...

Страница 7: ...e relevant chapters in the Owner s Manual Data List Contains various important preset content lists such as Voices Styles etc as well as MIDI related information of this instrument Smart Device Connection Manual Explains how to connect the instrument to a smart device such as smartphone or tablet etc Computer related Operations Includes instructions on connecting this instrument to a computer and ...

Страница 8: ...Backup 33 Resetting to the Factory programmed Settings Initializing 34 1 Piano Room Enjoying the Piano Performance 35 Playing a Piano Performance in the Piano Room 35 Making the Detailed Settings in the Piano Room 36 Recording your Performance in the Piano Room 37 2 Voices Playing the keyboard with various sounds 38 Playing Preset Voices 38 Calling up the Appropriate Settings for Piano Performance...

Страница 9: ...d Recalling Custom Panel Setups 80 Saving and Recalling Custom Panel Setups with Registration Memory 81 Using Playlists to Manage a Large Repertoire of Panel Setups 84 8 Mixer Editing the Volume and Tonal Balance 88 Basic Procedure 88 9 Connections Using Your Instrument with Other Devices 91 Connecting USB Devices USB TO DEVICE terminal 91 Connecting to a Computer USB TO HOST terminal 92 Connectin...

Страница 10: ...ny music genres letting you convincingly perform in any desired music style Moreover the special Super Articulation Voices realistically recreate many of the performance techniques and characteristic sounds generated when an artist plays an instrument The result is superbly detailed expression such as the realistic sound of finger slides on guitar and the expressive breath noises of saxophone and ...

Страница 11: ...ou can also cancel the vocal part on audio recordings letting you sing along with or instead of your favorite artists and groups and enjoy performing even more Page 77 The audio data in a Bluetooth equipped device such as a smartphone can be played back through the DGX 670 s built in speakers You can enjoy playing or singing along with the audio data or simply listening to your favorite music Page...

Страница 12: ...entire pitch of the instrument in semitone steps CHANNEL ON OFF button pages 53 65 Calls up settings for turning Style Song channels on or off MIXER EQ button page 88 Calls up various settings for the keyboard Style and Song parts OTS LINK button page 52 Turns on off the OTS Link function STYLE CONTROL buttons page 48 Controls Style playback LCD and related controls page 19 Indicates the current p...

Страница 13: ...yboard performance B PART ON OFF buttons page 38 Turns the keyboard part on or off C PIANO ROOM button page 35 Instantly calls up the optimum piano related settings for playing the instrument simply as a piano D REGISTRATION MEMORY buttons page 80 Registers and recalls panel setups E USB TO DEVICE terminal page 91 For connecting a USB flash drive or USB wireless LAN adaptor F PITCH BEND wheel page...

Страница 14: ...d foot pedals FC3A FC4A or FC5 can also be connected to this jack By default the sustain function is assigned NOTE Make sure that the power is off when connecting or disconnecting the footswitch Do not press the footswitch while turning the power on Doing this changes the recognized polarity of the footswitch resulting in reversed operation 7 1 2 3 4 5 6 CAUTION Before connecting the instrument to...

Страница 15: ...ess the sostenuto pedal while the note s are held those notes will sustain as long as you hold the pedal as if the damper pedal had been pressed but all subsequently played notes will not be sustained This makes it possible to sustain a note or notes for example while other notes are played staccato Soft Pedal Left The soft pedal reduces the volume and slightly changes the timbre of notes played w...

Страница 16: ...er cord first turn off the power and then follow this procedure in reverse order 1 Turn down the MASTER VOLUME dial to MIN 2 Press the P Standby On switch to turn the power on After the Main display appears adjust the volume as desired while playing the keyboard NOTICE Do not attempt any other operations such as pressing keys buttons or pedals Doing so may cause the instrument to malfunction 3 Aft...

Страница 17: ...ed off is 30 minutes by default however you can change the setting For details refer to page 18 NOTICE Any data which is not saved via the Save operation will be lost if the power automatically turns off Make sure to save your data before this happens Disabling Auto Power Off simple method Turn the power on while holding down the lowest key on the keyboard A message appears briefly then the instru...

Страница 18: ...play press the EXIT button Making Basic Settings 1UD 2UD Auto Power Off Determines the amount of time that elapses before the power is automatically turned off by the Auto Power Off function page 17 To disable Auto Power Off select Disabled here 3UD 4UD Language Determines the language English German French Spanish and Italian are available used in the display for messages 5UD 6UD Owner Name Lets ...

Страница 19: ...f display One is the type in which the item is selected and called up only by moving the cursor and the other is the type in which you need to press the ENTER button after moving the cursor to actually call up the item Example 1 Example 2 Display based Controls TAB L R buttons page 21 Data dial page 20 Cursor buttons U D L R and ENTER button see below 1UD 8UD buttons page 20 EXIT button page 21 In...

Страница 20: ...use the Data dial in tandem with the 1UD 8UD buttons to adjust parameters indicated in the display This convenient technique also works well with pop up parameters such as Tempo and Transpose Simply press the appropriate button ex TEMPO TAP and then rotate the Data dial to set the value For menus that appear in this section of the display use the 1U 8U upper buttons For menus that appear in this s...

Страница 21: ...o the default Main display page 23 In most procedures when selecting the file or item described throughout this Owner s Manual the Cursor buttons U D L R are used for simple selection though other methods may also be used Instruction Conventions in this Manual Throughout this manual instructions with multiple steps are given in convenient shorthand with arrows indicating the proper sequence Exampl...

Страница 22: ...Data List on the website for a list of the displays that can be called up with the Direct Access function 1 Press the DIRECT ACCESS button A message appears in the display prompting you to press the appropriate button 2 Press the button or move the PITCH BEND wheel or connected pedal corresponding to the desired setting display to instantly call up that display For example pressing the METRONOME b...

Страница 23: ...chord during your keyboard performance will be displayed When the Song containing the chord data is played back the current chord name will be displayed 3 Song MIDI file name and related information Displays the currently selected Song name time signature and tempo page 60 4 Audio file name and related information Displays information for the selected audio file in the connected USB flash drive pa...

Страница 24: ... USB flash drive is connected to the USB TO DEVICE terminal NOTE Before using a USB flash drive be sure to read Connecting USB Devices on page 91 2 Selectable data files The files that can be selected on this display are shown If more than 10 files exist the page numbers P1 P2 are shown below the files Pressing one of the 1U 7U buttons corresponding to the page numbers changes the display page For...

Страница 25: ... higher level folder by pressing the 8U button Example of the Preset Voice Selection display The preset Voices are categorized and contained in appropriate folders Press the 8U button to call up the next higher level folder This display shows the Voices in a folder The next highest level in this case folder is shown Each folder shown in this display contains appropriately categorized Voices ...

Страница 26: ... by using the TAB L R buttons If you want to save the data within an existing folder also select the folder here NOTE Files cannot be saved to the Preset tab The maximum total number of files folders which can be saved to the User tab differs depending on the file size and the length of the file folder names 2 Make sure that the File Management menu is shown at the bottom of the display If the men...

Страница 27: ... in the Preset tab or the PianoRoom folder page 37 The maximum number of files folders which can be saved in a folder is 500 In the User tab no more than three folder levels can be created The maximum total number of files folders which can be saved differs depending on the file size and the length of the file folder names 2 Make sure that the File Management menu is shown at the bottom of the dis...

Страница 28: ...enu is not shown press the 8D File button to call it up 3 Press the 1D Name button The window for the Rename operation appears at the bottom of the display 4 Move the cursor to the desired file folder by using the Cursor buttons U D L R and then press the ENTER button NOTE To cancel the Rename operation press the 7D Cancel button 5 Press the 8D OK button to confirm the file folder selection The Ch...

Страница 29: ...he display 4 Move the cursor to the desired file folder by using the Cursor buttons U D L R and then press the ENTER button Pressing the ENTER button selects highlights the file folder To cancel the selection press the ENTER button again Press the 8D All button to select all files folders indicated on the current display including the other pages To cancel the selection press the 8D All Off button...

Страница 30: ...on appears at the bottom of the display 4 Move the cursor to the desired file folder by using the Cursor buttons U D L R and then press the ENTER button Pressing the ENTER button selects highlights the file folder To cancel the selection press the ENTER button again Press the 8D All button to select all files folders indicated on the current display including the other pages To cancel the selectio...

Страница 31: ...osition 3 Press the 2UD 6UD and 7U buttons corresponding to the character you wish to enter Several different characters are assigned to each button and the characters change each time you press the button To actually enter the selected character move the cursor or press another character input button Alternately you can wait for a short time and the character will be entered automatically For mor...

Страница 32: ...button to call up the mark list 2 Use the Data dial to move the cursor to the desired mark or space and then press the 8U OK button Selecting custom icons for files shown at left of file name 1 Press the 1D Icon button to call up the Icon Select pop up 2 Select the icon by using the Cursor buttons U D L R or Data dial The display includes several pages Use the TAB L R buttons to select the desired...

Страница 33: ...nstructions refer to page 29 You can also back up System settings MIDI settings and User Effect settings individually to the Setup Files tab on the System display below For details refer to the Reference Manual on the website Chapter 10 1 Connect a USB flash drive to the USB TO DEVICE terminal for the backup destination 2 Call up the operation display MENU Cursor buttons U D L R System ENTER TAB L...

Страница 34: ...rt in the Data List on the website for details about which parameters belong to System Setup If you want to initialize only the Registration Memory settings page 81 turn the power on while holding the B6 key NOTE You can also reset specified settings to the factory default value or delete all files folders in the User drive Call up the operation display MENU Cursor buttons U D L R System ENTER TAB...

Страница 35: ...the control panel excepting the PIANO ROOM EXIT and 1UD 8UD buttons are disabled 2 Play the keyboard Change the piano settings according to the type of music you want to play or sound you want to create 3 Press the PIANO ROOM button or EXIT button to exit the Piano Room display All panel settings are restored to those which were set before the Piano Room display was called up Playing a Piano Perfo...

Страница 36: ...he Detailed Settings in the Piano Room 1UD 2UD Master Tune Determines the pitch of this instrument in 1Hz steps 3UD 4UD Brightness Determines the brightness of the sound Higher values result in a brighter sound 5UD 6UD Touch Determines how the sound responds to your playing strength Hard2 Requires strong playing to produce high volume Best for players with a heavy touch Hard1 Requires moderately s...

Страница 37: ...orded data will be lost if you turn the power off without executing the Save operation 5 To hear the recorded performance press one of the 2UD 3UD R buttons To stop playback use the 4UD 5UD J buttons The 6UD LL buttons are used to rewind and the 7UD RR buttons are used to fast forward playback position Only the last recorded performance can be played back Once you press one of the 8UD Close button...

Страница 38: ...r the Main and Layer parts The key which divides the keyboard into the left hand and right hand areas is referred to as Split Point NOTE The Split Point can be changed page 58 1 Press one of the PART ON OFF buttons to turn on the desired keyboard part 2 Press one of the VOICE category selection buttons to select a Voice category and call up the Voice Selection display for the part selected in step...

Страница 39: ...ice characteristics are indicated above the Preset Voice name For details see page 40 4 If necessary repeat steps 1 3 to select the Voice for the other part 5 Make sure that the desired keyboard part is turned on You can turn each keyboard part on or off by pressing the corresponding PART ON OFF button The Voice selected for each keyboard part can be confirmed on the Main display page 23 6 Play th...

Страница 40: ... Voice Characteristics There are various Voice types and some types as described below require special performance considerations These particular types have an indication above or in the icon at left of the Voice name on the Voice Selection display or the Main display For explanations of the other types refer to the Reference Manual on the website VRM Voices page 41 These recreate the characteris...

Страница 41: ...s on You can turn it on or off and adjust the depth via MENU Cursor buttons U D L R Voice Setting ENTER TAB L Piano Cursor button U 1 VRM For details refer to the Reference Manual on the website Calling up the Appropriate Settings for Piano Performance Piano Reset Playing Realistic Resonance enhanced Piano Sounds VRM Voices VRM Virtual Resonance Modeling On a actual acoustic piano if you press the...

Страница 42: ...ing this Voice will not sound properly when played back on other instruments Super Articulation Voices sound differently depending on the keyboard range velocity touch etc Hence if you turn on a Keyboard Harmony effect change the transpose setting or change the Voice Set parameters unexpected or undesired sounds may result Playing Super Articulation Voices Adding Articulation Effects by Using the ...

Страница 43: ...e Keyboard 1UD 2UD Touch Hard2 Requires strong playing to produce high volume Best for players with a heavy touch Hard1 Requires moderately strong playing for high volume Medium Standard Touch Response Soft1 Produces high volume with moderate playing strength Soft2 Produces relatively high volume even with light playing strength Best for players with a light touch 4UD Touch Off Level Determines th...

Страница 44: ...erall pitch of the instrument the keyboard sound Style playback Song playback and so on in semitone steps from 12 and 12 To instantly reset the value to 0 press the and buttons simultaneously NOTE The Transpose functions do not affect the Drum Kit or SFX Kit Voices You can independently select the part to be transposed as desired Press the Cursor button L R several times until the desired part app...

Страница 45: ...oll the wheel away from you or down roll the wheel toward you while playing the keyboard The Pitch Bend is applied to all the keyboard parts Main Layer and Left The PITCH BEND wheel is self centering and will automatically return to normal pitch when released NOTE The effects produced by using the PITCH BEND wheel may not be applied to the Left part during Style playback depending on the Style set...

Страница 46: ...e at the time with last note priority letting you play single lead sounds such as brass instruments more realistically Depending on the selected Voice Portamento may be produced when notes are played with legato NOTE Portamento is a function that creates a smooth transition in pitch from the first note played on the keyboard to the next 2 2UD 3UD Keyboard Harmony When the Keyboard Harmony function...

Страница 47: ...R Keyboard Harmony ENTER or VOICE EFFECT Cursor button D 2 Keyboard Harmony 4UD Type Pitch related settings Fine tuning the pitch of the entire instrument MENU Cursor buttons U D L R Master Tune Scale Tune ENTER TAB L Master Tune Scale Tuning MENU Cursor buttons U D L R Master Tune Scale Tune ENTER TAB R Scale Tune Pitch settings for each keyboard part MENU Cursor buttons U D L R Voice Setting ENT...

Страница 48: ...playing by yourself 1 Press one of the STYLE category selection buttons to call up the Style Selection display 2 Select the desired Style by using the Cursor buttons U D L R You can call up the other pages by pressing the buttons 1U 7U that correspond to the page numbers P1 P2 or by pressing the same STYLE category selection button several times 3 Make sure that the STYLE CONTROL ACMP button is on...

Страница 49: ...ction and chords played in this section are automatically detected and used as a basis for fully automatic accompaniment with the selected Style NOTE The Split Point can be changed as desired page 58 By default the chord section Chord Detection Area is set to the left hand section but you can change it to the right hand section page 57 if desired 6 Press the STYLE CONTROL START STOP button to stop...

Страница 50: ...Style is playing back the Style will automatically stop after the ending is played You can have the ending gradually slow down ritardando by pressing the ENDING rit button once again while the ending is playing NOTE The Intro and Ending sections feature three types sets for each Style If you want to use a different set of Intro and Ending sections you can select it on the display called up via MEN...

Страница 51: ...acent section s are provided and there are 13 types of variations as shown below From these variations the most appropriate variation for your current performance is played back For example as you play the keyboard more dynamically the Auto Accompaniment of the Style increases in dynamic intensity Naturally the opposite is also true you can bring the dynamics down by playing more sparsely To use t...

Страница 52: ...ing appropriate for the selected Main section NOTE You can call up the information window to confirm which Voices are prepared for each Main section A D of the current Style by pressing the 6D Info button If the button is not shown press the 8D Close button to call it up Gray color for a Voice name indicates that the corresponding part is currently turned off When using the Adaptive Style function...

Страница 53: ...r parts off making it ideal especially for piano performance Turning Each Part Channel of the Style On Off Each Style contains the channels listed below You can add variations and change the feeling of a Style by selectively turning channels on off as the Style plays 1 Press the CHANNEL ON OFF button several times to call up the Channel On Off Style display which contains the desired channel Style...

Страница 54: ...ncing your performance and letting you create dynamic phrases With the Accent function turned on accents are automatically generated by adding notes to Style playback according to your playing strength or accents you play This allows you to temporary change or interrupt the regular rhythm patterns For the Styles compatible with the Unison Accent function Unison is indicated above the Style name on...

Страница 55: ...gs This allows you to play freely without the limitations of a specific Split Point 4 Play the keyboard along with Style playback 5 At the desired timing the point you want to play in Unison turn on the Unison function by using the 1UD Unison On Off buttons You can conveniently turn on off the Unison function also by using the connected pedal To do this use the 4UD Pedal Function buttons to call u...

Страница 56: ... Minor seventh chord Simultaneously press the root key and both a white and black key to its left Multi Finger Automatically detects Single Finger or Fingered chord fingerings so you can use either type of fingering without having to switch fingering types Fingered Allows you to finger your own chords on the chord section of the keyboard while the instrument supplies appropriately orchestrated rhy...

Страница 57: ...Full Keyboard type is designed to work with many songs some arrangements may not be suitable for use with this feature This type is similar to Full Keyboard with the exception that less than three notes can be played to indicate the chords based on the previously played chord etc 9th 11th and 13th chords cannot be played This type is available only for Style playback Smart Chord Allows you to easi...

Страница 58: ...ENTER TAB L Split Point 2 Set the Split Point Changing the Split Points 4UD 5UD Style Sets the Style Split Point Use the 4UD buttons or press the desired key on the keyboard while holding one of the 5UD KBD buttons to specify the Split Point 6UD 7UD Left Sets the Left Split Point Use the 6UD buttons or press the desired key on the keyboard while holding one of the 7UD KBD buttons to specify the Sp...

Страница 59: ...elated settings MENU Cursor buttons U D L R Style Setting ENTER Specifying chords with your right hand while playing bass with your left hand MENU Cursor buttons U D L R Split Point Chord Fingering ENTER TAB L Split Point Creating editing Styles Style Creator MENU Cursor buttons U D L R Style Creator ENTER Realtime Recording TAB L R Basic Style Assembly TAB L R Assembly Editing the rhythmic feel T...

Страница 60: ... on page 91 MIDI and Audio There are two kinds of data that can be recorded and played back on this instrument MIDI Songs and audio files A MIDI Song is comprised of your keyboard performance information and is not a recording of the actual sound itself The performance information refers to which keys are played at what timing and at what strength just as in a musical score Based on the recorded p...

Страница 61: ... button to start playback When the selected Song reaches the end playback stops automatically NOTE If you wish to play Songs repeatedly without stopping change the Repeat Mode as desired For details refer to page 67 Queuing the next Song for playback While a Song is playing back you can queue up the next Song for playback This is convenient for chaining it to the next Song smoothly during live per...

Страница 62: ...op up display showing the current measure number or Phrase Mark number While the Song Position pop up is shown on the display you can also use the Data dial to adjust the value NOTE Phrase Mark is a pre programmed marker in certain Song data which indicates a specific location in the Song Adjusting the tempo Same procedure as with Style tempo See page 52 Adjusting the volume balance among Song Sty...

Страница 63: ...tation by using the TAB L R buttons when the Song playback is stopped As Song playback starts the ball bounces along through the score indicating the current position NOTE The displayed notation is generated by the instrument based on the Song data As a result it may not be exactly the same as commercially available sheet music of the same song especially when displaying notation of complicated pa...

Страница 64: ...TAB R Setting Cursor button D 2 Lyrics Language You can turn to the next previous lyrics or text page by assigning the function to a pedal MENU Cursor buttons U D L R Controller ENTER TAB L Pedal For details refer to the Reference Manual on the website Chapter 9 For more information about the Lyrics Text displays refer to the Reference Manual on the website Displaying Lyrics Displaying Text Regard...

Страница 65: ...ns to set the desired channel to Solo Only the selected channel is turned on and others are off To cancel solo playback press the same button again 3 Press the EXIT button to close the Channel On Off Song display You can mute the right hand part for practicing that part on your own while you view the notes to play in the Score display The explanations here apply when you practice the right hand pa...

Страница 66: ...e viewing the Score display The playback of the left and extra parts will wait for you to play the notes correctly 6 After your practice turn the GUIDE button off For left handed practice Turn off the left hand part by using the 5UD Left buttons For both handed practice Turn off both right and left hand parts by using the 6UD Right and 5UD Left buttons Make sure to turn the ACMP button off when pr...

Страница 67: ...inues playback through all the Songs in the specified folder repeatedly Random Continues playback at random through all the Songs in the specified folder repeatedly Specifying a Range of Measures and Playing them Back Repeatedly A B Repeat 1 Select a Song steps 1 3 on page 61 2 Press the SONG R K Play Pause button to start playback 3 Specify the repeat range Press the A B REPEAT button at the star...

Страница 68: ...ve be sure to read Connecting USB Devices on page 91 Recording All Parts at a time Quick Recording This simple method lets you start recording immediately without specifying the parts or channels you want to record to For Quick Recording each part will be recorded to the following channels Keyboard parts channels 1 3 Main channel 1 Left channel 2 Layer channel 3 Style parts channels 9 16 1 Make ne...

Страница 69: ...ts and Style parts are assigned recorded to each channel as described below You can create a Song by recording each part or channel independently allowing you create a complete piece which may be difficult to play live For example you can record the right hand part to channel 1 and then record the left hand part to channel 2 while listening to the already recorded right hand part To record a perfo...

Страница 70: ...ecorded Song start recording by pressing the SONG R K Play Pause button so that you can record while listening to the already recorded data 5 After you finish your performance press the REC button again to stop recording A message may appear prompting you to save the recorded data Press the EXIT button to close the message To hear the recorded performance press the R K Play Pause button 6 Record y...

Страница 71: ...animent features with Song playback SONG R K Play Pause LL Rewind STYLE CONTROL SYNC START STYLE CONTROL START STOP Song playback related parameters MENU Cursor buttons U D L R Song Setting ENTER TAB L R Play or Setting Editing Songs Song Creator MENU Cursor buttons U D L R Song Creator ENTER Selecting the setup data to be recorded to the top position of the Song TAB L R Setup Re recording a speci...

Страница 72: ...OTE For instructions on playback and recording of MIDI files refer to page 60 You can play back audio files of WAV format 44 1 kHz sample rate 16 bit resolution stereo that have been saved to the USB flash drive NOTE DRM Digital Rights Management protected files cannot be played back 1 Connect the USB flash drive containing the audio files to the USB TO DEVICE terminal NOTE Before using a USB flas...

Страница 73: ...le NOTE If the button is not shown press the 8D Close button to call it up 3UD R K Play Pause Starts or pauses playback at the current position 4UD J Stop Stops playback 5UD Prev Pressing this changes the file to the previous one holding it moves continuously back through the current file in seconds 6UD Next Pressing this changes the file to the next one holding it moves continuously forward throu...

Страница 74: ...rd since the vocal sound is usually at the center of the stereo image in most recordings First select an Audio file and then turn the Vocal Cancel function on off by pressing this button NOTE Though the Vocal Cancel function is highly effective on most audio recordings the vocal sound on some songs may not be completely canceled Vocal cancel does not affect the Audio Input Sound page 95 from exter...

Страница 75: ...e recorded data after saving record the data as a MIDI Song page 68 To record your keyboard performance and microphone sound separately record your keyboard performance as a MIDI Song page 68 and then record the microphone sound by using the USB Audio Recorder function 1 Connect the USB flash drive to the USB TO DEVICE terminal NOTE Before using a USB flash drive be sure to read Connecting USB Dev...

Страница 76: ...h the name automatically set NOTE The recording operation continues even if you close the USB Audio Player display by pressing the EXIT button Press the USB AUDIO button to call up the USB Audio Player display again and then stop the recording by using the 4UD J buttons 7 Use the 3UD R K buttons to play back the recorded performance To see the file of the recorded performance in the Audio File Sel...

Страница 77: ...he minimum position 2 Connect the microphone to the MIC INPUT jack 3 Turn on the power of the instrument and then adjust the volume by using the MASTER VOLUME dial 4 Call up the operation display MIC SETTING TAB L Mixer 5 Make sure that Mic the 1UD buttons is turned on If necessary also turn on the power of the connected microphone 6 Adjust the input level by using the 2UD 3UD Gain buttons while s...

Страница 78: ...rophone These effects are applied to the entire instrument keyboard parts Song and Style as well as the microphone If you want to apply effects only to the microphone sound you can specify the part and select the effect type via the 8UD DSP buttons For details refer to the Reference Manual on the website This function lets you instantly change the microphone settings for talking or making announce...

Страница 79: ...e and Singing Along with Your Performance Advanced Features Refer to the Reference Manual on the website Chapter 6 Making and saving the microphone settings MIC SETTING TAB R Setting Applying desired Effect to the microphone sound MIC SETTING TAB L Mixer 8UD DSP ...

Страница 80: ...gistration Memory Bank file beforehand you can easily call up the registered settings simply by pressing a button during your performance Playlist page 84 The Playlist function allows you to create custom performance lists A Playlist contains links to call up Registration Memory Bank files for each piece you play Each link to the Registration Memory is called a Record and you can collectively stor...

Страница 81: ...eckmark To cancel the operation use the 8UD Cancel buttons NOTE You can also use the Data dial to select the items 4 Press the desired REGISTRATION MEMORY 1 4 button to which you wish to memorize the panel setup Memorized buttons are lit in orange indicating that the number button contains data and its number is selected NOTICE If you select the button whose lamp is lit in orange or green here the...

Страница 82: ...all the four current panel setups turn the power on while holding the B6 key right most B key on the keyboard Saving the Registration Memory as a Bank File All of the panel settings are registered to the four Registration Memory buttons as a single Bank file 1 Press the REGISTRATION MEMORY BANK button to call up the Registration Bank Selection display 2 Press the 6D Save button to save the Bank fi...

Страница 83: ...cord via the 4D Add To Playlist button 3 Press one of the green lit numbered buttons REGISTRATION MEMORY 1 4 NOTE If you want to clear the current memory and create a new bank i e all lamps of the REGISTRATION MEMORY buttons are turned off press the 5D New Bank button on the display above Viewing Registration Bank information You can call up the information window to confirm which Voices and Style...

Страница 84: ... operation window and then use the 3UD 4UD Create New Playlist buttons to clear the list on the Playlist display 3 Add Records to the Playlist To add a Record via the Registration Bank Selection display 3 1 Use the 1UD List buttons to call up the Registration Bank Selection display The Add To Playlist window appears automatically 3 2 Use the Cursor buttons U D L R to select the desired Bank file t...

Страница 85: ...nd the new Records are added to the bottom of the Playlist 4 If necessary edit the Record The newly added Playlist Record simply recalls the selected registration Bank file If you want to set more detailed settings such as directly recalling a specified Registration Memory number you can edit the Record 4 1 Select the Record to be edited by using the Cursor buttons U D 4 2 Press the 5UD Edit butto...

Страница 86: ...w 2 Use the 7UD Select Save buttons to call up the Playlist File Selection display 3 Select the desired Playlist file 4 Press the EXIT button to return to the Playlist display 5 Select the Record on the Playlist display by using the Cursor buttons U D and then press the ENTER button The Registration Memory Bank registered as the Playlist Record is recalled and the Action you ve made page 85 is exe...

Страница 87: ...ep 5 on page 86 Deleting the Record from the Playlist 1 On the Playlist display move the cursor to the desired Record to delete by using the Cursor buttons U D 2 Use the 3UD Delete buttons to delete the selected Record A confirmation message appears If you want to cancel the operation press one of the 6UD No buttons here 3 Use the 7UD Yes buttons to actually delete the Record 4 Save the edited Pla...

Страница 88: ...ntire Style part and Audio playback via the USB Audio Player function External Select this when you want to adjust the balance among the microphone sound and Audio Input Sounds page 95 Style Select this when you want to adjust the balance among the parts of the Style Rhy1 Rhy2 These are the basic parts of the Style containing the drum and percussion rhythm patterns Bass The bass part uses various ...

Страница 89: ...e select the Style file saved here 1 Call up the operation display MENU Cursor buttons U D L R Style Creator ENTER 2 After the message asking whether you want to edit the existing Style or create a new Style appears press one of the 5UD 6UD Current Style buttons 3 Press the EXIT button to close the Rec Channel window 4 Press one of the 8UD Save buttons to call up the Style Selection display and th...

Страница 90: ...ENU Cursor buttons U D L R Song Creator ENTER 2 Use the TAB L R buttons to select the Setup tab 3 Use the Cursor buttons U D L R to select the item to be saved and then press the ENTER button to enter or remove the corresponding checkmark 4 Use the 6 UD 7 UD Apply buttons to actually apply the changes 5 Press one of the 8UD Save buttons to call up the Song Selection display and then save the setti...

Страница 91: ...us of the instrument USB devices 1 1 cannot be used on this instrument NOTICE The rating of the USB TO DEVICE terminal is a maximum of 5V 500mA Do not connect USB devices having a rating above this since this can cause damage to the instrument itself Connecting a USB device When connecting a USB device to the USB TO DEVICE terminal make sure that the connector on the device is appropriate and that...

Страница 92: ... buttons to actually execute the Format operation By connecting a computer to the USB TO HOST terminal you can transfer MIDI data or Audio data between the instrument and the computer For details on using a computer with this instrument refer to the Computer related Operations on the website NOTICE Use an AB type USB cable of less than 3 meters USB 3 0 cables cannot be used If you are using a DAW ...

Страница 93: ...ould be installed to the computer For details refer to the Computer related Operations on the website For instructions on connecting to a smart device refer to the Smart Device Connection Manual on the website Turning Audio Loopback On Off This allows you to set whether Audio Input Sound page 95 from the external device is output to a computer or a smart device or not along with the performance pl...

Страница 94: ...available depending on your area Before using the USB TO DEVICE terminal be sure to read Precautions when using the USB TO DEVICE terminal on page 91 When using a USB cable to connect the instrument to your smart device make the connection directly without passing through a USB hub The instrument will begin transmission a short time after the smart device is connected When you use your smart devic...

Страница 95: ... Cable AUX IN jack You can connect the headphone jack of an audio player such as a smartphone and portable audio player to the instrument s AUX IN jack Audio playback on the connected device is output from the built in speakers of this instrument NOTICE To avoid damage to the devices first turn on the power to the external device and then to the instrument When turning off the power first turn off...

Страница 96: ...t be compatible with A2DP Advanced Audio Distribution Profile The Bluetooth Audio function is explained here by using a smart device as an example of such Bluetooth equipped devices 1 Call up the Bluetooth display MENU Cursor buttons U D L R Bluetooth ENTER 2 Make sure that the Bluetooth function is set to On You can turn the Bluetooth function on off by using the 2UD 3UD buttons Before using the ...

Страница 97: ...f you are required to enter a passkey enter the numerals 0000 5 Play back audio data on the smart device to confirm that the built in speakers of the instrument can output the audio sound When you turn on the instrument the next time the last connected Bluetooth equipped device will be connected to this instrument automatically if the Bluetooth function of the Bluetooth equipped device and the ins...

Страница 98: ... damage the equipment NOTE Use audio cables and adaptor plugs having no zero resistance Reproducing a Natural Sound Distance Sensation even when using Headphones Stereophonic Optimizer The Stereophonic Optimizer feature recreates for headphones the spacious sensation you hear when you play an acoustic piano In general the sound from headphones is much too close to your ears for natural sound When ...

Страница 99: ...l unit can be connected to the PEDAL UNIT jack For details refer to page 15 NOTE Make sure that power is off when connecting or disconnecting the pedal Do not press the pedals while turning the power on Doing this changes the recognized polarity of the pedals resulting in reversed operation Connecting a Foot Pedal AUX PEDAL jack Connecting a Pedal Unit PEDAL UNIT jack Advanced Features Refer to th...

Страница 100: ... what you can do with each function or where you can find detailed instructions refer to the Function List on Page 101 1 Press the MENU button to call up the Menu display 2 Move the cursor to the desired function by using the Cursor buttons U D L R and then press the ENTER button to call up the corresponding display The Menu display consists of two pages Menu1 Menu2 You can switch between these pa...

Страница 101: ... Main Layer Left Chapter 2 Voice Set Filter Determines which settings effects etc linked to the Voices are not called up when selecting a Voice Chapter 2 Style Setting Setting1 2 For making Style playback related settings such as Unison Accent Auto Fill in Intro Ending type Synchro Stop Stop ACMP etc Page 54 Chapter 3 Adaptive Style For turning the Adaptive Style function on off and making related...

Страница 102: ... are changed via Registration Memory One Touch Setting etc Chapter 10 USB Indicates the capacity of the connected USB flash drive and allows you to format it Page 92 System Common Indicates the firmware version of this instrument and lets you make basic settings such as the language for the display and the Auto Power Off function Page 18 Backup Restore For backing up and restoring the settings and...

Страница 103: ...n appropriate level with the MASTER VOLUME dial All keyboard parts are set to off Use the PART ON OFF MAIN LAYER LEFT button to turn on the desired part The volume of the individual parts may be set too low Raise the volume in the Mixer display page 88 Make sure the desired channel is set to on pages 53 65 Make sure a pair of headphones or an adapter plug is not connected to the PHONES OUTPUT jack...

Страница 104: ...he selected Style may not contain any data Turn the ACMP button on and play left hand section on the keyboard to sound the accompaniment part of the Style Only the rhythm channel plays Make sure the Auto Accompaniment function is turned on press the ACMP button Make sure to play keys in the chord section of the keyboard page 49 Styles in a USB flash drive cannot be selected If the size of the Styl...

Страница 105: ...cted to the PHONES OUTPUT jack The Speaker setting is On Set the speaker setting to Headphone Switch via MENU Cursor buttons U D L R Utility ENTER TAB L Config1 Cursor button D 1 Speaker For details refer to the Reference Manual on the website Chapter 10 The on off setting of the pedal connected to the AUX PEDAL jack is reversed Change the polarity settings MENU Cursor buttons U D L R Controller E...

Страница 106: ...ices 68 Live Voices Compatibility for Song playback XG GS GM GM2 Other Features Mono Poly Yes Effects Types Reverb 58 Preset 30 User Chorus 106 Preset 30 User DSP 295 Preset 30 User Master Compressor 5 Preset 30 User Master EQ 5 Preset 30 User Part EQ 27 Parts Intelligent Acoustic Control IAC Yes Stereophonic Optimizer Yes Functions Dual Layer Yes Split Yes Styles Preset Number of Styles 263 Featu...

Страница 107: ...purchased the product Bluetooth version 4 1 Supported profile A2DP Compatible codec SBC Wireless output Bluetooth class 2 Maximum communication distance Approx 10 m Radio Frequency Operational Frequency 2 402 2 480 MHz Maximum output power EIRP 4 dBm Type of modulation GFSK π 4 DQPSK 8DPSK Storage and Connectivity Storage Internal Memory Approx 20 MB External Drives USB flash drive Connectivity DC...

Страница 108: ...ure GS GS was developed by the Roland Corporation In the same way as Yamaha XG GS is a major enhancement of the GM specifically to provide more Voices and Drum kits and their variations as well as greater expressive control over Voices and effects XF The Yamaha XF format enhances the SMF Standard MIDI File standard with greater functionality and open ended expandability for the future This instrum...

Страница 109: ...Access 22 Drum Kit Tutor 40 DSP 46 E Effect Mic 78 Effect Mixer 89 Effect Voice 45 Ending section 50 EQ 89 F Factory Reset 34 Fast forward 62 73 File 26 File Selection display 24 Fill in 52 Filter 89 Fingered 56 Fingered On Bass 56 Fingering type 56 Folder 27 Footswitch 14 Format 92 Freeze 83 Full Keyboard 57 G Guide 65 H Half pedal 15 Headphones 98 I IAC Intelligent Acoustic Control 17 Initialize...

Страница 110: ...3 Single Finger 56 Smart Chord 57 Smart Device 94 Song MIDI 60 Song Creator 71 Speaker 98 Split Point 58 Stand 15 Stereophonic Optimizer 98 Stop Audio 73 Stop Style 50 Style 48 Style Creator 59 Style Split Point 58 Super Articulation Voice 42 Synchro Start Song 62 Synchro Start Style 50 T Talk 78 Tempo 52 Text 64 Time Stretch 74 Touch Response 43 Touch Sensitivity 43 Transpose 44 Tuning 45 U Uniso...

Страница 111: ...RVICES LOSS OF USE DATA OR PROFITS OR BUSINESS INTERRUPTION HOWEVER CAUSED AND ON ANY THEORY OF LIABILITY WHETHER IN CONTRACT STRICT LIABILITY OR TORT INCLUDING NEGLIGENCE OR OTHERWISE ARISING IN ANY WAY OUT OF THE USE OF THIS SOFTWARE EVEN IF ADVISED OF THE POSSIBILITY OF SUCH DAMAGE COPYRIGHT AND PERMISSION NOTICE ICU 58 and later Copyright 1991 2016 Unicode Inc All rights reserved Distributed u...

Страница 112: ...ion Science and Economic Development Canada s licence exempt RSS s Operation is subject to the following two conditions 1 This device may not cause interference 2 This device must accept any interference including interference that may cause undesired operation of the device L émetteur récepteur exempt de licence contenu dans le présent appareil est conforme aux CNR d Innovation Sciences et Dévelo...

Страница 113: ... compliance doc html LV Latvian VIENKĀRŠOTA ES ATBILSTĪBAS DEKLARĀCIJA Ar šo Yamaha Music Europe GmbH deklarē ka radioiekārta DGX 670 atbilst Direktīvai 2014 53 ES Pilns ES atbilstības deklarācijas teksts ir pieejams šādā interneta vietnē https europe yamaha com en support compliance doc html LT Lithuanian SUPAPRASTINTA ES ATITIKTIES DEKLARACIJA Aš Yamaha Music Europe GmbH patvirtinu kad radijo įr...

Страница 114: ......

Страница 115: ...Yamaha Music Europe GmbH Tyskland Generatorvej 8C ST TH 2860 Søborg Denmark Tel 45 44 92 49 00 FINLAND F Musiikki Oy Antaksentie 4 FI 01510 Vantaa Finland Tel 358 0 96185111 NORWAY Yamaha Music Europe GmbH Germany Norwegian Branch Grini Næringspark 1 1332 Østerås Norway Tel 47 6716 7800 ICELAND Hljodfaerahusid Ehf Sidumula 20 IS 108 Reykjavik Iceland Tel 354 525 5050 CYPRUS Nakas Music Cyprus Ltd ...

Страница 116: ...Manual Development Group 2020 Yamaha Corporation Published 06 2020 MWMA B0 Yamaha Global Site https www yamaha com Yamaha Downloads https download yamaha com VDD7370 ...

Отзывы: