background image

About the Menu Settings

POCKETRAK CX   Reference Manual

52

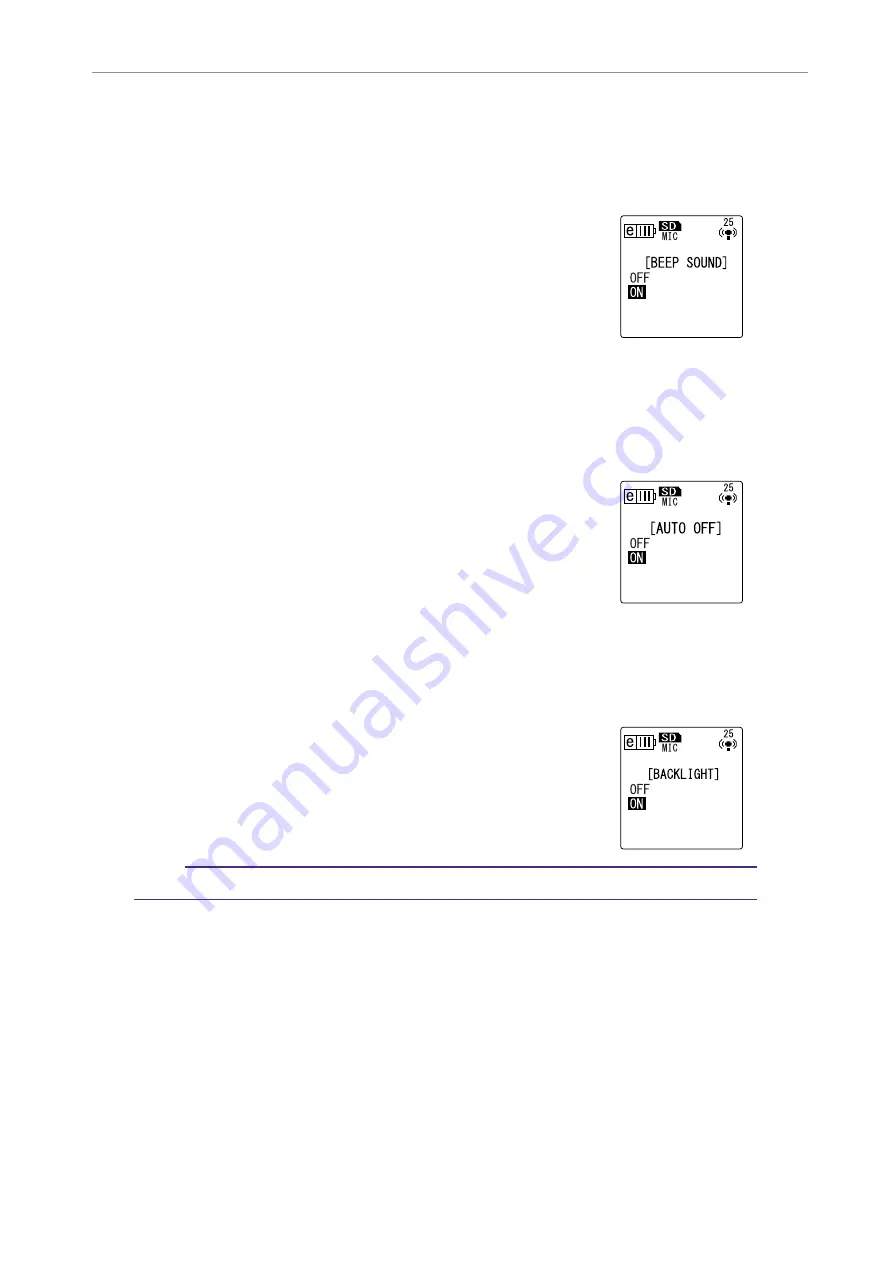
Turning the beep sound on or off

You can set the recorder so that it will make a beep sound when you operate the buttons or if 
you make an operational error.

Procedure:

Press the [MENU/ENTER] button for at least two (2) seconds 
while the main screen is displayed, press the [VOL +/-] buttons 
to select [COMMON MENU] 

 [BEEP SOUND] 

 [ON], then 

press the [MENU/ENTER] button.
To cancel the beep sound, select [OFF].

Activating the Auto Power Off function

If this function is turned on and you leave the recorder turned on for about 15 minutes without 
using it, the recorder will automatically turn off (except during recording, VAS recording standby 
mode, or playback).

Procedure:

Press the [MENU/ENTER] button for at least two (2) seconds 
while the main screen is displayed, press the [VOL +/-] buttons 
to select [COMMON MENU] 

 [AUTO OFF] 

 [ON], then 

press the [MENU/ENTER] button.
To cancel the Auto Power Off function, select [OFF].

Setting the Backlight function

When the Backlight function is turned on, the LCD backlight lights up for about 10 seconds each 
time you press a button or switch on the unit.

Procedure:

Press the [MENU/ENTER] button for at least two (2) seconds 
while the main screen is displayed, press the [VOL +/-] buttons 
to select [COMMON MENU] 

 [BACKLIGHT] 

 [ON], then 

press the [MENU/ENTER] button.
To cancel the Backlight function, select [OFF]. (The backlight 
will not light up.)

Note:

· If the battery power is insufficient, the backlight will not light up.

Содержание POCKETRAK CX

Страница 1: ...EN POCKET RECORDER POCKETRAK CX Reference Manual ...

Страница 2: ...tting the Auto Divide function AUTO DIVIDE 23 Recording with the self timer 24 Changing the LED setting 25 Playback 26 Playing back files 26 Playing back tracks from the Playlist 27 Indicators displayed during playback 27 Fast forwarding and fast reversing 28 Using headphones 28 Playback Settings 29 Changing the playback speed 29 Playing back specific sections of a track 30 Using the Skip playback...

Страница 3: ...s 80 Index 82 Copyrights Copying of the commercially available musical data is strictly prohibited except for your personal use This Reference Manual is the exclusive copyrights of Yamaha Corporation Windows is a registered trademark of Microsoft Corporation in the United States and other countries Apple Mac and Macintosh are trademarks of Apple Inc registered in the U S and other countries Eneloo...

Страница 4: ...ton to return to the previous screen during the menu setting operation or while the list screen is displayed move the cursor to the left or set the recording level 7 button Fast forward button Also use this button to proceed to the next screen during the menu setting operation or while the list screen is displayed move the cursor to the right or set the recording level 8 MENU ENTER button While th...

Страница 5: ...evice such as a CD player page 14 e POWER button Turns the power to the POCKETRAK CX on or off Press the button once briefly to turn the power on Press and hold down the button for at least two 2 seconds to turn the power off r FOLDER A B REPEAT button Press this button to select a folder or to use the A B Repeat or Clear Voice function t LIST INDEX button To display a list of files in the selecte...

Страница 6: ...e 71 a Headphones socket Connect inner ear headphones or other types of headphones here s ALC ON OFF switch Set this switch to ON to automatically adjust the recording level in accordance with the source level to optimize the dynamics of the resulting recording Turning the ALC Auto Level Control on and off page 17 d MIC SENS HIGH LOW switch Switches the microphone sensitivity to high or low in acc...

Страница 7: ... recording files into a computer The WAVE file extension is WAV MP3 and WMA format files are created by compressing the LPCM data External recording mode MIC LINE Timer Alarm Auto Divide Recording level with ALC off Microphone sensitivity High Pass Filter File number Total number of files Repeat playback Skip playback Playback speed Sound EQ microSD card Bit rate for recording and playing back MP3...

Страница 8: ...order stops playback VOL MENU ENTER SPEED PAUSE ESC PLAY STOP REC MENU ENTER Main screen Appears when the power to the unit is turned on Menu screen Appears when you press and hold down the MENU ENTER button for at least two 2 seconds while the main screen is displayed This screen enables you to change Recording mode set the date and time ini tialize the recorder and make various other settings Li...

Страница 9: ...yed press the VOL buttons to select COMMON MENU then press the MENU ENTER button 2 Press the VOL buttons to select DATE TIME then press the MENU ENTER button 3 Press the VOL buttons to select the year then press the button 4 In the same way select the month day 24 12 hour indication 24H or AM PM hour and minute then press the MENU ENTER button 5 Press the STOP ESC button twice The recorder display...

Страница 10: ...optimize the dynamics of the resulting recording see page 17 Setting the microphone sensitivity You can set the microphone sensitivity level to high or low to accommodate the input volume If the volume level is too high set the MIC SENS microphone sensi tivity switch on the left side of the unit to LOW If the volume level is too low set the switch to HIGH Using an external microphone You can use a...

Страница 11: ...l Recording a musical performance Before recording set the ALC switch to OFF and the MIC SENS microphone sensitivity switch to LOW 1 Press the FOLDER A B REPEAT button located on the side panel repeatedly to select a folder into which to record Hint Pressing the FOLDER A B REPEAT button repeatedly will scroll through the folders Select a folder from folders A D 2 Press the REC PAUSE button The uni...

Страница 12: ...Setting an appropriate recording level Adjust the recording level so that at the loudest source volume the level meter will move as far to the right as pos sible without deflecting all the way and the recording LED will not turn off If the recording level is too low Press the button to adjust the recording level so that the level meter will move moderately to the right Note If an appropriate recor...

Страница 13: ...OLDER A B REPEAT button located on the side panel repeatedly to select a folder into which to record Hint Pressing the FOLDER A B REPEAT button repeatedly will scroll through the folders Select a folder from folders A D VOL MENU ENTER SPEED PAUSE ESC PLAY STOP REC Recording mode Recording level Available recording time Recording remaining time Folder name Recording in progress indicator Level mete...

Страница 14: ...r You can record line input sources from an external audio device such as a CD player or MD player 1 Press the MENU ENTER button for at least two 2 seconds while the main screen is displayed press the VOL buttons to select REC MENU REC SELECT then press the MENU ENTER button 2 Press the VOL buttons to select LINE then press the MENU ENTER button Note Please note that you cannot adjust the recordin...

Страница 15: ...he recording source on the external audio device and press the REC PAUSE button Recording starts Note A recording mode of MP3 192kbps will be selected automatically You cannot select any other mode option While you are recording audio through the line input from the connected external device no audio will be heard from the speaker Use the headphones to listen to the audio being recorded 7 Press th...

Страница 16: ...ailable recording space for continuous recording in one file is 2GB Recording format Sampling frequency or bit rate File extension Application examples PCM 48 kHz WAV Recording a musical performance creating a master recording creating a CD and recording other original sound sources Higher sound quality 44 1 kHz MP3 320 kbps MP3 High quality recording of musical practice sessions conference meetin...

Страница 17: ...LC Auto Level Control on and off Note You can turn the ALC function on or off when recording audio to folders A D Turning the ALC function on Slide the ALC switch located on the side panel of the unit to ON The recording level will automatically be adjusted in response to the input level Turning the ALC function off Slide the ALC switch located on the side panel of the unit to OFF You can change t...

Страница 18: ...NDED FLAT SUPER BASS BASS MIDDLE BASS TREBLE TREBLE and SUPER TREBLE Features of each recording EQ preset Note You cannot change the parameters of these eight recording EQ presets Select the USER recording EQ option if you wish to customize the recording EQ RECOMMENDED FLAT SUPER BASS BASS This preset is recom mended for recording via the built in micro phone No EQ is used for recording This prese...

Страница 19: ...ndicator is displayed The unit displays the recording EQ screen 5 Press the buttons to select the desired recording EQ option You can select from eight recording EQ presets and one USER recording EQ which enables you to customize the EQ settings Hint For information on how to customize the USER recording EQ option refer to Customiz ing the recording EQ on page 20 6 Press the MENU ENTER button The ...

Страница 20: ...the VOL buttons to boost or cut the level of the selected fre quency band You can boost the level by as much as 12dB or cut the level by as much as 12dB in 1dB steps The larger value will raise the recording level and boost the fre quency band Note To adjust the level of other frequency bands repeat steps 3 and 4 To cancel the operation press the STOP ESC button 5 Press the MENU ENTER button The U...

Страница 21: ... Filter HPF You can cut the low frequency range by switching the High Pass Filter on The filter reduces the level of chatting voices wind and other noise in the recording environment and enables you to record clearer audio Procedure Press the MENU ENTER button for at least two 2 seconds while the main screen is displayed select REC MENU HPF High Pass Filter ON then press the MENU ENTER but ton To ...

Страница 22: ... recording time indicator and the VAS indicator will flash and the unit will enter Recording Pause mode Note If the recorder does not detect any audio or does not pause recording adjust the threshold by following the procedure in the Setting the voice sensing level VAS value section below If you start recording while the VAS function is turned on the first two seconds or so will be recorded with n...

Страница 23: ...rd the first track as file 1 the second track as file 2 and so on 1 Press the MENU ENTER button for at least two 2 sec onds while the main screen is displayed select REC MENU AUTO DIVIDE ON then press the MENU ENTER button 2 Press the STOP ESC button twice The unit displays the main screen including the Auto Divide indicator To cancel the Auto Divide function select OFF in step 1 Note The function...

Страница 24: ...ess the MENU ENTER button 3 Press the STOP ESC button twice The recorder displays the main screen 4 Press the FOLDER A B REPEAT button located on the side panel repeatedly to select a folder into which to record 5 Press the REC PAUSE button The recorder displays the self timer standby screen then starts counting down for the duration specified in step 2 The LED indicator flashes Note If the ALC sw...

Страница 25: ...tton for at least two 2 seconds while the main screen is displayed select COMMON MENU REC PLAY LED then press the MENU ENTER button 2 Press the VOL buttons to select OFF REC PLAY or PEAK PLAY then press the MENU ENTER button 3 Press the STOP ESC button twice The recorder displays the main screen OFF The LED indicator remains off during recording and playback REC PLAY The LED indicator lights up in...

Страница 26: ...ess the FOLDER A B REPEAT button located on the side panel repeatedly to select a folder from which to play back a file Hint Pressing the FOLDER A B REPEAT button repeatedly will scroll through the folders 2 Press the buttons to select the desired file number 3 Press the PLAY SPEED button The recorder starts playing back the file 4 Press the VOL buttons to set the proper playback volume level The ...

Страница 27: ...uttons to select the desired Playlist then press the MENU ENTER button 3 Press the PLAY SPEED button The recorder starts playing the tracks in the sequence specified in the Playlist To resume normal playback press the FOLDER A B REPEAT button while the unit is stopped Note The unit will not play the tracks from a Playlist if the Playlist contains an error in the drive name folder name file name et...

Страница 28: ...ack a file that contains index marks press the Y button once briefly to skip to the next index mark Press the T button once briefly to locate the previous index mark Hint For information on inserting index marks refer to page 40 Using headphones Use headphones if you do not want sound to be output from the speaker or if the sound from the speaker is difficult to hear Connect the headphones to the ...

Страница 29: ... FAST The corresponding playback speed indicator appears on the screen The playback speed varies with the file format as follows The recorder remembers the changed playback speed after the playback is stopped and will use that speed for the next playback operation However the playback speed will be reset to normal when the power is turned off Note You can change the speed only for playback of MP3 ...

Страница 30: ...s the buttons Playback will skip ahead or back by the specified amount of time Note The playback point will not skip to the next or previous folder The function is effective only within one folder If the distance between the current point and an index mark or the beginning of the next file is shorter than the distance between the current point and the skip point the recorder will locate the index ...

Страница 31: ...ack do one of the following operations during A B Repeat playback Press the FOLDER A B REPEAT button again Press the STOP ESC button Press the buttons Note If the duration between point A and B is too short you will be unable to set up A B Repeat playback If you set point A but not point B the end of the file will automatically become point B Using the Phrase playback function You can move back th...

Страница 32: ...ton twice The recorder displays the main screen Hint You can specify the amount of time for Phrase playback by displaying the menu screen during playback Playing back the same track repeatedly You can play back the same track repeatedly Repeat playback The Repeat playback function features various Repeat playback modes such as playing back the same file repeatedly playing files in a folder in norm...

Страница 33: ...io playback less static or noisy and easier to listen to You can use this function for the files in the VOICE A D folders This function is not effective on files in the LINE L MUSIC M and Recycle Bin folders 1 During playback press and hold down the FOLDER A B REPEAT button located on the side panel for at least two 2 seconds The Clear Voice function turns on Press and hold down the FOLDER A B REP...

Страница 34: ...idually to suit your preference The sound EQ presets include FLAT BASS1 BASS2 POP ROCK and JAZZ Features of each sound EQ preset Note You cannot change the parameters of the six sound EQ presets Use the USER EQ option if you wish to adjust the sound EQ to suit your preference FLAT BASS1 BASS2 No EQ is used The original sound will be played as is This preset mildly boosts the lower frequency range ...

Страница 35: ...sired sound EQ option Select from six sound EQ presets and one USER EQ option which enables you to customize the EQ set tings Hint For information on how to customize the USER EQ option refer to Customizing the sound EQ option on page 36 3 Press the MENU ENTER button The selection of the sound EQ option is confirmed 4 Press the STOP ESC button The recorder displays the main screen Hint You can sel...

Страница 36: ...nd to cut or boost The selected frequency band will be displayed as a black bar 4 Press the VOL buttons to boost or cut the level of the selected fre quency band You can boost the level by as much as 12dB or cut the level by as much as 12dB in 1dB steps The larger value will raise the playback level and boost the frequency band Note To adjust the level of other frequency bands repeat steps 3 and 4...

Страница 37: ...PEED button The recorder starts playing back the file 3 Press the STOP ESC button at the point at which you wish to divide the file The recorder stops playback 4 Press the EDIT PHRASE button located on the side panel press the VOL buttons to select DIVIDE then press the MENU ENTER button 5 Press the buttons to select YES then press the MENU ENTER button The recorder displays the message DIVIDING t...

Страница 38: ...division The two pieces created by a file division overlap each other at the division point as shown in the table below To be divided successfully a file must be twice the overlap time or longer in duration Recording mode Overlap time Required length MP3 32 kbps About 8 seconds About 16 seconds or longer 64 kbps About 4 seconds About 8 seconds or longer 128 kbps About 2 seconds About 4 seconds or ...

Страница 39: ...e in effect 2 Press the buttons to select the desired file number then press the EDIT PHRASE button located on the side panel 3 Press the VOL buttons to select FADE IN then press the MENU ENTER button 4 Press the VOL buttons to select YES then press the MENU ENTER button The unit displays the message FADE IN EXECUT ING Note If you have selected any file other than a PCM file recorded on the unit o...

Страница 40: ... forward fast reverse or playback operation You can insert index marks only in the files in the VOICE A D folders Inserting index marks 1 During recording or playback press the LIST INDEX button located on the side panel at the point where you want to insert an index mark The unit displays the message INDEX SETTING and the index mark is inserted Note Recording or playback continues after you inser...

Страница 41: ... The unit displays the message DELETING and the index marks are deleted Note Deleting index marks will not delete the audio recording You cannot delete index marks individually All index marks in a file will be deleted If you delete a file that contains index marks the index marks will be deleted even if the Recycle Bin function see page 42 is turned on If you move the file from the Recycle Bin ba...

Страница 42: ...ess the VOL buttons to select COMMON MENU RECYCLE BIN ON then press the MENU ENTER button The Recycle Bin function is turned on 2 Press the STOP ESC button twice to go back to the main screen Note You can move files to the Recycle Bin folder only from the VOICE A D folders and LINE L folder You cannot move files from the MUSIC M folder to the Recycle Bin folder regardless of whether the Recycle Bi...

Страница 43: ...DER A B REPEAT button located on the side panel repeatedly to select the Recycle Bin folder 2 Press the DEL button located on the side panel 3 Press the VOL buttons to select RESTORE then press the MENU ENTER button 4 When the Restore screen is displayed press the buttons to select the desired file then press the MENU ENTER button The selected file number flashes 5 Press the VOL buttons to select ...

Страница 44: ...on the side panel repeatedly to select the Recycle Bin folder 2 Press the DEL button located on the side panel 3 Press the VOL buttons to select EMPTY then press the MENU ENTER button Emptying the Recycle Bin will permanently delete all files in the Recycle Bin and the same files from the microSD card You will be unable to restore those files Be sure to backup important files on a computer or othe...

Страница 45: ...MENU ENTER button 4 When the File Delete screen is displayed press the buttons to select a file to delete then press the MENU ENTER button The selected file number flashes 5 Press the VOL buttons to select YES then press the MENU ENTER button The unit displays the message DELETING and the file is deleted Note If you decide not to execute the delete operation select CANCEL then press the MENU ENTER...

Страница 46: ...ete all files on the card regardless of whether the Recycle Bin function is turned on or off You must also format a commercially available microSD card before you use the card for the first time If you delete files from the microSD card you will be unable to restore those files Be sure to check the file contents before you delete a file Be sure to backup important files on a computer or other exte...

Страница 47: ...TART TIME Press the buttons to select the hour or minute use the VOL buttons to set the value then press the MENU ENTER button Note You can program the time up to 24 hours ahead 4 Specify the recording time duration REC TIME Press the buttons to select the desired recording time duration from 30m 1h 2h or MAX recording continues until the available space used up Then press the MENU ENTER button 5 ...

Страница 48: ...ou cannot program Timer recording if the alarm has already been programmed and vice versa Canceling Timer recording Select CANCEL as in step 2 of the Programming Timer recording procedure then press the MENU ENTER button Programming the alarm If you program the alarm it will sound at the specified time You can specify your favorite song as the alarm sound instead of a beep Before you proceed make ...

Страница 49: ... the volume level is set to 0 you will not hear the alarm at the programmed time 5 Press the STOP ESC button twice The alarm is now programmed At the programmed time the alarm will go off If you selected BEEP a beep will sound for about 10 seconds If you selected MUSIC the music file the entire song in the ALARM folder will be played back Note The alarm indicator will flash while the alarm is soun...

Страница 50: ...ce activated system on or off 22 Menu items Description Reference page REPEAT Sets the Repeat playback mode 32 PHRASE PLAY Sets the Phrase playback time by the number of seconds the playback point will be moved back 31 SKIP PLAY Sets the Skip playback time by the amount of time the playback point will skip 30 SOUND EQ Adjusts the tone 34 Menu items Description Reference page BEEP SOUND Turns the b...

Страница 51: ...he VOL buttons to select REC MODE then press the MENU ENTER button 4 Press the VOL buttons to select MP3 128kbps then press the MENU ENTER button 5 Press the STOP ESC button twice The recorder displays the main screen Selecting the battery type Select eneloop or alkaline depending on the battery type you plan to use Procedure Press the MENU ENTER button for at least two 2 seconds while the main sc...

Страница 52: ...urn off except during recording VAS recording standby mode or playback Procedure Press the MENU ENTER button for at least two 2 seconds while the main screen is displayed press the VOL buttons to select COMMON MENU AUTO OFF ON then press the MENU ENTER button To cancel the Auto Power Off function select OFF Setting the Backlight function When the Backlight function is turned on the LCD backlight l...

Страница 53: ...ry default Note Initializing the recorder settings will not delete any data on the microSD card For infor mation on initializing a microSD card refer to page 46 Procedure Press the MENU ENTER button for at least two 2 seconds while the main screen is displayed press the VOL buttons to select COMMON MENU MENU RESET YES then press the MENU ENTER button If you decide not to initialize the settings se...

Страница 54: ...e Edition Macintosh Computer Macintosh computer with built in USB interface OS Mac OS X 10 4 10 5 Note The menu items and buttons displayed on your computer may not exactly match those shown in this manual depending on the OS version of your computer This manual uses Windows XP and Widows Media Player 11 as examples Please visit the website below for the latest information on included software and...

Страница 55: ...isappears from the desktop remove the USB cable Precautions when using the USB terminal Be sure to observe the following points when connecting the recorder to a computer s USB interface If you do not observe these points you risk freezing the computer corrupting the data and losing the data If the computer or the recorder freezes restart the operating system or appli cation software such as Windo...

Страница 56: ...puter follow the steps below 1 From the Start menu or on the desktop right click My Computer to dis play the pop up menu then select Properties to open the System Prop erty window 2 Click the Hardware tab then click Device Manager to open the Device Manager window 3 Expand Disk drives and Universal Serial Bus controllers Disk drives must include Yamaha Pocketrak USB Device and the Universal Serial...

Страница 57: ...ick to select Open folder to view files then click OK The sys tem will display the recorder s folders Files are stored in the following folders on the microSD card VOICE A D These folders store audio files in MP3 or WAV format recorded by the unit The VOICE folder contains sub folders A D Note Do not move the files to a different folder For example do not move a file in the A folder to the B folde...

Страница 58: ...folder This folder will be recognized only by a connected computer The recorder will not dis play this folder on its screen LINE This folder stores files recorded from external devices via the line connection Please note that if you change the name of an MP3 file originally recorded on the unit on the computer then move the file back to the LINE L folder you will be unable to play the file on the ...

Страница 59: ...Each file will be numbered sequentially based on when the file was moved to the Recycle Bin e g 001 002 003 etc 2 Folder name The folder that originally contained the file before it was moved to the Recycle Bin 3 File number The original number of the file before it was moved to the Recycle Bin 4 Extension File format MP3 for an MP3 recording file and WAV for a PCM recording file Folder File VOICE...

Страница 60: ...the recorder Drag and drop the audio file to the MUSIC M folder on the computer desktop in the Removable Disk icon Windows or recorder drive icon Macintosh Before transferring audio files to the VOICE A D folders or LINE L folder rename the files following the file naming rules see page 59 The unit will not play files that do not comply with the file naming rule unless they are in the MUSIC M fold...

Страница 61: ...the Burn List pane in the Windows Media Player panel 5 Click Start Burn to start copying the files to the CD R RW disc Audio CD Audio files are converted to CD DA format and copied to a CD R RW disc You can play the disc on a CD R compatible CD player in your home or car Data CD Audio files MP3 or PCM are copied to a CD R RW disc without conversion You can play the disc on a computer but not on an...

Страница 62: ...lly available music data is strictly prohibited except for your per sonal use Yamaha makes no representations or warranties with regard to the content of files and cannot be held responsible for the failure of transfers or downloads or for damage or erasure of music files due to malfunction of the unit or your computer Ripping CDs Creating compatible music files from music CDs You can import music...

Страница 63: ...r computer has access to the Internet the system will automatically obtain and display music information related to the CD 5 Check the box for each song that you wish to rip to your computer then click Start Rip The system starts ripping the CD Note You can also set Windows Media Player so that inserting a music CD will automatically start ripping Click Click Check ...

Страница 64: ...1 From the Start menu select All Programs then click Windows Media Player to start Windows Media Player 2 Click Sync in the menu bar 3 Connect the recorder to the computer Note If the system displays the Device Setup window click Finish 4 Right click Sync in the menu bar then select Pocketrak Advanced Options 5 Check the box for Create folder hierarchy on device on the Sync tab then click OK Note ...

Страница 65: ...K CX Reference Manual 65 6 Drag and drop the desired music files from the Library pane in the left col umn of the window to the Sync List pane in the right column of the window 7 Click Start Sync The files will be transferred to the POCKETRAK CX Click ...

Страница 66: ...folder into the Playlist in the desired sequence Enter the file names into the Playlist in the following format Drive name Folder name File name See the example below 3 From the File menu select Save As then name the file xxx file name m3u to save the Playlist 4 Transfer the saved Playlist file to the MUSIC M folder on the recorder see page 58 Be sure to transfer the Playlist file directly to the ...

Страница 67: ...t the included DVD ROM into the computer s DVD ROM drive 3 Double click the CubaseAI4 msi icon in the Cubase AI 4 for Windows folder for Windows users or double click the CubaseAI4 mpkg in the Cubase AI 4 for MacOS X for Macintosh users Follow the on screen instructions to install the Cubase AI software Note To continue to use Cubase AI and be eligible to receive support and other benefits you wil...

Страница 68: ...Application Cubase AI 4 If you specified a file destination when installing the Cubase AI software launch the application from that location Create a Cubase AI shortcut or alias on your desktop so that you can easily launch the program when required 2 Select New Project from the File menu to create a new project file The new project dialog window will open For this example select CAI4 4 Stereo 8 M...

Страница 69: ... are to be stored and click OK An empty project window with 4 stereo and 8 monaural tracks will appear 4 Click in the track list the area in which the track names are displayed to select a track into which to import audio data Various settings for the selected track are available in the Inspector on the left side of the display Project window Mixer window Transport panel Inspector Track list ...

Страница 70: ...then click Open Note If the Import Options dialog box appears select the desired options then click OK 7 To save the project file select Save from the File menu enter a file name then save the file Save your project file frequently to avoid losing unsaved data in case a problem occurs Hint For further instructions such as adding effects or mixing refer to the PDF manual pro vided with the software...

Страница 71: ...e HOLD CHARGE switch setting When recharging is complete the LED turns off Note Recharging a completely exhausted eneloop battery takes approximately 220 minutes You can recharge an eneloop battery during data transfer However the battery may be exhausted more quickly 5 Disconnect the recorder from your computer Note The battery may become warm during recharge but this is normal The battery life h...

Страница 72: ... DATA You pressed the PLAY SPEED button but the selected folder contains no files CANNOT CHANGE PLAYBACK SPEED You attempted to change the playback speed while playing back a PCM recording You cannot change the playback speed of PCM WAV files Editing Index INDEX FULL You attempted to insert more index marks than the maximum number 36 of index marks allowed per file No more index marks will be reco...

Страница 73: ... pressed the EDIT PHRASE button to edit a file in the MUSIC folder List screen NO FILE The selected folder does not contain any files that can be played on the unit Recycle Bin CANNOT EDIT READ ONLY MODE You pressed the EDIT PHRASE button to edit a file in the Recycle Bin folder FOLDER FULL You cannot move the file from the Recycle Bin to its original folder because the folder contains the maximum...

Страница 74: ...o eneloop see page 51 Possible cause The HOLD CHARGE switch is not set correctly Corrective action Set the HOLD CHARGE switch to HOLD w Icon appeared when you attempted to recharge the battery Possible cause You attempted to recharge a battery other than the eneloop You attempted to recharge the battery but no battery was inserted The eneloop is not inserted correctly Corrective action Insert the ...

Страница 75: ...e cause The audio file is not in the type of PCM WAV format that is supported by the unit Corrective action The unit will not play back a WAV file that was not recorded on the unit Possible cause The file was transferred to an incorrect destination Corrective action The unit will not play files that were transferred from a computer to a folder other than the MUSIC M folder Be sure to transfer the ...

Страница 76: ...connected via a bus powered USB hub remove the hub then use the included USB cable to connect the recorder directly to the computer s USB terminal Alternatively use a self powered USB hub with the power adapter If the computer features multiple USB terminals use a different USB terminal to connect the recorder see page 54 Possible cause A network drive has been assigned Corrective action If a netw...

Страница 77: ...n stereo microphones Turn on the High Pass Filter via menu item HPF see page 21 Set the MIC SENS microphone sensitivity switch to LOW The recorded sound is distorted Possible cause The microphone sensitivity level may not be appropriately set Corrective action Set the MIC SENS microphone sensitivity switch to LOW If you still hear distortion set the High Pass Filter to ON and attach the wind scree...

Страница 78: ...l on the unit You can also dub the recordings from your tape player or MD player to the unit see page 14 Q Are there any tips to making a good recording A Try a test recording to set the optimum recording mode and sensitivity see page 10 since the recording condition varies with the location and circumstances Q Does the available recording time specified in the manual apply to each file A No it re...

Страница 79: ... the computer and transferred back to the unit A You may have changed the file name on the computer If you change the file name the file will not play even if it is transferred back into the VOICE or LINE folder However you will be able to play the file if you transfer it into the MUSIC folder ...

Страница 80: ...M 48kHz 16bit 40 21 000Hz PCM 44 1kHz 16bit 40 20 000Hz MP3 320kbps 40 20 000Hz MP3 192kbps 40 15 000Hz MP3 128kbps 40 7 500Hz MP3 64kbps 40 6 500Hz MP3 32kbps Frequency response recording with the built in microphone 60 20 000Hz PCM recording The high end frequency response varies with the recording mode that was selected for recording with an external microphone The low end response is 60Hz in a...

Страница 81: ...pprox 54 hours PCM Approx 22 hours Eneloop MP3 Approx 44 hours PCM Approx 21 5 hours Recording condition Record ing LED off backlight off no recording monitoring ALC on Battery life for playback through headphones with the included 2GB microSD card Alkaline battery MP3 Approx 58 5 hours PCM Approx 25 hours Eneloop MP3 Approx 48 hours PCM Approx 23 hours Playback condition Playback LED off backligh...

Страница 82: ...s from a folder 46 Dividing files 37 E EDIT PHRASE button 5 Editing Files 37 Eneloop 71 EQ equalizer 18 34 Error messages 72 External audio device 14 External microphone 10 F Fade in 39 Fade out 39 FAQ 78 Fast forwarding 28 Fast reversing 28 File 57 File names 38 59 Folder 57 Folder structure 59 FOLDER A B REPEAT button 5 11 Formatting a microSD card 46 Frequency 16 18 34 H Headphones 28 Headphone...

Страница 83: ...rging 71 Recording Recording from an external audio device such as a CD player 14 Recording musical performance 11 Simple recording 13 Recording EQ equalizer 18 Recording level 12 Recording mode 10 16 Recording peak limiter 12 21 Recycle Bin 42 Repeat playback 31 32 S Screens 8 Self timer 24 Skip playback 30 Sound EQ equalizer 34 Sound quality 16 Speaker 6 Specifications 80 STANDBY mode 11 Stereo ...

Отзывы: