background image

ENGLISH

Connecting to a Computer

POCKETRAK 2G   Owner’s Manual

37

Recharging the eneloop

• Be sure to insert and recharge the eneloop. Do 

not attempt to recharge alkaline batteries. Oth-
erwise, the battery liquid may leak and damage 
the unit.

• Recharge the eneloop at an ambient temperature 

between 5 and 35 degrees Celsius (41 and 95 
degrees Fahrenheit).

Before recharging the eneloop

• Make sure that the BATTERY SETTING is set to 

“eneloop.” 

Note:

· To set to “eneloop”, press and hold down the 

MENU/STOP button for at least two seconds to 
access the COMMON menu, then select “eneloop” 
for the BATTERY SETTING.

• Be sure to close the battery cover before you 

start recharging.

Recharging the eneloop

1.

Connect the unit to your computer. 
(page 23)

2.

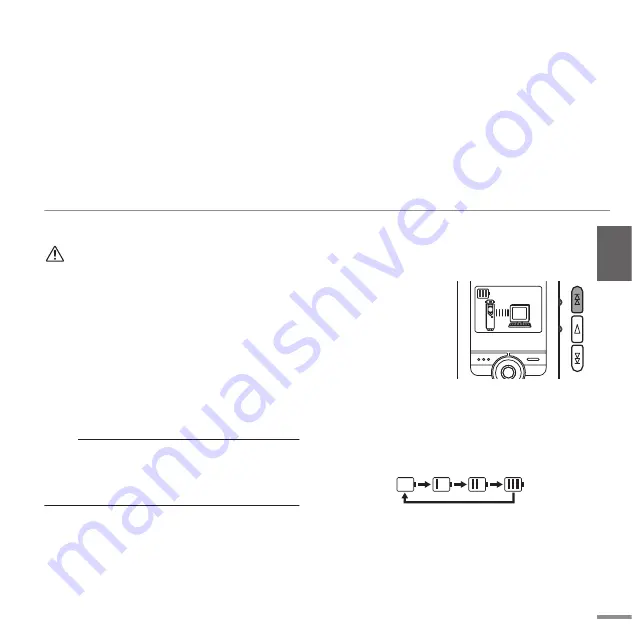
While the LCD 
screen on the 
recorder indicates 
that the unit is 
connected to the 
computer, press 
the 

Y

 button for 

at least two seconds.

The REC/PEAK LED lights up and recharging starts. 
When the battery is recharging, the battery indica-
tor on the LCD screen changes in the following 
sequence:

When recharging is complete, the REC/PEAK LED 
turns off.

Содержание POCKETRAK 2G - 2 GB Digital Player

Страница 1: ...Owner s Manual Bedienungsanleitung Mode d emploi Manual de instrucciones Manuale di istruzioni RU IT ES FR DE EN ITALIANO ESPA OL FRAN AIS DEUTSCH ENGLISH...

Страница 2: ...s manual may cause interference harmful to the operation of other electronic devices Compliance with FCC This applies only to products distributed by YAMAHA CORPORATION OF AMERICA class B regulations...

Страница 3: ...spected FCC DoC This device complies with Part 15 of the FCC Rules Operation is subject to the following two conditions 1 this device may not cause harmful interference and 2 this device must accept a...

Страница 4: ...at Microsoft may include a revocation list with the licenses Content owners may require you to upgrade WMDRM to access their content If you decline an upgrade you will not be able to access content th...

Страница 5: ...tents Included Accessories 7 Main Features 8 Precautions 9 Starting Up 13 Controls 13 LCD screen 14 Adjusting the direction of the built in microphones Tilt up 14 Inserting a battery 15 Basic Operatio...

Страница 6: ...be Reader must be installed in your computer Adobe Reader can be downloaded free at the following website http www adobe com SPECIAL NOTICES Copying of the commercially available musical data is stric...

Страница 7: ...phone stand adapter Attaching the Pocketrak soft case to a tripod Screw the tripod attachment into the threaded socket on the Pocketrack soft case Note No tripod is included It is an optional accessor...

Страница 8: ...es can be adjusted depending on the situation page 14 Auto Level Control MIC ALC Auto Level Control function helps you to adjust the sensitivity of the microphones in response to the recording environ...

Страница 9: ...personnel Handling caution Do not operate the device or use headphones earphones while driving car or riding a motorcycle or a bicycle since this could result in a serious accident CAUTION Always fol...

Страница 10: ...this product or the specified charger Charging the battery in any other charger may cause excessive or abnormal current flow during charging producing abnormal chemical reactions within the battery t...

Страница 11: ...t in a dry and cool place to prevent possible leakage of the battery fluid CAUTION Check the battery capacity before recording or deleting recorded material If the remaining battery capacity indicatio...

Страница 12: ...treatment recovery and recycling of old products and used batteries please take them to applicable collection points in accordance with your national legislation and the Directives 2002 96 EC and 200...

Страница 13: ...lume buttons VOL 8 Folder Index button FOLDER INDEX 9 LCD screen 10 Delete button DEL 11 Pause Record button PAUSE REC 12 Menu Stop button MENU STOP 13 Speaker 14 Headphones socket 15 Power Hold switc...

Страница 14: ...er 12 Information display Time Message Mode etc 13 Security setting On Off S folder only 14 Folder A B C D S L M Adjusting the direction of the built in microphones Tilt up You can adjust the directio...

Страница 15: ...e eneloop page 37 or replace the battery with a new alkaline battery If you keep using the recorder without recharging the eneloop or replacing the battery the recorder will display the message LOW BA...

Страница 16: ...ket The speaker will be disconnected automatically Turning the power on or off Set the POWER HOLD switch to the right HELLO appears briefly on the dis play and the power turns on and then the last sel...

Страница 17: ...engaged If an operation button is pressed while the Hold function is engaged HOLD ON will appear on the display and nothing else will happen Set the POWER HOLD switch to the right HOLD OFF appears on...

Страница 18: ...atically to suit the volume level of the source such as musical practices or meetings page 19 This function is turned off by default Hint Press and hold down the FOLDER INDEX button for at least two s...

Страница 19: ...vity If the sensitivity level is optimum The microphone sensitivity is opti mum when the meter indicates a 6 level consistently without deflecting all the way to the right at loud sounds 4 Press the P...

Страница 20: ...on Press it again to resume recording Inserting index marks You can insert index marks only in the files in the VOICE folder To insert an index mark press the FOLDER INDEX button during recording INDE...

Страница 21: ...equired to start playback of a file or an extremely large number of files Depending on the MP3 WMA file the displayed playing time may vary from the actual playing time You may be unable to play certa...

Страница 22: ...elect the file to be deleted then press the W button 5 Press the Y or T button to select YES then press the W button The selected file is deleted Hint To delete all files in the selected folder press...

Страница 23: ...n the recorder use the USB terminal slide switch to extend the USB terminal then insert the extended USB terminal in the correct orientation into a USB connector on your computer Do not apply force to...

Страница 24: ...efore turning the power to the unit on off or plugging unplugging the USB terminal Make sure that no read or write operations are in progress Safely remove the unit from the computer after closing all...

Страница 25: ...move Hardware If the icon is not displayed refer to Windows Help 2 Click Safely Remove Hardware 3 Select USB Mass Storage Device and click Stop 4 Make sure that Yamaha Pocketrak USB Device is in the l...

Страница 26: ...folder are named IC_A_XXX file number MP3 or IC_A_XXX file num ber WAV The same naming rule applies to the B C and D folders Each of the A B C D and S folders accommo dates up to 99 files You can pla...

Страница 27: ...em displays the DATA_S folder if the secu rity lock has been canceled Manual folder This folder stores the PDF manual files in each of the language folders English German French Spanish Italian Russia...

Страница 28: ...This folder stores files recorded from external devices Files recorded and stored in the LINE folder are named IC_L_XXX file number MP3 The LINE folder accommodates up to 199 files You can play only t...

Страница 29: ...ccessory disk on page 34 before installing Cubase AI 4 Step1 Installing Cubase AI 4 IMPORTANT Since the End User Software License Agreement EUSLA shown on your PC display in your installing the DAW so...

Страница 30: ...application after a limited period of time expires Step2 Connecting the unit to your computer Connect the unit directly to your computer using the USB terminal page 23 Step3 Importing audio data to C...

Страница 31: ...ple select CAI4 4 Stereo 8 Mono Audio Track Recorder and click OK Note Cubase AI 4 data is stored as a project file 3 When the directory selection dialog window appears select the folder to which the...

Страница 32: ...o data to The various settings for the selected track are available in the Inspector on the left side of the display 5 Go to File menu Import Audio File My Computer When the following window appears s...

Страница 33: ...select desired options then click OK 7 To save the project file select Save from the File menu then enter a file name before actually saving the file Save your project file frequently to avoid losing...

Страница 34: ...low http www yamahasynth com Note that Yamaha does not offer technical support for the DAW software in the accessory disk About the DAW software in the accessory disk The accessory disk contains DAW s...

Страница 35: ...SOFTWARE will continue to be protected under relevant copyrights You may use the SOFTWARE on a single computer You may make one copy of the SOFTWARE in machine readable form for backup purposes only...

Страница 36: ...IES AS TO THE SOFTWARE EXPRESS AND IMPLIED INCLUDING BUT NOT LIMITED TO THE IMPLIED WARRAN TIES OF MERCHANTABILITY FITNESS FOR A PARTICULAR PURPOSE AND NON INFRINGEMENT OF THIRD PARTY RIGHTS SPECIFICA...

Страница 37: ...To set to eneloop press and hold down the MENU STOP button for at least two seconds to access the COMMON menu then select eneloop for the BATTERY SETTING Be sure to close the battery cover before you...

Страница 38: ...tery may be exhausted more quickly The battery may become warm during recharge but this is normal The battery life has come to an end if the battery is exhausted relatively quickly even after being fu...

Страница 39: ...usic Central Europe GmbH Branch Benelux Clarissenhof 5 b 4133 AB Vianen The Netherlands Tel 0347 358 040 FRANCE Yamaha Musique France BP 70 77312 Marne la Vall e Cedex 2 France Tel 01 64 61 4000 ITALY...

Страница 40: ...al Musical Instrument Division Yamaha Corporation 2008 Yamaha Corporation 1AJ6P1P0036 A 807IP 02B0 Printed in China Yamaha Web Site English only http www yamahasynth com Yamaha Manual Library http www...

Отзывы: