background image

12

y

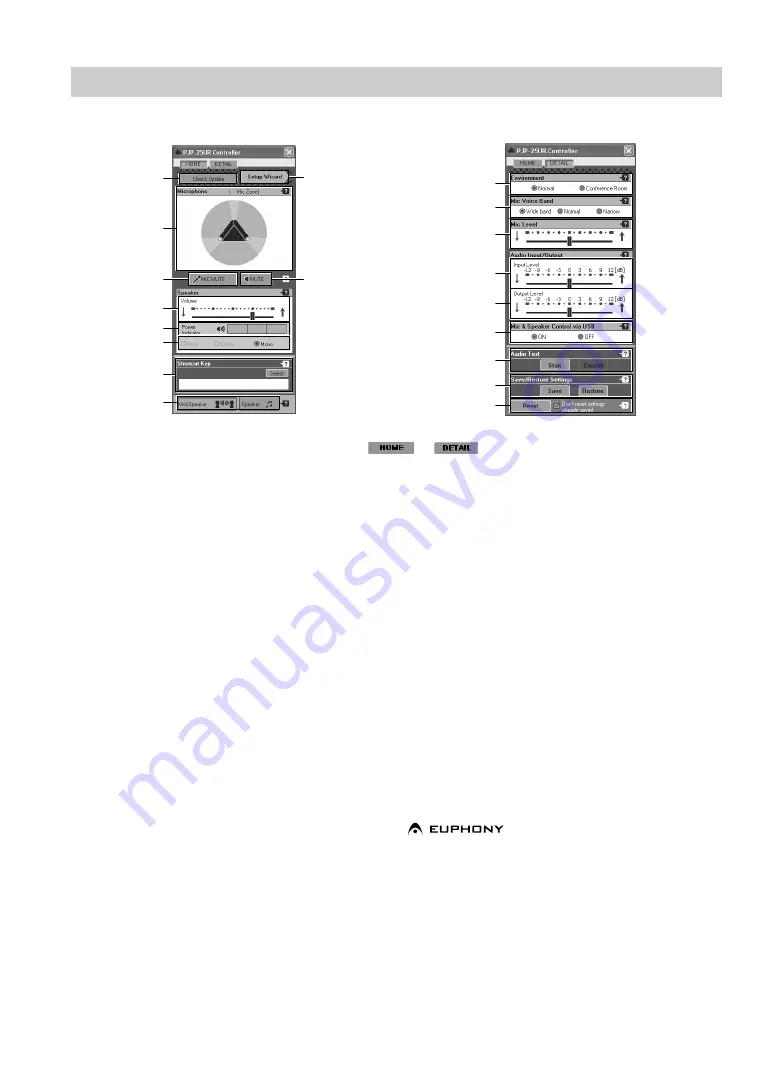
To switch between HOME and DETAIL screens, click 

 or 

. When the operation mode is set to 

"Speaker", the DETAIL screen is not available.

Items in the HOME screen

1

Check Update

Update the firmware of this unit. For details, refer to 
"Using the Latest Features" (page 17).

2

Setup Wizard

Check the installation method suited to your purpose of 
using this unit. For details, refer to "Checking the 
optimum installation method" (page 14).

3

Mic Zone

Shows the microphone status (speaker angles and audio 
pickup area).

4

MIC MUTE

Turn off (mute) the microphones of this unit temporarily. 
In this mode, the microphones of this unit do not pick up 
any sounds.
To cancel the mute function, click MIC MUTE again.

y

During muting, the MIC MUTE LED (above the MIC 
MUTE key on this unit) lights and the microphone LEDs 
turn off. If the mute function is canceled, the MIC MUTE 
LED turns off and the microphone LEDs light.
You can also operate the mute function using MIC MUTE 
on this unit.

5

MUTE

Turn off (mute) the speaker of this unit temporarily. In this 
mode, the speaker of this unit does not output sounds.
To cancel the mute function, click MUTE again.

6

Volume

Adjust the speaker volume of this unit using the slider bar.

7

Power Indicator

Shows the electrical power which this unit can use for 
audio output.

y

Since this unit works according to the USB standard, it 
may turn on the attenuator or speaker mute function 
automatically to protect the system in case the unit detects 
high audio levels. If this happens repeatedly, turn down the 
volume or use the AC adapter (sold separately).

8

Playback mode setting

Select "Wide", "Stereo" or "Mono" for the playback mode. 
If "Wide" or "Stereo" is selected, the EUPHONY system 
works. This setting is available only when the operation 
mode is set to "Speaker".

Euphony is a revolutionary sound field reproduction 
system implemented with state-of-the-art sound 
technologies developed under the basic concept of 
enjoying beautiful sound.

9

Shortcut Key

Select a function assigned to SHORTCUT on this unit. For 
details, refer to "Configuring the shortcut key" (page 14).

About the "PJP-25UR Controller" screen

HOME screen

DETAIL screen

1

3

4

6
7

8

9

@

5

2

I

A

F

B

E

D

C

H

G

Содержание PJP-25UR

Страница 1: ...PJP 25UR Conference Microphone Speaker User s Manual...

Страница 2: ......

Страница 3: ...ntroller 11 About the PJP 25UR Controller screen 12 Checking the optimum installation method 14 Configuring the shortcut key 14 Saving the settings of this unit 15 Testing the audio 16 Resetting the s...

Страница 4: ...er unit of the web conference or VoIP telephone system Incorporating this unit as the microphone speaker into the web conference or VoIP telephone system provides a smoother conferencing experience fo...

Страница 5: ...s it again 7USB port Connect to the computer using the USB cable 8DC IN 5V terminal Connect the AC adapter sold separately 9AUDIO OUT terminal Connect to the line in on the audio device or computer 0A...

Страница 6: ...ging Environment Normal blink in orange for three seconds middle LED only Reset operation blink in orange twice from left to right 2MIC MUTE LED Normal turns off MIC mute lights in orange 3Information...

Страница 7: ...ademark of DiMAGIC Co Ltd Intel and Celeron are trademarks or registered trademarks of Intel Corporation and its subsidiaries in the United States and other countries Follow the procedure below to con...

Страница 8: ...s shown below Default device in Sound playback YAMAHA PJP 25UR Default device in Sound recording YAMAHA PJP 25UR y Normally YAMAHA PJP 25UR is automatically selected when this unit is connected to the...

Страница 9: ...e taking the positions of talkers into consideration To assure clear conversation by getting the most out of the arrayed microphones adjust the angles of the microphones as shown below Step 3 Installi...

Страница 10: ...the setting depending on the environment When using in the normal environment select Normal When using in the quiet environment like a conference room select Conference Room Press MENU PC and VOLUME...

Страница 11: ...mputer as an administrator when installing the PJP 25UR Controller 1 Load the supplied CD ROM into the computer s CD ROM drive 2 Select the language 3 Click Software The setup program starts 4 Click N...

Страница 12: ...tall the PJP 25UR Controller Follow the procedure below to uninstall the PJP 25UR from the computer 1 Select Start Control Panel The Control Panel screen appears 2 Click Add or Remove Programs The Add...

Страница 13: ...ll Programs YAMAHA PJP 25UR PJP 25UR Controller to start the PJP 25UR Controller 2 Press MENU PC on this unit The PJP 25UR Controller screen appears 3 Configure the settings Configure the settings of...

Страница 14: ...speaker of this unit temporarily In this mode the speaker of this unit does not output sounds To cancel the mute function click MUTE again 6Volume Adjust the speaker volume of this unit using the slid...

Страница 15: ...of 12 0 to 12 0 dB using the slider bar This setting is applied to inputs from another device through the audio cable EOutput Level Adjust the audio output level amplification in the range of 12 0 to...

Страница 16: ...reen instructions to install this unit Follow the procedure below to select a function to be activated by pressing SHORTCUT on this unit 1 In the PJP 25UR Controller screen click Select 2 Select a fun...

Страница 17: ...pplied to the settings to be saved 5 Click Save The settings are saved If the number you selected in step 3 has already been used the confirmation message appears before executing the overwriting proc...

Страница 18: ...ion Resetting all settings 1 In the PJP 25UR Controller screen click DETAIL The DETAIL screen appears 2 Uncheck the Don t reset settings already saved box 3 Click Reset All settings are reset to defau...

Страница 19: ...gram at a website accessible by the general public is prohibited unless you have permission from Yamaha 3 Production of duplicates You may only duplicate this program for the purpose of backup or when...

Страница 20: ...e Agreement screen appears 2 Read the contents of license agreement carefully select Accept all terms of the license agreement and then click OK The PJP 25UR Firmware Update screen appears If you do n...

Страница 21: ...ick Check Update The PJP 25UR License Agreement screen appears 2 Read the contents of license agreement carefully select Accept all terms of the license agreement and then click OK The PJP 25UR Firmwa...

Страница 22: ...e audio cable is not connected properly Check that the audio cable is connected firmly The voltage decreases due to high volume Turn the volume down Use the AC adapter sold separately The playback vol...

Страница 23: ...f power Accessories USB cable CD ROM Quick Start Guide Option AC adapter sold separately Computer environment OS Microsoft Windows Vista XP Professional XP Home Edition 2000 CPU 750 MHz or higher Inte...

Страница 24: ...August 2008 3rd edition...

Отзывы: