background image

SYSTEM OPERATIONS

15

 En

Eng

lish

BA

S

IC


OPE

R

A

T

IO

NS

BASIC OPERATIONS

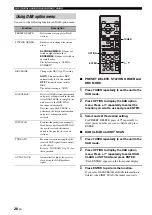
Follow the procedure below to select an input source and adjust the sound settings on the system.

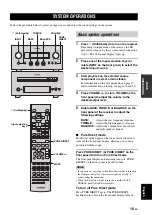
1

Press   (On/Standby) to turn on the receiver.

Depending on input mode of the receiver, the BD 
player also turns on by the system control connection 
(

p.8). The front panel display lights up.

2

Press one of the input selection keys (or 
rotate INPUT on the front panel) to select the 
desired input source.

3

Start playback on the selected source 
component or select a radio station.

For information on the disc playback, see page 17, 
and for information on tuning, see pages 26 and 30.

4

Press /– (or turn VOLUME on the 
front panel) to adjust the volume to the 
desired output level.

5

Rotate BASS, TREBLE, or BALANCE on the 
front panel of the receiver to adjust the 
following settings.

BASS: 

Adjusts the low frequency response.

TREBLE: 

Adjusts the high frequency response.

BALANCE: 

Adjusts the volume level of each left 
and right speaker channel.

Pure Direct mode

Pure Direct mode bypasses the tone control circuit and 
turns off the front panel display, allowing you to enjoy 
pure high-fidelity sound.

Press PURE DIRECT (or PURE DIRECT on the 
front panel) to turn on Pure Direct mode.

The front panel display automatically turns off. PURE 
DIRECT on the front panel is backlit in blue.

Notes

• If you carry out operations while Pure Direct mode is turned on, 

the front panel display of the receiver lights up briefly to 
acknowledge the command.

• While the Pure Direct mode is turned on, neither BASS, 

TREBLE, nor BALANCE is available.

To turn off Pure Direct mode

Press PURE DIRECT again. The PURE DIRECT 
backlight turns off and the front panel display turns on.

SYSTEM OPERATIONS

INPUT

BASS

PHONES

VOLUME

MIN

MAX

TREBLE

BALANCE

PRESET

PURE DIRECT 

L

R

TP

TIMER

QUICK

INPUT

 (On/Standby)

VOLUME

PURE 
DIRECT

BASS

BALANCE

TREBLE

A

B

C

D

EXIT

TOP MENU/TITLE LIST

POP UP MENU

 (On/Standby)

/–

Input selection

keys

PURE DIRECT

MUTE

Basic system operations

Содержание PianoCraft MCR-940

Страница 1: ...OWNER S MANUAL B RECEIVER BLU RAY DISC PLAYER MCR 940 R 840 BD 940 NS BP300 ...

Страница 2: ...m use of this unit with a voltage other than specified 13 To prevent damage by lightning keep the power cable and outdoor antennas disconnected from a wall outlet or this unit during a lightning storm 14 Do not attempt to modify or fix this unit Contact qualified Yamaha service personnel when any service is needed The cabinet should never be opened for any reasons 15 When not planning to use this ...

Страница 3: ...l images in a selected folder 21 Playing back movies recorded on a DVD R DVD RW 21 Using Function Control Screen for BD DVD 22 Using Functions menu for Audio CD 23 Viewing disc information 23 Enjoying BONUSVIEW and BD LIVE 24 DAB DIGITAL AUDIO BROADCASTING TUNING 26 Preparing the DAB tuning 26 Tuning DAB stations 26 DAB station information 27 Presetting DAB stations 27 Selecting preset DAB station...

Страница 4: ...ons are also available using the front panel buttons y indicates a tip for your operation Notes contain important information about safety and operating instructions This manual is printed prior to production Design and specifications are subject to change in part as a result of improvements etc In case of differences between the manual and the product the product has priority This product include...

Страница 5: ...he disc Finalize refers to a recorder processing a recorded disc so that it will play in other BD players recorders as well as this player Only finalized DVD discs will play back in this player This player does not have a function to finalize discs The following discs cannot be played back or will not play back properly on this Player If such a disc is mistakenly played back speaker damage may occ...

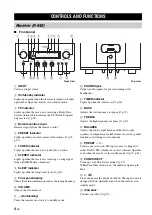
Страница 6: ... sets it to standby mode B PHONES jack Outputs audio signals for private listening with headphones C TIMER indicator Lights up when the timer is set p 34 D BASS Adjusts the low frequency response p 15 E TREBLE Adjusts the high frequency response p 15 F BALANCE Adjusts the audio output balance of the left to right speakers to compensate for imbalances caused by speaker locations or listening room c...

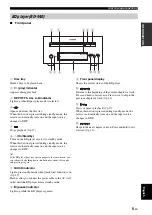
Страница 7: ...it by holding down this button for about 10 seconds and pressing it again 7 QUICK indicator Light up in standby mode when Quick Start function is on p 39 Flashes after you connect the power cable to the AC wall outlet until the BD player enters standby mode 8 e pause indicator Lights up while the BD player is paused 9 Front panel display Shows the current status of the BD player 0 Returns to the b...

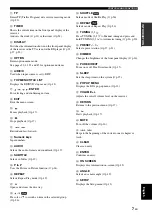
Страница 8: ...ENTER to enter the selected group Pressing ENTER starts playback when a song is selected 7 Starts or Pauses Playback 8 Input selection keys Selects the input source on the receiver When selecting an input source press the corresponding input selection key or turn INPUT on the front panel The name of the corresponding input source appears on the front panel display of the receiver Each time you pre...

Страница 9: ...ses the Picture in Picture function p 24 P REPEAT Selects Repeat Play mode p 19 Q Opens and closes the disc tray R Press or to switch an item in the selected group p 36 S SHUFFLE Selects mode of Shuffle Play p 36 T REPEAT Selects mode of Repeat Play p 36 U TUNING Press TUNING to Manual tuning and press and hold TUNING to Automatic tuning p 26 p 30 V PRESET u d Select a preset station p 27 p 31 W D...

Страница 10: ...en components are complete Do not let the bare speaker wires touch each other or any metal part of the receiver This could damage the receiver and or the speakers All connections must be correct L left to L R right to R to and to If the connections are faulty no sound will be heard from the speakers and if the polarity of the speaker connections is incorrect the sound will be unnatural and lack ba...

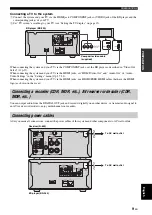
Страница 11: ...o Out of Audio Video Settings in the Settings menu p 37 38 When connecting the system and your TV via the HDMI jacks use HIGH SPEED HDMI cables that have the HDMI logo as shown on the cover You can output audio from the DIGITAL OUT jack and record it digitally on another device or transmit audio signal to an AV receiver or decoder to enjoy multichannel source audio After you made all connections c...

Страница 12: ...r iPod can be charged automatically even when the receiver is in standby mode You can disconnect the iPod during the playback You can enjoy a variety of contents with interactive functions by connecting to the internet when playing BD LIVE compatible discs See pages 24 and 40 regarding further information on BD LIVE functions Be sure to turn off the BD player and the equipment before making any co...

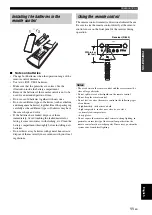
Страница 13: ...e sure to aim the remote control directly at the remote control sensor on the front panel of the receiver during operation Notes The area between the remote control and the receiver must be clear of large obstacles Do not spill water or other liquids on the remote control Do not drop the remote control Do not leave or store the remote control in the following types of conditions high humidity such...

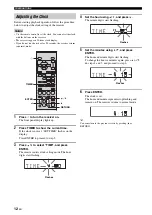
Страница 14: ...E flashes on the display Press ENTER to proceed to step 3 3 Press to select TIME and press ENTER The receiver enters clock setting mode The hour digits start flashing 4 Set the hour using and press The minute digits start flashing 5 Set the minutes using and press ENTER The hour and minute digits start flashing To change the hour or minutes again press or do steps 4 and 5 and proceed to step 6 6 P...

Страница 15: ... or EXIT to exit the setup menu y You can return the previous menu by pressing RETURN You can select your preferred language settings so that the BD player will automatically switch to your preferred language whenever you load a disc If the language selected is not available on the disc the disc s default setting language will be used instead The OSD on screen display language for the BD DVD setup...

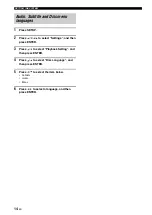
Страница 16: ...d then press ENTER 3 Press to select Playback Setting and then press ENTER 4 Press to select Disc Language and then press ENTER 5 Press to select the item below Subtitle Audio Menu 6 Press to select a language and then press ENTER Audio Subtitle and Disc menu languages ...

Страница 17: ...s the high frequency response BALANCE Adjusts the volume level of each left and right speaker channel Pure Direct mode Pure Direct mode bypasses the tone control circuit and turns off the front panel display allowing you to enjoy pure high fidelity sound Press PURE DIRECT or PURE DIRECT on the front panel to turn on Pure Direct mode The front panel display automatically turns off PURE DIRECT on th...

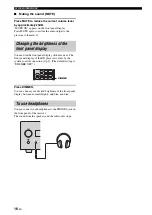
Страница 18: ... receiver The front panel display of the BD player also dims by the system control connection p 8 The default setting is DIMMER OFF Press DIMMER You can choose your desired brightness of the front panel display between normal bright mid dim and dim You can connect your headphones to the PHONES jack on the front panel of the receiver The sound from the speakers and the subwoofer stops Changing the ...

Страница 19: ...imply by pressing Resume function Resume function may not work depending on the disc To playback from the beginning of a disc cancel resume mode by pressing again Notes To play a double sided DVD load it with the side you want to play facing down If you press on the front panel while the BD player is on standby this system automatically turns on and selects DISC as the input source The disc tray o...

Страница 20: ...enu Use TOP MENU TITLE LIST when the instructions refer to Title Menu If no top menu is available TOP MENU TITLE LIST will have no effect The top menu screen may be displayed by pressing POP UP MENU depending on the DVD You can play BD DVD in slow motion You can also play DVD in reverse slow motion 1 During playback press 2 Slow motion playback functions when or is pressed for more than 2 seconds ...

Страница 21: ...screen Notes With some discs you can only select subtitles by using the disc s menu Use TOP MENU TITLE LIST and POP UP MENU to display the disc s menu You can change the default subtitle language for BD DVD in the Disc Language p 39 Some BD DVD Video discs have content recorded at multiple camera angles that you can select during playback You can turn the camera icon on if you prefer p 39 This ico...

Страница 22: ...t the start point Set End Point displays B lights up on the front panel display 3 Press ENTER at the scene where you want to set the end point The section between start point and end point is played back repeatedly REP and A B light up on the display To cancel repeat playback press REPEAT To close the Repeat menu press EXIT Note The start and end points must be within the same title DVD or track A...

Страница 23: ...nalize refers to a recorder processing a recorded disc so that it will play in other DVD players recorders as well as this player Only finalized DVD discs will play back in this player This player does not have a function to finalize discs About Title List The Title List can be displayed in two types Thumbnail and Title List Each time you press A the screen changes between Thumbnail and Title List...

Страница 24: ...ach time you press B while the Title List screen is displayed the Title List display changes between displaying the newest title first and the oldest title first Playback by selecting a Playlist 1 Press C while the Thumbnail or Title List screen is displayed The Playlist screen is displayed 2 Press to select the title then press ENTER Playback of the selected title will begin To stop playback pres...

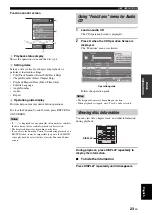
Страница 25: ...k of a BD DVD video it may be impossible to operate the BD DVD video playback In cases like this close the Function Control screen 1 Load an audio CD The CD Operation Screen is displayed 2 Press D when the CD Operation Screen is displayed The Functions menu is activated Follow the operation guide Notes The displayed items vary depending on the disc When playback is stopped only Track can be select...

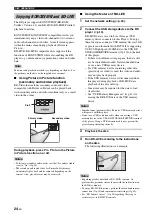
Страница 26: ...evice connected to this Player To enjoy these functions connect a USB memory device 2GB or greater and formatted with FAT 32 16 supporting USB 2 0 High Speed 480Mbit s to the USB BD STORAGE SERVICE terminal p 10 on the back of this player If there is insufficient storage space the data will not be copied downloaded Delete unneeded data or use a new USB memory device If a USB memory device containi...

Страница 27: ...h the internet may not be able to display the connection depending on the status updating of the provider In such cases take out the disc and try again If the BD LIVE screen does not appear for a while after you select the BD LIVE function in the BD disc menu the USB memory device may not have enough free space In such cases eject the disc from the player and then erase the data in the USB memory ...

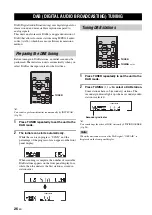
Страница 28: ...can starts automatically While the scan is in progress SCAN and the percentage of the progress of scan appear on the front panel display When scanning is complete the number of receivable DAB stations appears on the front panel display for a while then the unit airs the first station as stored in station order 1 Press TUNER repeatedly to set the unit to the DAB mode 2 Press TUNING to select a DAB ...

Страница 29: ... PRESET u d to select a preset DAB station The PRESET indicator lights up in the front panel display DAB station information STATION LABEL Displays the name of the current DAB station and preset number DLS Dynamic Label Segment Displays information about the current DAB station such as the name of the song artist and speaker etc This data is continuously updated by the DAB broadcaster thus changin...

Страница 30: ...necessary preset DAB stations STATION ORDER Enables you to change the station order ALPHA NUMERIC Stations are listed in alphabetical order ENSEMBLE Stations are listed in ensemble order The default setting is ALPHA NUMERIC DRC MODE Changes the DRC p 27 setting AUTO This unit utilizes DRC automatically if it is transmitted OFF This unit does not utilize DRC The default setting is AUTO DAB CLEAR De...

Страница 31: ...default setting is ON ON Automatically adjusts the receiver clock using the DAB broadcast signal OFF Does not adjust the receiver clock Note Changing the AUTO CLOCK setting also changes AUTO CLOCK on the RDS p 33 You cannot set AUTO CLOCK on the DAB and RDS separately This unit can receive Band III only DAB frequency information Frequency Channel label 174 928 MHz 5A 176 640 MHz 5B 178 352 MHz 5C ...

Страница 32: ...e receiver to FM mode 2 Press TUNING to tune into the desired station manually Follow the procedure below to preset radio stations automatically 1 Press TUNER to set the receiver to FM mode 2 Press and hold MEMORY for more than 2 seconds The PRESET indicator starts flashing on the front panel display and automatic station preset starts When all frequencies are searched preset stops automatically T...

Страница 33: ...d repeatedly to select a preset station y You can also use the front panel to select preset stations Press PRESET u d repeatedly to select a preset station When you press PRESET u d on the front panel of the receiver in standby mode the receiver automatically activates the tuner and tunes in to the preset station that you selected previously To delete the preset station 1 Press TUNER to set the un...

Страница 34: ...io Data System modes are available If the signal strength is weakened by external interference while the receiver is receiving the Radio Data System data the reception may be cut off unexpectedly and WAIT appears on the front panel display When RT mode is selected the receiver can display the program information by a maximum of 64 alphanumeric characters including the umlaut symbol Unavailable cha...

Страница 35: ...eturns to its previous state To cancel the search Press TP during search You can use the CT information received from the Radio Data System stations to adjust the built in clock of the receiver 1 Press OPTION An option menu item appears on the front panel display 2 Press to select AUTO CLOCK and press ENTER 3 Press to select ON or OFF and press ENTER The AUTO CLOCK status is displayed The default ...

Страница 36: ...of Adjusting the Clock p 12 4 Press or an input selection key to select the input source to be used when the timer turns on the receiver and press ENTER The receiver automatically selects the input source when it is turned on by the clock timer If FM is selected as the input source the preset number e g P01 is shown on the front panel display Press to select the preset number of the station you wa...

Страница 37: ...ess SLEEP repeatedly to select the desired duration Each time you press the key the duration changes as follows The SLEEP indicator lights up on the front panel display y The sleep timer is canceled if you set the receiver to standby mode If you press SLEEP once while the sleep timer is set the ongoing duration appears on the front panel display To cancel the sleep timer Press SLEEP repeatedly to ...

Страница 38: ...start playback of the selected song or group View the screen of the iPod to control the menu Operate the iPod using the iPod controls or the supplied remote control Repeating playback Repeat Play You can play back a single track or a group of tracks on your iPod repeatedly Press REPEAT Each time you press the key mode of Repeat Play changes The following chart is an example of how mode changes as ...

Страница 39: ... video output resolution Some TV are not fully compatible with the Blu ray disc player which may cause the image distortion In this case set HDMI Video Out to the default setting p 45 HDMI Video Out will be reset to Auto factory preset value Auto 1080p 1080i 720p 576 480p Note When the BD player is connected to a 1080p 24Hz compatible TV and the HDMI Video Out is set to Auto 1080p 24Hz will automa...

Страница 40: ...be output from speakers or an excessive electrical load is applied to them Settings on this Player Output Resolution Video Out Select HDMI Video Out Component Out CVBS Out 3 HDMI Auto 1 480i 576i 2 1080p No Output No Output 1080i 1080i 1 480i 576i 720p 720p 1 480i 576i 480p 576p 480p 576p 1 480i 576i Settings on this Player Output Resolution Video Out Select Component Video Out HDMI Out CVBS Out 3...

Страница 41: ... Language list p 56 for available languages Angle Mark Display Some BD DVD videos have multiple angles When you watch those videos you can display an angle mark on the lower right of the screen PIN Code Setting You can set the password for setting or changing the Parental Control level Notes When you forget the password you can reset the current password using System Reset p 43 You can change the ...

Страница 42: ...ETUP 2 Press to select Settings then press ENTER 3 Press to select Communication Setup then press ENTER 4 Select Ethernet Setup BD LIVE then press ENTER 5 Press to select Change then press ENTER For initializing the current setting select Initialize then press ENTER 6 For setting the IP address press to select Yes or No then press ENTER If selecting Yes The IP address is automatically obtained If ...

Страница 43: ...uch as IP address can be entered on the input screen either by selecting each of the characters in the Numeric mode or using the Number buttons on the remote control 1 Press ENTER at the boxes in which characters are to be entered and the input screen will appear 2 Press to select the desired input mode When inputting the address of the proxy server 1ABC Alphabet numeric character Sign Edit When i...

Страница 44: ...Edit The same operation as the colored buttons and RETURN can be performed by selecting each of the items and pressing ENTER Del Char stands for deleting characters Num ABC DEF GHI JKL MON PQRS TUV WXYZ Spc Num 1 2 3 4 5 6 7 8 9 0 ABC A B C a b c DEF D E F d e f GHI G H I g h i JKL J K L j k l MNO M N O m n o PQRS P Q R S p q r s TUV T U V t u v WXYZ W X Y Z w x y z Spc space 1 2 3 4 5 6 7 8 9 0 _...

Страница 45: ...ss select Yes and press ENTER 7 Start the process The screen for the current operation will display 8 Press ENTER This function allows software updates by inserting a USB memory device with the update file into the USB BD STORAGE SERVICE terminal on this player The USB memory device must be clear of all files except software update data to allow new software uploading To check for the availability...

Страница 46: ...enian IA Interlingua IE Interlingue IK Inupiak IN Indonesian IS Icelandic IT Italian IW Hebrew JA Japanese JI Yiddish JW Javanese KA Georgian KK Kazakh KL Greenlandic KM Cambodian KN Kannada KO Korean KS Kashmiri KU Kurdish KY Kirghiz LA Latin LN Lingala LO Laothian LT Lithuanian LV Latvian Lettish MG Malagasy MI Maori MK Macedonian ML Malayalam MN Mongolian MO Moldavian MR Marathi MS Malay MT Mal...

Страница 47: ...e and press OPTION VIDEO RESET appears on the front panel display of the BD player 2 Press to select VIDEO RESET or HDMI COMP VIDEO RESET Restore the resolution of Component Video Out p 37 or HDMI Video Out p 37 to the factory default setting HDMI COMP Set the video output priority to HDMI or Component For details see Video Out Select p 37 3 Press ENTER to confirm the setting DONE is displayed To ...

Страница 48: ...for the receiver to cool down and then turn it back on 8 No sound Incorrect input or output cable connections Connect the cables properly If the problem persists the cables may be defective 8 No appropriate input source has been selected Select an appropriate input source with the INPUT selector on the front panel or the input selection keys on the remote control Speaker connections are not secure...

Страница 49: ...weak Use the TUNE AID feature to locate the best positioning of the indoor DAB antenna 29 There is noise interference e g hiss crackle or jitter The indoor DAB antenna needs to be repositioned Readjust the position of the indoor DAB antenna 8 The DAB signals are too weak Use the TUNE AID feature to locate the best positioning of the indoor DAB antenna 29 The DAB station information does not appear...

Страница 50: ...emote control Problem Cause Remedy See page The remote control does not work nor function properly The remote control may be operated outside its operation range For information on the remote control operation range see Using the remote control 11 The remote control sensor on this system may be exposed to direct sunlight or lightening invented fluorescent lamps Change the lighting or orientation o...

Страница 51: ...etting on your TV is not correct Select the correct input setting on the TV 13 The BD player is not set properly for HDMI or component video cable connection Set the BD player properly 37 The screen freezes and operation buttons do not work The disc is damaged or dirty Check the disc surface The BD player is frozen Reboot the BD player 5 There is sound but no picture The video cable is not connect...

Страница 52: ...not properly connected Connect the broadband router and or modem properly 10 The broadband router or modem is not turned on Turn on the broadband router or modem The network settings are not correct Check Communication Setup 40 Cannot download BD LIVE contents The network cable is not connected properly Connect the network cable properly 10 The USB memory device is not connected properly Check tha...

Страница 53: ...ormat the USB memory again Occurs if the USB memory is not formatted with FAT 32 16 Format the USB memory with your PC The Connected USB Memory cannot be used It should be compliant with USB 2 0 Occurs if USB memory not compliant with USB 2 0 High Speed 480Mbit s is used i e USB 1 0 USB 1 1 Connect USB 2 0 High Speed 480Mbit s compliant USB memory Error message Possible Error Remedy ...

Страница 54: ...hange information in image files especially those using JPEG compression Refer to http exif org for more information When using the unit to play a CD RW R disc with still images stored recorded With CD RW R discs on which still images are mixed in with music or movies you will be able to play only the still images You may not be able to play some of these discs at all Multi session discs cannot be...

Страница 55: ...hannels left center and right and 2 surround stereo channels Dolby Digital provides five full range audio channels With an additional channel especially for bass effects called LFE or low frequency effect the system has a total of 5 1 channels LFE is counted as 0 1 channel By using 2 channel stereo for the surround speakers more accurate moving sound effects and surround sound environment are poss...

Страница 56: ...LIFIER SECTION Minimum RMS output power per channel 6 Ω 1 kHz 10 THD 65 W 65 W Input sensitivity Impedance PLAYER etc 200 mV 47 kΩ Frequency response PLAYER etc 20 Hz to 20 kHz 0 5 dB Total harmonic distortion PLAYER etc 30 W 6 Ω 0 04 or less Signal to noise ratio IHF A network PLAYER 200 mV Input shorted 100 dB or more TUNER SECTION GENERAL Power supply AC 230 V 50 Hz Power consumption 115 W Dime...

Страница 57: ...7 212 872 other U S and worldwide patents issued pending DTS is a registered trademark and the DTS logos Symbol DTS HD and DTS HD Master Audio Essential are trademarks of DTS Inc 1996 2008 DTS Inc All Rights Reserved is a trademark BD LIVE logo is a trademark of Blu ray Disc Association BONUSVIEW is a trademark of Blu ray Disc Association is a trademark of DVD Format Logo Licensing Corporation HDM...

Страница 58: ...lingua ia 0901 Occitan oc 1503 Setswana tn 2014 Azerbaijani az 0126 Interlingue ie 0905 Oromo om 1513 Tonga to 2015 Bashkir ba 0201 Inupiak ik 0911 Oriya or 1518 Turkish tr 2018 Byelorussian be 0205 Indonesian in 0914 Panjabi pa 1601 Tsonga ts 2019 Bulgarian bg 0207 Icelandic is 0919 Polish pl 1612 Tatar tt 2020 Bihari bh 0208 Hebrew iw 0923 Pashto Pushto ps 1619 Twi tw 2023 Bislama bi 0209 Yiddis...

Страница 59: ...KYVÄLLE JA NÄKYMÄTTÖMÄLLE LUOKAN 2 LASERSÄTEILYLLE ÄLÄ KATSO SÄTEESEEN ADVARSEL KLASSE 2 SYNLIG OG USYNLIG LASERSTRÅLING HVIS DENNE DELEN ÅPNES STIRR IKKE INN I STRÅLEN ADVARSEL KLASSE 2 SYNLIG OG USYNLIG LASERSTRÅLINGVED ÅBNING KIG IKKE IND I STRÅLEN ACHTUNG BEI GEÖFFNETER ABDECKUNG IST SICHTBARE UND UNSICHTBARE LASERSTRAHLUNG DER KLASSE 2 IM GERÄTEINNERENVORHANDEN NICHT IN DEN STRAHL SEHEN ATTEN...

Страница 60: ... standards in force in the country where it is used 4 Accidents lightning water fire improper ventilation battery leakage or any cause beyond Yamaha s control 5 Defects of the system into which this product is incorporated and or incompatibility with third party products 6 Use of a product imported into the EEA and or Switzerland not by Yamaha where that product does not conform to the technical o...

Отзывы: