background image

3-5

1

2

3

4

5

6

7

8

9

10

ENGINE

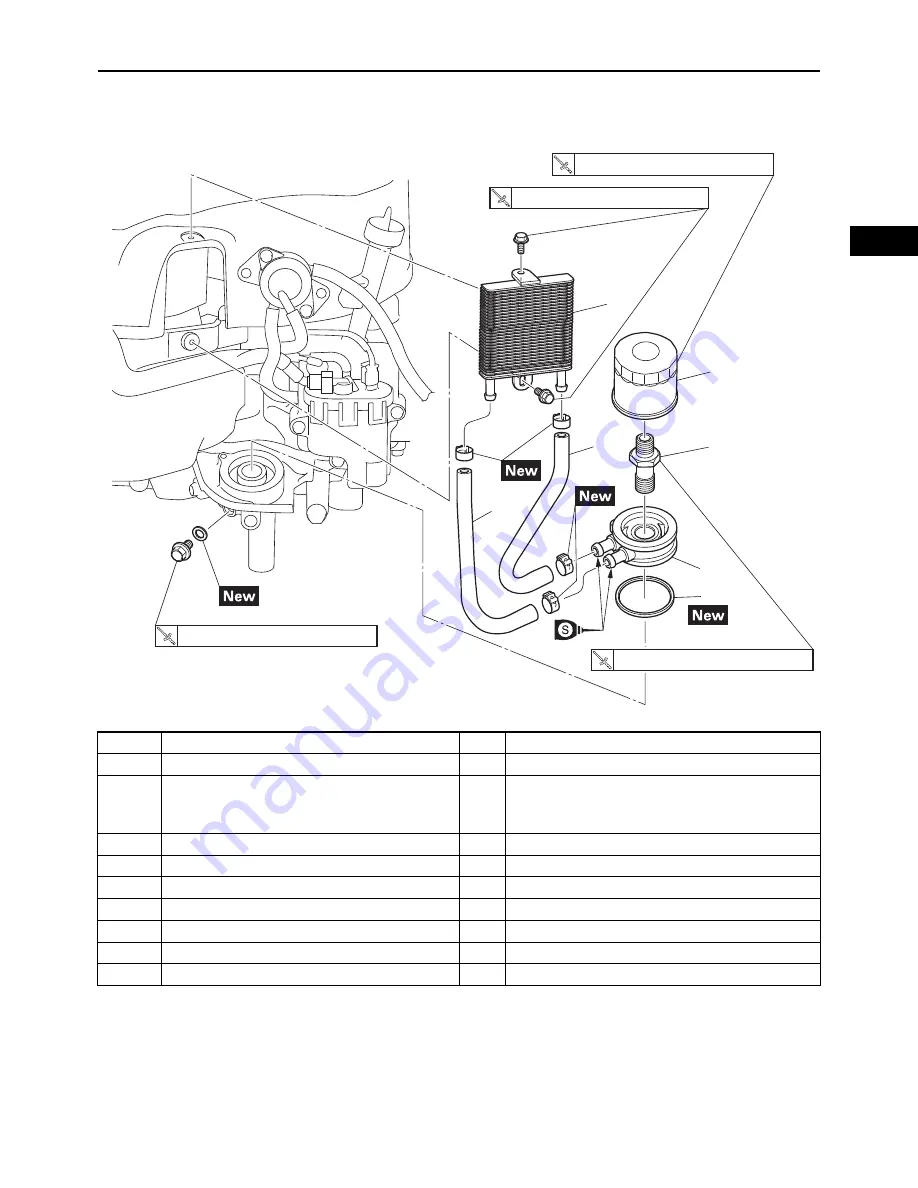
OIL COOLER

OIL COOLER

Order

Job/Parts to remove

Q’ty

Remarks

Removing the oil cooler

Remove the parts in the order listed.

Engine oil

Drain.
Refer to “REPLACING THE ENGINE OIL” on 
page 2-6.

1

Oil cooler

1

2

Oil hose 1

1

3

Oil hose 2

1

4

Oil filter

1

5

Adapter union bolt

1

6

Adapter

1

7

Oil seal

1

17 N

m (1.7 kgf

m, 12 lb

ft)  

14 N

m (1.4 kgf

m, 10 lb

ft)  

9 N

m (0.9 kgf

m, 6.5 lb

ft)  

62 N

m (6.2 kgf

m, 45 lb

ft)  

1

2

3

4

5

6

7

Содержание MX775

Страница 1: ...SERVICE MANUAL MX775 MX800 MX825 7UD F8197 E0 LIT 19616 02 37 2016 12 1 7UD F8197 E0_Cover indd 1 2016 12 13 11 23 58 ...

Страница 2: ...7UD F8197 E0_Cover indd 2 2016 12 13 11 23 58 ...

Страница 3: ...NUAL 2016 by Yamaha Motor Corporation U S A 1st Edition December 2016 All rights reserved Any reprinting or unauthorized use without the written permission of Yamaha Motor Corporation U S A is expressly prohibited LIT 19616 02 37 ...

Страница 4: ...h the most satisfaction from his machine and to con form to federal environmental quality objectives Yamaha Motor Powered Products Co Ltd is continually striving to improve all of its models Modifi cations and significant changes in specifications or procedures will be forwarded to all authorized Yamaha dealers and will appear in future editions of this manual where applicable TIP This Service Man...

Страница 5: ...han the section title 2 To help identify parts and clarify procedure steps there are exploded diagrams at the start of each removal and disassembly section 3 Numbers are given in the order of the jobs in the exploded diagram A number indicates a disas sembly step 4 Symbols indicate parts to be lubricated or replaced 5 Refer to SYMBOLS A job instruction chart accompanies the exploded diagram provid...

Страница 6: ...ant to every machine SYMBOL DEFINITION SYMBOL DEFINITION Filling fluid Lubricant Special tool Tightening torque Wear limit clearance Engine speed Electrical data Replace the part with a new one Lithium soap base grease Molybdenum disulfide grease Engine oil Silicone fluid Apply locking agent LOCTITE T R New LS M E S LT ...

Страница 7: ...GENERAL INFORMATION PERIODIC CHECKS AND ADJUSTMENTS ENGINE FUEL ELECTRICAL TROUBLESHOOTING SPECIFICATIONS 1 2 3 4 5 6 7 8 9 10 INDEX ...

Страница 8: ...MEMO ...

Страница 9: ... 4 ENGINE OIL LEVEL 2 5 REPLACING THE ENGINE OIL 2 6 FUEL LEAKAGE 2 8 FUEL FILTER 2 8 OIL COOLER 2 9 AIR FILTER ELEMENT 2 9 ADJUSTING THE VALVE CLEARANCE 2 9 CYLINDER HEADS DECARBONIZATION 2 13 ENGINE SPEED 2 14 ADJUSTING THE ENGINE SPEED 2 15 LOW ENGINE SPEED Replace the throttle body 2 16 FITTINGS AND FASTENERS 2 16 ENGINE ENGINE INSPECTION 3 1 MEASURING THE COMPRESSION PRESSURE 3 1 AIR FILTER 3...

Страница 10: ...T SHAFT ASSEMBLY 3 41 CHECKING THE FLYWEIGHT SHAFT ASSEMBLY 3 41 ASSEMBLING THE FLYWEIGHT SHAFT ASSEMBLY 3 42 INSTALLING THE FLYWEIGHT SHAFT ASSEMBLY AND GOVERNOR FORK 3 42 REMOVING THE CAMSHAFT AND VALVE LIFTERS 3 43 CHECKING THE CAMSHAFT 3 43 CHECKING THE VALVE LIFTERS 3 44 CHECKING THE REED VALVE 3 45 INSTALLING THE VALVE LIFTERS AND CAMSHAFT 3 45 INSTALLING THE COVER 1 3 45 INSTALLING THE COVE...

Страница 11: ...5 30 CHECKING THE ENGINE TEMPERATURE SENSOR 5 31 CHECKING THE IGNITION COILS 5 32 CHECKING THE IGNITION SPARK GAP 5 33 CHECKING THE SPARK PLUG CAPS 5 33 CHECKING THE STATOR COIL ASSEMBLY 5 34 CHECKING THE RECTIFIER REGULATOR 5 35 CHECKING THE FUEL INJECTORS 5 35 CHECKING THE STARTER MOTOR OPERATION 5 36 ELECTRIC STARTING SYSTEM 5 37 REMOVING THE STARTER MOTOR 5 37 DISASSEMBLING THE STARTER MOTOR 5...

Страница 12: ...GENERAL TORQUE SPECIFICATIONS 7 10 LUBRICATION POINTS AND TYPE OF LUBRICANTS 7 11 WIRE ROUTING DIAGRAM 7 12 UPPER SIDE VIEW 7 12 LEFT SIDE VIEW 7 16 RIGHT SIDE VIEW 7 18 REAR SIDE VIEW 7 22 ...

Страница 13: ... four digits identify the model and the remaining digits indicates the production number Designs and specifications are subject to change without notice STARTING SERIAL NUMBER 1 Model Code Starting serial num ber MX775VJ7L6 7U2J 7U2J 1000101 MX775VJ7W6 7U2J 2000101 MX775VJ7X6 7U2J 3000101 MX800VJ7L6 7U1J 7U1J 1000101 MX800VJ7W6 7U1J 2000101 MX800VJ7X6 7U1J 3000101 MX825VJ7L6 7UDJ 7UDJ 1000101 MX82...

Страница 14: ...ONS 1 2 1 2 3 4 5 6 7 8 9 10 GENERAL INFORMATION DIMENSIONS TOP MOUNTING BASE 1 UNC Unified coarse thread Unit in 2 PCD Pitch Circle Diameter mm in mm in 157 1 6 19 499 2 19 65 35 35 45 45 PCD 254 4 3 8 16UNC ...

Страница 15: ...1 3 1 2 3 4 5 6 7 8 9 10 GENERAL INFORMATION DIMENSIONS REAR REAR For models equipped with a muffler mm in mm in 463 8 18 26 231 1 9 1 463 8 18 26 445 4 17 54 231 1 9 1 ...

Страница 16: ...DIMENSIONS 1 4 1 2 3 4 5 6 7 8 9 10 GENERAL INFORMATION RIGHT SIDE RIGHT SIDE For models equipped with a muffler mm in mm in 416 2 16 39 114 3 4 5 639 25 16 416 2 16 39 639 25 16 116 7 4 59 ...

Страница 17: ...g the engine always keep the engine and yourself away from fire NOTES ON SERVICE Correct tools Be sure to use the correct special tool for the job to guard against damage Oil grease and seals Be sure to use genuine Yamaha oils grease and sealers or the equivalents Expendable parts Always replace the gaskets O rings cotter pins and cir clips with new parts when servicing engine ...

Страница 18: ...sassembly Contact surfaces of moving parts should be oiled when reassembled Make sure that the parts move smoothly after each sec tion of the machine is assembled ALL REPLACEMENT PARTS We recommend the use of genuine Yamaha parts for all replacements Use oil and or grease recommended by Yamaha for assembly and adjustment GASKETS OIL SEALS AND O RINGS 1 All gaskets seals and O rings should be repla...

Страница 19: ...ium base grease to the seal lip s Oil the bearings liberally when installing BASIC SERVICE INFORMATION ELECTRICAL SYSTEM Checking the electrical system TIP Before checking the electrical system make sure that the battery voltage is at least 12 V 1 2 Do not use compressed air to spin the bearings dry This causes damage to the bearing surfaces NOTICE a Never insert the tester probes into the coupler...

Страница 20: ...r blower Rust stains Connect and disconnect several times When disconnecting a coupler release the coupler lock hold both sections of the coupler securely and then disconnect the coupler There are many types of coupler locks therefore be sure to check the type of coupler lock before discon necting the coupler NOTICE When disconnecting a connector do not pull the leads Hold both sections of the con...

Страница 21: ...ontinuity with the digital circuit tester TIP If there is no continuity clean the terminals When checking the wire harness perform steps 1 to 3 As a quick remedy use a contact revitalizer available at most part stores Model 88 Multimeter with tachometer YU A1927 For waterproof couplers never insert the tester leads directly into the coupler When performing any checks using a waterproof coupler use...

Страница 22: ...The resistance values shown were obtained at the stan dard measuring temperature of 20 C 68 F If the mea suring temperature is not 20 C 68 F the specified measuring conditions will be shown Model 88 Multimeter with tachometer YU A1927 Engine temperature sensor resistance 9 0 k 11 0 k at 25 C 77 F ...

Страница 23: ...essor 90890 01253 Ignition checker 90890 06754 FI Diagnostic Tool 90890 03253 Feeler gauge set YU 26900 9 Oil filter wrench YM 01469 Engine compression tes ter YU 33223 Primary clutch holder YU 01235 Rotor holding tool 90890 01235 Heavy duty puller YU 33270 B Cylinder gauge Commercially obtainable Piston ring compressor YM 08037 Dial indicator gauge YU A8428 Pressure vacuum tester YB 35956 B Fuel ...

Страница 24: ...SPECIAL TOOLS AND TESTERS 1 12 1 2 3 4 5 6 7 8 9 10 GENERAL INFORMATION MEMO ...

Страница 25: ...missions control These controls not only function to ensure air filter but are also vital to proper engine operation and maximum performance PERIODIC MAINTENANCE LUBRICATION INTERVALS 1 For models equipped with a Yamaha muffler 2 Items marked with an asterisk require special tools data and technical skills have a Yamaha dealer perform the service Daily 50 hrs 100 hrs 200 hrs 250 hrs 500 hrs 1000 h...

Страница 26: ...auge set Out of specification Regap If necessary clean the spark plugs with a spark plug cleaner TIP Before installing the spark plugs clean the gasket surface and plug surface Check and adjust the areas around the cylinder head after the engine has cooled down completely WARNING Before removing the spark plugs use compressed air to clean the cylinder head covers to prevent dirt from falling into ...

Страница 27: ...MUFFLER For models equipped with a muffler 1 Remove Spark arrester screw 1 2 Remove Spark arrester 1 TIP Use a flathead screw driver to pry the spark arrester out from the muffler a b Spark plug 20 N m 2 0 kgf m 14 lb ft T R The engine and muffler will be very hot after the engine has been run Avoid touching the engine and muffler while they are still hot with any part of your body or clothing dur...

Страница 28: ...r 6 Install Muffler Refer to MUFFLER For models equipped with a muffler on page 3 4 Spark arrester Spark arrester screw TIP Align the spark arrester lump a with the hole b in the muffler pipe ENGINE OIL LEAKAGE 1 Place the multi purpose engine on a level surface Do not use a wire brush to clean otherwise the noise damping material may come out and the damping effect may be reduced NOTICE When clea...

Страница 29: ... Place the multi purpose engine on a level surface b Warm up the engine for several minutes c Stop the engine d Remove the oil filler cap e Wipe the engine oil dipstick 1 clean insert it back into the oil filler hole without screwing it in and then remove it again to check the oil level Add oil if necessary TIP The engine oil should be between the minimum a and maximum b level marks 3 Install Oil ...

Страница 30: ...bolt 1 Oil drain bolt gasket 2 3 Drain Engine oil 4 If the oil filter is also to be replaced perform the fol lowing procedure a Remove the oil filter 1 with an oil filter wrench 2 b Lubricate the O ring 3 of the new oil filter with a thin coat of engine oil Avoid draining the engine oil immediately after stop ping the engine The oil is hot and should be handled with care to avoid burns WARNING 2 1...

Страница 31: ...the oil filler hole 1 in the crankcase 7 Check Engine oil level Refer to ENGINE OIL LEVEL on page 2 5 Oil filter 14 N m 1 4 kgf m 10 lb ft T R 2 1 Oil drain bolt 27 N m 2 7 kgf m 20 lb ft New T R 0 C SAE 5W 32 F 25 C 80 F YAMALUBE SAE 10W 30 Performance All Purpose Recommended engine oil A YAMALUBE SAE 10W 30 Performance All Purpose SAE 10W 30 or 10W 40 B SAE 5W 30 Recommended engine oil grade API...

Страница 32: ... throttle body FUEL FILTER 1 Remove Fuel filter 2 Check Fuel filter Damage Replace Dirt clog Clean TIP Clean the fuel filter with clean gasoline and then dry it thoroughly Replace fuel hose every four years NOTICE Do not smoke and keep away from open flames sparks or any other source of fire when handling or in the vicinity of fuel WARNING ...

Страница 33: ...age dirty Replace 3 Install Inner element Air filter element Air filter case cover Dust cap ADJUSTING THE VALVE CLEARANCE The following procedure applies to all of the valves 1 Remove Spark plug cap 1 Spark plug 2 Be sure not to run the engine without air filter element Otherwise this can result in excessive piston and or cylinder wear NOTICE 1 2 3 Before removing the spark plug use compressed air...

Страница 34: ...11 4 Turn the crankshaft clockwise and then set the piston at TDC top dead center on the compression stroke TIP Check the piston position by inserting a screw driver into the spark plug hole 5 Measure Valve clearance Between the rocker arm and adjusting pad Out of specification Adjust to original set value at every 1000 hr TIP Valve clearance must be measured when the engine has cooled down enough...

Страница 35: ... adjusting pad 3 so that they can be installed in the correct place b Calculate the difference between the specified valve clearance and the measured valve clearance Example Specified valve clearance 0 07 0 13 mm 0 003 0 005 in Measured valve clearance 0 18 mm 0 007 in 0 18 mm 0 007 in 0 13 mm 0 005 in 0 05 mm 0 002 in Valve clearance cold Normal ENG operation range between 1000 hr periodic mainte...

Страница 36: ...ting pad number Example 1 80 mm 0 071 in 0 05 mm 0 002 in 1 85 mm 0 073 in The adjusting pad number is 185 e Round off the adjusting pad number according to the following table and then select the suitable adjusting pad TIP Refer to the following table for the available adjusting pads Example Adjusting pad number 188 Rounded value 200 New adjusting pad number 200 f Install the new adjusting pad 4 ...

Страница 37: ... adjustment steps until the specified clearance is obtained 7 Install Cylinder head cover gasket Cylinder head cover Cylinder head cover bolts Spark plug Spark plug cap CYLINDER HEADS DECARBONIZATION 1 Remove Cylinder heads Refer to CYLINDER HEAD COVERS CYLINDER HEADS on page 3 20 2 Eliminate Carbon deposits Refer to CHECKING THE CYLINDER HEADS on page 3 24 3 Install Cylinder heads Refer to INSTAL...

Страница 38: ...h no load Out of specification Adjust a Move the throttle lever 1 to the high engine speed position a b Check the high engine speed 4 Measure Low engine speed with no load Out of specification Adjust a Move the throttle lever 1 to the low engine speed position a 1 FI Diagnostic Tool 90890 03253 High engine speed with no load 3550 3600 r min a 1 Low engine speed with no load 1450 1550 r min a 1 ...

Страница 39: ...stic Tool 1 3 Adjust High engine speed a Move the throttle lever 1 to the high engine speed position a b Turn the throttle stop screw 2 in direction b or c until the high engine speed is obtained 4 Adjust Low engine speed 1 FI Diagnostic Tool 90890 03253 1 2 a b c Direction b High engine speed is increased Direction c High engine speed is decreased High engine speed with no load 3550 3600 r min ...

Страница 40: ...op screw 1 in direction a or b 1 Turn the throttle stop screw 1 throttle body in direc tion a or b until the low engine speed is obtained FITTINGS AND FASTENERS 1 Check All fittings and fasteners Looseness Tighten Rough movement Replace the defective part s Damage pitting Replace a 1 c d b 3 2 2 Direction c Low engine speed is decreased Direction d Low engine speed is increased Low engine speed wi...

Страница 41: ...Compression pressure Open the throttle and crank the engine until the needle stop rising on the engine compression tes ter Out of specification Refer to steps a and b Before removing the spark plug use compressed air to clean the cylinder head cover to prevent dirt from falling into the engine NOTICE 1 2 Engine compression tester YU 33223 Standard compression pressure 1 31 1 45 MPa 13 4 14 8 kg cm...

Страница 42: ...ssion pressure is above the maximum specification check the cylinder head valve sur faces and piston crown for carbon deposits Carbon deposits Eliminate 5 Install Spark plug Spark plug cap Reading Diagnosis Higher than without oil Worn cylinder piston and piston ring s Same as without oil Defective piston piston ring s valve s and cylinder head gasket Improper valve timing and valve clearance Spar...

Страница 43: ...ove the parts in the order listed 1 Dust cap 1 2 Air filter case cover 1 3 Air filter element 1 4 Inner element 1 5 Air filter cover 1 1 6 Air filter case stay 1 7 Air filter case 1 8 Joint 2 1 1 2 3 4 5 6 6 7 8 10 N m 1 0 kgf m 7 2 lb ft 1 8 N m 0 18 kgf m 1 3 lb ft 1 8 N m 0 18 kgf m 1 3 lb ft 7 N m 0 7 kgf m 5 1 lb ft ...

Страница 44: ...s equipped with a muffler Order Job Parts to remove Q ty Remarks Removing the muffler Remove the parts in the order listed 1 Muffler 1 2 Spark arrester 1 3 Gasket 2 4 O2 sensor 1 1 2 3 3 5 N m 0 35 kgf m 2 5 lb ft 20 N m 2 0 kgf m 14 lb ft 20 N m 2 0 kgf m 14 lb ft 18 N m 1 8 kgf m 13 lb ft 4 ...

Страница 45: ...ove the parts in the order listed Engine oil Drain Refer to REPLACING THE ENGINE OIL on page 2 6 1 Oil cooler 1 2 Oil hose 1 1 3 Oil hose 2 1 4 Oil filter 1 5 Adapter union bolt 1 6 Adapter 1 7 Oil seal 1 17 N m 1 7 kgf m 12 lb ft 14 N m 1 4 kgf m 10 lb ft 9 N m 0 9 kgf m 6 5 lb ft 62 N m 6 2 kgf m 45 lb ft 1 2 3 4 5 6 7 ...

Страница 46: ...own in the illustration 2 Remove Oil hose 1 Oil hose 2 Oil cooler CHECKING THE OIL COOLER 1 Check Oil cooler 1 Oil hose 1 2 Oil hose 2 3 Adapter 4 Damage Replace Dirt clog Clean INSTALLING THE OIL COOLER 1 Clean Mating surfaces of the adapter and the crankcase cover 2 with a cloth dampened with lacquer thinner 2 Install Oil seal 1 Adapter 2 Adapter union bolt 3 1 2 a A Hose clamp pliers 1 2 3 4 1 ...

Страница 47: ...er 2 3 Install Oil filter Oil hose 2 Oil hose 1 Hose clamp Clic R 1 TIP Install the hose clamp using the hose clamp pliers 2 When installing the hose clamp make sure that the thin tip a of the hose clamp pliers is directed as shown in the illustration 4 Install Oil cooler Oil cooler bolts a b 1 2 a A Hose clamp pliers New Oil cooler bolt 9 N m 0 9 kgf m 6 5 lb ft T R ...

Страница 48: ...the parts in the order listed 1 ECU coupler 2 Disconnect 2 Earth terminal 1 3 ECU 1 4 Engine hunger 1 For maintenance 5 Rectifier regulator lead connector 4 Disconnect 6 Rectifier regulator 1 7 Fuse holder bracket 1 8 Fuse 1 30 A 9 Fuse 2 10 A 20 N m 2 0 kgf m 14 lb ft 4 0 N m 0 40 kgf m 2 9 lb ft 7 N m 0 7 kgf m 5 1 lb ft 7 N m 0 7 kgf m 5 1 lb ft 7 N m 0 7 kgf m 5 1 lb ft 1 2 3 4 5 6 7 8 9 ...

Страница 49: ...1 2 3 4 5 6 7 8 9 10 ENGINE ECU RECTIFIER REGULATOR AND FUSES INSTALLING THE FUSES 1 Install 30 A fuse 1 10 A fuses 2 2 1 a For the 30 A fuse 1 there is identification red tape a on the wire harness NOTICE ...

Страница 50: ...gulator Refer to ECU RECTIFIER REGULATOR AND FUSES on page 3 8 Low pressure fuel pump Refer to FUEL PUMPS on page 4 1 Oil cooler Refer to OIL COOLER on page 3 5 Fan case Refer to CASE AND FAN on page 3 11 1 Ignition coil 1 lead coupler 1 Disconnect 2 Ignition coil 2 lead coupler 1 Disconnect 3 Ignition coil 1 1 4 Ignition coil 2 1 5 Spark plug 2 20 N m 2 0 kgf m 14 lb ft 20 N m 2 0 kgf m 14 lb ft ...

Страница 51: ...U RECTIFIER REGULATOR AND FUSES on page 3 8 Low pressure fuel pump Refer to FUEL PUMPS on page 4 1 Oil cooler Refer to OIL COOLER on page 3 5 1 Oil filler cap 1 2 Oil filler pipe 1 3 O ring 1 4 Fan case cover 1 5 Grass screen 1 6 Fan case 1 7 Fan 1 10 N m 1 0 kgf m 7 2 lb ft 10 N m 1 0 kgf m 7 2 lb ft 10 N m 1 0 kgf m 7 2 lb ft 7 N m 0 7 kgf m 5 1 lb ft 7 N m 0 7 kgf m 5 1 lb ft 7 N m 0 7 kgf m 5 ...

Страница 52: ...fer to ECU RECTIFIER REGULATOR AND FUSES on page 3 8 3 Remove Low pressure fuel pump Refer to FUEL PUMPS on page 4 1 4 Remove Oil cooler Refer to OIL COOLER on page 3 5 5 Remove Oil filler cap Oil filler pipe 6 Remove Fan case cover 1 Grass screen 2 Fan case 3 Fan 4 1 2 3 4 Because there is a risk of damage remove the grass screen 2 and fan case 3 in this order NOTICE ...

Страница 53: ...Clean INSTALLING THE CASE AND FAN 1 Install Fan 1 Fan bolts Fan case 2 Fan case bolts Grass screen 3 Grass screen bolts Fan case cover 4 Fan case cover bolts 1 2 3 4 4 3 2 1 Fan bolt 10 N m 1 0 kgf m 7 2 lb ft Fan case bolt 7 N m 0 7 kgf m 5 1 lb ft Grass screen bolt 10 N m 1 0 kgf m 7 2 lb ft Fan case cover bolt 7 N m 0 7 kgf m 5 1 lb ft T R T R T R T R ...

Страница 54: ...SE AND FAN TIP Insert the tab a of the fan case cover 4 into the hole b of the fan case 2 first and then install 2 Install Oil filler pipe Oil filler pipe bolt Oil filler cap 2 4 a b a b Oil filler pipe bolt 7 N m 0 7 kgf m 5 1 lb ft T R ...

Страница 55: ... page 3 3 ECU and rectifier regulator Refer to ECU RECTIFIER REGULATOR AND FUSES on page 3 8 Low pressure fuel pump Refer to FUEL PUMPS on page 4 1 Oil cooler Refer to OIL COOLER on page 3 5 Fan case Refer to CASE AND FAN on page 3 11 1 Crankshaft position sensor lead coupler 1 Disconnect 2 Crankshaft position sensor 1 3 Flywheel 1 4 Woodruff key 1 5 Stator coil assembly 1 180 N m 18 kgf m 130 lb ...

Страница 56: ...REGULATOR AND FUSES on page 3 8 3 Remove Low pressure fuel pump Refer to FUEL PUMPS on page 4 1 4 Remove Oil cooler Refer to OIL COOLER on page 3 5 5 Remove Fan case cover Grass screen Fan case Fan Refer to CASE AND FAN on page 3 11 6 Remove Crankshaft position sensor 1 7 Remove Flywheel nut 1 Washer 2 TIP Attach the primary clutch holder 3 to hold the flywheel 1 1 3 2 Primary clutch holder YU 012...

Страница 57: ...ywheel If necessary one bolt may be backed out slightly to level the tool body 9 Remove Stator coil assembly CHECKING THE FLYWHEEL AND STATOR COIL ASSEMBLY 1 Check Flywheel 1 Stator coil assembly 2 Damage Replace INSTALLING THE FLYWHEEL AND STATOR COIL ASSEMBLY 1 Install Stator coil assembly Stator coil assembly bolts 2 Install Woodruff key Flywheel 1 2 Heavy duty puller YU 33270 B 1 2 Stator coil...

Страница 58: ...ION SENSOR on page 3 19 5 Install Fan Fan case Grass screen Fan case cover Refer to CASE AND FAN on page 3 11 6 Install Low pressure fuel pump Refer to FUEL PUMPS on page 4 1 7 Install ECU and rectifier regulator Refer to ECU RECTIFIER REGULATOR AND FUSES on page 3 8 8 Install Air filter case Refer to AIR FILTER on page 3 3 1 3 2 Flywheel nut 180 N m 18 kgf m 130 lb ft Primary clutch holder YU 012...

Страница 59: ...ft position sensor air gap a Loosen the crankshaft position sensor bolts 1 b Adjust the crankshaft position sensor air gap c Tighten the crankshaft position sensor bolts 1 Crankshaft position sensor bolt 7 N m 0 7 kgf m 5 1 lb ft T R Feeler gauge set YU 26900 9 Crankshaft position sensor air gap 0 5 1 5 mm 0 02 0 06 in 1 Feeler gauge set YU 26900 9 Crankshaft position sensor air gap 0 5 1 5 mm 0 0...

Страница 60: ...h and low pressure fuel pump Refer to FUEL PUMPS on page 4 1 Oil cooler Refer to OIL COOLER on page 3 5 Fan case Refer to CASE AND FAN on page 3 11 Flywheel and stator coil assembly Refer to FLYWHEEL AND STATOR COIL ASSEMBLY on page 3 15 Throttle body assembly Refer to THROTTLE BODY ASSEMBLY on page 4 6 Intake manifold Refer to FUEL INJECTORS AND INTAKE MANIFOLD on page 4 9 Starter motor assembly ...

Страница 61: ...et 1 4 Rocker arm shaft 1 Intake 5 Rocker arm shaft 1 Exhaust 6 Rocker arm 1 Intake 7 Rocker arm 1 Exhaust 8 Adjusting pad 3 9 Push rod 2 10 Cylinder head assembly 1 1 11 Cylinder head gasket 1 12 Dowel pin 2 1 2 3 4 5 6 7 8 8 9 10 11 12 12 11 N m 1 1 kgf m 8 0 lb ft 4 0 N m 0 40 kgf m 2 9 lb ft 7 N m 0 7 kgf m 5 1 lb ft 50 N m 5 0 kgf m 36 lb ft 12 N m 1 2 kgf m 8 7 lb ft 1st 2nd ...

Страница 62: ... fuel pump Refer to FUEL PUMPS on page 4 1 Oil cooler Refer to OIL COOLER on page 3 5 Fan case Refer to CASE AND FAN on page 3 11 Flywheel and stator coil assembly Refer to FLYWHEEL AND STATOR COIL ASSEMBLY on page 3 15 Throttle body assembly Refer to THROTTLE BODY ASSEMBLY on page 4 6 Intake manifold Refer to FUEL INJECTORS AND INTAKE MANIFOLD on page 4 9 Starter motor assembly Refer to REMOVING ...

Страница 63: ...head cover gasket 1 5 Rocker arm shaft 1 Intake 6 Rocker arm shaft 1 Exhaust 7 Rocker arm 1 Intake 8 Rocker arm 1 Exhaust 9 Adjusting pad 3 10 Push rod 2 11 Cylinder head assembly 2 1 12 Cylinder head gasket 1 13 Dowel pin 2 11 N m 1 1 kgf m 8 0 lb ft 7 N m 0 7 kgf m 5 1 lb ft 2 3 4 5 6 7 8 9 9 11 10 12 13 13 4 0 N m 0 40 kgf m 2 9 lb ft 50 N m 5 0 kgf m 36 lb ft 12 N m 1 2 kgf m 8 7 lb ft 1st 2nd...

Страница 64: ...E PUSH RODS The following procedure applies to all of the push rods 1 Check Push rod runout Out of specifications Replace REMOVING THE CYLINDER HEADS The following procedure applies to all of the cylinder heads 1 Remove Cylinder head TIP Set the piston at TDC top dead center on the compres sion stroke Refer to ADJUSTING THE VALVE CLEARANCE on page 2 9 CHECKING THE CYLINDER HEADS The following proc...

Страница 65: ...t surface of the cylin der head at six points using the straight edge and feeler gauge set Out of specifications Resurface or replace INSTALLING THE CYLINDER HEAD ASSEMBLY 1 Install Cylinder head assembly 1 Cylinder head bolts 1 to 5 TIP Tighten the bolts to the specified torque in two steps and in order from 1 to 5 2 Install Cylinder head assembly 2 Cylinder head bolts 1 to 5 TIP Tighten the bolt...

Страница 66: ...3 26 1 2 3 4 5 6 7 8 9 10 ENGINE CYLINDER HEAD COVERS CYLINDER HEADS Cylinder head bolt 1st 12 N m 1 2 kgf m 8 7 lb ft 2nd 50 N m 5 0 kgf m 36 lb ft T R ...

Страница 67: ...isted The following procedure applies to both cylin ders Cylinder head assembly Refer to CYLINDER HEAD COVERS CYL INDER HEADS on page 3 20 1 Valve cotter 3 2 Valve spring retainer 3 3 Intake valve spring 2 4 Exhaust valve spring 1 5 Intake valve 2 6 Exhaust valve 1 7 Valve stem seal 3 8 Valve spring seat 3 1 2 4 5 6 7 8 1 2 3 7 8 2 3 7 8 ...

Страница 68: ...ALVE SPRINGS The following procedure applies to all of the valves valve springs and related components 1 Measure Valve stem length a Valve head diameter b Out of specifications Replace TIP Intake and exhaust springs are different Do not mix 1 2 3 4 5 6 7 Do not compress the valve spring more than neces sary Valve spring compressor 90890 01253 NOTICE b a Valve stem length Intake 88 8 mm 3 4961 in V...

Страница 69: ...ace 5 Measure Compressed valve spring force a Out of specification Replace a Valve stem diameter Intake 5 948 5 963 mm 0 2342 0 2348 in Valve stem diameter Exhaust 5 940 5 955 mm 0 2339 0 2344 in Limit Intake 5 918 mm 0 2330 in Limit Exhaust 5 910 mm 0 2327 in Valve stem runout limit 0 01 mm 0 0004 in a Valve spring free length Intake 37 1 mm 1 4606 in Valve spring free length Exhaust 35 6 mm 1 40...

Страница 70: ...e and valve seat 2 Apply a small amount of coarse mechanic s blue lay out fluid to the valve face a 3 Insert the valve into the valve guide and use a valve lapper to contact the valve face with the valve seat TIP Do not rotate the valve while the valve face is contacting the valve seat Installed compression spring force Intake 67 7 N 6 90 kgf 15 2 lbf Installed compression spring force Exhaust 118...

Страница 71: ...evenly on the valve face Lap the valve by tapping and rotating the valve lapper clockwise and counterclockwise 2 Clean off all of the lapping compound from the valve face and valve seat Apply fine lapping compound on the valve face and lap the valve as described in step 1 a Valve face contact width Intake 0 9 1 1 mm 0 0354 0 0433 in Valve face contact width Exhaust 0 9 1 1 mm 0 0354 0 0433 in Limi...

Страница 72: ...alve 1 Valve spring seat 2 Valve stem seal 3 Valve spring 4 Valve spring retainer 5 Valve cotter 6 Use the valve spring compressor 7 to install the parts Do not let the lapping compound enter the gap between the valve stem and the valve guide NOTICE 6 5 4 3 2 1 7 Valve spring compressor 90890 01253 New New a b Do not compress the spring more than necessary Surface a with the rounded edges of the v...

Страница 73: ...ge 3 20 1 Collar 1 2 Crankcase cover 2 1 3 Dowel pin 2 4 Relief valve 1 5 Oil pump cover 1 6 Oil strainer cover 1 7 Oil strainer 1 8 Inner rotor 1 9 Outer rotor 1 10 Oil seal 1 11 Oil pressure switch 1 10 N m 1 0 kgf m 7 2 lb ft 27 N m 2 7 kgf m 20 lb ft 27 N m 2 7 kgf m 20 lb ft 30 N m 3 0 kgf m 22 lb ft 30 N m 3 0 kgf m 22 lb ft 12 N m 1 2 kgf m 8 7 lb ft 1st 2nd 1 2 3 3 4 5 6 7 9 8 10 11 3 11 8...

Страница 74: ... 1 3 Remove Oil pump cover 1 4 Remove Oil strainer cover 1 Oil strainer 2 Inner rotor 3 Outer rotor 4 CHECKING THE OIL PUMP 1 Check Inner rotor 1 Outer rotor 2 Cracks damage wear Replace the defective part s 2 Check Oil strainer 1 Oil strainer cover 2 Damage Replace Contaminants Clean with solvent 1 1 1 2 3 4 1 2 1 2 ...

Страница 75: ...THE CRANKCASE COVER 2 1 Check Crankcase cover 2 Damage Replace INSTALLING THE OIL PRESSURE SWITCH 1 Check Oil pressure switch Damage Replace 2 Install Oil pressure switch 1 TIP Engage the two threads of the oil pressure switch screw a b Inner rotor to outer rotor tip clearance a 0 0 mm 0 0 in Inner rotor to outer rotor tip clearance b 0 19 0 35 mm 0 008 0 013 in Relief valve operating pressure ref...

Страница 76: ...Install Outer rotor 1 Inner rotor 2 Oil strainer 3 Oil strainer cover 4 TIP Face portion a of the oil strainer cover downward as shown in the illustration and install it 3 Install Oil pump cover 1 Oil pump cover bolts 4 Install Relief valve 1 Recommended lubricant Engine oil 1 2 3 4 a 1 Oil pump cover bolt 10 N m 1 0 kgf m 7 2 lb ft T R 1 Relief valve 30 N m 3 0 kgf m 22 lb ft T R ...

Страница 77: ...ase cover 2 mating surfaces 3 Install Crankcase cover 2 TIP Align the inner rotor a of the oil pump with the flat portion b of the crankshaft and install 4 Install Crankcase cover 2 bolts 1 to 11 TIP Tighten the bolts to the specified torque in two steps and in order from 1 to 11 Three bond No 1217G a b 11 1 2 3 4 5 6 7 8 9 10 11 Crankcase cover 2 bolt 1st 12 N m 1 2 kgf m 8 7 lb ft 2nd 30 N m 3 0...

Страница 78: ... to CYLINDER HEAD COVERS CYL INDER HEADS on page 3 20 1 Crankcase cover 1 1 2 Dowel pin 2 3 Bearing 1 4 Bearing 1 5 Clip 2 6 Governor fork 1 7 Flyweight shaft assembly 1 8 Oil seal 1 9 Cover 2 1 10 Gasket 1 11 Scroll air shroud 1 1 2 2 3 4 5 6 7 8 9 10 11 8 5 5 9 N m 0 9 kgf m 6 5 lb ft 10 N m 1 0 kgf m 7 2 lb ft 10 N m 1 0 kgf m 7 2 lb ft 12 N m 1 2 kgf m 8 7 lb ft 7 N m 0 7 kgf m 5 1 lb ft 30 N ...

Страница 79: ...marks 12 Cover 1 1 13 Dowel pin 2 14 Reed valve 1 15 Engine temperature sensor 1 16 Oil seal 1 12 13 14 15 16 8 5 5 9 N m 0 9 kgf m 6 5 lb ft 10 N m 1 0 kgf m 7 2 lb ft 10 N m 1 0 kgf m 7 2 lb ft 12 N m 1 2 kgf m 8 7 lb ft 7 N m 0 7 kgf m 5 1 lb ft 30 N m 3 0 kgf m 22 lb ft 12 N m 1 2 kgf m 8 7 lb ft 1st 2nd ...

Страница 80: ...ng the pistons camshaft and crankshaft Remove the parts in the order listed 1 Camshaft 1 2 Valve lifter 4 3 Connecting rod cap 2 4 Crankshaft 1 5 Connecting rod 2 6 Piston pin circlip 4 7 Piston pin 2 8 Piston 2 9 Top ring 2 10 2nd ring 2 11 Oil ring 2 1 2 2 2 3 4 5 6 6 7 8 9 10 11 3 5 6 6 7 8 9 10 11 20 N m 2 0 kgf m 14 lb ft 20 N m 2 0 kgf m 14 lb ft ...

Страница 81: ...rs 3 3 Remove Flyweight shaft assembly 1 Washer 2 TIP Remove the flyweight shaft assembly by tapping the weight shaft from outside of the crankcase cover 1 DISASSEMBLING THE FLYWEIGHT SHAFT ASSEMBLY 1 Remove Flyweight shafts 1 Weights 2 Collar 3 Washer 4 Circlip 5 Weight shaft 6 CHECKING THE FLYWEIGHT SHAFT ASSEMBLY 1 Check Flyweight shaft assembly move smoothly Rough movement Replace 1 2 3 3 2 1 ...

Страница 82: ...SEMBLY 1 Install Weight shaft 1 Circlip 2 Washer 3 Collar 4 Weights 5 Flyweight shafts 6 INSTALLING THE FLYWEIGHT SHAFT ASSEMBLY AND GOVERNOR FORK 1 Install Washer 1 Flyweight shaft assembly 2 2 Install Washers 1 Governor fork 2 Clips 3 3 Install Governor assembly Crankcase cover 1 Refer to INSTALLING THE CRANKCASE COVER 1 on page 3 47 4 Adjust Governor 6 6 6 5 4 3 2 1 New 2 1 1 1 2 3 ...

Страница 83: ...ing procedure applies to all of the camshaft and valve lifters 1 Remove Camshaft 1 TIP Remove the camshaft when the camshaft gear mark a and the crankshaft gear mark b are aligned 2 Remove Valve lifter 1 Intake Valve lifter 2 Exhaust CHECKING THE CAMSHAFT 1 Check Camshaft Crack damage wear Replace a b 1 1 1 2 2 Mark the valve lifters so as not to confuse them during reassembly NOTICE ...

Страница 84: ... THE VALVE LIFTERS The following procedure applies to all of the valve lifters a b Camshaft lobe dimensions Lobe height a Intake 32 885 mm 1 2947 in Limit 32 785 mm 1 2907 in Lobe height a Exhaust 33 957 mm 1 3369 in Limit 33 857 mm 1 3330 in Base circle diameter b Intake 26 000 mm 1 0236 in Limit 25 900 mm 1 0197 in Base circle diameter b Exhaust 26 000 mm 1 0236 in Limit 25 900 mm 1 0197 in a a ...

Страница 85: ...E LIFTERS AND CAMSHAFT The following procedure applies to all of the camshaft and valve lifters 1 Install Valve lifter 1 Intake Valve lifter 2 Exhaust 2 Install Camshaft 1 INSTALLING THE COVER 1 1 Clean Mating surfaces of the crankcase and the cover 1 with a cloth dampened with lacquer thinner 1 1 2 2 a b 1 Be sure to align the camshaft gear mark a with the crankshaft gear mark b NOTICE ...

Страница 86: ...e in order from 1 to 5 INSTALLING THE COVER 2 1 Install Gasket Cover 2 Cover 2 bolts 1 to 5 TIP Tighten the bolts to the specified torque in order from 1 to 5 CHECKING THE CRANKCASE COVER 1 1 Check Crankcase cover 1 Damage Replace Bearing Noise wear rotational failure Replace Three bond No 1217G 5 1 2 3 4 5 Cover 1 bolt 9 N m 0 9 kgf m 6 5 lb ft T R 5 1 2 3 4 5 Cover 2 bolt 10 N m 1 0 kgf m 7 2 lb...

Страница 87: ...wall Cylinder wall Vertical scratches Replace the cylinder and replace the piston and piston rings as a set 2 Measure Cylinder warpage TIP Measure the warpage on the contact surface of the cylin der head at six points using a straight edge and feeler gauge set Out of specification Replace the crankcase assembly 3 Measure Piston to cylinder clearance a Measure cylinder bore C with the cylinder bore...

Страница 88: ...If out of specification replace the piston and piston rings as a set e Calculate the piston to cylinder clearance with the following formula f If out of specification replace the crankcase assembly and replace the piston and piston rings as a set Bore 80 000 80 020 mm 3 1496 3 1504 in Warpage limit 80 025 mm 3 1506 in C maximum of D1 D2 D3 D4 D5 D6 P a Piston diameter 79 959 79 980 mm 3 1480 3 148...

Страница 89: ...ications Replace 3 Measure Piston pin diameter a Out of specification Replace 4 Check Check that the piston pin enters smoothly into the piston pin hole TIP If the piston pin fits too tight into the piston check the pis ton pin hole If there is any protrusion use a knife or scraper to gently remove it so that piston pin can be pushed in smoothly with your fingers CHECKING THE PISTON RINGS The foll...

Страница 90: ...m the piston ring grooves and pis ton rings 2 Install Piston ring into the cylinder TIP Use the piston crown to level the piston ring near bottom of cylinder a where cylinder wear is lowest 3 Measure Piston ring end gap Out of specification Replace the piston rings as a set Piston ring Top ring Side clearance 0 04 0 08 mm 0 0016 0 0031 in Limit 0 13 mm 0 0051 in 2nd ring Side clearance 0 03 0 07 m...

Страница 91: ...icator gauge 3 Measure Crank pin outside diameter a Out of specification Replace Use a micrometer Top ring End gap installed 0 20 0 35 mm 0 0079 0 0138 in Limit 0 60 mm 0 0236 in 2nd ring End gap installed 0 20 0 35 mm 0 0079 0 0138 in Limit 0 60 mm 0 0236 in Oil ring End gap installed 0 20 0 70 mm 0 0079 0 0276 in 1 Dial indicator gauge YU A8428 Runout limit 0 03 mm 0 0012 in a Crank pin outside ...

Страница 92: ...Connecting rod cap 2 TIP Tighten the cap bolts so that the crankshaft does not move while the oil clearance is being measured 3 Remove Connecting rod cap Connecting rod 4 Measure Connecting rod big end oil clearance Out of specification Replace crankshaft or con necting rod assembly and then measure the clear ance again TIP Measure the widest portion of the pressed Plastigauge INSTALLING THE PISTO...

Страница 93: ...tall the 2nd ring so that the RN mark b faces toward the piston head Make sure that the piston rings move smoothly 2 Apply the engine oil to the inside of the connecting rod small end 3 Install Piston 1 Piston pin 2 Piston pin circlips 3 TIP Make sure that the mark a on the piston head faces toward the flywheel Install the piston pin clips so that the clip ends are 45 b or more from the cutout in ...

Страница 94: ...ressor 1 TIP Attach the piston ring compressor to the piston and then insert the piston into the cylinder 4 Check Piston 1 with the connecting rod 1 1 position TIP Make sure that the mark a on the piston 1 head faces toward the flywheel Make sure that the 7UD mark b on the connecting rod 1 faces toward the crankcase cover 1 45 90 90 90 a b c d a Top ring oil ring expander b Lower oil ring rail c 2...

Страница 95: ...t the YAMAHA mark b on the connect ing rod 2 faces toward the crankcase cover 1 6 Install Crankshaft 1 7 Install Connecting rod cap 1 1 Connecting rod cap 1 bolts 2 TIP Make sure that the mark a on the connecting rod 1 is aligned with the mark b on the connecting rod cap 1 Tighten the connecting rod cap 1 bolts alternately two to three times a 1 1 b 1 2 1 2 2 1 a b Connecting rod cap bolt 20 N m 2...

Страница 96: ... the connecting rod 2 is aligned with the mark b on the connecting rod cap 2 Tighten the connecting rod cap 2 bolts alternately two to three times 9 Install Camshaft Refer to INSTALLING THE VALVE LIFTERS AND CAMSHAFT on page 3 45 Crankcase cover 1 Refer to INSTALLING THE CRANKCASE COVER 1 on page 3 47 2 1 2 2 1 a b Connecting rod cap bolt 20 N m 2 0 kgf m 14 lb ft T R ...

Страница 97: ...el hose 1 3 Low pressure fuel pump 1 4 Fuel pump bracket 1 5 Fuel injector pipe 1 1 Disconnect 6 Purge hose 2 1 Disconnect 7 High pressure fuel pump lead coupler 1 Disconnect 8 High pressure fuel pump 1 9 Fuel pump bracket 1 10 Pulsar hose 1 11 Fuel delivery hose 1 7 N m 0 7 kgf m 5 1 lb ft 9 N m 0 9 kgf m 6 5 lb ft 9 N m 0 9 kgf m 6 5 lb ft 1 2 3 5 6 7 8 9 11 10 4 ...

Страница 98: ...e area under where it will be removed 2 Disconnect High pressure fuel pump lead coupler TIP Slide the coupler cover a upward as shown in the illustra tion and remove the coupler 3 Remove High pressure fuel pump Cover fuel injector pipe 1 connections with a cloth when disconnecting them Residual pressure in the fuel lines could cause fuel to spurt out when removing the fuel injector pipe 1 WARNING ...

Страница 99: ... Pressure vac uum tester 1 and check that gasoline is flowing out of the fuel delivery hose 3 d If not replace the fuel pump assembly CHECKING THE HIGH PRESSURE FUEL PUMP 1 Check High pressure fuel pump Cracks damage Replace 2 Check Fuel pressure a Disconnect the fuel injector pipe 1 1 from the fuel pump Refer to REMOVING THE HIGH PRESSURE FUEL PUMP on page 4 2 1 2 3 4 2 1 3 Pressure vacuum tester...

Страница 100: ... and then lock the coupler 3 Connect Fuel injector pipe 1 TIP Install the fuel injector pipe 1 securely onto the high pres Be sure to disconnect the fuel injector pipe 1 by hand Do not forcefully disconnect the hose with tools NOTICE 3 2 Fuel pressure gauge YU 03153 Fuel pressure adapter YM 03186 Fuel line pressure at idle 255 285 kPa 2 55 2 85 kgf cm 36 98 41 33 psi a a When connecting the fuel i...

Страница 101: ...4 5 1 2 3 4 5 6 7 8 9 10 FUEL FUEL PUMPS sure fuel pump joint until a distinct click is heard ...

Страница 102: ...ted Air filter case Refer to AIR FILTER on page 3 3 1 Governor spring 1 2 Governor assembly 1 3 Throttle lever comp 1 4 Link rod spring 1 1 5 Stay 1 6 Breather hose 1 7 Joint 1 1 8 Gasket 1 9 Throttle body assembly lead coupler 1 Disconnect 10 Throttle body assembly 1 11 Gasket 1 1 2 3 4 5 6 7 8 9 10 11 8 N m 0 8 kgf m 5 8 lb ft 7 N m 0 7 kgf m 5 1 lb ft 1 1 N m 0 11 kgf m 0 80 lb ft ...

Страница 103: ...Y ASSEMBLY 1 Check Throttle body assembly Cracks damage Replace 2 Check Throttle valve operation Throttle valve can not move smoothly Replace Engine speed adjustment Can not adjust engine high low engine speed by procedure on page 2 16 Replace INSTALLING THE THROTTLE BODY ASSEMBLY 1 Install Gaskets 1 Throttle body assembly 2 Joint 1 3 Breather hose 4 Stay 5 Throttle body assembly nuts 1 5 5 2 3 4 ...

Страница 104: ...bly Install the governor spring to the throttle lever comp first and then to the governor assembly 3 Adjust Governor Governor assembly a Loosen the governor assembly bolt 1 b Turn the governor assembly 2 counterclockwise until it stops c Turn the governor fork 3 counterclockwise until it stops d Tighten the governor assembly bolt 1 4 Check Engine speed Refer to ENGINE SPEED on page 2 14 1 a b c d ...

Страница 105: ... REGULATOR AND FUSES on page 3 8 Low pressure fuel pump Refer to FUEL PUMPS on page 4 1 Oil cooler Refer to OIL COOLER on page 3 5 Fan case and fan Refer to CASE AND FAN on page 3 11 Throttle body assembly Refer to THROTTLE BODY ASSEMBLY on page 4 6 Ignition coil Refer to IGNITION COILS on page 3 10 1 Purge hose 1 2 Fuel injector 1 lead coupler 1 Disconnect 3 Fuel injector 2 lead coupler 1 Disconn...

Страница 106: ... Fuel injector pipe 1 1 6 Fuel injector pipe 2 1 7 Inlet pipe 1 1 8 Inlet pipe 2 1 9 Fuel injector 1 1 10 Fuel injector 2 1 11 Intake manifold 1 12 Intake manifold joint 2 13 Gasket 4 14 Manifold absolute pressure sensor 1 4 5 6 7 8 9 10 11 12 12 13 13 14 7 N m 0 7 kgf m 5 1 lb ft 3 0 N m 0 30 kgf m 2 2 lb ft 1st 2nd 7 N m 0 7 kgf m 5 1 lb ft 9 N m 0 9 kgf m 6 5 lb ft ...

Страница 107: ... pressure fuel pump Refer to FUEL PUMPS on page 4 1 Oil cooler Refer to OIL COOLER on page 3 5 Fan case and fan Refer to CASE AND FAN on page 3 11 Throttle body assembly Refer to THROTTLE BODY ASSEMBLY on page 4 6 Ignition coil Refer to IGNITION COILS on page 3 10 2 Remove Hose clamp Clic R Refer to REMOVING THE OIL COOLER on page 3 6 Fuel injector pipe 1 1 Fuel injector pipe 2 2 3 Disconnect Fuel...

Страница 108: ... inlet pipe 2 from the fuel injector 6 Check Fuel injectors Obstruction Replace and check the fuel pump fuel supply system Deposit Replace Damage Replace 7 Check Fuel injector resistance Refer to CHECKING THE FUEL INJECTORS on page 5 35 INSTALLING THE FUEL INJECTORS The following procedure applies to all of the fuel injectors and related components 1 Install Fuel injector 1 O ring 2 Inlet pipe 3 1...

Страница 109: ...lead coupler TIP Insert the coupler securely slide the coupler cover a downward as shown in the illustration and then lock the coupler 5 Install Hose clamp Clic R Refer to INSTALLING THE OIL COOLER on page 3 6 Fuel injector pipe 1 Fuel injector pipe 2 6 Install Ignition coil Refer to IGNITION COILS on page 3 10 Throttle body assembly Refer to THROTTLE BODY ASSEMBLY on page 4 6 Fan case and fan Ref...

Страница 110: ...ion and remove the coupler 2 Remove Manifold absolute pressure sensor INSTALLING THE MANIFOLD ABSOLUTE PRESSURE SENSOR 1 Install Manifold absolute pressure sensor O ring Manifold absolute pressure sensor bolt 2 Connect Manifold absolute pressure sensor lead coupler TIP Insert the coupler securely slide the lock a of the coupler as shown in the illustration and install the coupler REMOVING THE INTA...

Страница 111: ...HE INTAKE MANIFOLD 1 Install Gaskets 1 Intake manifold joints 2 Intake manifold 3 2 Install Intake manifold nuts 1 4 and bolts 5 8 TIP Tighten the bolts and nuts to the specified torque in two steps and in order from 1 to 8 3 Install Fuel injectors Refer to INSTALLING THE FUEL INJECTORS on page 4 12 1 3 3 2 2 3 1 1 2 2 New 1 2 3 4 5 6 7 8 4 4 Intake manifold nut and bolt 1st 3 0 N m 0 30 kgf m 2 2...

Страница 112: ... O R B W B G R Gy B G Y Br G W R W R W B B R B R W W Y L O Y L L O R R Y L R Y R Y R Y R Y R Y R Y R Y R Y R Y Y V W W B Br B G P L Br G L W G W Y L B B W R Gy G R O G Y B Y L L O R Y R Y P L G B G R Y L W O B B B W R Br G W B Gy G Y B Y L Gy B W B V L O R R R Y R Y R Y R Y R Y R Y 30A 10A 10A L R W B B Y G R L G W Br G Br OFF ON R L R B Br G START 2 3 1 7 8 9 0 w w e r y u o a t f g p s d i 4 5 6...

Страница 113: ...pressure switch 20 Crankshaft position sensor 8 Starter relay 21 High pressure fuel pump 9 Starter motor 22 Ignition coil 2 10 Battery 23 Ignition coil 1 11 Main switch 24 Fuel injector 1 12 Mil light 25 Fuel injector 2 13 Oil warning light B Black G R Green Red Br Brown G W Green White G Green G Y Green Yellow Gy Gray L O Blue Orange L Blue L W Blue White O Orange P L Pink Blue R Red R L Red Blue...

Страница 114: ...re are 5 Modes in this diag tool CURRENT Displays current error codes DIAG Displays sensor output HISTORY Displays history error codes Diag tool display 1 history error code if the same error happened in the past CLEAR Deletes history error codes PROPERTY Display ECU property Not needed for usual maintenance Operation CONNECTING AND DISCONNECTING 1 Turn the main switch OFF 2 Connect the FI Diagnos...

Страница 115: ...o push UP DOWN buttons simultaneously for more than 3 sec onds MODE button 3 The MODE button is used to move to MODE select function and decide the operating MODE POWER LED Green 4 The LED comes on when power Main Switch Voltage is supplied to the FI Diagnostic Tool WARNING LED Orange 5 The LED comes on when error code is detected in CURRENT MODE LCD Display 6 This LCD display indicates error code...

Страница 116: ...E 12 SELECT 4 EACH MODE 13 CURRENT 5 DETERMINE MODE 14 DIAG 6 FAILED 15 HISTORY 7 Reboot UP DOWN Simultaneously more than 3 seconds 16 CLEAR 8 WAITING 17 PROPERTY 9 COM ERROR CODE NO ERROR COM ERROR CODE NO ERROR WAITING CURRENT CURRENT DIAG HISTORY CLEAR PROPERTY DOWN MODE UP SELECT NO ERROR SELECT 1 2 3 4 5 6 7 15 14 13 17 16 11 8 9 10 12 ...

Страница 117: ...elected Mode 2 Message Diag Code Item What to display Unit MAP Manifold Absolute Pressure Sen sor Manifold Absolute Pressure psi IAT Intake Air Temperature Sensor Intake Air Temperature F ET Engine Temperature Sensor Engine Temperature F TPS Throttle Position Sensor Throttle Valve position O2 O2 sensor Oxygen density V RPM Engine rpm Engine rpm rpm HOUR Engine run hour Engine run hour hr P0122 01 ...

Страница 118: ...the past Display there is no error code in the past 1 Selected Mode 3 Unit 2 Selected Diag Code 4 Sensor output 1 Selected Mode 3 Total number of Error Code 2 Error Code 4 Current page number on display 1 Selected Mode 2 Message psi 14 7 DIAG MAP 2 3 4 1 P0122 01 02 HISTORY 2 3 4 1 CODE NO ERROR HISTORY 2 1 ...

Страница 119: ...ICAL FUEL INJECTION SYSTEM CLEAR MODE PROPERTY MODE This MODE is not needed for usual maintenance 1 Question Delete 4 CANCELED 2 DOWN button NO 5 DELETED 3 UP button YES NO YES HISTORY CLEAN DELETED HISTORY CANCELED HISTORY 3 2 1 5 4 ...

Страница 120: ... Engine temperature sensor 3 Fuel pump high pressure 10 Crankshaft position sensor 4 Fuel injector 11 Throttle body 5 ECU Engine Control Unit 12 Manifold absolute pressure sensor 6 Throttle position sensor 13 Air filter case 7 Ignition coil 14 Muffler A Fuel system B Air system C Control system 3 13 B 11 12 10 9 8 A 4 5 C 7 6 14 2 1 ...

Страница 121: ... Low Voltage P0132 Oxygen Sensor O2 Circuit High Voltage P0032 Oxygen Sensor Heater Heater Circuit High Voltage P0031 Oxygen Sensor Heater Heater Circuit Low Voltage P0201 Fuel Injector Injector 1 Circuit Malfunction P0202 Fuel Injector Injector 2 Circuit Malfunction P0230 Fuel Pump Relay FPR FPR Coil Circuit Low Voltage or Open P0232 Fuel Pump Relay FPR FPR Coil Circuit High Voltage P0336 Cranksh...

Страница 122: ...put value on dis play changes with heating or cooling sen sor alone ET Engine Tem perature Sen sor Engine Tem perature F Compare the sensor output value with ambient air temperature with engine cold Confirm the sensor output value on dis play changes with heating or cooling sen sor alone Sensor resistance 9 0 11 0 k 25 C TPS Throttle Posi tion Sensor Throttle Valve position Confirm throttle positi...

Страница 123: ...ensor and ECU Open or low voltage in wire harness between sensor and ECU Malfunction in sensor unit Malfunction in ECU Vacuum leak from intake manifold Error Code P0108 System or Component Manifold Absolute Pressure Sensor MAP Detail of Error MAP Circuit High Voltage Engine Symptoms Poor engine start There is possibility it can t start Poor driveability Deteriorated exhaust Engine Running availabi...

Страница 124: ...ss and coupler between sensor and ECU Low voltage in wire harness between sensor and ECU Malfunction in sensor unit Malfunction in ECU Error Code P0113 System or Component Intake Air Temperature Sensor IAT Detail of Error IAT Circuit High Voltage or Open Engine Symptoms Poor engine start Poor driveability Deteriorated exhaust Unstable engine idling Engine Running availability Able to run engine DI...

Страница 125: ...ss and coupler between sensor and ECU Low voltage in wire harness between sensor and ECU Malfunction in sensor unit Malfunction in ECU Error Code P0118 System or Component Engine Temperature Sensor ET Detail of Error Engine Temperature Sensor Circuit High Voltage or Open Engine Symptoms Poor engine start Poor driveability Deteriorated exhaust Unstable engine idling Engine Running availability Able...

Страница 126: ...arness and coupler between sensor and ECU Low voltage or open in wire harness between sensor and ECU Malfunction in sensor unit Malfunction in ECU Error Code P0123 System or Component Throttle Position Sensor TPS Detail of Error TPS Circuit High Voltage Engine Symptoms Poor engine start There is possibility it can t start Poor driveability Deteriorated exhaust Unstable engine idling Different idli...

Страница 127: ...re harness and coupler between sensor and ECU Low voltage in wire harness between sensor and ECU Malfunction in sensor unit Malfunction in ECU Error Code P0132 System or Component Oxygen Sensor Detail of Error Circuit High Voltage Engine Symptoms Deteriorated exhaust Engine Running availability Able to run engine DIAG Tool Code Mode DIAG Code O2 Diagnosing Probable Cause Malfunction in wire harnes...

Страница 128: ...ness and coupler between sensor and ECU High voltage in wire harness between sensor and ECU Malfunction in sensor heater unit Malfunction in ECU Error Code P0031 System or Component Oxygen Sensor Heater Detail of Error Heater Circuit Low Voltage Engine Symptoms Deteriorated exhaust until exhaust gas heated after engine starts Engine Running availability Able to run engine DIAG Tool Code Diagnosing...

Страница 129: ... harness and coupler between injector and ECU Shorted or open in wire harness between sensor and ECU Malfunction in injector Malfunction in ECU Error Code P0202 System or Component Fuel Injector Detail of Error Injector 2 Circuit Malfunction Engine Symptoms Cylinder 2 stops Engine Running availability Able to run with Cylinder 1 alone DIAG Tool Code Diagnosing Fuel injector resistance 11 4 12 6 Pr...

Страница 130: ...ction in wire harness and coupler between pump and ECU Low voltage or open in wire harness between pump and ECU Malfunction in pump Malfunction in ECU Error Code P0232 System or Component Fuel Pump Relay FPR Detail of Error FPR Coil Circuit High Voltage Engine Symptoms Engine stop Unable to start engine Engine Running availability Unable to run engine DIAG Tool Code Diagnosing Probable Cause Malfu...

Страница 131: ...loose sensor dirty sensor air gap Malfunction in sensor unit Malfunction in ECU Malfunction in rotor damaged deformed Error Code P0337 System or Component Crankshaft Position Sensor CPS Detail of Error CPS Sensor No Signal Engine Symptoms Poor engine start There is possibility it can t start Poor driveability Deteriorated exhaust Unstable engine idling Engine Running availability Depends on the ca...

Страница 132: ...on in wire harness and coupler between coil and ECU Shorted or open in wire harness between coil and ECU Malfunction in coil Malfunction in ECU Error Code P0352 System or Component Ignition Coil Detail of Error Cylinder 2 Ignition Coil Malfunction Engine Symptoms Cylinder 2 stops operating Injector also stops operating Engine Running availability Able to run with Cylinder 1 alone DIAG Tool Code Di...

Страница 133: ...ttery and ECU Shorted or open in wire harness between battery and ECU Malfunction in battery Malfunction in charging system Malfunction in ECU Error Code P0563 System or Component System Voltage Detail of Error System Voltage High Engine Symptoms Engine stop Unable to start engine Engine Running availability Depends on the case DIAG Tool Code Diagnosing Confirm battery voltage Probable Cause Malfu...

Страница 134: ...ual intake air volume Intake air leak clogged man ifold dirty restricted air filter Malfunction in ECU Malfunction in wiring harness Error Code P0172 System or Component BLM MinAdapt Detail of Error Correction amount of injection fuel is beyond lower limit Engine Symptoms Poor engine start There is possibility it can t start Poor driveability Deteriorated exhaust Unstable engine idling Different i...

Страница 135: ...ble engine idling Different idling engine rpm Overheat Engine knock sound Engine Running availability Able to run engine DIAG Tool Code How to Diagnosis Probable Cause Fuel system malfunction Clogged fuel filter line fuel injector fuel pump Malfunction in O2 sensor Malfunction in manifold absolute pressure sensor Difference of actual intake air volume Intake air leak clogged man ifold Running out ...

Страница 136: ...5 25 1 2 3 4 5 6 7 8 9 10 ELECTRICAL ELECTRICAL COMPONENTS ELECTRICAL COMPONENTS 1 2 2 3 4 5 6 6 7 8 9 10 11 12 13 14 ...

Страница 137: ...sor 2 Fuel injector 3 Engine temperature sensor 4 High pressure fuel pump 5 Oil pressure switch 6 Ignition coil spark plug cap 7 Stator coil assembly 8 Rectifier regulator 9 Crankshaft position sensor 10 Throttle position sensor 11 O2 sensor 12 ECU Engine Control Unit 13 Fuse 14 Starter motor ...

Страница 138: ...back and forth between the switch positions a few times CHECKING THE FUSES The following procedure applies to all of the fuses 1 Remove Fuse 1 2 Check Fuse a Connect the digital circuit tester to the fuse and check the continuity Ω O L Never insert the tester probes into the coupler termi nal slots Always insert the probes from the opposite end of the coupler taking care not to loosen or dam age t...

Страница 139: ...lectri cal circuit is operational d If the fuse immediately blows again check the elec trical circuit 4 Install Fuse CHECKING THE OIL PRESSURE SWITCH 1 Drain Engine oil 2 Disconnect Oil pressure switch lead Model 88 Multimeter with tachometer YU A1927 b a Fuse amperage a 30 A 1 Fuse amperage b 10 A 2 Never use a fuse with an amperage other than that specified Improvising or using a fuse with the w...

Страница 140: ...ue with atomosphere pressure Does not much Replace the manifold absolute CHECKING THE THROTTLE POSITION SENSOR 1 Remove Throttle body assembly Refer to THROTTLE BODY ASSEMBLY on page 4 6 2 Check Throttle position sensor maximum resistance Out of specification Replace the throttle position sensor Model 88 Multimeter with tachometer YU A1927 1 FI Diagnostic Tool 90890 03253 Atomosphere pressure Refe...

Страница 141: ...case cover Grass screen Fan case Refer to CASE AND FAN on page 3 11 2 Check Crankshaft position sensor resistance Out of specification Replace the crankshaft posi tion sensor a Connect the digital circuit tester to the crank shaft position sensor coupler as shown Resistance 3 0 7 0 k Model 88 Multimeter with tachometer YU A1927 a b Positive tester probe Terminal a Negative tester probe Terminal b ...

Страница 142: ...e the engine temperature sensor terminals do not get wet c Place a thermometer 3 in the water d Slowly heat the water then let it cool down to the specified temperature 1 2 Positive tester probe White Red 1 wire harness color Negative tester probe Black 2 wire harness color Handle the engine temperature sensor with special care Never subject the engine temperature sensor to strong shocks If the en...

Страница 143: ... coil from the spark plug b Connect the digital circuit tester to the ignition coil as shown c Measure the primary coil resistance 2 Check Secondary coil resistance Out of specification Replace a Connect the digital circuit tester to the ignition coil as shown Primary coil resistance 0 44 0 66 1 2 Model 88 Multimeter with tachometer YU A1927 Positive tester probe Red 1 wire harness color Negative ...

Страница 144: ...on system circuit is operating normally a Disconnect the spark plug cap 1 from the spark plug b Connect the ignition checker 2 as shown c Turn the main switch to START d Measure the ignition spark gap a CHECKING THE SPARK PLUG CAPS The following procedure applies to all of the spark plug caps 1 Remove Spark plug cap 2 Check Spark plug cap resistance Out of specification Replace the spark plug cap ...

Страница 145: ...l resistance Out of specification Replace the stator coil assembly a Connect the digital circuit tester to the stator coil connector as shown b Measure the stator coil resistance 1 2 Model 88 Multimeter with tachometer YU A1927 Positive tester probe Spark plug side 1 Negative tester probe High tension cord side 2 Stator coil resistance 18 A 0 16 0 24 at 23 C 73 4 F 20 A 0 112 0 168 at 23 C 73 4 F ...

Страница 146: ... The following procedure applies to all of the fuel injectors 1 Remove Fuel injector Refer to FUEL INJECTORS AND INTAKE MANI FOLD on page 4 9 2 Check Fuel injector resistance Out of specification Replace the fuel injector a Disconnect the fuel injector coupler from the fuel injector b Connect the digital circuit tester to the fuel injector coupler as shown Regulated voltage 14 15 V FI Diagnostic T...

Страница 147: ...y side and the starter motor side b Check the starter motor operation c Disconnect the main switch coupler d Connect the jumper lead 1 to the starter relay coupler e Check the starter motor operation Model 88 Multimeter with tachometer YU A1927 1 2 Positive tester probe Injector terminal 1 Negative tester probe Injector terminal 2 1 A wire that is used as a jumper lead must have at least the same ...

Страница 148: ...EM REMOVING THE STARTER MOTOR Order Job Parts to remove Q ty Remarks Removing the starter motor Remove the parts in the order listed 1 Starter relay terminals 1 Disconnect 2 Earth terminal 1 Disconnect 3 Starter motor assembly 1 1 2 3 9 N m 0 9 kgf m 6 5 lb ft 23 N m 2 3 kgf m 17 lb ft ...

Страница 149: ...Q ty Remarks Disassembling the starter motor Disassemble the parts in the order listed 1 Rear bracket 1 2 Insulator 1 3 Brush spring 4 4 Brush 4 5 Yoke 1 6 Armature 1 7 Starter relay 1 8 Starter drive lever 1 9 Starter case 1 1 2 3 4 5 6 7 8 9 11 N m 1 1 kgf m 8 0 lb ft 9 N m 0 9 kgf m 6 5 lb ft 6 N m 0 6 kgf m 4 3 lb ft ...

Страница 150: ...blade which has been grounded to fit the commutator TIP The mica insulation of the commutator must be undercut to ensure proper operation of the commutator 3 Measure Armature coil insulation continuity Defects Replace the starter motor Connect the digital circuit tester to the armature coil a Depth of insulator a 2 0 mm 0 79 in Model 88 Multimeter with tachometer YU A1927 Commutator continuity Con...

Страница 151: ...ce CHECKING THE STARTER RELAY 1 Measure Magnetic switch coil resistance Connect the digital circuit tester to the magnetic switch Out of specification Replace ASSEMBLING THE STARTER MOTOR 1 Install Starter drive lever 1 1 1 2 Brush wear limit length 6 0 mm 0 2362 in Model 88 Multimeter with tachometer YU A1927 A B C Holding coil resistance A B 0 88 1 32 Pull in coil resistance A C 0 4 0 6 1 ...

Страница 152: ...5 41 1 2 3 4 5 6 7 8 9 10 ELECTRICAL ELECTRIC STARTING SYSTEM 2 Install Armature and starter drive lever 1 3 Install Starter relay 1 1 1 Starter relay nut 11 N m 1 1 kgf m 8 0 lb ft T R ...

Страница 153: ... Refer to CHECKING THE IGNITION SPARK GAP on page 5 33 If the ignition spark gap is OK the igni tion system is OK 5 Check the ignition coils Refer to CHECKING THE IGNITION COILS on page 5 32 Replace the ignition coils 6 Check the spark plug cap resistance Refer to CHECKING THE SPARK PLUG CAPS on page 5 33 Replace the spark plug cap 7 Check the crankshaft position sensor Refer to CHECKING THE CRANK...

Страница 154: ...rter motor Refer to ELECTRIC STARTING SYSTEM on page 5 37 Repair or replace the starter motor 5 Check the main switch Replace the main switch 6 Check the entire starting system s wiring Refer to CIRCUIT DIAGRAM on page 5 1 Properly connect or repair the starting system s wiring 7 The starting system circuit is OK No Checking steps Possible remedy 1 Check the fuses Refer to CHECKING THE FUSES on pa...

Страница 155: ...er to FUEL PUMPS on page 4 1 Replace the fuel pumps 6 Check the low engine speed Refer to ENGINE SPEED on page 2 14 Adjust the low engine speed 7 Measure the valve clearance Refer to ADJUSTING THE VALVE CLEARANCE on page 2 9 Adjust the valve clearance 8 Check the compression pressure Refer to MEASURING THE COMPRESSION PRES SURE on page 3 1 Too high Decarbonize the combustion chamber if there is ca...

Страница 156: ... Too low Next checking steps 6 Check governor setting Refer to INSTALLING THE THROTTLE BODY ASSEM BLY on page 4 7 Adjust the governor 7 Check the valve face and valve seat for wear Refer to VALVES on page 3 27 Resurface or replace the valve face and valve seat 8 Check if the marks on the crankshaft and camshaft are aligned Refer to INSTALLING THE VALVE LIFTERS AND CAM SHAFT on page 3 45 Correct 9 ...

Страница 157: ...he valve clearance 7 Check the valve face and valve seat for wear Refer to VALVES on page 3 27 Resurface or replace the valve face and valve seat 8 Check if there is seizure wear or damage on the piston piston ring or cylinder Refer to PISTONS CAMSHAFT CRANKCASE AND CRANKSHAFT on page 3 38 Rebore or replace the piston piston ring or cylinder No Checking steps Possible remedy 1 Check the fuses Refe...

Страница 158: ...k the fuses Refer to CHECKING THE FUSES on page 5 27 Replace the fuse s 2 Check the battery Clean the battery terminals Recharge or replace the battery 3 Check the main switch Replace the main switch 4 Check the engine oil level Add the oil if it is insufficient 5 Check the oil filter Replace the oil filter 6 Check the oil pressure switch Refer to CHECKING THE OIL PRESSURE SWITCH on page 5 28 Repl...

Страница 159: ...gasoline Gasohol E10 acceptable Engine oil quantity 2 0 L 2 11 US qt 1 76 Imp qt Recommended engine oil YAMALUBE SAE 10W 30 Performance All Purpose SAE 10W 30 or 10W 40 Recommended engine oil grade API Service SE type or higher Oil filter type Cartridge Lubrication system Full pressure with filter Air filter system Dry Cooling system Air cooled Starting system Electric starter Stopping system Misf...

Страница 160: ...lar unleaded gasoline with a pump octane number R M 2 of 86 or higher or research octane number of 91 or higher Gasohol containing ethanol can be used if the ethanol content does not exceed 10 E10 Use only unleaded gasoline The use of leaded gasoline will cause severe damage to internal engine parts NOTICE ...

Страница 161: ...995 19 000 mm 0 7478 0 7480 in Limit 18 975 mm 0 7470 in Piston ring Top ring Type Barrel Dimensions 1 2 2 9 mm 0 0472 0 1142 in End gap installed 0 20 0 35 mm 0 0079 0 0138 in Limit 0 60 mm 0 0236 in Side clearance 0 04 0 08 mm 0 0016 0 0031 in Limit 0 13 mm 0 0051 in 2nd ring Type Taper Dimensions 1 0 2 5 mm 0 0394 0 0984 in End gap installed 0 20 0 35 mm 0 0079 0 0138 in Limit 0 60 mm 0 0236 in...

Страница 162: ... mm 1 0197 in Base circle diameter Exhaust 26 000 mm 1 0236 in Limit 25 900 mm 1 0197 in Camshaft journal diameter 16 965 16 990 mm 0 6679 0 6689 in Limit 16 950 mm 0 6673 in Valve Valve dimensions Valve head diameter Intake 27 9 28 1 mm 1 0984 1 1063 in Valve head diameter Exhaust 34 9 35 1 mm 1 3740 1 3819 in Valve stem diameter Intake 5 948 5 963 mm 0 2342 0 2348 in Valve stem diameter Exhaust ...

Страница 163: ...ter Intake 12 000 12 018 mm 0 4724 0 4731 in Rocker arm shaft hole inside diameter Exhaust 12 000 12 018 mm 0 4724 0 4731 in Rocker arm shaft diameter Intake 11 981 11 991 mm 0 4717 0 4721 in Rocker arm shaft diameter Exhaust 11 981 11 991 mm 0 4717 0 4721 in Oil clearance 0 08 mm 0 0031 in Valve spring Valve spring free length Intake 37 1 mm 1 4606 in Valve spring free length Exhaust 35 6 mm 1 40...

Страница 164: ... clearance 0 19 0 35 mm 0 008 0 013 in Relief valve operating pressure 342 538 kPa 3 42 5 38 kgf cm 49 59 78 01 psi Throttle body ID mark E 3750 2 MX775 E 3750 1 MX800 E 3750 0 MX825 Throttle position sensor Output voltage at idle 0 95 4 5 V Resistance 3 0 7 0 k Governor assembly Tension spring attach hole 7 Engine speed High engine speed with no load 3550 3600 r min Low engine speed with no load ...

Страница 165: ... 73 4 F 20 A 0 112 0 168 at 23 C 73 4 F 25 A 0 096 0 144 at 23 C 73 4 F Rectifier regulator Regulator type Single phase full wave rectification Regulated voltage 14 15 V Rectifier capacity 25 A Fuel injection sensor Crankshaft position sensor resis tance 3 0 7 0 k Manifold absolute pressure sen sor air pressure 14 15 psi Engine temperature sensor resistance 9 0 11 0 k at 25 C 77 F Electric startin...

Страница 166: ... bolt M6 1 0 10 N m 1 0 kgf m 7 2 lb ft Fan case bolt M6 1 0 7 N m 0 7 kgf m 5 1 lb ft Grass screen bolt M6 1 0 10 N m 1 0 kgf m 7 2 lb ft Fan case cover bolt M6 1 0 7 N m 0 7 kgf m 5 1 lb ft Oil filler pipe bolt M6 1 0 7 N m 0 7 kgf m 5 1 lb ft Stator coil assembly bolt M6 1 0 7 N m 0 7 kgf m 5 1 lb ft Flywheel nut M22 1 5 180 N m 18 kgf m 130 lb ft Crankshaft position sensor bolt M6 1 0 7 N m 0 ...

Страница 167: ...ottle body assembly nut M6 1 0 7 N m 0 7 kgf m 5 1 lb ft Governor assembly bolt M6 1 0 8 N m 0 8 kgf m 5 8 lb ft Inlet pipe bolt M6 1 0 9 N m 0 9 kgf m 6 5 lb ft Manifold absolute pressure sensor bolt M6 1 0 7 N m 0 7 kgf m 5 1 lb ft Intake manifold nut and bolt M6 1 0 1st 3 0 N m 0 30 kgf m 2 2 lb ft 2nd 7 N m 0 7 kgf m 5 1 lb ft Starter motor assembly bolt M8 1 25 23 N m 2 3 kgf m 17 lb ft Earth...

Страница 168: ... assemblies are included in the applicable sections of this book To avoid warpage tighten multi fastener assemblies in a crisscross fashion in progressive stages until full torque is reached Unless otherwise specifications call for clean dry threads Components should be at room temperature Thread size Tightening torque N m kgf m lb ft M4 2 0 2 1 5 M5 3 0 3 2 2 M6 7 0 7 5 2 M7 10 1 0 7 4 M8 15 1 5 ...

Страница 169: ...l Connecting rod cap bolt Piston pin Piston Valve stem Valve stem end Valve rocker arm shaft Valve push rod end Valve lifter stem Camshaft lobe Camshaft gear teeth Camshaft journal Adjusting pad Inner rotor Outer rotor Fuel injector O ring Governor collar internal surface Governor fork meet surface Governor weight moving point Oil pressure switch Crankcase cover 2 Three bond No 1217G Cover 1 Three...

Страница 170: ...7 12 1 2 3 4 5 6 7 8 9 10 SPECIFICATIONS WIRE ROUTING DIAGRAM WIRE ROUTING DIAGRAM UPPER SIDE VIEW ...

Страница 171: ... prize B Insert the purge hose 1 purge hose 2 cap all the way into the 3 WAY joint C Make sure that there is no looseness or tension of the lead D Insert the protector side of the purge hose 2 all the way into the pipe of the fuel pump E Install the cap in the direction shown in the illustration F Keep the length shown in the illustration to 0 2 0 mm 0 0 08 in and cut off the end of the plastic lo...

Страница 172: ...7 14 1 2 3 4 5 6 7 8 9 10 SPECIFICATIONS WIRE ROUTING DIAGRAM ...

Страница 173: ...2 lead 10 Stator 21 Fuel injector 2 lead 11 Crankshaft position sensor coupler 22 Intake manifold A Install the leads so that they overlap each other B Lock the fuel injector coupler after installation C Install the lead as shown in the illustration D Gap between crankshaft position sensor and rotor should be 0 5 1 5 mm 0 02 0 06 in E Installation details of ignition coil and coupler F After insta...

Страница 174: ...7 16 1 2 3 4 5 6 7 8 9 10 SPECIFICATIONS WIRE ROUTING DIAGRAM LEFT SIDE VIEW ...

Страница 175: ...k plug cap 26 Rectifier regulator lead red 13 Stay 27 Rectifier regulator lead black 14 Fuse 10 A coupler A Tighten the earth terminal together with the mounting bolt in the direction shown in the illustration B Install the spark plug cap in the direction shown in the illustration C Install in the stay D Tighten together with the vehicle battery positive terminal E Direction of upper surface of th...

Страница 176: ...7 18 1 2 3 4 5 6 7 8 9 10 SPECIFICATIONS WIRE ROUTING DIAGRAM RIGHT SIDE VIEW ...

Страница 177: ...til it reaches the end as shown in the illustration C Install white painted portion in the direction shown in the illustration D Install the plastic locking tie at the position shown in the illustration E Fuel delivery hose installation details F Install with the yellow painted portion on top G The position of the binding area of the plastic locking tie should be on the engine side H Keep the leng...

Страница 178: ...way into the oil cooler B Face the projection inward C Install the white painted portion in the direction shown in the illustration D 8 12 mm 0 31 0 47 in E Install the hose clamp in the direction shown in the illustration F Install the yellow painted portion in the direction shown in the illustration G 2 0 4 0 mm 0 08 0 16 in H Face the projection outward ...

Страница 179: ...6 Oil pressure switch 3 High pressure fuel pump lead 7 Oil pressure switch lead 4 Purge hose 8 Spark plug cap A The high pressure fuel pump coupler should be laid along the purge hose B Install the spark plug cap in the direction shown in the illustration C Oil pressure switch lead routing direction D Direction of upper surface of the engine ...

Страница 180: ...7 22 1 2 3 4 5 6 7 8 9 10 SPECIFICATIONS WIRE ROUTING DIAGRAM REAR SIDE VIEW ...

Страница 181: ...ction shown in the illustration F Insert the breather hose all the way into the pipe of the joint 1 G Insert the joint 2 until it contacts the projection on the joint 1 H 2 0 4 0 mm 0 08 0 16 in I Insert the air filter cover 1 until it contacts the air filter case J Installation angle of joint 2 15 75 reference value K Install the joint 2 in the direction shown in the illustration L Insert from 22...

Страница 182: ... Clamp 7 Ignition coil 1 lead 4 O2 sensor coupler 8 Fuel injector 1 lead A FI diagnostic tool coupler B Main switch coupler C Direction of upper surface of the engine D Allowance 2 0 mm 0 08 in or less E Install the plastic locking tie as shown in the illustration F Install the leads so that they do not overlap each other The leads should not interfere with the side of the fan case ...

Страница 183: ...7 25 1 2 3 4 5 6 7 8 9 10 SPECIFICATIONS WIRE ROUTING DIAGRAM MEMO ...

Страница 184: ...r B V R W B B L Y B W B L W P L W B W G W L W G Br P L B G Y O G R Gy R B Gy R L B G R B O R B W B G R Gy B G Y Br G W R W R W B B R B R W W Y L O Y L L O R R Y L R Y R Y R Y R Y R Y R Y R Y R Y R Y 30A 10A 10A OFF ON START 2 3 1 7 8 9 0 w w e r y u o a t f g p s d i 4 5 6 q ...

Страница 185: ...aft position sensor 8 Starter relay 21 High pressure fuel pump 9 Starter motor 22 Ignition coil 2 10 Battery 23 Ignition coil 1 11 Main switch 24 Fuel injector 1 12 Mil light 25 Fuel injector 2 13 Oil warning light B Black G R Green Red Br Brown G W Green White G Green G Y Green Yellow Gy Gray L O Blue Orange L Blue L W Blue White O Orange P L Pink Blue R Red R L Red Blue V Violet R W Red White W ...

Страница 186: ...MEMO ...

Страница 187: ...7UD F8197 E0_Cover indd 2 2016 12 13 11 23 58 ...

Страница 188: ...SERVICE MANUAL MX775 MX800 MX825 7UD F8197 E0 LIT 19616 02 37 2016 12 1 7UD F8197 E0_Cover indd 1 2016 12 13 11 23 58 ...

Отзывы: