background image

En

35

  4  

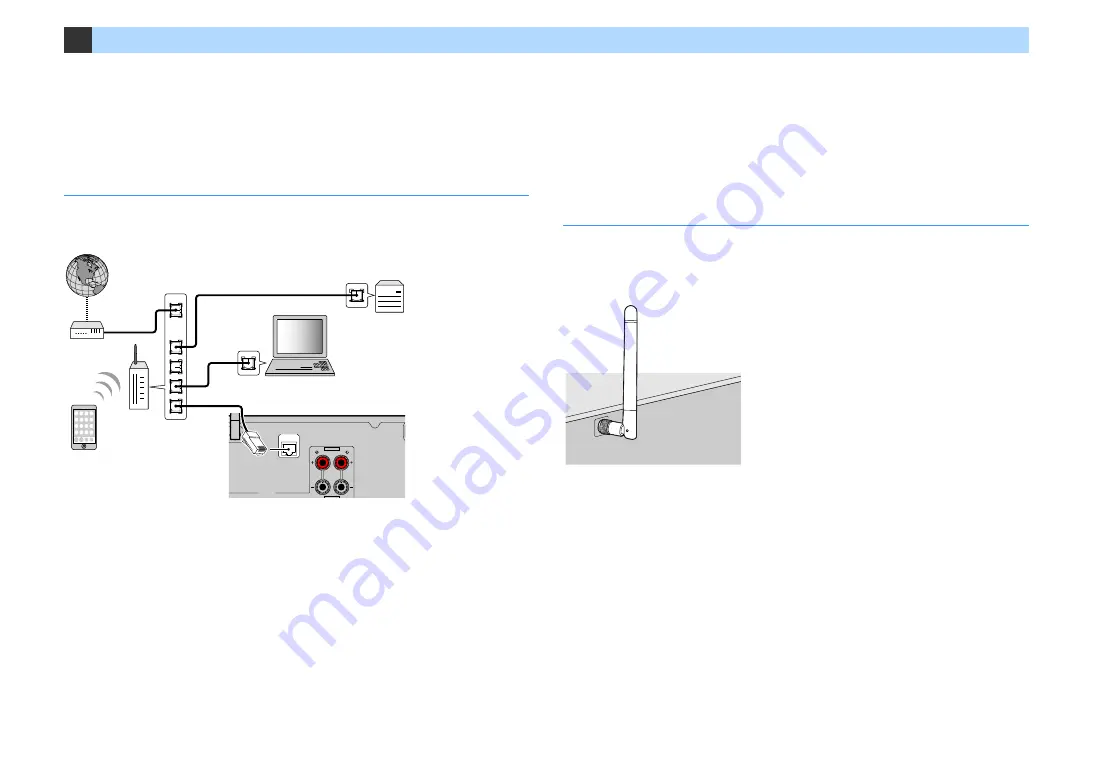
Connecting a network cable or preparing the wireless antenna

Connect the unit to a router (access point) with a network cable, or prepare the wireless 

antenna for establishing a wireless network connection.

You can enjoy Internet radio or music files stored on media servers, such as PCs and Network 

Attached Storage (NAS), on the unit.

Connecting the network cable

Connect the unit to your router with a commercially-available STP network cable (CAT-5 or 

higher straight cable).

X

• If you want to use a wired (network cable) connection when a wireless connection has been made, set “Network 

Connection” (p.114) in the “Setup” menu to “Wired”.

• If you are using a router that supports DHCP, you do not need to configure any network settings for the unit, as 

the network parameters (such as the IP address) will be assigned automatically to it. You only need to configure 

the network settings if your router does not support DHCP or if you want to configure the network parameters 

manually (p.114).

• You can check whether the network parameters (such as IP address) are properly assigned to the unit in 

“Network” (p.122) in the “Information” menu.

Y

• Some security software installed on your PC or the firewall settings of network devices (such as a router) may 

block the access of the unit to the network devices or the Internet. In these cases, configure the security 

software or firewall settings appropriately.

• Each server must be connected to the same subnet as the unit.

• To use the service via the Internet, broadband connection is strongly recommended.

Preparing the wireless antenna

If you want to establish a wireless network connection, stand the wireless antenna up straight.

For information on how to connect the unit to a network device wirelessly, see “Connecting to 

a network device wirelessly” (p.48).

Y

Do not apply excessive force on the antenna. Doing so may damage it.

CLASS 2 WIRING CABLAGE CLASSE 2

SPEAKERS

NETWORK

(NET)

F.PRESENCE/ZONE2

EXTRA SP1

EXTRA SP2

WIRELESS

LAN

WAN

Network Attached Storage 

(NAS)

Internet

Modem

Router

Network cable

PC

The unit (rear)

Mobile device

WIRELESS

Содержание MusicCast TSR-7810

Страница 1: ...AV Receiver Owner s Manual Read the supplied booklet Safety Brochure before using the unit EN ...

Страница 2: ...power amplifier 36 Connecting a device compatible with the trigger function 36 6 Connecting the power cable 37 7 Selecting an on screen menu language 38 8 Configuring the necessary speaker settings 39 9 Optimizing the speaker settings automatically YPAO 40 Measuring at one listening position single measure 42 Measuring at multiple listening positions multi measure 43 Checking the measurement resul...

Страница 3: ...g a registered item 87 Controlling the unit from a web browser web control 88 Top menu screen 89 Control screen 89 Settings screen 90 Viewing the current status 91 Switching information on the front display 91 Viewing the status information on the TV 91 Configuring playback settings for different playback sources Option menu 92 Option menu items 92 CONFIGURATIONS 96 Configuring input sources Input...

Страница 4: ...nd network 134 Error indications on the front display 136 Glossary 137 Audio information audio decoding format 137 Audio information others 138 HDMI and video information 139 Network information 139 Yamaha technologies 139 Supported devices and file formats 140 Supported devices 140 File formats 140 Video signal flow 141 Video conversion table 141 Information on HDMI 142 HDMI Control 142 Audio Ret...

Страница 5: ...egions Due to product improvements specifications and appearance are subject to change without notice This manual explains operations using the supplied remote control Icons used in this manual Y indicates precautions for use of the unit and its feature limitations X indicates supplementary explanations for better use About remote control This section explains how to use the supplied remote contro...

Страница 6: ...ous wireless connection methods p 48 The unit supports the Wi Fi feature that allows the unit to connect to your wireless router access point without a network cable connection In addition Wireless Direct enables connecting a mobile device to the unit directly without router Creating3 dimensionalsoundfields p 60 Connectingpresencespeakersallowsyoutocreateanatural 3 dimensional sound field in your ...

Страница 7: ... AV CONTROLLER will turn your smartphone tablet into a Wi Fi enabled remote control for your Yamaha network products This application provides you the flexibility to control the available inputs volume mute power commands and playback source Functions Power on off and volume adjustment Input scene and sound mode selection DSP Parameter adjustment Playback control including music selection for some...

Страница 8: ...of the unit Front panel INFO WPS ZONE 2 ZONE CONTROL MEMORY PRESET FM AM TUNING CONTROL TV BD DVD NET RADIO INPUT SCENE MAIN ZONE PHONES SILENT CINEMA CONNECT STRAIGHT PURE DIRECT HDMI IN 5V 1A VIDEO VOLUME AUX USB TONE PROGRAM YPAO MIC j i l b c d e f a g h k m v p o n r s t u q ...

Страница 9: ...p 65 i Front display Displays information p 10 j Remote control sensor Receives remote control signals p 5 k TUNING keys Select the radio frequency p 65 l PURE DIRECT key Enables disables Pure Direct p 64 m INPUT knob Selects an input source n PHONES jack For connecting headphones o YPAO MIC jack For connecting the supplied YPAO microphone p 40 p TONE CONTROL key Adjusts the high frequency range a...

Страница 10: ... output to Zone2 is enabled p 85 k MUTE Blinks when audio is temporarily muted l Volume indicator Indicates the current volume m VIRTUAL Lights up when the Virtual Presence Speaker VPS or Virtual Surround Back Speaker VSBS p 60 or the virtual surround processing p 62 is working n Cursor indicators Indicate the remote control cursor keys currently operational o Information display Displays the curr...

Страница 11: ...R HDMI 1 BD DVD HDMI 2 HDMI 3 HDMI 4 HDMI 5 HDCP2 2 HDCP2 2 HDCP2 2 1 2 ARC ANTENNA FM AM SURROUND CENTER CLASS 2 WIRING CABLAGE CLASSE 2 FRONT SINGLE SPEAKERS AV 5 VIDEO AV 6 ZONE OUT SUBWOOFER SUR BACK SURROUND PRE OUT CENTER FRONT SINGLE ZONE 2 NETWORK TRIGGER OUT REMOTE NET 12V IN OUT 0 1A COMPONENTVIDEO 1 2 HDMI OUT RADIO WIRELESS HDCP2 2 SURROUND BACK ZONE2 BI AMP F PRESENCE ZONE2 EXTRA SP1 ...

Страница 12: ...le p 35 h SPEAKERS terminals For connecting to speakers p 15 i VOLTAGE SELECTOR Taiwan Brazil and General models only Selects the switch position according to your local voltage p 37 j Power cable For connecting to an AC wall outlet p 37 k PHONO jacks For connecting to a turntable p 33 l AUDIO 1 2 jacks For connecting to audio playback devices and inputting audio signals p 33 m AV 1 6 jacks For co...

Страница 13: ...en TUNER is selected as the input source p 65 BAND Switches between FM and AM radio PRESET Select a preset station TUNING Select the radio frequency External device operation keys Let you perform playback operations when USB or NET is selected as the input source or control playback of the HDMI Control compatible playback device p 142 k Sound mode keys Select a sound mode p 59 l INFO key Selects t...

Страница 14: ... 35 5 Connecting other devices p 36 6 Connecting the power cable p 37 7 Selecting an on screen menu language p 38 8 Configuring the necessary speaker settings p 39 9 Optimizing the speaker settings automatically YPAO p 40 10 Connecting to a network device wirelessly p 48 11 Connecting to the MusicCast network p 56 This completes all the preparations Enjoy playing movies music radio and other conte...

Страница 15: ...the diagram Caution Under its default settings the unit is configured for 8 ohm speakers When connecting 6 ohm speakers set the unit s speaker impedance to 6 Ω MIN In this case you can also use 4 ohm speakers as the front speakers For details see Setting the speaker impedance p 19 E 1 2 3 9 4 6 7 5 9 R 0 3 m 1 ft or more 1 8 m 5 9 ft 0 5 to 1 m 1 6 to 3 3 ft 1 8 m 5 9 ft 0 5 to 1 m 1 6 to 3 3 ft 1...

Страница 16: ... speaker system brings out the full performance of the unit and allows you to enjoy a highly natural 3 dimensional sound field with any contents X The surround back speakers and presence speakers do not produce sounds simultaneously The unit automatically changes the speakers to be used depending on the input signal and CINEMA DSP p 60 When using front presence speakers installed to the ceiling or...

Страница 17: ...ing this speaker system when you cannot place speakers in the rear side of the room X When placing surround speakers in thefront side set Layout Surround in the Setup menuto Front before performing YPAO p 39 5 1 system front 5 1 channel using front presence speakers We recommend using this speaker system when you cannot place speakers in the rear side of the room X When using front presence speake...

Страница 18: ...ce speakers to the ceiling above the listening position It delivers realistic overhead sound effects and sound field with excellent linkage of front and rear sound spaces effectively Y For details on the installation position of ceiling speakers see Notes on installation of ceiling speakers p 19 Dolby Enabled SP Use the Dolby Enabled speakers as the presence speakers It utilizessounds reflected fr...

Страница 19: ... 4 ohm speakers as the front speakers 1 Before connecting speakers connect the power cable to an AC wall outlet 2 While holding down STRAIGHT on the front panel press MAIN ZONE z 3 Check that SP IMP is displayed on the front display 4 Press STRAIGHT to select 6 Ω MIN 5 Press MAIN ZONE z to set the unit to standby mode and remove the power cable from the AC wall outlet You are now ready to connect ...

Страница 20: ... circuit Speakers to be connected If you have nine speakers you can use the both surround back speakers and front presence speakers In this case the unit automatically changes the speakers to be used depending on the input signal and CINEMA DSP If you have seven speakers use two of them as surround back speakers 1 or front presence speakers 2 If you have five speakers use two of them as surround s...

Страница 21: ...speakercableandtwist the bare wires of the cable firmly together 2 Loosen the speaker terminal 3 Insert the bare wires of the cable into the gap on the side upper right or bottom left of the terminal 4 Tighten the terminal Using a banana plug U S A Canada China Australia Taiwan Brazil and General models only 1 Tighten the speaker terminal 2 Insert a banana plug into the end of the terminal Connect...

Страница 22: ...apply the following speaker configurations to enhance your system Using the four internal amplifiers for front speakers to have more high quality sounds Example Example Bi amp connection Using the excess internal amplifiers for stereo speakers in another room Main zone Zone2 Bi amp connection Multi zone configuration ...

Страница 23: ...surround back speakers in the main zone do not output sound Main zone Multi zone Power Amp Assign p 106 Page Output channel max Bi amp Surround back Front presence 7 Surround back 1 Zone2 7 1 1Zone 23 7 Front presence 1 Zone2 5 1 2 1Zone 24 5 5 1 BI Amp 24 Speaker Connect to 12 FRONT 3 CENTER 45 SURROUND 67 EXTRA SP2 ER not used 9 SUBWOOFER 1 2 Zone2 speakers EXTRA SP1 2 1 1 2 3 4 6 9 9 7 5 Main z...

Страница 24: ...t sound 5 1 BI Amp Speaker Connect to 12 FRONT 3 CENTER 45 SURROUND 67 not used ER EXTRA SP1 9 SUBWOOFER 1 2 Zone2 speakers EXTRA SP2 2 1 1 E R 2 3 4 9 9 5 Main zone Zone2 Speaker Connect to 12 FRONT and EXTRA SP2 bi amp connection 3 CENTER 45 SURROUND 67 not used ER not used 9 SUBWOOFER 1 2 1 3 4 5 9 9 2 Bi amp ...

Страница 25: ... outlet p 39 X You can also connect Zone2 speakers using an external amplifier p 83 when using surround back speakers in the main zone 1 2 3 4 5 9 SURROUND CENTER CLASS 2 WIRING CABLAGE CLASSE 2 FRONT SINGLE SURROUND BACK ZONE2 BI AMP SPEAKERS SUBWOOFER F PRESENCE ZONE2 EXTRA SP1 EXTRA SP2 1 2 The unit rear Caution Before making bi amp connections remove any brackets or cables that connect a woofe...

Страница 26: ...ng front presence speakers in the main zone SURROUND CENTER CLASS 2 WIRING CABLAGE CLASSE 2 FRONT SINGLE SURROUND BACK SPEAKERS F PRESENCE ZONE2 EXTRA SP1 EXTRA SP2 R E FL FR 1 2 3 4 5 9 Main zone Zone2 The unit rear ...

Страница 27: ...ble Y Use a 19 pin HDMI cable with the HDMI logo We recommend using a cable less than 5 0 m 16 4 ft long to prevent signal quality degradation X The unit s HDMI jacks support the HDMI Control Audio Return Channel ARC and 3D and 4K Ultra HD video transmission features Use high speed HDMI cables to enjoy 3D or 4K Ultra HD videos Video jacks To input output only video signals use the following jacks ...

Страница 28: ...ceive TV broadcasts only from the set top box If you connect a TV that supports HDMI Control to the unit with an HDMI cable you can control the unit s power and volume with the TV s remote control To use HDMI Control and ARC you need to configure the HDMI settings on the unit For details on the settings see Information on HDMI p 142 OPTICAL Digital optical cable COAXIAL Digital coaxial cable Stere...

Страница 29: ...1 BD DVD HDMI 2 HDMI 3 H HDCP2 2 HDCP2 2 HDCP2 2 HDCP2 2 1 2 ARC ANTENNA FM AM AV 5 VIDEO AV 6 ZONE OUT SUR BACK SURROUND PR C SINGLE ZONE 2 TRIGGER OUT REMOTE 12V IN OUT 0 1A COMPONENTVIDEO HDMI OUT RADIO PHONO GND PR PB Y COMPONENT VIDEO OPTICAL OPTICAL AV4 TV COMPONENT VIDEO MONITOR OUT PB Y PR PR PB Y Y PR PB O O The unit rear MONITOR OUT COMPONENT VIDEO jacks Video input component video AV 4 ...

Страница 30: ...e unit Y The component video signals other than 480i 576i signals input to AV 1 2 jacks of the unit can be output from the MONITOR OUT COMPONENT VIDEO jacks only To watch those videos you need to connect your TV to the MONITOR OUT COMPONENT VIDEO jacks of the unit p 29 For details refer to Video signal flow p 141 O 1 AUDIO 2 PR COMPONENT VIDEO VIDEO MONITOR OUT PB Y PR HDMI 1 BD DVD HDMI 2 HDMI 3 ...

Страница 31: ...tal coaxial AV 3 VIDEO COAXIAL Digital optical AV 4 VIDEO OPTICAL Analog stereo AV 5 6 VIDEO AUDIO AUDIO 1 AUDIO 2 OPTICAL OPTICAL COAXIAL VIDEO AV4 AV3 AV2 AV 1 TV PB Y PR PB Y HDMI 1 BD DVD HDM HDCP2 2 HDCP2 2 HDC 1 2 ARC ANTENNA FM A AV 5 VIDEO AV 6 Z TRIGGER OUT REMOTE 12V IN OUT 0 1A COMPONENTVIDEO HDMI OUT RADIO PHONO GND R L COAXIAL OPTICAL OPTICAL COAXIAL VIDEO VIDEO L R L R C C O O V V Th...

Страница 32: ...put jack to be used and press the Cursor key q 6 Use the Cursor keys to select Audio In and press ENTER 7 Use the Cursor keys to select AV5 audio input jack to be used 8 Press ON SCREEN This completes the necessary settings If you select AV 2 as the input source by pressing AV 2 the video audio played back on the video device will be output from the unit ENTER RETURN POP UP MENU TOP MENU OPTION ON...

Страница 33: ...able that match the output jacks on your device Audio output jacks on audio device Audio output jacks on the unit Digital optical AV 1 OPTICAL AV 4 OPTICAL Digital coaxial AV 2 3 COAXIAL Analog stereo AV 5 6 AUDIO AUDIO 1 2 Turntable PHONO PHONO When connecting a turntable The PHONO jack of the unit is compatible with an MM cartridge To connect a turntable with a low output MC cartridge use a boos...

Страница 34: ...tenna unit The wires of the AM antenna have no polarity OPTICAL OPTICAL COAXIAL VIDEO AV4 AV3 AV2 AV 1 TV PB Y PR COMPONENT VIDEO VIDEO MONITOR OUT PB Y PR HDMI 1 BD DVD HDMI 2 HDMI 3 HDMI 4 HDMI 5 HDCP2 2 HDCP2 2 HDCP2 2 HDCP2 2 1 2 ARC ANTENNA FM AM SURROUND CENTER CLASS 2 WIRING CABLAGE CLASSE 2 FRONT SPEAKERS VIDEO NETWORK TRIGGER OUT REMOTE NET 12V IN OUT 0 1A COMPONENTVIDEO HDMI OUT RADIO WI...

Страница 35: ... the network parameters manually p 114 You can check whether the network parameters such as IP address are properly assigned to the unit in Network p 122 in the Information menu Y Some security software installed on your PC or the firewall settings of network devices such as a router may block the access of the unit to the network devices or the Internet In these cases configure the security softw...

Страница 36: ...ecting the external device to the TRIGGER OUT jack with a monaural mini jack cable X You can configure the trigger function settings in Trigger Output p 119 in the Setup menu Caution To prevent the generation of loud noises or abnormal sounds make sure the followings before making connections Remove the power cable of the unit and turn off the external power amplifier before connecting them When u...

Страница 37: ...r cable into an AC wall outlet Improper setting of VOLTAGE SELECTOR may cause damage to the unit and create a potential fire hazard After all the connections are complete plug in the power cable NT SINGLE SURROUND BACK ZONE2 BI AMP F PRESENCE ZONE2 EXTRA SP1 EXTRA SP2 220V 240V 110V 120V VOLTAGE SELECTOR The unit rear VOLTAGE SELECTOR CENTER WIRING CABLAGE CLASSE 2 FRONT SINGLE SURROUND BACK ZONE2...

Страница 38: ... To confirm the setting press ENTER 7 To exit from the menu press ON SCREEN X The information on the front display is provided in English only AV AV HDMI HDMI ENTER RETURN POP UP MENU TOP MENU PHONO NET USB BLUETOOTH TUNER AUDIO 6 5 4 3 2 1 V AUX 5 4 3 2 1 4 3 2 1 8 7 6 5 9 0 RADIO NET TV BD DVD SCENE MUTE OPTION ON SCREEN DISPLAY MODE MOVIE MUSIC INFO SLEEP ENT PRESET TUNING VOLUME PROGRAM HDMI O...

Страница 39: ...tion or Zone2 speakers select Power Amp Assign p 106 then select your speaker system When using the surround speakers for front 5 1 channel system Virtual CINEMA FRONT select Configuration Layout Surround p 107 then select Front When using the presence speakers for Dolby Atmos or DTS X playback select Configuration Layout Front Presence p 108 then select your front presence speaker layout 7 To exi...

Страница 40: ...work setup appears For now press RETURN and proceed to Step 3 3 Turn on the subwoofer and set the volume to half If the crossover frequency is adjustable set it to maximum 4 Place the YPAO microphone at your listening position and connect it to the YPAO MIC jack on the front panel X Place the YPAO microphone at your listening position same height as your ears We recommend the use of a tripod as a ...

Страница 41: ...u can take measurements at up to 8 different positions in the room The speaker settings will be optimized to suit the area defined by those positions multi measure No default Select this option if your listening position will always be fixed Take the measurements at only one position The speaker settings will be optimized to suit that position single measure a b a a b c d e c d d e bac Multi measu...

Страница 42: ...and press ENTER X If YPAO Volume is enabled the high and low frequency levels are automatically adjusted according to the volume so that you can enjoy natural sounds even at low volume You can also enable disable YPAO Volume in YPAO Volume p 93 in the Option menu 5 Disconnect the YPAO microphone from the unit This completes optimization of the speaker settings Caution The YPAO microphone is sensit...

Страница 43: ...ER When you have taken measurements at 8 listening positions the following screen appears automatically X To check the measurement results select Result For details see Checking the measurement results p 45 4 Use the Cursor keys to select Save Cancel and press ENTER 5 To save the measurement result use the Cursor keys to select SAVE and press ENTER The adjusted speaker settings are applied X To fi...

Страница 44: ... exposed to direct sunlight or high temperatures such as on top of AV equipment AV AV HDMI HDMI ENTER RETURN POP UP MENU TOP MENU PHONO NET USB BLUETOOTH TUNER AUDIO 6 5 4 3 2 1 V AUX 5 4 3 2 1 4 3 2 1 8 7 6 5 9 0 RADIO NET TV BD DVD SCENE MUTE OPTION ON SCREEN DISPLAY MODE MOVIE MUSIC INFO SLEEP ENT PRESET TUNING VOLUME PROGRAM HDMI OUT PARTY BAND SUR DECODE STRAIGHT ENHANCER PURE DIRECT MEMORY M...

Страница 45: ...the menu press ON SCREEN Wiring Polarity of each speaker Reverse The speaker cable may be connected with the reverse polarity Size Size of each speaker cross over frequency of the subwoofer Large The speaker can reproduce low frequency signals effectively Small The speaker cannot reproduce low frequency signals effectively Distance Distance from the listening position to each speaker Level Output ...

Страница 46: ...d E 6 Check Sur Surround back speakers are connected but no surround speakers are connected Surround speakers need to be connected in order to use surround back speakers Follow the on screen instructions to exit YPAO turn off the unit and then reconnect the speakers E 7 No MIC The YPAO microphone has been removed Connect the YPAO microphone to the YPAO MIC jack firmly and follow the on screen inst...

Страница 47: ...nd then reconnect the speaker cable If the speaker is connected correctly Depending on the type of speakers or room environment this message may appear even if the speakers are connected correctly In this case you can ignore the message W 2 Over Distance A speaker is placed more than 24 m 80 ft from the listening position Select Distance in Result p 45 and move the speaker identified by 24 00m 80 ...

Страница 48: ...ter access point are too far apart the unit may not connect to a wireless router access point In such case place them close to each other Connecting without a wireless router access point Connect a mobile device to the unit directly You can use the application for smartphone tablet AV CONTROLLER p 7 to control the unit from mobiles devices or enjoy music files stored on mobiles devices on the unit...

Страница 49: ...ceiver power to turn on the unit 2 Turn on the TV and switch the TV input to display video from the unit HDMI OUT jack Y Operations with TV screen are available only when your TV is connected to the unit via HDMI 3 Press ON SCREEN 4 Use the Cursor keys to select Setup and press ENTER 5 Use the Cursor keys e r to select Network 6 Use the Cursor keys q w to select Network Connection and press ENTER ...

Страница 50: ... Push the WPS button on the wireless router access point When the connection process finishes Completed appears on the front display If Not connected appears repeat from Step 1 or try another connection method The name of the unit Tap here to start setup The network currently selected AV AV HDMI HDMI ENTER RETURN POP UP MENU TOP MENU PHONO NET USB BLUETOOTH TUNER AUDIO 6 5 4 3 2 1 V AUX 5 4 3 2 1 ...

Страница 51: ...ing for an access point For details on settings see Searching for an access point p 52 Manual Setting You can set up a wireless connection by entering the required information such as SSID manually For details on settings see Setting up the wireless connection manually p 52 PIN Code You can set up a wireless connection by entering the unit s PIN code into the wireless router access point The metho...

Страница 52: ...tion setting screen appears on the TV You need to setup the SSID network name encryption method and security key for your network 1 Use the Cursor keys and ENTER to enter the SSID of the access point and select NEXT 2 Use the Cursor keys q w and ENTER to check the security method of the access point and select NEXT Settings None WEP WPA2 PSK AES Mixed Mode AV AV HDMI HDMI ENTER RETURN POP UP MENU ...

Страница 53: ...Enter the unit s PIN code into the wireless router access point For details on settings refer to the instruction manual of the wireless router access point 3 Use the Cursor keys e r to select CONNECT and press ENTER to start the connection process When the connection process finishes Completed appears on the TV screen If Not connected appears repeat from Step 1 or try another connection method 4 T...

Страница 54: ...s q w and ENTER to check Wireless Direct and select OK X The checkmark indicates the current setting 8 Use the Cursor keys q w and ENTER to check the desired security method and select NEXT Settings None WPA2 PSK AES Y If you select None the connection may be insecure since the communication is not encrypted AV AV HDMI HDMI ENTER RETURN POP UP MENU TOP MENU PHONO NET USB BLUETOOTH TUNER AUDIO 6 5 ...

Страница 55: ...played in Step 10 from the list of available access points 3 When you are prompted for a password enter the security key displayed in Step 10 12To exit from the menu press ON SCREEN AV AV HDMI HDMI ENTER RETURN POP UP MENU TOP MENU PHONO NET USB BLUETOOTH TUNER AUDIO 6 5 4 3 2 1 V AUX 5 4 3 2 1 4 3 2 1 8 7 6 5 9 0 RADIO NET TV BD DVD SCENE MUTE OPTION ON SCREEN DISPLAY MODE MOVIE MUSIC INFO SLEEP ...

Страница 56: ...cCast CONTROLLER application icon on your mobile device and tap Setup X If you have already connected other MusicCast compatible devices to the network tap Settings and then Add New Device 3 Operate the MusicCast CONTROLLER application following the on screen instructions then hold down CONNECT on the front panel of the unit for 5 seconds 4 Operate the MusicCast CONTROLLER application followingthe...

Страница 57: ...e HDMI OUT jack to be used for signal output changes X You can also select an HDMI output jack by selecting a scene p 58 When HDMI OUT 1 2 is selected the unit outputs video signals at the highest resolution supported by both TVs or projectors connected to the unit For example if you have connected a 1080p TV to the HDMI OUT 1 jack and a 720p TV to the HDMI OUT 2 jack the unit outputs 720p video s...

Страница 58: ...layback function allows you to start playback of an external device connected to the unit via HDMI To enable SCENE link playback specify the device type in Device Control p 99 in the Scene menu SCENE Input HDMI 1 AV 4 NET RADIO TUNER Sound program MOVIE Sci Fi STRAIGHT MUSIC 7ch Stereo MUSIC 7ch Stereo Compressed Music Enhancer Off On On On HDMI output jack HDMI OUT 1 2 HDMI OUT 1 2 HDMI OUT 1 2 H...

Страница 59: ...applied separately to each input source You can check which speakers are currently outputting sound by looking at the speaker indicators on the unit s front panel p 10 or at the Audio Signal screen in the Information menu p 121 About Dolby Atmos Dolby Atmos contents are decoded as Dolby TrueHD or Dolby Digital Plus in the following situations Dolby Atmos PCM format is always decoded as Dolby Atmos...

Страница 60: ...movie theater in which the audience is surrounded by beautiful reverberations from the left right and rear Spectacle This program delivers the scale and grandeur of spectacular movie productions It delivers an expansive sound space to match the cinemascope wide screen and boasts a broad dynamic range providing everything from small delicate sounds to powerful loud booms Sci Fi This program clearly...

Страница 61: ...space of a big live hall Hall in Munich This program simulates a Munich concert hall with approximately 2 500 seats that uses stylish wood for the interior finishing Fine beautiful reverberations spread richly creating a calming atmosphere The listener s virtual seat is at the center left of the arena Hall in Vienna This program simulates a 1 700 seat middle sized concert hall with a shoebox shape...

Страница 62: ...5 speakers placed in front Virtual CINEMA FRONT If you have surround speakers but there is no space to place them in the rear of your room you can place them in the front p 17 and enjoy multichannel surround sound using Virtual CINEMA FRONT When Layout Surround p 107 in the Setup menu is set to Front the unit creates the virtual surround speakers in the rear side to allow you to enjoy multichannel...

Страница 63: ...back speaker except when a Dolby Atmos content is played When the Neural X decoder is selected virtual surround processing such as Virtual CINEMA FRONT p 60 YPAO Volume p 93 Dialogue Level p 93 Extra Bass p 94 or Compressed Music Enhancer p 64 does not work VOL STRAIGHT bSurround Use the Dolby Surround decoder suitable for all sources A real acoustic space including overhead will be created especi...

Страница 64: ...nal sound before it was compressed This function can be used along with any other sound modes 1 Press ENHANCER Each time you press the key Compressed Music Enhancer is enabled or disabled Y Compressed Music Enhancer does not work on signals whose sampling rate is over 48 kHz X You can also use Enhancer p 94 in the Option menu to enable disable Compressed Music Enhancer VOL PURE DIRECT VOL ENHANCER...

Страница 65: ...e frequency Hold down the key for about a second to search stations automatically Numeric keys Enter a frequency directly For example to select 98 50 MHz press 9 8 5 and 0 or ENT TUNED lights up when a signal is received from a radio station STEREO also lights up when a stereo signal is received Y Wrong Station appears when you enter a frequency that is out of reception range X You can switch betw...

Страница 66: ...select TUNER as the input source 2 Press PRESET repeatedly to select the desired radio station You can also enter a preset number 01 to 40 directly by using the Numeric keys after pressing PRESET once Y No Presets appears when no radio stations are registered Wrong Num appears when an invalid number is entered Empty appears when a preset number not in use is entered X To clear preset stations use ...

Страница 67: ...ess ENTER again to start the search immediately X To search upward downward from the current frequency press the Cursor keys q w while READY is displayed To cancel the search press RETURN Texts in parentheses denote indicators on the front display The following screen appears for about 3 seconds when the search finishes Y TP Not Found appears for about 3 seconds when no traffic information station...

Страница 68: ...eset Menu Function Browse Moves to the browse screen preset station list Screen Off Closes the screen display and shows the background Press one of the Menu operation keys to redisplay it a b c Menu Submenu Function Utility Memory Registers the current station to the preset number selected in the list Auto Preset Automatically registers FM radio stations with strong signals up to 40 stations Clear...

Страница 69: ...nd song title is displayed on the TV X If the unit detects the Bluetooth device previously connected the unit automatically connects to the Bluetooth device after Step 1 To establish another Bluetooth connection first terminate the current Bluetooth connection To terminate the Bluetooth connection perform one of the following operations Perform the disconnect operation on the Bluetooth device Sele...

Страница 70: ...e connection process finishes audio played back on the unit will be reproduced from the Bluetooth speakers headphones 6 To exit from the menu press ON SCREEN X To terminate the Bluetooth connection perform the disconnect operation on the Bluetooth speakers headphones Y AirPlay and DSD audio cannot be delivered When the Pure Direct mode is enabled input sources other than the network sources and US...

Страница 71: ...u can control the USB memory device with the menu displayed on the TV screen 1 Press USB to select USB as the input source The browse screen is displayed on the TV X If playback is ongoing on your USB storage device the playback screen is displayed RADIO CONNECT STRAIGHT HDMI IN 5V 1A VIDEO AUX USB The unit front USB storage device VOL Connected USB AV AV HDMI HDMI ENTER RETURN POP UP MENU TOP MEN...

Страница 72: ...e Up Moves to the previous next page of the list 1 Page Down 10 Pages Up Moves 10 pages forward backward 10 Pages Down Return Returns to the higher level list Now Playing Moves to the playback screen Screen Off Closes the screen display and shows the background Press one of the Menu operation keys to redisplay it e d c b a AV AV HDMI HDMI ENTER RETURN POP UP MENU TOP MENU PHONO NET USB BLUETOOTH T...

Страница 73: ...een Off Closes the screen display and shows the background Press one of the Menu operation keys to redisplay it a c b Item Setting Function Shuffle Shuffle Off Off Turns off the shuffle function On On Plays back songs in the current album folder in random order x appears on the TV screen Repeat Repeat Off Off Turns off the repeat function One One Plays back the current song repeatedly c appears on...

Страница 74: ...h music server For a PC with Windows Media Player installed The setting procedure may vary depending on the PC and Windows Media Player version The following procedure is a setup example for Windows Media Player 12 and Windows Media Player 11 For Windows Media Player 12 1 Start Windows Media Player 12 on your PC 2 Select Stream then Turn on media streaming 3 Click Turn on media streaming 4 Select ...

Страница 75: ...s not supported by the unit cannot be selected If the unit detects a series of unsupported files such as images and hidden files during playback playback stops automatically AV AV HDMI HDMI ENTER RETURN POP UP MENU TOP MENU PHONO NET USB BLUETOOTH TUNER AUDIO 6 5 4 3 2 1 V AUX 5 4 3 2 1 4 3 2 1 8 7 6 5 9 0 RADIO NET TV BD DVD SCENE MUTE OPTION ON SCREEN DISPLAY MODE MOVIE MUSIC INFO SLEEP ENT PRES...

Страница 76: ...details see DMC Control p 98 Menu Function 1 Page Up Moves to the previous next page of the list 1 Page Down 10 Pages Up Moves 10 pages forward backward 10 Pages Down Return Returns to the higher level list Now Playing Moves to the playback screen Screen Off Closes the screen display and shows the background Press one of the Menu operation keys to redisplay it a e c b d Menu Function Browse Moves ...

Страница 77: ...urns off the repeat function One One Plays back the current song repeatedly c appears on the TV screen All All Plays back all songs in the current album folder repeatedly v appears on the TV screen AV AV HDMI HDMI ENTER RETURN POP UP MENU TOP MENU PHONO NET USB BLUETOOTH TUNER AUDIO 6 5 4 3 2 1 V AUX 5 4 3 2 1 4 3 2 1 8 7 6 5 9 0 RADIO NET TV BD DVD SCENE MUTE OPTION ON SCREEN DISPLAY MODE MOVIE M...

Страница 78: ...to select an item and press ENTER If an Internet radio station is selected playback starts and the playback screen is displayed X To return to the previous screen press RETURN AV AV HDMI HDMI ENTER RETURN POP UP MENU TOP MENU PHONO NET USB BLUETOOTH TUNER AUDIO 6 5 4 3 2 1 V AUX 5 4 3 2 1 4 3 2 1 8 7 6 5 9 0 RADIO NET TV BD DVD SCENE MUTE OPTION ON SCREEN DISPLAY MODE MOVIE MUSIC INFO SLEEP ENT PR...

Страница 79: ...ages Up Moves 10 pages forward backward 10 Pages Down Return Returns to the higher level list Now Playing Moves to the playback screen Screen Off Closes the screen display and shows the background Press one of the Menu operation keys to redisplay it a e c b d Menu Function Bookmark On Adds the current station to the Bookmarks folder p 80 Browse Moves to the browse screen Screen Off Closes the scre...

Страница 80: ...tuner com with the web browser on your PC and enter the vTuner ID Y To use this feature you need to create your personal account Create your account using your e mail address 4 Register your favorite radio stations Click the Add icon next to the station name X To remove the station from the Bookmarks folder select Bookmarks in the Home screen and then click the Remove icon next to the station name...

Страница 81: ...the unit using the AirPlay password p 90 Playback of iTunes iPod music contents Follow the procedure below to play back iTunes iPod music contents on the unit 1 Turn on the unit and start iTunes on the PC or display the playback screen on the iPod If the iTunes iPod recognizes the unit the AirPlay icon appears Y If the icon does not appear check whether the unit and PC iPod are connected to the ro...

Страница 82: ...es iPod controls to adjust volume the volume may be unexpectedly loud This could result in damage to the unit or speakers If the volume suddenly increases during playback stop playback on the iTunes iPod immediately Menu Function Screen Off Closes the screen display and shows the background Press one of the Menu operation keys to redisplay it a c b AV AV HDMI HDMI ENTER RETURN POP UP MENU TOP MENU...

Страница 83: ...bles For details see Connecting Zone2 speakers p 25 Using an external amplifier Connect the external amplifier placed in Zone2 to the unit with a stereo pin cable X You can adjust the volume for Zone2 output with the unit When using an external amplifier with volume control set Volume p 117 in the Setup menu to Fixed Caution Remove the unit s power cable from the AC wall outlet before connecting s...

Страница 84: ...N OUT jacks with monaural mini jack cables and an infrared signal receiver AUDIO 1 AUDIO 2 OPTICAL OPTICAL COAXIAL VIDEO AV4 AV3 AV2 AV 1 TV PB Y PR MO PB Y PR HDMI 1 BD DVD HDMI 2 HDCP2 2 HDCP2 2 HDCP2 2 1 2 ARC ANTENNA FM AM AV 5 VIDEO AV 6 ZONE OUT ZONE 2 TRIGGER OUT REMOTE 12V IN OUT 0 1A COMPONENTVIDEO HDMI OUT RADIO PHONO GND REMOTE IN OUT The unit rear REMOTE IN OUT jacks Infrared signal tr...

Страница 85: ...reen operations are not available for Zone2 Use the front display or web control p 88 to control Zone2 AirPlayisavailableinZone2onlywhenAirPlayplaybackisongoinginthemain zone X To set the sleep timer 120 min 90 min 60 min 30 min off press SLEEP repeatedly The Zone2 output will be disabled after a specified period of time To adjust the Zone2 volume press VOLUME or MUTE when using the unit s interna...

Страница 86: ...yback is automatically selected for all zones Utilize this function when you want to use main zone music as background music for a house party 1 Press PARTY Each time you press the key the party mode is turned on or off When the party mode is turned on PARTY lights up in the front display Y If the party mode does not work on Zone2 set Party Mode Set p 118 in the Setup menu to Enable default PARTY ...

Страница 87: ...to this unit APC which contains the registereditem is turned off or notconnectedto the network The registered network content is temporarily unavailable or out of service The registered item file has been deleted or moved to another location A BLUETOOTH connection cannot be established When you register music files stored on a USB storage device or a PC this unit memorizes the relative position of...

Страница 88: ... address of the unit in the address bar of the web browser Example X You can check the IP address of the unit in Network p 122 in the Information menu You can bookmark the unit s IP address in the browser or create a shortcut link p 90 to access the web control screenquicklyinthefuture However ifyouareusingaDHCPserver theIPaddressoftheunitmaychangeeach time the unit is turned on If you have enable...

Страница 89: ...t the increments used for volume adjustment g RELOAD Reloads the current status of the unit Control screen a PLAY INFO Selects an input source or controls playback for the selected zone b TOP MENU Moves to the top menu screen c SCENE Selects a scene for the selected zone d POWER Turns on off the power for the selected zone e VOLUME Adjusts the volume or mutes the audio output for the selected zone...

Страница 90: ...re Updates the firmware of the unit by using the firmware you have downloaded on the PC Follow the on screen instructions to start the firmware update Create Link Creates a shortcut link to the desired control screen Tips Displays tips for use of the web control Licenses Displays the licenses of the software used in the unit b BACK Moves to the top menu screen c RELOAD Reloads the current status o...

Страница 91: ... into a Radio Data System broadcasting station p 67 VOL Audio Decoder INFO Item name VOL Surround HDMI1 Information Bluetooth USB SERVER AirPlay Song song title Artist artist name Album album name DSP Program sound mode name Audio Decoder decoder name NET RADIO Song song title Album album name Station station name DSP Program sound mode name Audio Decoder decoder name MusicCast DSP Program sound m...

Страница 92: ... adjusted 93 Dialogue Dialog Dialogue Level Dialog Lvl Adjusts the volume of dialogue sounds 93 DTS Dialogue Control DTS Dialog Adjusts the volume of dialogue sounds for DTS X contents 93 Dialogue Lift Dialog Lift Adjusts the perceived height of dialogue sounds 94 Lipsync Adjustment Lipsync Adj Adjusts the delay between video and audio output 94 Subwoofer Bass Subwoofer Bass Subwoofer Trim SW Trim...

Страница 93: ...e DRC A DRC Sets whether the dynamic range from maximum to minimum is automatically adjusted when the volume level is adjusted When it is set to On it is useful for listening to playback at a low volume at night Settings If On is selected the dynamic range becomes narrow at a low volume and wide at a high volume Dialogue Dialog Adjusts the volume or perceive height of dialogue sounds Dialogue Leve...

Страница 94: ...ing is available only when Delay Enable p 109 in the Setup menu is set to Enable default Subwoofer Bass Subwoofer Bass Adjust the subwoofer volume or bass sound Subwoofer Trim SW Trim Fine adjusts the subwoofer volume Setting range 6 0 dB to 0 0 dB to 6 0 dB 0 5 dB increments Extra Bass Extra Bass Enables disables Extra Bass When Extra Bass is enabled you can enjoy enhanced bass sounds regardless ...

Страница 95: ... between input sources use this function to correct it Setting range 6 0 dB to 0 0 dB to 6 0 dB 0 5 dB increments Video Out V Out Selects a video to be output with the audio input source Settings FM Mode FM Mode Switches between stereo and monaural for FM radio reception Settings Direct Direct Disables the video signal processing Processing Processing Enables the video signal processing Off Off Do...

Страница 96: ...previous screen during menu operations press RETURN 5 Use the cursor keys to select a setting and press ENTER 6 To exit from the menu press ON SCREEN Input menu items X Available items vary depending on the selected input source Default settings are underlined Item Function Page Rename Icon Select Changes the input source name and icon 97 Audio In Combines the video jack of the selected input sour...

Страница 97: ...or keys to select OK and press ENTER X To restore the default setting select RESET 7 To exit from the menu press ON SCREEN Audio In Combines the video jackof the selected input source withanaudiojack of others Forexample use this function in the following cases Connecting a playback device that supports HDMI video output but not HDMI audio output Connecting a playback device that has component vid...

Страница 98: ...ws Media Player 12 on the same network Configuring the SCENE function Scene menu You can change the settings of the SCENE function p 58 using the TV screen 1 Press ON SCREEN 2 Use the cursor keys to select Scene and press ENTER 3 Use the cursor keys e r to select a scene to be configured and press the cursor key q X You can still switch the scene by using cursor keys e r after Step 3 Auto Automati...

Страница 99: ...T SCENE4 RADIO Off Y To control playback of an HDMI Control compatible device by SCENE link playback you need to set HDMI Control in the Setup menu to On and perform the HDMI Control link setup p 142 Detail Displays the assignments of the selected scene Item Function Page Save Registers the current settings in the selected scene 99 Load Loads the settings registered for the selected scene You can ...

Страница 100: ...ct OK and press ENTER X To restore the default setting select RESET 5 To exit from the menu press ON SCREEN Reset Restores the default settings p 58 for the selected scene Configuring sound programs surround decoders DSP Program menu You can change the settings of the sound programs and surround decoders using the TV screen 1 Press ON SCREEN 2 Use the cursor keys to select DSP Program and press EN...

Страница 101: ...ce it Initial Delay Adjusts the delay between the direct sound and presence sound field generation 1 ms to 99 ms Higher to enhance the delay effect and lower to reduce it Surround Initial Delay Adjusts the delay between the direct sound and surround sound field generation 1 ms to 49 ms Higher to enhance the delay effect and lower to reduce it Surround Back Initial Delay Adjusts the delay between t...

Страница 102: ...o 0 to 5 Front Rear Balance Adjusts the front and rear volume balance 5 to 0 to 5 Higher to enhance the front side and lower to enhance the rear side Left Right Balance Adjusts the left and right volume balance 5 to 0 to 5 Higher to enhance the right side and lower to enhance the left side Height Balance Adjust the height volume balance using the presence speakers 0 to 5 to 10 Higher to enhance th...

Страница 103: ...ress ON SCREEN 2 Use the cursor keys to select Setup and press ENTER 3 Use the cursor keys e r to select a menu 4 Use the cursor keys q w to select an item and press ENTER X To return to the previous screen during menu operations press RETURN 5 Use the cursor keys to select a setting and press ENTER 6 To exit from the menu press ON SCREEN ...

Страница 104: ... input source 109 Auto Manual Select Selects the method to adjust the delay between video and audio output 109 Adjustment Adjusts the delay between video and audio output manually 110 Dynamic Range Selects the dynamic range adjustment method for bitstream audio Dolby Digital and DTS signals playback 110 Max Volume Sets the limit value of the volumes 110 Initial Volume Sets the initial volume for w...

Страница 105: ...udio transmitter 70 Multi Zone Main Zone Set Zone Rename Changes the zone name for main zone displayed on the TV screen 117 Zone2 Set Volume Enables disables volume adjustments for Zone2 output 117 Max Volume Sets the Zone2 limit value of the volumes 117 Initial Volume Sets the Zone2 initial volume for when the unit is turned on 117 Zone Rename Changes the zone name for Zone2 displayed on the TV s...

Страница 106: ...mp connection 7 1 1Zone Select this option when you use Zone2 speakers in addition to the 7 1 system in the main zone p 23 5 1 2 1Zone Select this option when you use Zone2 speakers in addition to the 5 1 2 system in the main zone p 24 5 1 BI Amp Select this option when you connect speakers that support bi amp connections p 24 Large Select this option for large speakers The front speakers will pro...

Страница 107: ...Select this option when two large speakers are connected The surround back speakers will produce all of the surround back channel frequency components Small x1 Select this option when one small speaker is connected The subwoofer or front speakers will produce surround back channel low frequency components lower than the specified crossover frequency default 80 Hz Small x2 Select this option when t...

Страница 108: ...uto Setup have already been saved p 40 Press ENTER again to view the measurement results Manual equalizer adjustment 1 Set Parametric EQ to Manual and press ENTER 2 Press ENTER again to enter the edit screen 3 Use the cursor keys to select a speaker and press ENTER X To restore the default settings for all speakers select PEQ Data Clear and then OK To copy the parametric equalizer values acquired ...

Страница 109: ...he Lipsync adjustment for each input source Choices HDMI 1 5 AV 1 6 V AUX AUDIO 1 2 Settings Auto Manual Select Selects the method to adjust the delay between video and audio output Setting range X Even if Auto Manual Select is set to Auto the automatic adjustment does not work depending on the TV connected to the unit In this case adjust the delay manually in Adjustment Off Does not output test t...

Страница 110: ...elected sound programs except 2ch Stereo and 7ch Stereo Settings Virtual Surround Back Speaker Selects whether to create Virtual Surround Back Speaker VSBS using the surround speakers When VSBS is enabled the unit creates VSBS when no surround back speakers are connected Settings X VSBS is effective only when 6 1 or 7 1 channel content is played back Maximum Produces audio without adjusting the dy...

Страница 111: ...Selects a resolution to output HDMI video signals when Video Mode is set to Processing Settings X If you need to select a resolution that is not supported by your TV set MON CHK p 125 in the ADVANCED SETUP menu to SKIP and try again Note that the output video may not be displayed on your TV normally Disable Disables playback of object based audio signals Those signals will be played in normal 5 1 ...

Страница 112: ...cts an audio input jack of the unit to be used for TV audio input when HDMI Control is set to On The unit s input source automatically switches to TV audio when the TV input is switched to its built in tuner Settings AV 1 6 AUDIO 1 2 Default AV 4 Y When using ARC to input TV audio to the unit you cannot use the input jacks selected here for connecting an external device because the input will be u...

Страница 113: ...s audio input through HDMI jacks to the TV when the unit is in standby mode If this function is set to On or Auto you can use the input selection keys HDMI 1 5 V AUX to select an HDMI input even when the unit is in standby mode the standby indicator on the unit blinks Settings Off Disables ARC On Enables ARC Off Does not set the unit to standby mode when the TV is turned off On Sets the unit to st...

Страница 114: ...u want to connect the unit to a network via the wireless router access point For details on settings see Connecting the unit to a wireless network p 49 Wireless Direct Select this option when you want to connect a mobile device to the unit directly For details on settings see Connecting a mobile device to the unit directly Wireless Direct p 54 Off Does not use a DHCP server Configure the network p...

Страница 115: ... the edit position and the cursor keys q w to select a value 4 To confirm the setting press ENTER 5 To save the changes use the cursor keys to select OK and press ENTER 6 To exit from the menu press ON SCREEN Network Name Edits the network name the unit s name on the network displayed on other network devices Setup procedure 1 Press ENTER to enter the name edit screen 2 Use the cursor keys and ENT...

Страница 116: ...This setting is not available when Network Standby p 114 is set to Off Audio Send Configures the Bluetooth settings when the unit is used as the Bluetooth audio transmitter Transmitter Enables disables the Bluetooth audio transmitter function When this function is enabled you can enjoy audio played back on the unit using Bluetooth speakers headphones p 70 Settings Off Disables the Bluetooth functi...

Страница 117: ...n Power Amp Assign p 106 is set to 7 1 1Zone or 5 1 2 1Zone Max Volume Sets the Zone2 limit value of the volumes Setting range 30 0 dB to 10 0 dB 5 0 dB increments X This setting is available only when Power Amp Assign p 106 is set to 7 1 1Zone or 5 1 2 1Zone Initial Volume Sets the Zone2 initial volume for when the unit is turned on Settings X This setting is available only when Power Amp Assign ...

Страница 118: ... Message Selects whether to display short messages on the TV screen when the unit is operated such as input selection and volume adjustment Settings Wallpaper Selects the image to be used as wallpaper on the TV Settings Disable Disables switching to the party mode Enable Enables switching to the party mode You can turn on off the party mode by pressing PARTY on the remote control On Displays short...

Страница 119: ...h Target Zone An electronic signal is transmitted according to the setting made in Source Manual Select this to manually switch the output level for electronic signal transmission with Manual Low Stops the electronic signal transmission when you switch to the input source specified in this option High Transmits the electronic signal when you switch to the input source specified in this option Low ...

Страница 120: ... unit s power consumption by setting ECO Mode to On After setting be sure to press ENTER to restart the unit Settings Y When ECO Mode is set to On the front panel display may become dark If you want to play audio at high volume set ECO Mode to Off Off Does not set the unit to standby mode automatically 20 Minutes Sets the unit to standby mode when you have not operated the unit and no input signal...

Страница 121: ...ion on the front display is provided in English only Viewing information about the unit Information menu You can view information about the unit using the TV screen 1 Press ON SCREEN 2 Use the cursor keys to select Information and press ENTER 3 Use the cursor keys e r to select an information type 4 To exit from the menu press ON SCREEN ...

Страница 122: ...of samples per second of the input digital signal Bitrate The amount of data per second of the input bitstream signal Dialogue The dialogue normalization level of the input bitstream signal Output Channel The number of signal output channels for example 5 1 2 denotes standard 5 1 channel plus 2 for overhead speaker channels and the speaker terminals from which signals are output HDMI Signal Presen...

Страница 123: ...nt panel press MAIN ZONE z 3 Press PROGRAM to select an item 4 Press STRAIGHT to select a setting 5 Press MAIN ZONE z to set the unit to standby mode and turn it on again The new settings take effect SSID The SSID of the wireless network Security Security method Security Key Security key IP Address IP address Subnet Mask Subnet mask MAC Address Wi Fi MAC address Network Connection Wireless Direct ...

Страница 124: ...ning frequency setting of the unit depending on your country or region Settings Item Function Page SP IMP Changes the speaker impedance setting 124 REMOTE ID Selects the unit s remote control ID 124 TU Taiwan Brazil Asia and General models only Changes the FM AM tuning frequency setting 124 TV FORMAT Switches the video signal type 125 MON CHK Removes the limitation on HDMI video output 125 4K MODE...

Страница 125: ...input output at the unit when HDMI 4K 60 Hz 50 Hz compatible TV and playback device are connected to the unit Settings Y When MODE 1 is selected use a high speed HDMI cable that supports 18 Gbps Restoring the default settings INIT Restores the default settings for the unit Choices YES Enables the monitor check function Outputs video signals with a resolution supported by the TV only SKIP Disables ...

Страница 126: ...ss STRAIGHT repeatedly to select USB or NETWORK and press INFO to start firmware update Choices X If the unit detects newer firmware over the network the corresponding message will be displayed after ON SCREEN is pressed In this case you can also update the unit s firmware by following the procedure in Updating the unit s firmware via the network p 127 Checking the firmware version VERSION Check t...

Страница 127: ... ENTER in the System screen Note Do not operate the unit or disconnect the power cable or network cable during firmware update Firmware update takes about 20 minutes or more depending on your Internet connection speed If the unit is connected to the wireless network network update may not be possible depending on the condition of the wireless connection In this case update the firmware using the U...

Страница 128: ...s BD DVD players to the unit enable HDMI Control on each device and perform the HDMI Control link setup This setup is required every time you add a new HDMI Control compatible device to your system For information on how HDMI Control works between your TV and playback devices refer to the instruction manuals for each device I want to turn off the on screen messages displayed during operations By d...

Страница 129: ...to a drop in the power supply voltage Hold down MAIN ZONE z on the front panel for more than 10 seconds to initialize and reboot the unit If the problem persists disconnect the power cable from the AC wall outlet and plug it again The power turns off standby mode immediately The unit was turned on while a speaker cable was shorted Twist the bare wires of each speaker cable firmly and reconnect to ...

Страница 130: ...onnected to the output jacks of the unit is not turned on Turn on all devices connected to the output jacks of the unit No sound is coming from a specific speaker The playback source does not contain a signal for the channel To check it use Audio Signal in the Information menu p 122 The currently selected sound program decoder does not use the speaker To check it use Test Tone in the Setup menu p ...

Страница 131: ...oes not support ARC is connected to the unit only with an HDMI cable Use a digital optical cable to make an audio connection p 28 If the TV is connected to the unit with an audio cable The TV audio input setting does not match the actual connection Use TV Audio Input in the Setup menu to select the correct audio input jack p 112 If you are trying to use ARC ARC is disabled on the unit or TV Set AR...

Страница 132: ...ted by the unit see HDMI signal compatibility p 144 The TV does not support HDCP High bandwidth Digital Content Protection Refer to the instruction manuals for the TV and check the TV s specifications If you want to play back contents that require HDCP 2 2 compatible devices both the TV and playback device must support HDCP 2 2 The playback device that supports HDCP 2 2 is connected to other than ...

Страница 133: ...ats or other electrical equipment It is difficult to completely eliminate noise It may be reduced by using an outdoor AM antenna Radio stations cannot be selected automatically Your area is too far from the FM station transmitter Select the station manually p 65 Use an outdoor antenna We recommend using a sensitive multi element antenna The AM radio signal is weak Adjust the AM antenna orientation...

Страница 134: ...d the Bluetooth device are too far apart Move the Bluetooth device closer to the unit There is a device such as microwave oven and wireless LAN that outputs signals in the 2 4 GHz frequency band nearby Move the unit away from those devices Problem Cause Remedy The unit does not detect the USB device The USB device is not connected to the USB jack securely Turn off the unit reconnect your USB devic...

Страница 135: ...ntly not available There may be a network problem at the radio station or the service may have been stopped Try the station later or select another station The selected Internet radio station is currently broadcasting silence Some Internet radio stations broadcast silence at certain of times of the day Try the station later or select another station Access to the network is restricted by the firew...

Страница 136: ...No device The unit cannot detect the USB device Turn off the unit and reconnect your USB device If the problem persists try another USB device Please wait The unit is preparing for connecting to the network Wait until the message disappears If the message stays more than 3 minutes turn off the unit and turn it on again RemID Mismatch The remote control IDs of the unit and the remote control are no...

Страница 137: ...igh definition home theater experience with the quality of the studio master Dolby TrueHD can carry up to eight channels of 96 kHz 24 bit audio up to six channels of 192 kHz 24 bit audio simultaneously This technology is used for audio on BD Blu ray discs DSD Direct Stream Digital DSD Direct Stream Digital technology stores audio signals on digital storage media such as SACD Super Audio CDs The si...

Страница 138: ...for audio on a variety of media including CDs and BD Blu ray discs Sampling frequency Quantization bit Sampling frequency and quantization bits indicate the quantity of information when an analog audio signal is digitized These values are noted as in the following example 48 kHz 24 bit Sampling frequency Sampling frequency the number of times the signal is sampled per second is called the sampling...

Страница 139: ...can carry the Wi Fi Certified trademark WPS WPS Wi Fi Protected Setup is a standard established by the Wi Fi Alliance which allows easy establishment of a wireless home network Yamaha technologies CINEMA DSP Digital Sound Field Processor Since the Dolby Surround and DTS systems were originally designed for use in movie theaters their effect is best experienced in a theater that has many speakers d...

Страница 140: ...3 or later Mac with OS X Mountain Lion or later and Mac and PC with iTunes 10 2 2 or later as of March 2016 Made for iPhone 6 Plus iPhone 6 iPhone 5s iPhone 5c iPhone 5 iPhone 4s iPad Air 2 iPad mini 3 iPad Air iPad mini 2 iPad mini iPad 3rd and 4th generation iPad 2 iPod touch 5th generation as of March 2016 File formats For information about specifications of each file refer to the instruction m...

Страница 141: ... You can select the resolution and the aspect ratio applied to HDMI output video processing in Video Mode p 111 in the Setup menu The unit does not convert 480 line and 576 line video signals interchangeably m Available HDMI out COMPONENT VIDEO out VIDEO out Resolution 480i 576i 480p 576p 720p 1080i 1080p 4K 480i 576i 480p 576p 720p 1080i 480i 576i HDMI in 480i 576i m m m m m m 480p 576p m m m m m...

Страница 142: ...e from the unit s remote control Starting playback on the playback device and turning on the TV with a scene selection p 58 Switching the TV input to display the on screen menu when ON SCREEN is pressed Controlling the playback device playback and menu operations using the external device operation keys Example To use HDMI Control you need to perform the following HDMI Control link setup after con...

Страница 143: ...io output setting on the TV We recommend using TV and playback devices from the same manufacturer so that HDMI Control works more effectively We do not assure the operation of all HDMI Control compatible devices Audio Return Channel ARC ARC allows you to input TV audio to the unit with the HDMI cable which transmits video signal to the TV Check the following after the HDMI Control settings 1 Selec...

Страница 144: ... each device To decode audio bitstream signals on the unit set the input source device appropriately so that the device outputs the bitstream audio signals directly does not decode the bitstream signals on the playback device For details refer to the instruction manual for the playback device Audio signal type Audio signal format Compatible media example 2ch Linear PCM 2ch 32 to 192 kHz 16 20 24 b...

Страница 145: ...ates and other countries x v Color x v Color is a trademark of Sony Corporation DLNA and DLNA CERTIFIED are trademarks or registered trademarks of Digital Living Network Alliance All rights reserved Unauthorized use is strictly prohibited Windows Windows is a registered trademark of Microsoft Corporation in the United States and other countries Internet Explorer Windows Media Audio and Windows Med...

Страница 146: ... v Color HD audio playback 21 9 Aspect Ratio BT 2020 Colorimetry HDR Compatible Video Format Repeater Mode VGA 480i 60 Hz 576i 50 Hz 480p 60 Hz 576p 50 Hz 720p 60 Hz 50 Hz 1080i 60 Hz 50 Hz 1080p 60 Hz 50 Hz 30 Hz 25 Hz 24 Hz 4K 60 Hz 50Hz 30 Hz 25 Hz 24 Hz Audio Format Dolby Atmos Dolby TrueHD Dolby Digital Plus Dolby Digital DTS X DTS HD Master Audio DTS HD High Resolution Audio DTS Express DTS ...

Страница 147: ... PHONO 1 kHz 100 W 8 Ω 3 5 mV 47 kΩ AV 5 etc 1 kHz 100 W 8 Ω 200 mV 47 kΩ Maximum Input Signal PHONO 1 kHz 0 1 THD 60 mV AV 5 etc 1 kHz 0 5 THD Effect On 2 3 V Output Level Output Impedance PRE OUT 1 V 1 2 kΩ SUBWOOFER 1 V 1 2 kΩ ZONE2 OUT 470 mV 1 2 kΩ Maximum Output Level PRE OUT 1 6 V Headphone Impedance 16 Ω or more Frequency Response AV 5 etc to Front 10 Hz to 100 kHz 0 3 dB RIAA Equalization...

Страница 148: ...Asia model AC 220 to 240 V 50 60 Hz Power Consumption U S A and Canada models 400 W China Taiwan Brazil Asia and General models 270 W Other models 300 W Standby Power Consumption HDMI Control Off Standby Through Off 0 1 W HDMI Control ON Standby through AUTO HDMI no signal and no CEC for 8 hours 0 4 W HDMI Control On Standby Through On No Signals 1 1 W Network Standby On Wired 2 1 W Wi Fi 2 4 W Wi...

Страница 149: ...Manual Development Department 2016 Yamaha Corporation Published 07 2016 AM A0 Yamaha Global Site http www yamaha com Yamaha Downloads http download yamaha com YJ101A0 EN ...

Отзывы: