Quic
k Guide — Pla
ying the MO
TIF ES
Playing the Keyboard (in the Voice Play mode)
64
Owner’s Manual
2
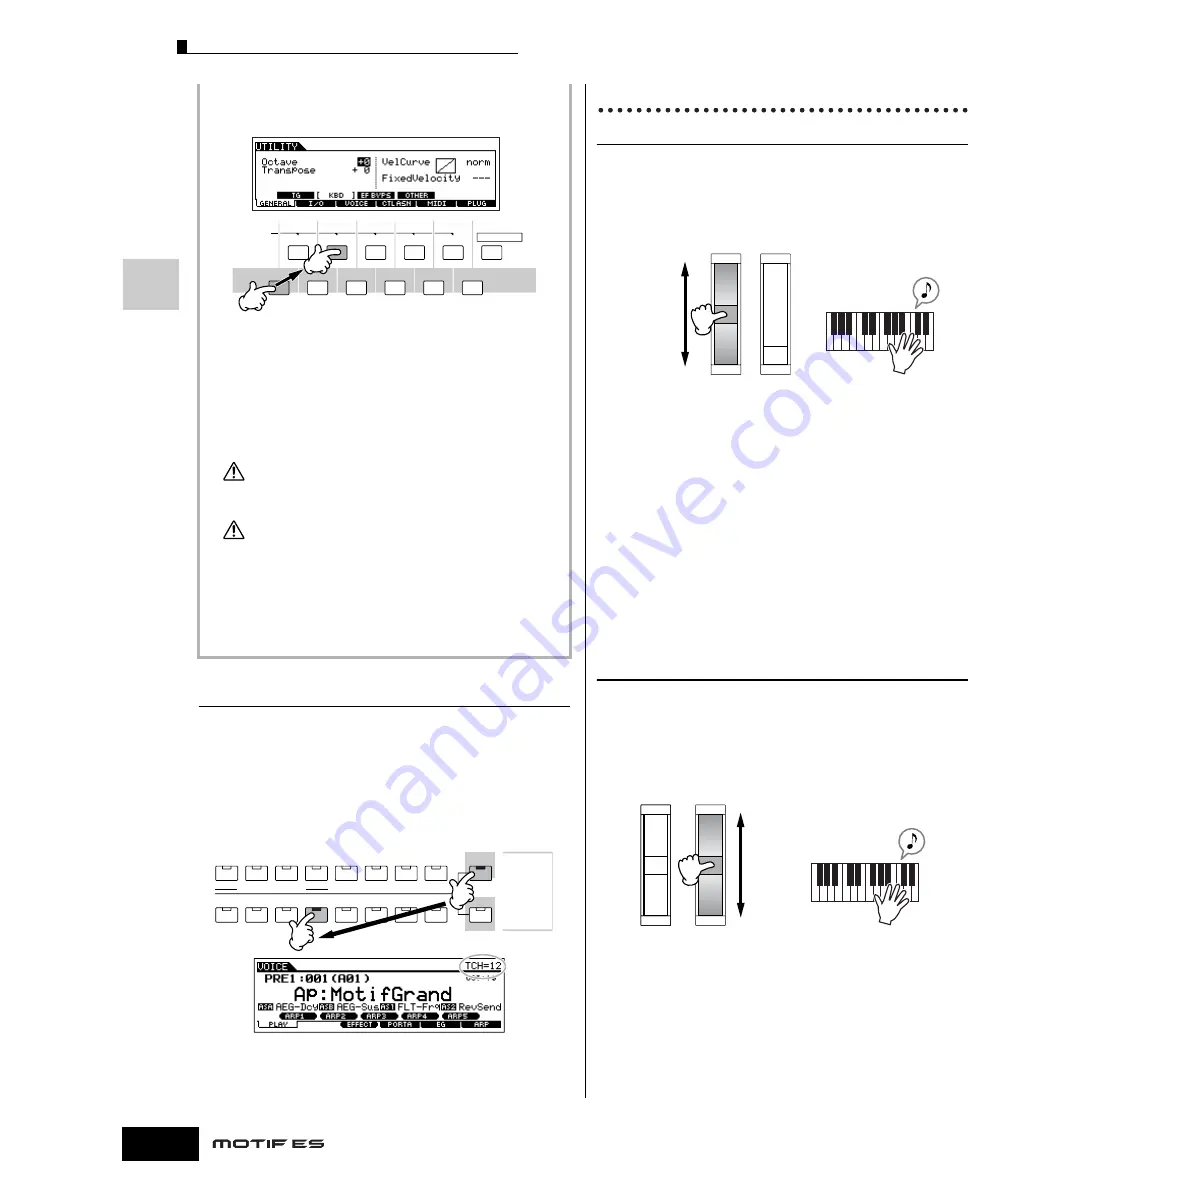
Press the [F1] GENERAL button, then the [SF2]
KBD button.
3
Move the cursor to “Transpose” by using the
Cursor button.
4
Change the Transpose value by using the [INC/
YES], [DEC/NO] buttons and data dial.
5
Press the [STORE] button to store the Transpose
setting to internal Flash ROM.
Make sure to execute step #5. The settings made in step #4 will be
lost if you turning the power off without executing step #7.
Never attempt to turn off the power while data (e.g., Voice) is being
written to Flash ROM (while a “Please keep power on” message is
shown). Turning the power off in this state may not only cause the
system to freeze (due to data corruption in the Flash ROM) and
prevent normal startup the next time the power is turned on, it may
also result in loss of all user data.
n
The transpose setting is available in all modes.
Keyboard MIDI transmit channel setting
This function is especially convenient when recording to an
external sequencer or controlling another instrument via MIDI.
It lets you easily change the transmit channel with just a
couple of button presses. Press the [TRACK SELECT] button
(the lamp lights), then press the appropriate NUMBER button
([1] - [16]). The transmit channel setting is shown at the top
right of the display.
n
You can also set the MIDI keyboard transmit channel from the Utility
mode ([UTILITY]
→
[F5] MIDI
→
[SF1] CH
→
KBDTransCh). This
parameter is available for the Voice mode/Performance mode but not
for the Song mode/Pattern mode.
Using Controllers
Pitch Bend Wheel
Use the Pitch Bend wheel to bend notes up (roll the wheel
away from you) or down (roll the wheel toward you) while
playing the keyboard. This wheel is self-centering and will
automatically return to normal pitch when released. Try out the
Pitch Bend wheel while pressing a note on the keyboard.
n
Each preset Voice has its own default Pitch Bend Range setting. The
Pitch Bend Range setting for each Voice can be changed in the
[VOICE]
→
[EDIT]
→
[COMMON]
→
[F1] GENERAL
→
[SF5] OTHER
display and stored as a User Voice in the Voice Store mode. From this
display you can also reverse the Pitch Bend function — so that moving
the wheel up lowers the pitch, and moving it down raises the pitch.
n
Functions other than Pitch Bend can be assigned to the Pitch Bend
Wheel in the [VOICE]
→
[EDIT]
→
[COMMON]
→
[F4] CTL SET
display. These assignment settings can be stored as a User Voice in
the Voice Store mode. Even if a different function is assigned to this
wheel, the Pitch Bend function is available and Pitch Bend messages
are still generated when the wheel is used.
n
Using the Pitch Bend wheel generates the same MIDI message to
extend devices, regardless of the assignments made in the Voice Edit
mode.
Modulation Wheel
Even though the Modulation wheel is conventionally used to
apply vibrato to the sound, many of the preset Voices have
other functions and effects assigned to the wheel. The more
you move this wheel up, the greater the effect that is applied
to the sound. Try out the Modulation wheel with various preset
voices while playing the keyboard.
n
To avoid accidentally applying effects to the current Voice, make sure
the Modulation Wheel is set to minimum before you start playing.
n
Various functions can be assigned to the Modulation Wheel in the [VOICE]
→
[EDIT]
→
[COMMON]
→
[F4] CTL SET display. These assignment
settings can be stored as a User Voice in the Voice Store mode.
n
Using the Modulation wheel generates the same MIDI message to
external devices, regardless of the assignments made in the Voice
Edit mode.
SCENE
SF1
SF
2
SF
3
SF
4
SF
5
F
1
F
2
F
3
F
4
F
5
F
6
INFORMATION
CAUTION
CAUTION
ELEMENT/PERF. PART/ZONE
8
7
6
5
4
3
2
1
16
MUTE
TRACK
SELECT
NUMBER
SOLO
15
14
12
13
11
10
9
Pitch Up
Pitch Down
Pitch Bend Wheel
Maximum
Minimum
Modulation Wheel
Содержание MOTIF ES6
Страница 1: ......


