Yamaha MCR-330 Скачать руководство пользователя страница 16

CONNECTING EXTERNAL COMPONENTS

12

 En

You can connect a USB device or an iPod to this unit. For information on your component, refer to the owner's manual 
supplied with the component.

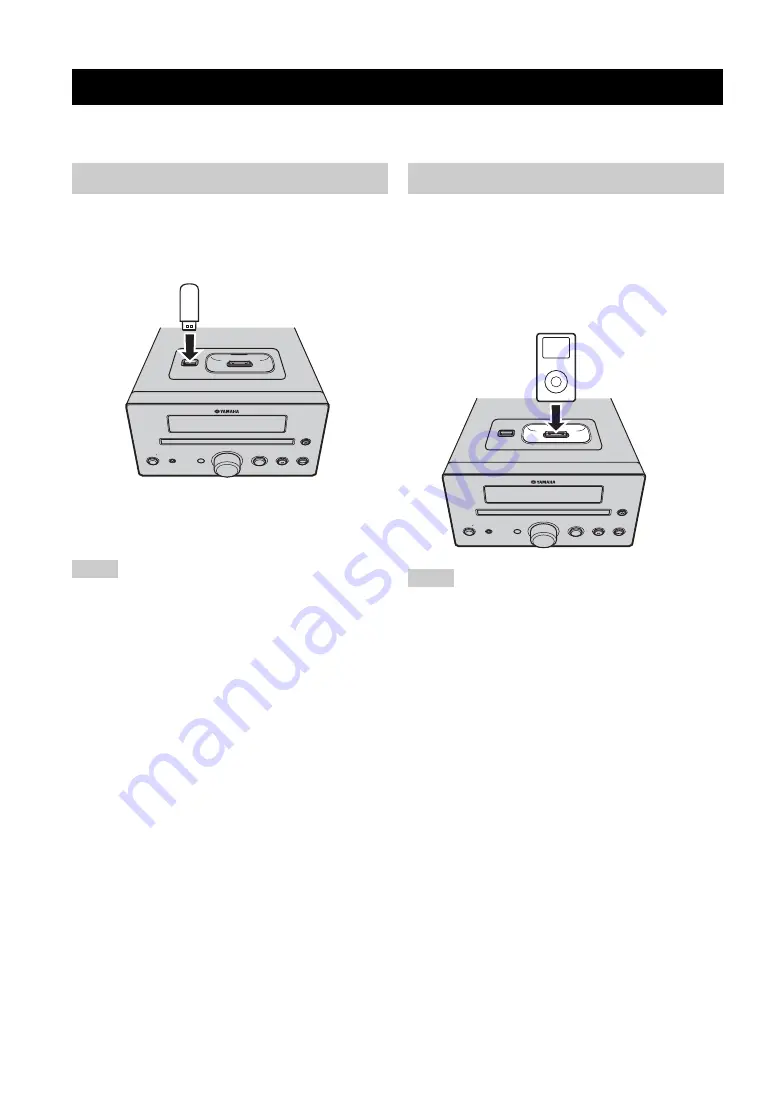
This unit has a USB port and can access MP3 or WMA 
files saved on your USB device. Connect your USB 
device to the USB port on the top panel of this unit.
For playback information of a USB device, see page 15.

Supported USB devices

This unit supports USB mass storage class devices (e.g., 
flash memories) using FAT16 or FAT32 format.

• Some devices may not work properly even if they meet the 

requirements.

• If your USB device is not played back after you connected it to 

this unit, follow any of the procedures below.
– Set this unit to the standby mode, and turn it on again.
– Disconnect the device while this unit is in the standby mode.
– Then connect the device again and turn on this unit.
– Connect an AC adapter if supplied with the device.

• If the USB device is not played back even after you performed 

the procedure(s) above, the device may not be playable on this 
unit.

• Do not connect devices other than USB mass storages class 

devices.

• Yamaha and suppliers accept no liability for the loss of data 

saved on the USB devices connected to this unit. 
As a precaution, it is recommended that the files are made 
backup copies.

• Playability of and power supply to all kind of USB devices are 

not guaranteed.

• Your USB device is automatically charged when your USB 

device is connected to the USB port even when this unit is in 
standby mode and ECO MODE is OFF.

• To remove USB device safely, disconnect after the playback is 

stopped.

This unit equips the iPod terminal on the top panel where 
you can directly station your iPod and control playback of 
your iPod using the supplied remote control.
Use this unit with the iPod dock adapter (supplied with 
your iPod or commercially available) appropriate for your 
iPod. If you use this unit without using an appropriate 
iPod dock adapter, loose connection may result.

• Only iPod (Click and Wheel), iPod nano, iPod mini, and iPod 

touch are supported.

• Do not connect any iPod accessories (such as headphones, a 

wired remote control, or an FM transmitter) to our iPod when it 
is stationed in the terminal.

• Unless your iPod is firmly stationed in the terminal, audio 

signals may not be output properly.

• Once the connection between your iPod and this unit is 

complete, “iPod” appears in the front panel display. If the 
connection between your iPod and this unit fails, a status 
message appears in the front panel display. For a complete list 
of connection status message, see the iPod section in 
“TROUBLESHOOTING” on page 23.

• Your iPod is automatically charged when your iPod is stationed 

in the terminal even when this unit is in standby mode and ECO 
MODE is OFF.

• To remove iPod safely, disconnect after the playback is 

stopped.

CONNECTING EXTERNAL COMPONENTS

Connecting a USB device

Notes

STANDBY  ON

PHONES

VOLUME

INPUT

USB

iPod

USB device

Connecting an iPod™ 

Notes

STANDBY  ON

PHONES

VOLUME

INPUT

USB

iPod

iPod

Содержание MCR-330

Страница 1: ...OWNER S MANUAL MODE D EMPLOI UA AMPLI TUNER CD CD RECEIVER ...

Страница 2: ...ution when moving the cart apparatus combination to avoid injury from tip over 13 Unplug this apparatus during lightning storms or when unused for long periods of time 14 Refer all servicing to qualified service personnel Servicing is required when the apparatus has been damaged in any way such as power supply cord or plug is damaged liquid has been spilled or objects have fallen into the apparatu...

Страница 3: ...tions does not guarantee that interference will not occur in all installations If this product is found to be the source of interference which can be determined by turning the unit OFF and ON please try to eliminate the problem by using one of the following measures Relocate either this product or the device that is being affected by the interference Utilize power outlets that are on different bra...

Страница 4: ...tning keep the power cord and outdoor antennas disconnected from a wall outlet or this unit during a lightning storm 14 Do not attempt to modify or fix this unit Contact qualified Yamaha service personnel when any service is needed The cabinet should never be opened for any reasons 15 When not planning to use this unit for long periods of time i e vacation disconnect the AC power plug from the wal...

Страница 5: ...S 13 SETTING THE SLEEP TIMER 14 BASIC PLAYBACK OPERATIONS FOR DISCS AND USB DEVICES 15 Switching the playback information display 16 Repeating playback Repeat Play 17 Playing back randomly Shuffle Play 17 FM TUNING 18 Automatic tuning 18 Manual tuning 18 Automatic preset tuning 18 Manual preset tuning 19 Selecting preset stations 19 CONTROLLING iPod 20 Using iPod 20 TROUBLESHOOTING 22 General 22 R...

Страница 6: ...information about safety and operating instructions This manual is printed prior to production Design and specifications are subject to change in part as a result of improvements etc In case of differences between the manual and the product the product has priority This product includes the following accessories Before connecting speakers make sure you received all of the following parts FEATURES ...

Страница 7: ... audio signals for private listening with headphones 6 Remote control sensor Receives signals from the remote control 7 VOLUME Adjusts the volume level 8 INPUT Selects an input source 9 Stops playback see page 15 0 Starts or pauses playback see page 15 A USB port Connect your USB device see page 12 B iPod terminal Connect your iPod see page 12 CONTROLS AND FUNCTIONS Front panel USB IPod A B Top vi...

Страница 8: ...your iPod CD USB in repeat mode 7 MUTE indicator Lights up when the sound is muted 8 Multi information display Shows the various information such as the tuning frequency 9 TUNED indicator Lights up when this unit is tuned into a station 0 MEMORY indicator Lights up when you preset radio stations automatically or manually A Multi information indicator Light up the menu currently selected see page 2...

Страница 9: ... to all modes The following operations are available for this unit when it is set to any input mode 1 Infrared signal transmitter Sends signals to the component you want to control 2 STANDBY ON Turns this unit on or sets it to the standby mode 3 Input selection keys Select the input source 4 FUNCTION By pressing FUNCTION you can select DIMMER TREBLE BASS BALANCE or ECO MODE 5 DISPLAY Switches the ...

Страница 10: ...buttons cannot be used 4 Starts or pauses playback see page 15 5 Stops playback see page 15 6 REPEAT Selects the Repeat Play mode see page 17 7 SHUFFLE Select the Shuffle Play feature see page 17 FM mode Operations available in FM mode The following operations are available for this unit when the FM mode is selected 1 TUNING Press TUNING to Manual tuning and press and hold TUNING to Automatic tuni...

Страница 11: ... twice to skip to the previous track 4 DISPLAY Displays the song information while iPod is in menu browse mode see page 16 5 Starts or pauses playback 6 SHUFFLE Selects the shuffle playback mode see page 21 7 MENU Returns to the upper level in the iPod menu 8 Skips to the next track Press and hold to fast forward 9 Press or to select an item in the selected group 0 REPEAT Selects the repeat playba...

Страница 12: ... cold places dusty places Replacing the battery in the remote control Change the battery when the operation range of the remote control decreases Insert the battery according to the polarity markings and If the battery runs out immediately remove it from the remote control to prevent an explosion or acid leak If the battery starts leaking dispose of it immediately Be careful not to let the leaking...

Страница 13: ...ly If the connections are faulty no sound will be heard from the speakers and if the polarity of the speaker connections is incorrect the sound will be unnatural and lacks bass Do not let the bare speaker wires touch each other or do not let them touch any metal part of this unit This could damage this unit and or the speakers Use speakers with the specified impedance shown on the rear panel of th...

Страница 14: ... grooved etc cable to the red terminals on this unit and your speaker Connect the plain cable to the black terminals on this unit and your speaker The low frequency range of the left channel and the right channel are mixed to output at the SUBWOOFER OUT jack Connect the SUBWOOFER OUT jack on this unit to the INPUT jack on the subwoofer using the subwoofer cable commercially available Do not connec...

Страница 15: ...lied indoor FM antenna to the FM jack of this unit 2 Place the antenna away from this unit and speaker cables After you made all connections connect the power cables of this unit and subwoofer optional You can connect your headphones to the PHONES jack on the front panel of this unit The sound from the speakers stops CONNECTING ANTENNAS SUBWOOFER OUT FM ANT 75 UNBAL TUNER Indoor FM antenna supplie...

Страница 16: ...atically charged when your USB device is connected to the USB port even when this unit is in standby mode and ECO MODE is OFF To remove USB device safely disconnect after the playback is stopped This unit equips the iPod terminal on the top panel where you can directly station your iPod and control playback of your iPod using the supplied remote control Use this unit with the iPod dock adapter sup...

Страница 17: ...the setting and press Center TREBLE Adjusts the high frequency response BASS Adjusts the low frequency response BALANCE Adjusts the volume level of each left and right speaker channel y TREBLE BASS and BALANCE are not adjustable when using the headphones To dim the display You can dim the front panel display of this unit 1 Press FUNCTION to display the function menu 2 Press repeatedly to select DI...

Страница 18: ...e front panel display y The sleep timer is canceled if you set this unit to the standby mode If you press SLEEP while the sleep timer is set the remaining time appears in the front panel display To cancel the sleep timer Press SLEEP repeatedly to select SLEEP OFF SETTING THE SLEEP TIMER STANDBY ON CD iPod FM USB SLEEP FM PRESET FUNCTION MENU DISPLAY FOLDER SHUFFLE REPEAT MUTE VOLUME TUNING MEMORY ...

Страница 19: ...automatically in order by the date and time of creation if playable files are in the USB device Total time does not appear on the front panel for USB device playback If the USB device is partitioned only the first partition is displayed Some files may not work properly depending on the USB device specification Copyright protected files cannot be played back This unit can play back files of 4 GB in...

Страница 20: ...back of an audio CD Track Title Artist and Album Title are available only for a CD TEXT disc You can switch the playback information 1 2 5 6 7 above during playback of your iPod in the menu browse mode see page 21 Playback information for MP3 or WMA files recorded on discs USB devices The following information is available during playback of an MP3 or WMA files recorded on discs USB device Switchi...

Страница 21: ...huffle play mode in the front panel display changes as follows The SHUFFLE FOLDER means tracks in the folder is play back in randomly To cancel Shuffle Play Press SHUFFLE repeatedly so that the SHUFFLE indicator disappears from the front panel display or press Repeating playback Repeat Play REPEAT STANDBY ON CD iPod FM USB SLEEP FM PRESET FUNCTION MENU DISPLAY FOLDER SHUFFLE REPEAT MUTE VOLUME TUN...

Страница 22: ...on automatically switches the tuner to monaural reception to increase the signal quality Follow the procedure below to preset radio stations automatically 1 Press FM to set the unit to the FM mode 2 Press and hold MEMORY for more than 2 seconds The AUTO PRESET and Push Center Key appear in the front panel display alternately To cancel press MEMORY 3 Press Center to start searching automatically Au...

Страница 23: ...eset You can tune into any desired station simply by selecting the preset station under which it was stored see page 18 1 Press FM to set the unit to the FM mode 2 Press PRESET to select a preset station To delete the preset station 1 Press FM to set the unit to the FM mode 2 Press FUNCTION to display the function menu Press to select PRESET DELETE and press Center 3 Press to select the preset num...

Страница 24: ...lete list of status messages that appear in the front panel display refer to the iPod section in TROUBLESHOOTING see page 23 Simple remote mode In the simple remote mode you can operate the iPod menu by viewing the iPod using the iPod controls or the supplied remote control 1 Press iPod to set this unit to the iPod mode 2 Press FUNCTION and to show iPod MODE on the front panel display and press Ce...

Страница 25: ...vel in the iPod menu press MENU 3 Repeat step 2 until you select the desired item and then press Center to start playback of the desired item group or song y While playing back a track or group with the menu browse mode you can switch the playback information such as song name elapsed time artist name or album name displayed in the front panel display by pressing DISPLAY Repeating playback Repeat ...

Страница 26: ... volume is turned down Turn up the volume Signals this unit cannot reproduce are being input from a source component such as a CD ROM Play a source whose signals can be reproduced by this unit Sound is heard from the speaker on one side only Incorrect cable connections Connect the cables properly If the problem persists the cables may be defective 9 There is noise interference from digital or radi...

Страница 27: ...urn off this unit and reconnect the iPod 12 Try resetting your iPod Unknown iPod The iPod being used is not supported by this unit Only iPod Click and Wheel iPod nano iPod mini and iPod Touch are supported iPod Your iPod is properly stationed in an iPod terminal iPod Unplugged Your iPod was removed from an iPod terminal Station your iPod back in an iPod terminal 12 USB Note Status message Cause Re...

Страница 28: ...MA music files If the number of files is small the disc may not be recognized The sampling rate of a MP3 or WMA file may not be compatible with this unit Check the sampling rate and bit rate of an MP3 or WMA file are compatible with this unit 25 USB playback does not start Improper USB device connections Connect the USB device again 12 The MP3 or WMA formats are not compatible with this unit Repla...

Страница 29: ...sc starts in alphanumeric order of files Playback for USB starts in order by date and time of file creation Copyright protected WMA DRM files cannot be played back by this unit The disc must be ISO9660 compatible The maximum file and folder numbers are as follows The root is counted as one of the folders NOTES ABOUT DISCS MP3 WMA FILES Compact discs digital audio The most popular discs for commerc...

Страница 30: ...sc be careful not to scratch the playing surface Compact discs are not affected by small particles of dust or fingerprints on their playing surface but even so they should be kept clean Wipe by using a clean dry cloth Do not wipe with a circular motion wipe straight outward from the center Do not try to clean the disc s surface by using any type of disc cleaner record spray anti static spray or li...

Страница 31: ...22 64 kbps while maintaining a similar audio quality to music CD MPEG Layer 3 audio decoding technology licensed from Fraunhofer IIS and Thomson Multimedia PLAYER SECTION Playback System CD CD R RW Laser Type Semiconductor laser GaAs GaAlAs Wave length 780 nm Output power 10 mW Audio Performance DAC 192 kHz 24 bit AMPLIFIER SECTION Maximum RMS output power per channel 6 Ω 1 kHz 10 THD 20 W 20 W To...

Страница 32: ... 2008 Yamaha Corporation All rights reserved Printed in Malaysia WQ57120 1 ...

Отзывы: