background image

E

4-27

EMU00404*

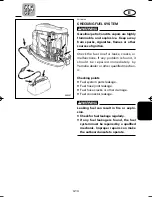
CHECKING BATTERY (for Electric
start model)

w

Battery  electrolytic  fluid  is  dangerous;  it
contains sulfuric acid and therefore is poi-
sonous and highly caustic.
Always  follow  these  preventive  mea-
sures:

8

Avoid  bodily  contact  with  electrolytic
fluid  as  it  can  cause  severe  burns  or
permanent eye injury.

8

Wear  protective  eye  gear  when  han-
dling or working near batteries.

Antidote (EXTERNAL):

8

SKIN - Flush with water.

8

EYES - Flush with water for 15 minutes
and get immediate medical attention.

Antidote (INTERNAL):

8

Drink  large  quantities  of  water  or  milk
followed  by  milk  of  magnesia,  beaten
egg,  or  vegetable  oil.  Get  immediate
medical attention.

Batteries  also  generate  explosive  hydro-
gen gas; therefore, you should always fol-
low these preventive measures:

8

Charge  batteries  in  a  well-ventilated
area.

8

Keep  batteries  away  from  fire,  sparks,
or  open  flames  (e.g.,  welding  equip-
ment, lighted cigarettes, etc.).

8

DO NOT SMOKE when charging or han-
dling batteries.

8

KEEP  BATTERIES  AND  ELECTROLYTIC
FLUID OUT OF REACH OF CHILDREN.

 68V-9-13-4  3/15/02 1:59 PM  Page 28

Содержание F115B

Страница 1: ...F115B LF115B OWNER S MANUAL U S A Edition LIT 18626 05 10 ...

Страница 2: ......

Страница 3: ...ecial precautions that must be taken to avoid damage to the outboard motor NOTE A NOTE provides key information to make procedures easier or clearer Yamaha continually seeks advancements in product design and quality Therefore while this manual contains the most current product information available at the time of printing there may be minor discrepancies between your machine and this manual If th...

Страница 4: ......

Страница 5: ...E CONTENTS GENERAL INFORMATION BASIC COMPONENTS OPERATION MAINTENANCE TROUBLE RECOVERY INDEX 1 2 3 4 5 6 READ THIS OWNER S MANUAL CAREFULLY BEFORE OPERATING YOUR OUTBOARD MOTOR EMU00003 ...

Страница 6: ......

Страница 7: ...otor serial number 1 1 Key number 1 1 EMISSION CONTROL INFORMATION 1 2 SAFETY INFORMATION 1 4 IMPORTANT LABELS 1 6 BASIC BOATING RULES 1 7 FUELING INSTRUCTIONS 1 11 Gasoline 1 12 Engine oil 1 12 BATTERY REQUIREMENT 1 13 PROPELLER SELECTION 1 14 START IN GEAR PROTECTION 1 15 1 2 3 4 5 6 ...

Страница 8: ...u in ordering spare parts from your Yamaha dealer or for reference in case your out board motor is stolen 1 Outboard motor serial number EMU00008 KEY NUMBER If a main key switch is equipped with the motor the key identification number is stamped on your key as shown in the illustration Record this number in the space provided for reference in case you need a new key 1 Key number 000318 q 000319 12...

Страница 9: ...n label New Technology 4 stroke EM Manufactured date label This label is attached to the clamp brack et 2 Manufactured date label EMISSION CONTROL INFORMATION ENGINE FAMILY THIS ENGINE CONFORMS TO 2001 U S EPA REGULATIONS FOR MARINE SI ENGINES THIS ENGINE CONFORMS TO 2001 CALIFORNIA EMISSION REGULATIONS FOR SI MARINE ENGINES REFER TO THE OWNERS MANUAL FOR MAINTENANCE SPECIFICATIONS AND ADJUSTMENTS...

Страница 10: ...nal carbureted two stroke engines These engines are equivalent to the U S EPA s 2006 stan dards for marine engines Two Stars Very Low Emission The two star label identifies engines that meet the Air Resources Board s 2004 exhaust emission standards Engines meeting these standards have 20 lower emissions than One Star Low Emission engines Three Stars Ultra Low Emission The three star label identifi...

Страница 11: ...lly Make sure there are no gas fumes or leaking fuel before starting the engine 8 This product emits exhaust gases which contain carbon monoxide a colorless odorless gas which may cause brain damage or death when inhaled Symptoms include nausea dizziness and drowsiness Keep cockpit and cabin areas well ventilated Avoid blocking exhaust outlets 8 Check throttle shift and steering for proper operati...

Страница 12: ...y organiza tions including the following United States Coast Guard Consumer Affairs Staff G BC Office of Boating Public and Consumer Affairs U S Coast Guard Headquarters Washington D C 20593 0001 Boating Safety Hotline 1 800 368 5647 National Marine Manufacturers Association NMMA 401 N Michigan Ave Chicago Il 60611 Marine Retailers Association of America 155 N Michigan Ave Chicago Il 60601 ...

Страница 13: ... during operation 8Keep hands hair and clothes away from flywheel and other rotating parts while engine is running 6A1 83625 41 Use only a counterclockwise rotation propeller with this engine Counterclockwise propellers are marked with a letter L after the size indication The wrong type of propeller could cause the boat to go in an unexpected direction which could lead to an accident 6K1 83623 41 ...

Страница 14: ...ccur unless both vessels try to avoid each other If that is the case both vessels become Give Way vessels EMU00015 BASIC BOATING RULES Rules of the road Just as there are rules which apply when you are driving on streets and high ways there are waterway rules which apply when you are driving your boat These rules are used internationally and are also enforced by the United States Coast Guard and l...

Страница 15: ...ssel This means that RULES WHEN ENCOUNTERING VESSELS There are three main situations which you may encounter with other vessels which could lead to a collision unless the Steering Rules are followed Meeting you are approaching another vessel head on Crossing you are traveling across the other vessel s path Overtaking you are passing or being passed by another vessel In the following illustration y...

Страница 16: ...nd orange boarders They signify speed zones restricted areas danger areas and general information the other vessel is expected to maintain its course and speed You must stay out of its way until you are clear of it Likewise if another vessel is passing you you should maintain your speed and direction so that the other vessel can steer itself around you OTHER SPECIAL SITUATIONS There are three othe...

Страница 17: ...ew old new old new LIGHTED BUOY Starboard Hand 2 4 6 Even number increasing toward head of naviga tion Leave to starboard right proceeding up stream White Light Red Light A LIGHTED SAFE WATER BUOY No number Marks midchannel pass on either side Letter has no lateral significance used for No number Topmost band red preferred Top Mark White Light White Light OR OR LIGHTED PREFERRED CHANNEL TO RB L RG...

Страница 18: ...tely with dry rags 8 Do not overfill the fuel tank 8 Tighten the filler cap securely after refueling 8 If you should swallow some gasoline inhale a lot of gasoline vapor or get gasoline in your eyes get immediate medical attention 8 If any gasoline spills onto your skin immediately wash with soap and water Change clothing if gasoline spills on it 8 Touch the fuel nozzle to the filler open ing or f...

Страница 19: ...it can cause fuel system damage or engine performance prob lems EMU01769 ENGINE OIL Recommended engine oil 4 stroke motor oil with a combination of corresponding SAE and API as shown in the chart EMU01804 GASOLINE If knocking or pinging occurs use a differ ent brand of gasoline or premium unlead ed fuel Engine oil quantity See Chapter 4 Specifications Recommended gasoline Regular unleaded gasoline...

Страница 20: ...used the electric system could perform poorly or be overloaded causing electric system damage For electric start models choose a battery which meets the following specifications EMU01860 EMU01787 NOTE The engine cannot be started if battery voltage is too low Minimum cold cranking amps CCA SAE 380 amps at 18 C 0 4 F Minimum marine cranking amps MCA ABYC 502 amps at 0 C 32 F Minimum reserve capacit...

Страница 21: ...dverse effect on the engine Yamaha outboard motors are fitted with propellers chosen to perform well over a range of applications but there may be uses where a propeller with a different pitch would be more appropriate For a greater operating load a smaller pitch propeller is more suitable as it enables the correct engine speed to be main tained Conversely a larger pitch pro peller is more suitabl...

Страница 22: ...uce the throttle setting to maintain the rpm in the proper operating range 1 Propeller diameter in inches 2 Propeller pitch in inches 3 Type of propeller propeller mark Refer to the section CHECKING PRO PELLER for instructions on propeller removal and installation 602014 13 x 17 K q w e 602015 15 K w e EMU01209 START IN GEAR PROTECTION Yamaha outboard motors or Yamaha approved remote control units...

Страница 23: ...ONS 2 2 Remote control 2 2 Trim tab 2 7 Power trim tilt switch 2 8 Digital tachometer 2 9 Digital speedometer 2 12 Fuel management meter 2 15 Tilt support lever 2 18 Top cowling lock levers 2 19 Flushing device 2 19 WARNING SYSTEM 2 20 Overheat warning 2 20 Low oil pressure warning 2 21 1 2 3 4 5 6 ...

Страница 24: ... levers 3 Engine oil drain bolt 4 Anti cavitation plate 5 Trim tab Anode 6 Propeller 7 Cooling water inlet 8 Anode 9 Flushing device 0 Power trim and tilt switch q Remote control box Side mount type w Remote control box Binnacle mount type e Switch panel For use with w r Digital speedometer t Digital tachometer y Fuel management meter May not be exactly as shown also may not be included as standar...

Страница 25: ...nted on the remote control box å Side mount remote control box Binnacle mount remote control box ç Switch panel for use with 1 Remote control lever 2 Neutral interlock trigger 3 Neutral throttle lever 4 Free accelerator 5 Main switch 6 Engine stop lanyard switch 7 Power trim tilt switch 8 Throttle friction adjusting screw 000322 w q e t y u i q r u u 702051 i ON START OFF ON START OFF t y 703022 A...

Страница 26: ...utral 2 Forward 3 Reverse 4 Shift 5 Fully closed 6 Throttle 7 Fully open EMU00099 Neutral Interlock Trigger To shift out of Neutral the neutral inter lock trigger of the remote control lever must first be pulled up EMU00100 Neutral Throttle Lever To open the throttle without shifting into either Forward or Reverse place the remote control lever in the Neutral posi tion and lift the neutral throttl...

Страница 27: ...nyard 2 should be attached to a secure place on the operator s cloth ing or arm or leg Should the operator fall overboard or leave the helm the lanyard will pull out the lock plate stopping igni tion to the engine This will prevent the boat from running away under power w 8 Attach the lanyard to a secure place on your clothing your arm or leg while operating 8 Do not attach the lanyard to clothing...

Страница 28: ...ividual engine switches are also on the control cover Pushing the switch UP trims the motor up then tilts the motor up Pressing the switch DN tilts the motor down and trims the motor down When the switch button is released the motor will stop in its current position NOTE 8 On the dual engine control the switch on the remote control grip controls both engines at the same time 8 Refer to the section...

Страница 29: ...utral position The free accelerator button will return automatically to its set position The remote control will then engage Forward and Reverse nor mally 1 Fully open 2 Fully closed 3 Free accelerator EMU01155 Throttle Friction Adjusting Screw A friction device in the remote control box provides adjustable resistance to move ment of the remote control lever and can be set according to operator pr...

Страница 30: ... tab has been installed or replaced to be sure steering is correct Be sure you have tightened the bolt after adjusting the trim tab 1 Trim tab 2 Bolt 3 Cap If equipped cC The trim tab also serves as an anode to protect the engine from electrochemical corrosion Never paint the trim tab as it will become ineffective as an anode Boat tends to veer The fin of trim tab To the left Turn to the left port...

Страница 31: ...n When the switch button is released the motor will stop in its current position w Use the power trim tilt switch located on the bottom engine cowling only when the boat is at a complete stop with the engine off Attempting to use the cowl ing mounted power trim tilt switch while the boat is moving could increase the risk of falling overboard and could distract the operator increasing the risk of c...

Страница 32: ...icator and the overheat warning indicator 1 Tachometer 2 Trim meter 3 Hour meter 4 Low oil pressure warning indicator 5 Overheat warning indicator 6 Set button 7 Mode button NOTE All segments of the display will light momentarily after the main switch is turned on and will return to normal there after EMU00136 Tachometer This meter shows the engine speed ...

Страница 33: ... EMU01620 Hour Meter his meter shows the number of hours the engine has been run It can be set to show the total number of hours or the number of hours for the current trip The display can also be turned on and off 8 Changing the display format Pressing the MODE button changes the display format in the following circular pattern Total hours Trip hours Display off 8 Resetting the trip hours Simulta...

Страница 34: ... not indicate the oil level in the engine Use the Oil Level Gauge to check the remaining oil quantity Refer to the section CHECKING THE ENGINE OIL LEVEL for details EMU01553 Overheat Warning Indicator If the engine temperature rises too high the warning indicator will start to blink Refer to OVERHEAT WARNING for details 1 Overheat warning indicator cC Do not continue to operate the engine if a war...

Страница 35: ...TE After the main switch is first turned on all portions of the meter come on as a check After a few seconds the meters will change to normal operation Watch the meter when turning on the main switch to make sure all segments come on EMU00141 Speedometer This meter shows the boat speed NOTE The speedometer displays km h mph or knots depending upon operator prefer ence Select the desired unit of me...

Страница 36: ...8 The trip distance is kept in memory by battery power The stored data will be lost if the battery is disconnected EMU01275 Clock This meter shows the current time Repeatedly push and release the mode button until the indicator on the face of the meter points to TIME To set the clock be sure the meter is in the TIME mode Press the set button the hour display will begin blinking Press the mode butt...

Страница 37: ...e fuel reading can be affected by the position of the sensor in the fuel tank and the attitude of the boat in the water Operation with bow up trim or continu ous turning can give false readings EMU00145 Warning indicator 8 Fuel warning If the fuel level decreases to one segment the fuel level warning segment 1 begins blinking 8 Low battery voltage warning If battery voltage drops the display 2 wil...

Страница 38: ... NOTE After the main switch is first turned on all portions of the meter come on as a check After a few seconds the meters will change to normal operation Watch the meter when turning on the main switch to make sure all segments come on EMU00147 Fuel Flow Meter The meter displays fuel flow within one hour at the rate of current engine opera tion If twin engines are installed on your boat the meter...

Страница 39: ...ter was last reset Repeatedly push and release the mode button until the indicator on the face of the meter points to total TTL To reset the total fuel consumption to 0 press the set and mode buttons together P S mpg Km L gph I h ECON SYNC TTL FUEL MANAGEMENT 000338 EMU01277 Fuel Economy This meter displays the distance per liter or gallon when cruising for reference use by the operator Repeatedly...

Страница 40: ...Yamaha digital speedometer and fuel management meter calculates speed miles traveled and fuel econo my by water movement at the stern of the boat This distance can vary greatly from the actual distance traveled because of water currents sea swells and the condition of the water speed sensor partially plugged or damaged 8 Individual engines may slightly vary in their fuel consumption due to manufac...

Страница 41: ...rt side engine speed is slightly higher 3 Engine speed is synchronized evenly between Port and Starboard side engines 4 Starboard side engine speed is slightly higher 5 Starboard side engine speed is higher NOTE If the two engines speeds are not syn chronized while cruising they can be syn chronized by adjusting trim angle or throttle EMU01207 Water Separator Warning Indicator If the water which h...

Страница 42: ...ing When replacing the cowl ing check to be sure it fits properly in the rubber seal Then lock the cowling again by moving the levers downward EMU01146 FLUSHING DEVICE This device 1 is used to clean the cooling water passages of the motor using a gar den hose and tap water NOTE Refer to Cleaning Cooling water Passages in Chapter 4 for instructions on usage ...

Страница 43: ...rning system has been activated stop the engine and check the water inlet for clogging NOTE In case of dual engine drive Should the overheat warning system of one engine operate it slows down and the buzzer sounds This will cause the other engine to slow down and the buzzer to sound For the other engine the warn ing system can be released by shifting the remote control lever into the neutral Warni...

Страница 44: ...it is safe to do so Check oil level and add oil as needed If the oil level is correct consult your Yamaha dealer cC Do not continue to run the engine if the low oil pressure lamp is ON Serious engine damage may occur Activation of Tiller Remote warning device control control model model Engine speed will automatically 1 decrease to about 2 000 3 500 r min The low oil pressure warning 1 indicator w...

Страница 45: ...NING IN ENGINE 3 4 PRE OPERATION CHECKS 3 5 Checking the engine oil level 3 6 Filling fuel 3 7 STARTING ENGINE 3 8 WARMING UP ENGINE 3 11 SHIFTING 3 12 STOPPING ENGINE 3 13 TRIMMING OUTBOARD MOTOR 3 14 TILTING UP DOWN 3 17 CRUISING IN OTHER CONDITIONS 3 19 Cruising in salt water 3 19 1 2 3 4 5 6 ...

Страница 46: ...irborne water spray while the boat is cruising Severe engine damage may result if the motor is operat ed continuously in the presence of air borne water spray NOTE During water testing check the buoyancy of the boat at rest with its maximum load Check that the static water level on the exhaust housing is low enough to pre vent water entry into the powerhead when water rises due to waves when the o...

Страница 47: ...peri ence and the specific boat motor com bination 8 Your dealer or other person experi enced in proper rigging should mount the motor If you are mounting the motor yourself you should be trained by an experienced person permanent mounted type 8 Your dealer or other person experi enced in proper outboard motor mounting should show you how to mount your motor portable type Mount the outboard motor ...

Страница 48: ... If the mounting height is too high cavitation tends to occur thus reducing the propulsion and if the pro peller tips cut the air the engine speed will rise abnormally and cause the engine to overheat If the mounting height is too low the water resistance will increase and thereby reduce engine efficiency Mount the engine so that the anti cavita tion plate is in alignment with the bottom of the bo...

Страница 49: ...ning in time 10 hours EMU00233 Run the engine under load in gear with a propeller installed as follows 1 For the first hour of operation Run the engine at 2 000 r min or at approximately half throttle 2 For the second hour of operation Run the engine at 3 000 r min or at approximately three quarter throttle and during this period run it at full throttle for approximately one minute every ten minut...

Страница 50: ...mage can occur EMU00208 Oil 8 Check the level of the oil in the sump with the dipstick If necessary add oil to bring the level up to the upper mark EMU00206 Fuel 8 Check to be sure you have plenty of fuel for your trip 8 Make sure there are no fuel leaks or gasoline fumes 8 Check fuel line connections to be sure they are tight 8 Be sure the fuel tank is positioned on a secure flat surface and that...

Страница 51: ...oose or damaged fasteners 8 Check the propeller for damage 8 Check that the battery is in good condi tion and battery connections are secure EMU01436 CHECKING THE ENGINE OIL LEVEL 1 Put the outboard motor in an upright position not tilted 2 Pull out the oil dipstick and wipe it clean 3 Completely re insert the dipstick and pull out it again 4 Check the oil level using the dipstick to be sure the l...

Страница 52: ...ged the amount of additives such as aromatics and oxy genates has increased These additives are important for the engines in passen ger cars but they can have detrimental effects in marine engines because of increased deposits in the combustion chamber When enough deposits collect piston rings begin sticking Performance drops and engine wear increases dramati cally While many additives available m...

Страница 53: ...pen flames and sparks while loosening the air vent screw 8 This product emits exhaust gases which contain carbon monoxide a col orless odorless gas which may cause brain damage or death when inhaled Symptoms include nausea dizziness and drowsiness Keep cockpit and cabin areas well ventilated Avoid blocking exhaust outlets 1 If there is an air vent screw on the fuel tank cap loosen it 2 or 3 turns ...

Страница 54: ... lock plate on the other end of the lanyard in the engine stop switch w 8 Attach the engine stop switch lanyard to a secure place on your clothing your arm or leg while operating 8 Do not attach the lanyard to clothing that could tear loose Do not route the lanyard where it could become entan gled preventing it from functioning 8 Avoid accidentally pulling the lanyard during normal operation Loss ...

Страница 55: ... Turn the main switch to START and hold it for a maximum of 5 sec onds 8 Immediately after the engine starts release the main switch to return it to ON cC 8 Do not turn the main switch to START when the engine is running 8 Do not keep the starter motor turning for more than 5 seconds The battery will rapidly become exhausted and it will be impossible for it to start the engine If the engine does n...

Страница 56: ...ause for the low oil pressure warning indicator cannot be found consult your Yamaha dealer 8 A continuous flow of water from the pilot hole shows that the water pump is pumping water through the cooling passages If water is not flowing out of the pilot hole at all times while the engine is running do not continue to run the engine Overheating and seri ous damage could occur Stop the engine and che...

Страница 57: ...r runs at low speeds EMU00264 FORWARD Pull up the neutral interlock trigger If equipped and move the remote control lever quickly and firmly from Neutral to Forward EMU00269 REVERSE w When operating in Reverse go slowly Do not open the throttle more than half Otherwise the boat may become unsta ble which could result in loss of control and an accident Pull up the neutral interlock trigger If equip...

Страница 58: ...tch to OFF 2 If there is a fuel joint or a fuel cock on the boat disconnect the fuel line or close the fuel cock after stopping the engine 3 Tighten the air vent screw on the fuel tank cap after stopping the engine if it is equipped 4 Remove the key if the boat will be left unattended NOTE The engine can also be stopped by pulling the lanyard and removing the lock plate from the engine stop lanyar...

Страница 59: ...at engine and propeller Correct trim is also affected by variables such as the load in the boat sea conditions and running speed w Excessive trim for the operating condi tions either trim up or trim down can cause boat instability and can make steering the boat more difficult This increases the possibility of an accident If the boat begins to feel unstable or is hard to steer slow down and or read...

Страница 60: ...tch located on the bottom engine cowling if equipped only when the boat is at a complete stop with the engine off The outboard motor trim angle can be adjusted operating the power trim tilt switch 1 To raise the bow trim out push the switch UP To lower the bow trim in push the switch DN Make test runs with the trim set to differ ent angles to find the position that works best for your boat and ope...

Страница 61: ...at is pushing the water and there is more air drag Excessive trim up can cause the propeller to ventilate which reduces performance further When trimmed out too much a boat may porpoise hop in the water which could throw the operator and pas sengers overboard EMU00283 Bow Down When the bow of the boat is down it is easier to accelerate from a standing start onto plane Too much trim in causes the b...

Страница 62: ... proce dures under STOPPING ENGINE Never tilt the motor while the engine is running Severe damage from overheating can result w Be sure all people are clear of the out board motor when adjusting the tilt angle also be careful not to pinch any body parts between the drive unit and engine bracket w Leaking fuel is a fire hazard Disconnect the fuel line or close the fuel cock if the engine will be ti...

Страница 63: ... you and support the engine w After tilting the engine be sure to sup port it with the tilt support lever Otherwise the engine could fall back down suddenly if oil in the power trim tilt unit should lose pressure 4 Once the engine is supported with the tilt support lever push the power trim tilt switch DOWN to retract the trim rods cC Be sure to retract the trim rods complete ly during mooring Thi...

Страница 64: ...er 3 Push the power trim tilt switch DN Down to lower the engine to the desired position EMU01030 CRUISING IN OTHER CONDITIONS CRUISING IN SALT WATER After operating in salt water wash out the cooling water passages with fresh water to prevent them from becoming clogged up with salt deposits NOTE Refer to cooling system flushing instruc tions in TRANSPORTING AND STORING OUTBOARD MOTOR ...

Страница 65: ... Checking fuel system 4 14 Inspecting fuel filter 4 15 Changing engine oil 4 16 Checking timing belt 4 18 Replacing fuse 4 19 Checking wiring and connectors 4 20 Exhaust leakage 4 20 Water leakage 4 20 Checking power trim and tilt system 4 20 Checking propeller 4 22 Changing gear oil 4 24 Inspecting and replacing anode s 4 26 Checking battery 4 27 Checking bolts and nuts 4 29 Cleaning cooling wate...

Страница 66: ... cranking amps MCA ABYC Min reserve capacity RC SAE 8Alternator output 8Starting carburetion system cm3 cu in mm in NGK mm in mm in mm in amps at 18 C 0 4 F amps at 0 C 32 F minutes V A W 4 stroke DOHC L4 1 741 106 24 79 0 88 8 3 11 3 50 TCI LFR6A 11 1 0 1 1 0 039 0 043 Remote control Electric start 0 17 0 23 0 007 0 009 0 31 0 37 0 012 0 015 380 502 124 12 25 Electronic Fuel Injection DRIVE UNIT ...

Страница 67: ...015 380 502 124 12 25 Electronic Fuel Injection 825 32 5 491 19 3 1 737 68 4 643 25 3 188 414 5 000 6 000 84 6 115 5 500 700 800 Forward Neutral Reverse 2 15 28 13 Power trim tilt KL Regular unleaded gasoline Minimum 86 4 stroke motor oil SE SF SG SH SJ 10W 30 10W 40 4 5 4 8 4 0 4 7 5 0 4 1 Hypoid gear oil SAE90 715 24 18 25 17 25 2 5 18 55 5 5 40 27 2 7 20 18 1 8 13 ...

Страница 68: ...ult your Yamaha dealer w 8 Never get under the lower unit while it is tilted even if a motor support bar is used Severe injury could occur if the outboard accidentally falls 8 USE CARE when transporting fuel tank whether in a boat or car 8 DO NOT fill fuel container to maximum capacity Gasoline will expand consid erably as it warms up and can build up pressure in the fuel container This can cause ...

Страница 69: ...Yamaha dealer prior to stor age However the following procedures can be performed by the owner with a minimum of tools cC 8 To prevent problems which can be caused by oil entering the cylinder from the sump keep the outboard motor upright when transporting and storing it If storing or transporting the out board motor on its side not upright put it on a cushion after draining the engine oil 8 Store...

Страница 70: ...to prevent the cooling system from clogging up with salt sand or dirt In addition fog ging of the engine is mandatory to pre vent expensive engine damage due to rust Perform the flushing and fogging at the same time w 8 Do not touch or remove electrical parts when starting or during operation 8 Keep hands hair and clothes away from flywheel and other rotating parts while engine is running EMU00342...

Страница 71: ... a Yamaha dealer EMU00349 Lubrication 1 Remove the spark plug s Spray a Yamaha Stor Rite Engine Fogging Oil into each cylinder for 5 seconds Grease the spark plug threads and reinstall the spark plug s and torque to proper specification Refer to the CLEANING AND ADJUSTING SPARK PLUG 2 Turn the engine over with the stop lanyard disconnected to work the fog ging oil into the piston rings 3 Change th...

Страница 72: ...x such as Yamaha Silicone Wax Part No ACC 11000 15 02 EMU00353 Battery Care w Battery electrolyte is poisonous and dan gerous causing severe burns etc It con tains sulfuric acid Avoid contact with skin eyes or clothing Antidote EXTERNAL Flush with water INTERNAL Drink large quantities of water or milk Follow with milk of mag nesia beaten egg or vegetable oil Call physician immediately EYES Flush w...

Страница 73: ...sconnect the black negative lead first to prevent the risk of shorting 2 Clean the battery casing and termi nals Fill each cell to the upper level with distilled water 3 Store the battery on a level surface in a cool dry well ventilated place out of direct sunlight 4 Once a month check the specific gravity of the electrolyte and recharge as required to prolong battery life 901015 UPPER LEVEL LOWER...

Страница 74: ...the emission control system must be performed by an authorized Yamaha marine dealership A service manual is available for purchase through a Yamaha dealer for owners who have the mechanical skills tools and other equipment necessary to perform maintenance not covered by this owner s manual EMU00356 REPLACEMENT PARTS If replacement parts are necessary use only genuine Yamaha parts or equiva lents o...

Страница 75: ...tion 4 22 Timing belt 3 Inspection Replacement 1 4 18 Battery Inspection Charge 1 4 27 Bolts Nuts 4 Retightening 1 1 4 29 Engine oil Change 4 16 Oil filter Change 1 Valve clearance 5 Inspection Adjustment 1 every 400 hours 2 years Thermostat Inspection 1 Interval Item Initial Every Refer page 10 hours 50 hours 3 months 100 hours 6 months 200 hours 1 year 1 If a portable fuel tank is equipped 2 The...

Страница 76: ...E 4 11 EMU00366 GREASING Yamaha marine grease Water resistant grease 000354 ...

Страница 77: ...air leak or carburetion problem in that cylinder Do not attempt to diagnose any problems yourself Instead take the outboard motor to a Yamaha dealer You should periodically remove and inspect the spark plug because heat and deposits will cause the spark plug to slowly break down and erode If electrode erosion becomes excessive or if carbon and other deposits are excessive you should replace the sp...

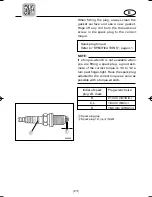
Страница 78: ...when you are fitting a spark plug a good esti mate of the correct torque is 1 4 to 1 2 a turn past finger tight Have the spark plug adjusted to the correct torque as soon as possible with a torque wrench 1 Spark plug gap 2 Spark plug I D mark NGK 903033 w q Spark plug torque Refer to SPECIFICATIONS page 4 1 Initial of spark Plug wrench size plug I D mark B 21 mm 13 16 in C L 16 mm 5 8 in D 18 3 mm...

Страница 79: ...m is found it should be repaired immediately by Yamaha dealer or other qualified mechan ic Checking points 8 Fuel system parts leakage 8 Fuel hose joint leakage 8 Fuel hose cracks or other damage 8 Fuel connector leakage w Leaking fuel can result in fire or explo sion 8 Check for fuel leakage regularly 8 If any fuel leakage is found the fuel system must be repaired by a qualified mechanic Improper...

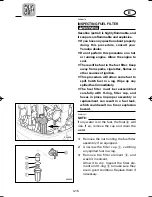
Страница 80: ... spill Catch fuel in a rag Wipe up any spilled fuel immediately 8 The fuel filter must be reassembled carefully with O ring filter cup and hoses in place Improper assembly or replacement can result in a fuel leak which could result in a fire or explosion hazard EMU01282 NOTE If any water is in the fuel the float 5 will rise If so remove the cup and drain the water 1 Remove the nut holding the fuel...

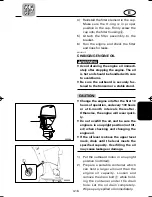
Страница 81: ... the engine oil 8 If the oil level is above the upper level mark drain until the level meets the specified capacity Overfilling the oil may cause leakage or damage 1 Put the outboard motor in an upright position not tilted 2 Prepare a suitable container which can hold a larger amount than the engine oil capacity Loosen and remove the drain bolt 1 while hold ing the container under the drain hole L...

Страница 82: ... possible 4 Remove the oil filler cap 2 Add the correct amount of oil through the filler hole Reinstall the filler cap 5 Start the engine and watch to make sure the low oil pressure warning lamp turns off Make sure that there are no oil leaks cC If the oil lamp does not turn off or if there are oil leaks stop the engine and find the cause Continued operation with a problem could cause severe engin...

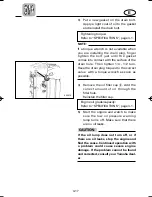
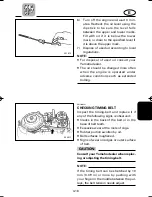
Страница 83: ... timing belt can be stretched by 10 mm 0 39 in or more by pushing with your finger in the middle between the pul leys the belt tension needs adjust 6 Turn off the engine and wait 3 min utes Recheck the oil level using the dipstick to be sure the level falls between the upper and lower marks Fill with oil if it is below the lower mark or drain to the specified level if it is above the upper mark 7 ...

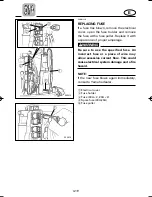
Страница 84: ...Replace it with a spare one of proper amperage w Be sure to use the specified fuse An incorrect fuse or a piece of wire may allow excessive current flow This could cause electrical system damage and a fire hazard NOTE If the new fuse blows again immediately consult a Yamaha dealer 1 Electrical cover 2 Fuse holder 3 Fuse 30A 2 20A 2 4 Spare fuse 30A 20A 5 Fuse puller ...

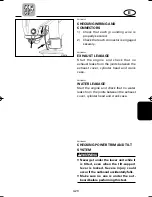
Страница 85: ... exhaust cover cylinder head and crank case EMU00385 WATER LEAKAGE Start the engine and check that no water leaks from the joints between the exhaust cover cylinder head and crank case EMU00993 CHECKING POWER TRIM AND TILT SYSTEM w 8 Never get under the lower unit while it is tilted even when the tilt support lever is locked Severe injury could occur if the outboard accidentally falls 8 Make sure ...

Страница 86: ...n the UP position Operate the tilt down switch briefly so the motor is supported the tilt support lever 5 Check that the tilt rod and trim rods are free of corrosion or other flaws 6 Activate the tilt down switch until the trim rods have gone completely into the cylinders 7 Activate the trim up switch until the tilt rod is fully extended Unlock the tilt support lever 8 Operate the motor to tilt do...

Страница 87: ...e OFF posi tion and remove the key and remove the lanyard from the engine stop switch Turn off the battery cut off switch if your boat has one 8 Do not use your hand to hold the pro peller when loosening or tightening the propeller nut Put a wood block between the cavitation plate and the propeller to prevent the propeller from turning EMU00390 Propeller Checking Point 8 Check each of the propelle...

Страница 88: ...y Otherwise the propeller could come off during operation and be lost 1 Apply Yamaha Marine grease or Corrosion resistant grease to the pro peller shaft 2 Install the thrust washer and propeller on the propeller shaft 3 Install the spacer and washer Tighten the propeller nut to the specified torque 4 Align the propeller nut with the pro peller shaft hole Insert a new cotter pin in the hole and ben...

Страница 89: ...d motor so that the oil drain plug is at the lowest point possi ble 2 Place a suitable container under the gear case 3 Remove the oil drain plug 1 NOTE The oil drain plug is magnetic Remove all metal particles from the plug before rein stalling it 4 Remove the oil level plug 2 to allow the oil to drain completely cC Inspect the used oil after it has been drained If the oil is milky water is get ti...

Страница 90: ... pres surized filling device inject the gear oil into the oil drain plug hole 6 When the oil begins to flow out of the oil level plug hole insert and tighten the oil level plug 7 Insert and tighten the oil drain plug Gear oil grade capacity Refer to SPECIFICATIONS page 4 1 000377 ...

Страница 91: ...acrificial anode s Check the anode s periodically Remove the scales from surfaces of the anode s For the inspection and replacement of the anode s consult a Yamaha dealer cC Do not paint the anode s for this would render it ineffective NOTE Remove the cover with anode after removing the bolts 1 when checking the anode condition ...

Страница 92: ...ush with water 8 EYES Flush with water for 15 minutes and get immediate medical attention Antidote INTERNAL 8 Drink large quantities of water or milk followed by milk of magnesia beaten egg or vegetable oil Get immediate medical attention Batteries also generate explosive hydro gen gas therefore you should always fol low these preventive measures 8 Charge batteries in a well ventilated area 8 Keep...

Страница 93: ...state of charge Installing a voltmeter will help you monitor your battery If you will not use the boat for a month or more remove the battery from the boat and store it in a cool dark place Completely recharge the battery before using it 3 If the battery will be stored for longer than a month check the specific grav ity of the fluid at least once a month and recharge the battery when it is low 901...

Страница 94: ...or the battery will not start the engine Connect the RED lead to the POSITIVE terminal first Then connect the BLACK lead to the NEG ATIVE terminal 1 Red lead 2 Black lead 3 Battery EMU01280 Disconnecting the Battery Disconnect the BLACK lead from the NEG ATIVE terminal first Then disconnect the RED lead from the POSITIVE termi nal EMU00408 CHECKING BOLTS AND NUTS 1 Check that bolts securing the cy...

Страница 95: ...e garden hose 3 4 When flushing is complete reinstall the garden hose connector 2 on the fitting 1 on the bottom cowling Tighten the connector securely cC Do not leave the garden hose connector loose on the bottom cowling fitting or let the hose hang free during normal opera tion Water will leak out of the connector instead of cooling the engine which can cause serious overheating Be sure the conn...

Страница 96: ...These paints can cause more rapid engine corrosion EMU00409 MOTOR EXTERIOR EMU00410 Cleaning the Outboard Motor After use wash the exterior of the out board with fresh water Flush the cooling system with fresh water NOTE Refer to Flushing Cooling System instruc tions in TRANSPORTING AND STORING OUTBOARD MOTOR EMU00412 Checking Painted Surface of Motor Check the motor for scratches nicks or flaking...

Страница 97: ...ROUBLE RECOVERY TROUBLESHOOTING 5 1 TEMPORARY ACTION IN EMERGENCY 5 5 Impact damage 5 5 Running single engine 5 5 Power trim tilt will not operate 5 6 Starter will not operate 5 7 Treatment of submerged motor 5 9 1 2 3 4 5 6 ...

Страница 98: ...ric overload and repair Replace fuse with one of correct amperage 4 Have serviced by a Yamaha dealer 5 Shift to neutral B Engine will not start Starter operates 1 Fuel tank empty 2 Fuel contaminated or stale 3 Fuel filter clogged 4 Starting procedure incorrect 5 Fuel pump malfunctions 6 Spark plug s fouled or incorrect type 7 Spark plug cap s fitted incorrectly 8 Poor connections or damaged igniti...

Страница 99: ...el joint connection incorrect 15 Battery lead disconnected 1 Inspect spark plug s Clean or replace with recommended type 2 Check for pinched or kinked fuel line or other obstructions in fuel system 3 Fill tank with clean fresh fuel 4 Clean or replace filter 5 Have serviced by a Yamaha dealer 6 Find and correct cause of warning 7 Inspect and adjust as specified 8 Check wires for wear or breaks Tigh...

Страница 100: ...ged 2 Propeller pitch or diameter incorrect 3 Trim angle incorrect 4 Motor mounted at incorrect height on transom 5 Warning system activated 6 Boat bottom fouled with marine growth 7 Spark plug s fouled or incorrect type 8 Weeds or other foreign matter tangled on gear housing 9 Fuel system obstructed 10 Fuel filter clogged 11 Fuel contaminated or stale 12 Spark plug gap incorrect 1 Have propeller ...

Страница 101: ...amaha dealer 15 Check and replace oil with specified type 16 Have serviced by a Yamaha dealer 17 Open the air vent screw 18 Have serviced by a Yamaha dealer 19 Connect correctly 20 Inspect spark plug and replace it with recommended type E Engine power loss F Engine vibrates excessively 1 Propeller damaged 2 Propeller shaft damaged 3 Weeds or other foreign matter tangled on propeller 4 Motor mounti...

Страница 102: ...ge is found or not return to the nearest harbor slowly and carefully 4 Have a Yamaha dealer inspect the outboard motor before operating it again 607011 5 5 001422 EMU00418 RUNNING SINGLE ENGINE Using only one of the engines in case of an emergency be sure to keep the unused one tilted up and operate the other engine at low speed cC If the boat is operated with one engine in the water but not runni...

Страница 103: ...wer trim and tilt because of a discharged battery or a failure with the power trim and tilt unit the engine can be tilted manually 1 Manual valve screw EMU00421 1 Loosen the manual valve screw coun terclockwise until it stops 2 Put the engine in the desired position then tighten the manual valve screw clockwise ...

Страница 104: ...oes not oper ate Make sure the remote control lever is in neutral Otherwise the boat could unexpectedly start to move which could result in an accident 8 Be sure no one is standing behind you when pulling the starter rope It could whip behind you and injure someone 8 An unguarded rotating flywheel is very dangerous Keep loose clothing and other objects away when starting the engine Use the emergen...

Страница 105: ...cy starter rope into the notch in the flywheel rotor and wind the rope clockwise 6 Pull the rope slowly until resistance is felt 7 Remove the rope from the flywheel temporarily 8 Rewind the rope approximately 3 4 of a turn clockwise 9 Give a strong pull straight out to crank and start the engine Repeat if necessary EMU01040 Emergency Starting Engine 1 Remove the top cowling 2 Remove the two bolts ...

Страница 106: ...he spark plug holes downward to allow any water mud or contami nants to drain 3 Drain the fuel from the carburetor fuel filter and fuel line Drain the engine oil completely 4 Fill the sump with the fresh engine oil as the same quantity as the engine oil capacity 5 Feed engine fogging oil or engine oil through the carburetor s and spark plug hole s while cranking the engine with the manual starter ...

Страница 107: ...E EMU00450 Chapter 6 INDEX INDEX 6 1 1 2 3 4 5 6 ...

Страница 108: ...al speedometer 2 12 Digital tachometer 2 9 Disconnecting the battery 4 29 E Emergency starting engine 5 8 Emission control information 1 2 Engine oil 1 12 Engine stop lanyard switch 2 4 Exhaust leakage 4 20 F Filling fuel 3 7 Filling fuel tank 4 5 Flushing cooling system and fogging engine 4 5 Flushing device 2 19 Flushing with the flushing attachment 4 5 Forward 3 12 Free accelerator 2 6 Fuel con...

Страница 109: ...gine 5 5 S Safety information 1 4 Shifting 3 12 Specification data 4 1 Speedometer 2 12 Start in gear protection 1 15 Starter will not operate 5 7 Starting engine 3 8 Stopping engine 3 13 Storing outboard motor 4 4 T Tachometer 2 9 Temporary action in emergency 5 5 Throttle friction adjusting screw 2 6 Tilt support lever 2 18 Tilting up down 3 17 Top cowling lock levers 2 19 Trailering outboard mo...

Страница 110: ...gistration records are checked 2 Read the Limited Warranty statement which follows these instructions This warranty applies to Yamaha outboard motors sold in the United States whether purchased sepa rately or when supplied as original equipment by a boat builder The terms also apply to original equipment packages sold in Canada with coverage provided by Yamaha Motor Canada see Warranty Guide for C...

Страница 111: ...ilable in one country may not be sold or serviced in the other 6 If you need any additional information about your Yamaha or warranty coverage which your dealer cannot provide please contact us directly Yamaha Motor Corporation U S A P O Box 6555 Cypress CA 90630 Attention Customer Relations Department Telephone No 714 761 7439 Fax No 714 761 7559 Yamaha Motor Canada Ltd 480 Gordon Baker Road Toro...

Страница 112: ...em 8 Power Trim and Tilt Assembly WARRANTY REGISTRATION To be eligible for warranty coverage the outboard motor must be registered with Yamaha Motor Corporation U S A Warranty registration can be accomplished by any authorized Yamaha Outboard Motor Dealer Upon receipt of the registration an Owner s Warranty Card will be sent by Yamaha to the registered purchaser OBTAINING REPAIRS UNDER WARRANTY To...

Страница 113: ...he warranty period A The customer s responsibility includes all costs of normal maintenance services non warranty repairs accident and collision dam ages Q What are some examples of abnormal strain neglect or abuse A These terms are general and overlap each other in areas Specific examples include Running the machine out of oil operating the machine with a broken or damaged part which causes anoth...

Страница 114: ...ation such as names addresses model engine serial number dates and receipts CHANGE OF ADDRESS The federal government requires each manufacturer of a motor vehicle to maintain a complete up to date list of all first purchasers against the possibility of a safety related defect and recall This list is complied from the purchase registrations sent to Yamaha Motor Corporation U S A by the selling deal...

Страница 115: ...ll receive service If you need more information about your warranty coverage or your Yamaha outside the U S A or Canada please contact an autho rized Yamaha dealer in your country 2 Keep a copy of your sales contract or invoice for the purchase of your Yamaha and present it if you need warranty repairs This document should show the date of purchase which is important evidence the repairing dealer ...

Страница 116: ......

Страница 117: ......

Страница 118: ...Printed in Japan April 2002 1 3 1 68V 28199 13 F115AET FL115AET E Printed on recycled paper ...

Страница 119: ...r au détail OUTBOARD MOTOR MODEL AND SERIAL NUMBER From I D label on clamp bracket MODÉLE ET NO DE SÉRIE DU MOTEUR HORS BORD sur l étiquette d identification de la presse de fixation For Dealer Use Only A l usage du concessionnaire YAMAHA DEALER NUMBER NO DU CONCESSIONNAIRE YAMAHA DEALER NAME NOM DU CONCESSIONNAIRE DATE SOLD DATE DE LIVRAISON OWNER S NAME NOM DU PROPRIÉTAIRE ADDRESS ADRESSE PHONE ...

Страница 120: ...PLACE POSTAGE HERE ATTN WARRANTY DEPARTMENT Warranty card 2 27 02 11 47 AM Page 2 ...

Отзывы: