background image

14

EMX62M

[80]

[80]

[90]

[100]

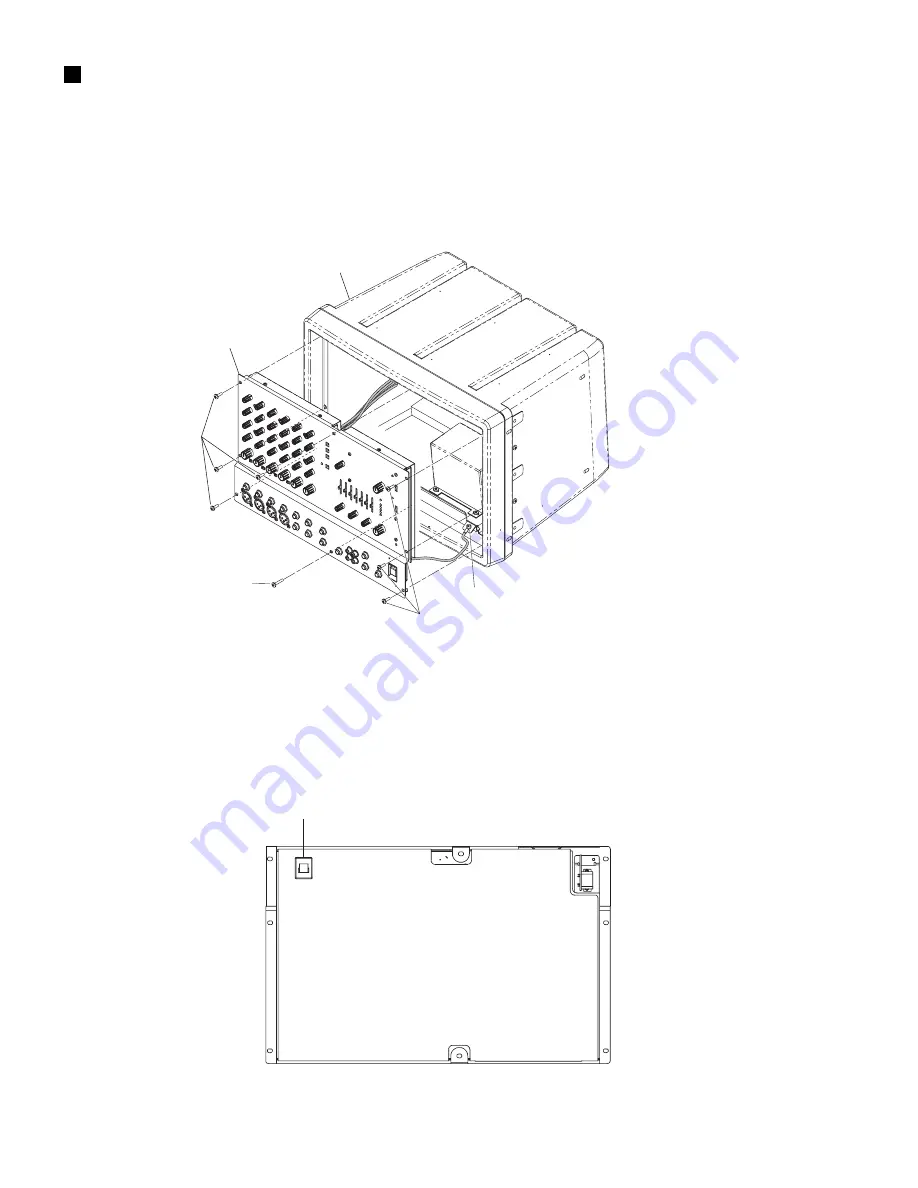
Body Assembly

Front Panel Assembly

 DISASSEMBLY PROCEDURE

1.

Front Panel Assembly
(Time required: about 3 min)

1-1.

Remove the seven (7) screws marked [80] and the
screw marked [90]. (Fig.1)

1-2.

Hold volume knobs and pull the panel to the front.
(Fig.1)

1-3.

Remove the screw marked [100]. The front panel
assembly can then be removed. (Fig.1)

(Fig. 1)

[80]: Bind Head Screw 4.0X12 MFZN2BL (VB132700)

[90]: Bind Head Screw 4.0X20 MFZN2BL (VB403600)

[100]: Bind Head Screw A4.0X8 MFZN2BL (VP156800)

(Fig. 2)

2.

MIX62 Circuit Board 1/2
(Time required: about 16 min)

2-1.

Remove the front panel assembly. (See Procedure 1)

2-2.

Remove the cable from the cord binder marked
[170]. (Fig.2)

[170]

[170]: Cord Binder TS-0708 KSS (VZ765100)

Содержание EMX62M

Страница 1: ...LAYOUT 7 CIRCUIT BOARD LAYOUT WIRING 10 DIMENSIONS 11 BLOCK LEVEL DIAGRAM 12 DISASSEMBLY PROCEDURE 14 LSI PIN DESCRIPTION 19 IC BLOCK DIAGRAM 20 CIRCUIT BOARDS 21 INSPECTION 29 OVERALL CIRCUIT DIAGRAM PARTS LIST EMX62M This document is printed on chlorine free ECF paper with soy ink OPTION RK 88 RACK MOUNT KIT ...

Страница 2: ...ng disassembly and parts replacement Recheck all work before you apply power to the unit WARNING CHEMICAL CONTENT NOTICE The solder used in the production of this product contains LEAD In addition other electrical electronic and or plastic where applicable components may also contain traces of chemicals found by the California Health and Welfare Agency and possibly other entities to cause cancer a...

Страница 3: ... gain 86 dB CH IN Lo Z to SPEAKERS OUT CH1 4 66 dB CH IN Lo Z to MAIN OUT MONITOR OUT CH1 4 66 dB CH IN Lo Z to EFFECT OUT CH1 4 48 dB CH IN Lo Z to REC OUT CH1 4 56 dB CH IN Hi Z to MAIN OUT MONITOR OUT CH1 4 26 dB LINE IN to MAIN OUT CH5 26 dB AUX IN to MAIN OUT 22 dB 2TR IN to MAIN OUT 46 dB Super Hi z IN to MAIN OUT CH6 Crosstalk at 1 kHz 65 dB adjacent input 65 dB input to output Input channe...

Страница 4: ... 1 2 10 kΩ 600Ω Line 22 dB 61 6 mV 10 dB 245 mV 20 dB 7 75 V Phone jack 3 3 Unbalanced 0 dB 0 775 Vrms 0 dBV 1 Vrms Super Hi Z IN CH6 1 2 470 kΩ 1kΩ 42 dB 6 16 mV 30 dB 24 5 mV 0 dB 0 775 V Phone jack 3 AUX IN 10 kΩ 600Ω Line 22 dB 61 6 mV 10 dB 245 mV 20 dB 7 75 V Phone jack 3 2TR IN 1 2 10 kΩ 600Ω Line 22 dBV 79 4 mV 10 dBV 316 mV 17 8 dBV 7 76 V Phono jack PHONE JACKS are unbalanced 0 dB 0 775 ...

Страница 5: ...5 EMX62M ...

Страница 6: ...6 EMX62M ...

Страница 7: ...EMX62M PANEL LAYOUT CONTROL PANEL 1 CONTROL SECTION Channel Control Equalizer HIGH LOW MONITOR control EFFECT control LEVEL control PAD switch CH1 4 Digital Effect EFFECT select switch ON switch indicator ...

Страница 8: ...control Peak Level Indicator LIMITER indicator MAIN MONITOR PHANTOM switch indicator YAMAHA SPEAKER PROCESSING POWER switch indicator EFFECT RTN control MASTER control PHANTOM ON OFF switch POWER ON OFF switch indicator 10 1 1 12 13 14 15 16 18 19 ON OFF switch 11 12 13 14 15 16 17 18 19 ...

Страница 9: ...UT terminal Super Hi Z CH6 EFFECT OUT terminal FOOT SW terminal INPUT TO MAIN terminal AUX IN INPUT TO MAIN terminal 2TR IN OUTPUT terminal REC OUT OUTPUT terminal MAIN OUTPUT terminal MONITOR OUTPUT terminal PHONES SPEAKERS 1 2 terminal AC IN socket 2 1 1 2 3 5 6 7 8 9 10 1 1 4 1 2 3 4 5 6 7 8 9 10 11 1 2 ...

Страница 10: ...04 CN101 Power Transformer AC INLET POWER ON OFF 1 2 3 Location Connector Assembly Remarks Parts No 1 MIX621 2 PWR1 3 2426 2426 14P L 700 V842610 2 PWR1 3 PWR2 3 B B2P V828330 3 PWR3 3 MIX622 2 PSW V8272900 6P 3P 3P 15P 15P MIX62 1 2 PWR 3 3 PWR 1 3 MIX62 2 2 MIX62 1 2 PWR 2 3 Power Transformer ...

Страница 11: ...11 EMX62M DIMENSIONS 305mm 481 5mm 448 5mm 327 6mm 62mm Front View Side View Front View with Rack Mount Adaptor ...

Страница 12: ... 1 2 LINE 1 AUX IN 2TR IN Super Hi Z 2 MUTE MIX62 1 2 3 1 2 3 4 1 2 3 4 1 2 3 4 1 2 3 4 1 2 3 4 1 2 3 4 1 2 3 4 IC101 201 SW401 IC301 2 6 3 5 1 7 3 1 IC302 3 1 IC303 5 7 IC303 IC507 SW501 SW503 SW101 102 SW201 202 3 1 IC404 6 7 IC401 6 7 IC401 2 1 IC IC102 202 IC301 IC302 5 IC403 6 7 9 11 13 15 16 25 27 A A ...

Страница 13: ... PHONES EFFECT OUT PWR 1 3 PWR 2 3 1 2 3 4 1 2 3 4 1 2 3 4 1 2 3 4 SW403 IC401 7 IC401 1 IC402 IC408 409 5 7 IC406 8 1 2 3 4 6 IC407 3 1 IC403 7 IC402 3 1 IC403 3 1 OUTPUT REC OUT CN501 14PIN CN101 14PIN W101RE1 W101RE2 W101BL1 W101BL2 38CA1 8822112 A A ...

Страница 14: ...the front Fig 1 1 3 Remove the screw marked 100 The front panel assembly can then be removed Fig 1 Fig 1 80 Bind Head Screw 4 0X12 MFZN2BL VB132700 90 Bind Head Screw 4 0X20 MFZN2BL VB403600 100 Bind Head Screw A4 0X8 MFZN2BL VP156800 Fig 2 2 MIX62 Circuit Board 1 2 Time required about 16 min 2 1 Remove the front panel assembly See Procedure 1 2 2 Remove the cable from the cord binder marked 170 F...

Страница 15: ...bs marked 60 the eight 8 knobs marked 70 and the eight 8 knobs marked 80 The mix62 circuit board 1 2 can then be removed Fig 4 Note When placing the front panel assembly on the table take care not to weight the MIX62 circuit board 2 2 Fig 5 70 60 80 50 40 40 40 40 40 60 70 90 A A 41 41 Fig 4 40 Screw 3X25 MFZNBL V3289800 41 Bonding Tapping Screw B 3 0X8 MFZN2BL VN413300 50 Knob GREEN M GRAY V62253...

Страница 16: ...b marked 110 The MIX62 circuit board 2 2 can then be removed Fig 6 2 Pull Pull Push Push Push Push MIX 2 2 90 110 90 110 Fig 6 2 4 Rear Panel Assembly Time required about 5 min 4 1 Remove the front panel assembly See Procedure 1 4 2 Remove the six 6 screws marked 60 and the two 2 screws marked 44 Fig 7 4 3 Hold the cord holder and pull the rear panel to the front to remove Fig 8 Note When reinstal...

Страница 17: ...ews marked 60 the screw marked 70 and the three 3 screws marked 80 The PWR circuit board 1 3 can then be removed Fig 9 Fig 9 30 Bind Head Screw SP 3 0X8 MFZN2Y EG330290 60 Bind Head Tapping Screw B 3 0X10 MFZN2BL EP600140 70 Bind Head Tapping Screw B 3 0X6 MFZN2BL EP600230 80 Bind Head Tapping Screw B 3 0X8 MFZN2BL EP600190 Fig 10 7 PWR Circuit Board 3 3 Time required about 6 min 7 1 Remove the re...

Страница 18: ...ee Procedure 4 8 2 Remove the four 4 screws marked 43 The power transformer can then be removed Fig 11 43 Bind Head Tapping Screw B 4 0X8 MFZN2BL EG340190 9 Front Frame Time required about 6 min 9 1 Remove the front panel assembly See Procedure 1 9 2 Remove the four 4 screws marked 50 to remove the handle assembly Fig 12 9 3 Remove the ten 10 screws marked 40 The front frame can then be removed Fi...

Страница 19: ...ce address 16 ICN I Initial clear 48 MA6 O 17 PRG I DC D 5V 49 MA7 O 18 MODE I Preset mode H DC 5V 50 MA12 O 19 VSS Ground 51 MA14 O 20 AVSS Ground 52 VSS Ground 21 CVA N C 53 MA10 O 22 AORL O N C 54 MA011 O 23 AORR O N C 55 MA09 O External RAM interface address 24 CHL I Sample hold capacitor connection 56 MA8 O 25 AIL I Lch ADC input 57 MA13 O 26 VDD DC D 5V 58 VDD DC D 5V 27 AIR I Rch ADC input ...

Страница 20: ...060M TE2 OP XM560A00 Quad Operational Amplifier MIX62 IC408 IC409 LB1423N XZ348A00 LED Driver D1 Constant Current Circuit 1 D2 2 D3 3 D4 4 GND 5 D5 6 Amp Output 7 IN 8 VCC 9 MIX62 IC406 TL072CPSR XV423A00 Dual Operational Amplifier 1 2 3 4 V 8 7 6 5 Output A V Non Inverting Input A DC Voltage Supply DC Voltage Supply Output B Inverting Input B Non Inverting Input B Inverting Input A NJM4558MT 1 IG...

Страница 21: ...COMPONENT SIDE 22 MIX62 1 2 CIRCUIT BOARD PATTERN SIDE 24 PWR 1 3 CIRCUIT BOARD COMPONENT SIDE 26 PWR 2 3 CIRCUIT BOARD COMPONENT SIDE 28 PWR 3 3 CIRCUIT BOARD COMPONENT SIDE 28 MIX62 2 2 CIRCUIT BOARD COMPONENT SIDE 28 MIX62 2 2 CIRCUIT BOARD PATTERN SIDE 28 ...

Страница 22: ...ONITOR EFFECT LEVEL PAD HIGH LOW MONITOR EFFECT LEVEL PAD HIGH LOW MONITOR EFFECT LEVEL HIGH LOW MONITOR EFFECT LEVEL HIGH LOW MONITOR EFFECT LEVEL PAD Hi Z Low Z Hi Z Low Z Hi Z Low Z Hi Z Low Z Super Hi Z 1 Super Hi Z 2 LINE 1 LINE 2 EFFEC FOOT SW O SMALL HA LARGE HA VOCAL A A ...

Страница 23: ...2 REC OUT 1 REC OUT 2 PHONES MAIN MONITOR POWER 6 3 0 5 10 YAMAHA SPEAKER PROCESSING ON OFF ON OFF GRAPHIC EQUALIZER EFFECT RTN EFFECT RTN AUX IN 2TR IN MASTER MASTER ON SMALL HALL LARGE HALL VOCAL PHAMTOM A A to PWR1 3 CN101 Component side 3NA V826700 1 ...

Страница 24: ...24 EMX62M MIX62 1 2 Circuit Board A A ...

Страница 25: ...25 EMX62M A A Pattern side ...

Страница 26: ...26 EMX62M PWR 1 3 Circuit Board to PWR2 3 W101RE2 to PWR2 3 W101BL2 to MIX62 CN501 A A ...

Страница 27: ...27 EMX62M Component side 3NA V826840 to Power Transformer A A ...

Страница 28: ...1 3 W101BL1 to PWR 1 3 W101RE1 AC IN to Power Tranceformer to MIX62 2 2 CN001 ON OFF to PWR 3 3 1Pin W102YE 2Pin Non Connect 3Pin W102BR PWR 3 3 Circuit Board MIX62 2 2 Circuit Board Component side PWR 2 3 3NA V826840 1 PWR 3 3 3NA V826840 1 PMIX62 2 2 3NA V826700 1 ...

Страница 29: ...e should be 150Ω Connect the load of 10kΩ to MAIN OUT MONITOR OUT EFFECT OUT and REC OUT terminal and connect the load of 40Ω to PHONES OUT Set each control as follows CH INPUT 1 4 EQ HIGH LOW level control CENTER MONITOR level control MAX EFFECT level control MAX LEVEL control MAX PAD switch OFF CH INPUT 5 6 EQ HIGH LOW level control CENTER MONITOR level control MAX EFFECT level control MAX LEVEL...

Страница 30: ...he table If the frequency variation is within 20 of the rated value the rusult can be regarded as OK Table 2 4 1 unit dB EQ VR Setting INPUT FREQUENCY RANGE OF VARIATION HIGH MAX 10kHz 12 2 MIN 12 2 LOW MAX 100Hz 12 2 MIN 12 2 2 5 GEQ Response Characteristic Check On condition of 2 1 set the GEQ faders to MIN or MAX and mesure the output levels of MAIN OUT and MONITOR OUT Then confirm that output ...

Страница 31: ...nput channels to minimum Set the MASTER control of MAIN and MONITOR to maximum or minimum and mesure the noise level of MAIN OUT MONITOR OUT and EFFECT OUT Then confirm that the noise levels are less than the values shown in the table 2 10 1 Table 2 10 1 unit dBs MASTER VR MAIN OUTPUT L R MONITOR OUTPUT EFFECT OUT MAX 71 71 73 MIN 88 88 2 11 PHANTOM Check Connect the 2 7kΩ load between the pin1 an...

Страница 32: ...minal and confirm that the output level for 20Hz 20kHz signal are within 1 3dB from the level for 1kHz signal YAMAHA SPEAKERS PROCESSING Switch ON Apply 70Hz 26dB signal into input terminal and confirm that the output level is within 6 5 2dB from the level for 1kHz input with YAMAHA SPEAKERS PROCESSING switch OFF Besides confirm that the LED lights up when YAMAHA SPEAKERS PROCESSING switch is ON a...

Страница 33: ...al until output level is saturated and confirm that the protection circuit works and the relay does not open Apply 1Hz Vp p 6V 8 7dBs signal and confirm that the protection circuit starts to work in 2 seconds to cut off the signal Stop applying the input signal and confirm that the system automatically resumes in 5 seconds 3 10 PC LIMITER Circuit and LIMITER Circuit Check Connect 1Ω 5 100W load an...

Страница 34: ...34 EMX62M ...

Страница 35: ...35 EMX62M ...

Страница 36: ...36 EMX62M ...

Страница 37: ...37 EMX62M ...

Страница 38: ...38 EMX62M ...

Страница 39: ... 5 EMX62M P 1 MIX62 1 2 OP AMP OP AMP OP AMP OP AMP OP AMP OP AMP OP AMP to P 2 B 1 From P 3 F 2 to P 3 B 2 to P 3 B 5 to P 3 B 4 From P 4 G 3 From P 4 G 3 From P 4 G 4 to P 2 G 5 38CC1 8822116 2 1 EMX62M OVERALL CIRCUIT DIAGRAM 1 5 MIX62 1 2 1 4 ...

Страница 40: ...M EMX62M EMX62M EMX62M P 2 OP AMP OP AMP OP AMP OP AMP OP AMP OP AMP OP AMP From P 1 B 5 From P 4 G 3 From P 4 G 4 to P 3 B 2 to P 3 B 5 to P 3 B 4 From P 4 G 3 From P 1 H 5 38CC1 8822116 3 1 EMX62M CIRCUIT DIAGRAM 2 5 MIX62 1 2 2 4 ...

Страница 41: ...P AMP OP AMP OP AMP OP AMP From P 1 H 4 to P 1 G 3 From P 4 G 3 From P 4 G 3 to P 4 G 2 From P 4 G 3 From P 4 G 4 From P 2 G 4 From P 4 G 5 From P 1 H 4 From P 2 G 4 From P 4 G 5 to P 1 G 4 From P 2 G 4 From P 1 H 4 to P 4 B 4 to P 2 G 5 to P 4 G 3 38CC1 8822116 4 1 EMX62M CIRCUIT DIAGRAM 3 5 MIX62 1 2 3 4 ...

Страница 42: ... DSP SRAM 256K OP AMP OP AMP to P 3 B 4 From P 3 B 4 to P 3 B 3 to P 3 G 5 to P 2 G 2 to P 1 G 5 to P 3 G 5 to P 2 G 1 to P 1 G 5 to P 3 G 2 to P 3 G 2 to P 2 G 5 to P 1 G 4 From P 3 G 3 38CC1 8822116 5 1 38CC1 8822116 5 1 3P to PWR3 3 W102BR 1P to PWR3 3 W102YE to PWR1 3 CN101 EMX62M CIRCUIT DIAGRAM 4 5 MIX62 1 2 4 4 ...

Страница 43: ...PUT 2 COMMON 3 INPUT PWR1 3 IC103 NJM7915FA XD854A00 REGULATOR 15V 1 2 3 1 OUTPUT 2 INPUT 3 COMMON PWR1 3 IC104 NJM7805FA XJ607A00 REGULATOR 5V 1 2 3 1 OUTPUT 2 COMMON 3 INPUT PWR1 3 IC105 D3SBA60 V8151400 DIODE STACK 4 0A 600V PWR1 3 D140 1SS133 1SS176 HSS104 VD631600 DIODE 1 2 1 ANODE 2 CATHODE PWR1 3 D101 105 110 111 124 MTZ J 5 1B 5 1V VG437400 ZENER DIODE 1 ANODE 2 CATHODE 2 1 PWR1 3 D106 107...

Страница 44: ...rts The mark in the remarks column indicates that these parts are interchangeable The second letter of the shaded part number is O not zero The second letter of the shaded part number is I not one Note DESTINATION ABBREVIATIONS A Australian model M South African model B British model O Chinese model C Canadian model Q South east Asia model D German model T Taiwan model E European model U U S A mod...

Страница 45: ...2 EMX62M OVERALL ASSEMBLY 10 40 60 42 41 70 80 90 100 140 43 50 B40 B120 B110 B10 B40 B40 B30 B50 B60 B20 B80 B90 B70 B130 44 44 110 ...

Страница 46: ...Code Insulation Sheet BODY ASSEMBLY Body Assembly Body Assembly Sub Front Frame Sub Handle Assembly Bind Head Tapping Screw P Bind Head Screw Side Plate Bind Head Screw Side Plate Bind Head Screw Shield Sheet Reinforcement Plate Bind Head Screw ACCESSORIES AC Cord AC Cord AC Cord AC Cord Speaker Cable Set J U H A J COM J U H A FORTE B62 UL CSA AS A CE 4 0X8 MFZN2BL 4 0X8 MFZN2BL 4 0X12 MFZN2BL 4 0...

Страница 47: ...4 EMX62M FRONT PANEL ASSEMBLY 120 170 30 100 110 140 130 41 40 10 160 20a 150 70 60 80 50 60 70 80 90 20b ...

Страница 48: ...B Knob Knob Knob Knob Bind Head Screw Escutcheon Power Switch Power Switch Knob Connector Assembly Wiring Assembly Bind Head Screw Shield Plate Bind Head Tapping Screw B Cord Binder J COM MIX62 1 2 MIX62 2 2 NEW NIFCO BL 3X25 MFZNBL 3 0X8 MFZN2BL GREEN M GRAY L GRAY M GRAY BLUE M GRAY L GRAY D GRAY 3 0X8 MFZN2BL MX12 4 MX12 4 2426 2426 14P 700L GND A4 0X8 MFZN2BL 3 0X6 MFZN2BL TS 0708 KSS V833170 ...

Страница 49: ...6 EMX62M REAR PANEL ASSEMBLY 120 90 170 180 80 80 60 30 60 20a 20b 20c 70 110 10 50 50 40 100 100 ...

Страница 50: ...cuit Board Circuit Board Circuit Board Circuit Board Circuit Board Circuit Board Bind Head Screw Support Insulation Sheet Bind Head Tapping Screw B Bind Head Tapping Screw B Bind Head Tapping Screw B Bind Head Tapping Screw B Bonding Tapping Screw B Holder Cord Bind Head Tapping Screw B Bind Head Screw Angle Bracket AC Inlet J U H A J U H A PWR B62 1 4 PWR B62 1 4 PWR B62 2 4 PWR B62 2 4 PWR B62 4...

Страница 51: ...amic Capacitor chip Ceramic Capacitor chip Ceramic Capacitor chip Ceramic Capacitor chip Ceramic Capacitor chip Electrolytic Cap Electrolytic Cap Ceramic Capacitor chip Ceramic Capacitor chip Electrolytic Cap LLM Electrolytic Cap LLM Electrolytic Cap Electrolytic Cap Ceramic Capacitor chip Ceramic Capacitor chip Electrolytic Cap Ceramic Capacitor chip Ceramic Capacitor chip Ceramic Capacitor chip ...

Страница 52: ...itor Ceramic Capacitor chip Ceramic Capacitor chip Ceramic Capacitor chip Ceramic Capacitor chip Ceramic Capacitor chip Ceramic Capacitor chip Electrolytic Cap Electrolytic Cap Ceramic Capacitor chip Ceramic Capacitor chip Ceramic Capacitor chip Ceramic Capacitor chip Ceramic Capacitor chip Ceramic Capacitor chip Ceramic Capacitor chip Ceramic Capacitor chip Electrolytic Cap Electrolytic Cap Elect...

Страница 53: ...ramic Capacitor chip Mylar Capacitor Mylar Capacitor Ceramic Capacitor chip Ceramic Capacitor chip Ceramic Capacitor chip Ceramic Capacitor chip Ceramic Capacitor chip Ceramic Capacitor chip Ceramic Capacitor chip Ceramic Capacitor chip Ceramic Capacitor chip Ceramic Capacitor chip Ceramic Capacitor chip Ceramic Capacitor chip Ceramic Capacitor chip Electrolytic Cap Mylar Capacitor Mylar Capacitor...

Страница 54: ...one Jack Phone Jack Phone Jack Phone Jack Phone Jack Phone Jack Pin Jack Phone Jack Phone Jack Ferrite Bead Ferrite Bead LED LED LED LED LED LED LED LED LED LED Transistor chip Transistor chip Transistor chip 10 00 25 0V 0 1000 25V Z 3300P 50V J 100P 50V J 0 1000 25V Z 0 1000 25V Z 1 00 50 0V 0 1000 25V Z VH 3P SE M2426XX 14P TE 1SS355 TE 17 1SS355 TE 17 1SS355 TE 17 1SS355 TE 17 ZJSR5101 223TA NJ...

Страница 55: ...or chip Carbon Resistor chip Carbon Resistor chip Carbon Resistor chip Carbon Resistor chip Carbon Resistor chip Carbon Resistor chip Carbon Resistor chip Carbon Resistor chip Carbon Resistor chip Carbon Resistor chip Carbon Resistor chip Carbon Resistor chip Carbon Resistor chip Carbon Resistor chip Carbon Resistor chip Carbon Resistor chip Carbon Resistor chip Carbon Resistor chip Carbon Resisto...

Страница 56: ...Resistor chip Carbon Resistor chip Carbon Resistor chip Carbon Resistor chip Carbon Resistor chip Carbon Resistor chip Carbon Resistor chip Carbon Resistor chip Carbon Resistor chip Carbon Resistor chip Carbon Resistor chip Carbon Resistor chip Carbon Resistor chip Carbon Resistor chip Carbon Resistor chip Carbon Resistor chip Carbon Resistor chip Carbon Resistor chip Carbon Resistor chip Carbon R...

Страница 57: ...r chip Carbon Resistor chip Carbon Resistor chip Carbon Resistor chip Carbon Resistor chip Carbon Resistor chip Carbon Resistor chip Carbon Resistor chip Carbon Resistor chip Carbon Resistor chip Carbon Resistor chip Carbon Resistor chip Carbon Resistor chip Carbon Resistor chip Carbon Resistor chip Carbon Resistor chip Carbon Resistor chip Carbon Resistor chip Carbon Resistor chip Carbon Resistor...

Страница 58: ...Variable Resistor Rotary Variable Resistor Rotary Variable Resistor Rotary Variable Resistor Rotary Variable Resistor Rotary Variable Resistor Rotary Variable Resistor Rotary Variable Resistor Rotary Variable Resistor Rotary Variable Resistor Rotary Variable Resistor Rotary Variable Resistor Rotary Variable Resistor Rotary Variable Resistor Rotary Variable Resistor Rotary Variable Resistor Rotary ...

Страница 59: ...olyester Film Cap Polyester Film Cap Electrolytic Cap Electrolytic Cap Ceramic Capacitor E Ceramic Capacitor E Ceramic Capacitor F Monolithic Ceramic Cap Monolithic Ceramic Cap Ceramic Capacitor F Ceramic Capacitor F Electrolytic Cap Electrolytic Cap Electrolytic Cap Electrolytic Cap Electrolytic Cap Electrolytic Cap Electrolytic Cap Electrolytic Cap Electrolytic Cap Electrolytic Cap Electrolytic ...

Страница 60: ...use Fuse Fuse Fuse Fuse Fuse Fuse IC IC IC IC Phone Jack Phone Jack Coil Coil Ferrite Bead Ferrite Bead Coil Positive Thermistor Transistor Transistor Transistor Transistor Digital Transistor Transistor Transistor Transistor Transistor Transistor Transistor Transistor Transistor Transistor Transistor Transistor Pair Transistor Pair Transistor Pair Transistor Pair Transistor Transistor 0 0022 500 M...

Страница 61: ...Resistor Carbon Resistor Carbon Resistor Metal Film Resistor Carbon Resistor Carbon Resistor Flame Proof C Resistor Flame Proof C Resistor Carbon Resistor Carbon Resistor Carbon Resistor Carbon Resistor Flame Proof C Resistor Flame Proof C Resistor Metal Film Resistor Metal Film Resistor Flame Proof C Resistor Flame Proof C Resistor Flame Proof C Resistor Flame Proof C Resistor Flame Proof C Resis...

Страница 62: ...101a W102 VV315400 V3225000 V8272900 XW440A00 XW442A00 XY532A00 XY533A00 Relay Connector Assembly Ferrite Core Connector Assembly Power Transformer Power Transformer Power Transformer Power Transformer DC OSA SH 224DM3M B B2P FR25 15 12 D40 PSW UL CSA AS A CE V828330 U A J H 06 03 15 15 15 15 ...

Страница 63: ...20 EMX62M RK 88 RACK MOUNT KIT 10 20 REF NO PART NO DESCRIPTION REMARKS QTY RANK VB132700 RACK MOUNT KIT Bind Head Screw Rack Angle 4 0X12 MFZN2BL RK 88 V840830 01 10 20 6 2 RANK Japan only New Parts ...

Отзывы: