124
Chapter 10—Control Room Monitoring
DM1000 Version 2—Owner’s Manual
1 Press the MONITOR [DISPLAY] button repeatedly until the Monitor | C-R/TB
page appears.
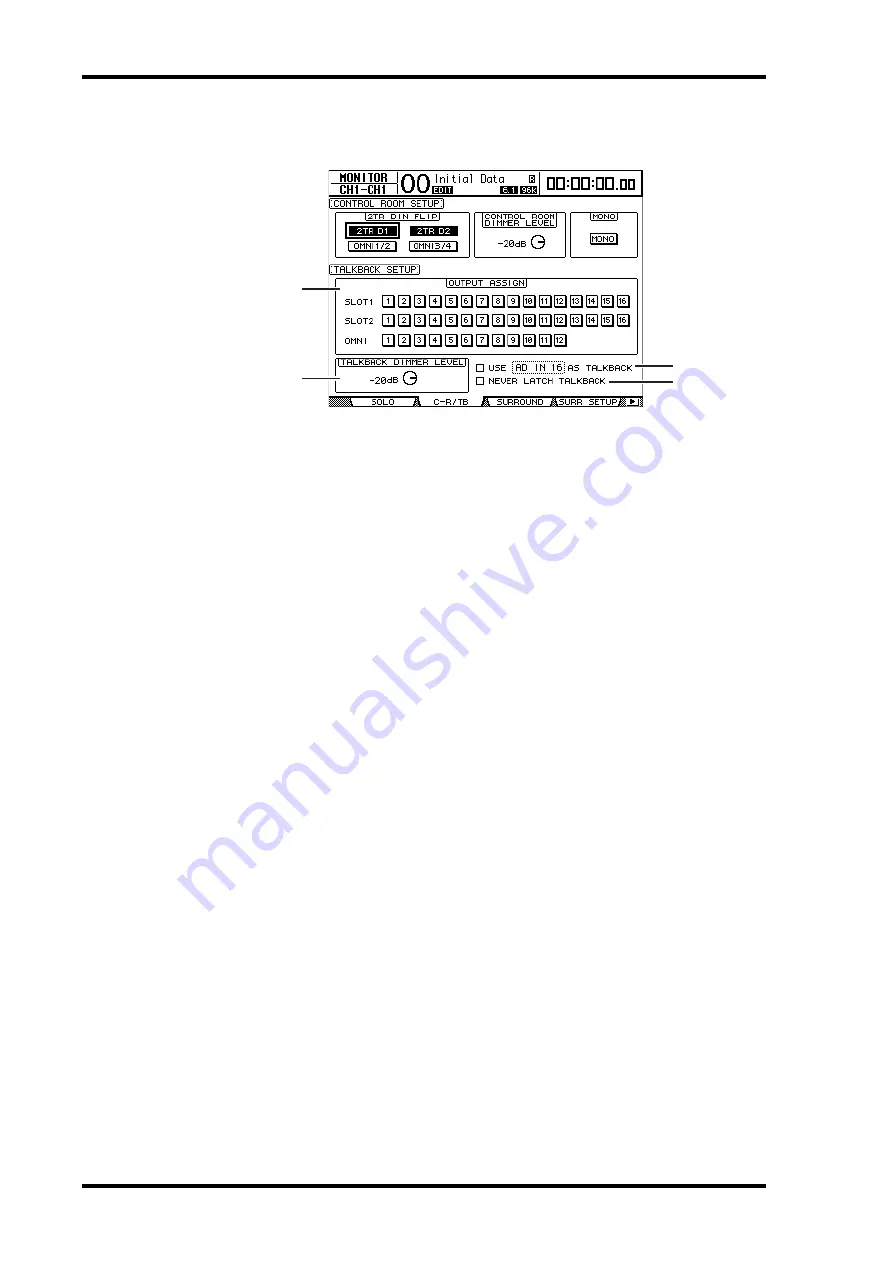
This page contains the following parameters:
A
OUTPUT ASSIGN section
The buttons in this section enable you to assign the Talkback mic signal to the desired
outputs. (You can select multiple destinations.)
B
TALKBACK DIMMER LEVEL
When the Talkback function is active, this parameter determines the amount of attenu-
ation applied to the Control Room monitor signals. The amount of attenuation can
range from 0 dB to –96 dB.
C
USE ..... AS TALKBACK check box
Checking this box enables you to select an AD Input or slot input channel signal speci-
fied in the parameter box as the Talkback signal source.
D
NEVER LATCH TALKBACK check box
If this check box is checked, the Talkback function is enabled only while you are holding
down the [TALKBACK] button. When you release the button, the Talkback function
turns off. If the check box is unchecked, the Talkback function remains effective after
you press and release the [TALKBACK] button.
2 Move the cursor to the number button of an output channel to which you
wish to assign the Talkback signal in the OUTPUT ASSIGN section, then press
the [ENTER] button to highlight the channel number.
3 If you wish to operate the [DIMMER] button during Talkback communica-
tion, move the cursor to the TALKBACK DIMMER LEVEL control and rotate
the Parameter wheel or press the [INC]/[DEC] buttons to set the amount of
attenuation.
4 Press the [TALKBACK] button.
The Talkback function is enabled.
By default, pressing and releasing the [TALKBACK] button once enables the Talkback func-
tion. Press the button again to turn off the function. If you press and hold down the [TALK-
BACK] button for more than 300ms, the Talkback function is enabled as long as you hold
down the button, and the function is turned off when you release the button.
However, if you have checked the NEVER LATCH TALKBACK check box on the Monitor |
Talkback page, the Talkback function remains effective only while you are pressing and
holding down the button.
3
4
1
2
Содержание DM 1000
Страница 42: ...42 Chapter 3 Operating Basics DM1000 Version 2 Owner s Manual ...
Страница 52: ...52 Chapter 4 Connections and Setup DM1000 Version 2 Owner s Manual ...
Страница 92: ...92 Chapter 7 Bus Outs DM1000 Version 2 Owner s Manual ...
Страница 108: ...108 Chapter 8 Aux Sends DM1000 Version 2 Owner s Manual ...
Страница 146: ...146 Chapter 11 Surround Functions DM1000 Version 2 Owner s Manual ...
Страница 214: ...214 Chapter 16 Automix DM1000 Version 2 Owner s Manual ...
Страница 385: ...DM1000 Block Diagram ...


