background image

CP4 STAGE/CP40 STAGE Owner’s Manual

15

Setting Up

Setting Up

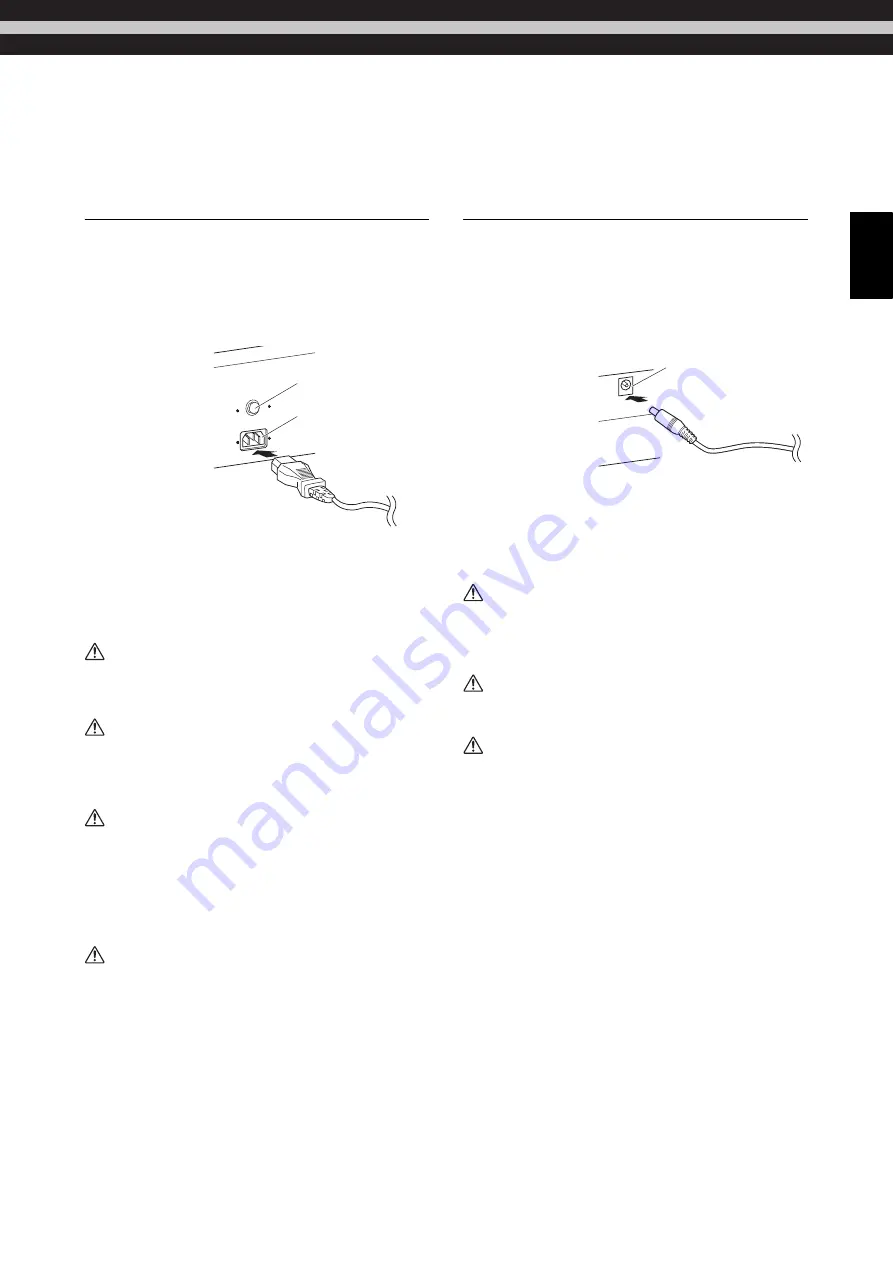
Power Supply

CP4 STAGE

1

Ensure that the [

P

] (Power) switch on the 

rear panel is set to the Off (

N

) position.

2

Insert the appliance end of the bundled 
power cord (see below) into the [AC IN] jack, 
also on the rear panel.

3

Plug the other end of the power cord into a 
domestic-use, AC wall outlet.

NOTE

Carry out this procedure in reverse order when 
disconnecting the power cord.

WARNING

Use only the AC power cord supplied with your stage piano. 
The use of an inappropriate replacement can lead to 
overheating or electric shock.

WARNING

The power cord supplied with your stage piano must not be 
used with other electrical equipment. Failure to observe this 
precaution can result in the equipment being damaged or 
lead to the outbreak of fire.

WARNING

Make sure your CP4 STAGE meets the voltage requirement 
for the country or region in which it is being used. The power 
cord includes a grounding pin to prevent electrical shock 
and damage to the equipment. When connecting to an outlet, 
connect the adaptor’s ground lead to the ground screw. If 
you are unsure how to make this connection, contact your 
Yamaha dealer or service center.

CAUTION

The stage piano remains charged and draws a small amount 
of power even when the [

P

] (Power) switch is set to the Off 

position. If it will not be used for an extended period of time, 
therefore, be sure to unplug the power cord from the wall 
outlet.

CP40 STAGE

1

Ensure that the [

P

] (Standby/On) switch on 

the rear panel is set to the Standby (

N

position.

2

Connect the DC power cord from the bundled 
power adaptor (see below) to the DC IN jack 
on the rear panel.

3

Plug the adaptor’s AC power cord into a 
domestic-use, AC wall outlet.

NOTE

Carry out this procedure in reverse order when 
disconnecting the power adaptor.

WARNING

Be sure to use only the power adaptor supplied with your 
stage piano. Use of a different adaptor is inherently 
dangerous and may result in equipment damage, 
overheating, or the outbreak of fire.

WARNING

Make sure your CP40 STAGE meets the voltage requirement 
for the country or region in which it is being used. 

CAUTION

The stage piano remains charged and draws a small amount 
of power even when the [

P

] (Standby/On) switch is set to the 

Standby position. If it will not be used for an extended period 
of time, therefore, be sure to unplug the power adaptor from 
the wall outlet.

[

P

] switch

[AC IN] jack

DC IN jack

Содержание CP4 Stage

Страница 1: ...EN Owner s Manual STAGE PIANO ...

Страница 2: ... We sincerely believe that our products and the pro duction methods used to produce them meet these goals In keeping with both the letter and the spirit of the law we want you to be aware of the following Battery Notice This product MAY contain a small non rechargeable battery which if applicable is soldered in place The average life span of this type of battery is approx imately five years When r...

Страница 3: ...old type batteries Some of these may be rechargeable Make sure that the battery being charged is a rechargeable type and that the charger is intended for the battery being charged When installing batteries never mix old batteries with new ones and never mix different types of batteries Batteries MUST be installed cor rectly Mismatches or incorrect installation may result in overheating and battery...

Страница 4: ...his instrument contains no user serviceable parts Do not open the instrument or attempt to disassemble or modify the internal components in any way If it should appear to be malfunctioning discontinue use immediately and have it inspected by qualified Yamaha service personnel Do not expose the instrument to rain use it near water or in damp or wet conditions place on it any containers such as vase...

Страница 5: ...connecting the instrument to other electronic components turn off the power for all components Before turning the power on or off for all components set all volume levels to minimum Be sure to set the volumes of all components at their minimum levels and gradually raise the volume controls while playing the instrument to set the desired listening level Do not insert a finger or hand in any gaps on...

Страница 6: ...ally available data including but not limited to MIDI data and or audio data is strictly prohibited except for your personal use This product incorporates and bundles computer programs and contents in which Yamaha owns copyrights or with respect to which it has license to use others copyrights Such copyrighted materials include without limitation all computer software style files MIDI files Wave d...

Страница 7: ...pdf files on the accompanying CD Owner s Manual this booklet This Owner s Manual describes how to set up your CP4 STAGE or CP40 STAGE and perform basic operations This is the document you should read first when you start playing and using the instrument Reference Manual pdf document The Reference Manual describes the design of the CP4 STAGE and CP40 STAGE and all of the parameters that may be set ...

Страница 8: ...ased navigation in particular are extremely useful functions available only with digital type documents The most recent version of Adobe Reader can be downloaded from the following web page http www adobe com products reader Latest firmware version Yamaha may from time to time update product firmware and the other associated software without prior notice We recommend that you check our web site fo...

Страница 9: ...any versatile effects such as choruses and flangers also built in you can easily create a rich tapestry of different sounds for your stage performances Weighted hammer action 88 key keyboards that feel just like the real thing The CP4 STAGE and CP40 STAGE employ an 88 key keyboard with a weighted hammer action design that is virtually indistinguishable from an actual piano The CP4 STAGE also featu...

Страница 10: ...Contrast 18 Basic Operations Display Content 19 Cursor Types Operations 19 Changing Setting Values 19 Displaying Menus Making Selections 20 Changing Panes 20 Entering Text 20 Exiting from the Current Screen 20 Performances 21 Parts Within a Performance 21 Changing Performances Voices 21 Quick Start Guide 22 Playing Voices 22 Layering Voices 24 Splitting the Keyboard for Left and Right Hands 25 Pra...

Страница 11: ... Audio Files 36 File Operations Using a USB Flash Memory Device 39 Configuring Utility Settings for the Overall System 41 Using with a Computer 44 Using with a Portable Music Player 45 Using with Other MIDI Devices 45 Appendix 48 Shift Functions 48 On screen Messages 49 Troubleshooting 51 Specifications 54 Index 55 ...

Страница 12: ...each of the Parts 7 SLIDER FUNCTION button page 28 Use this button to change the parameter currently assigned to the Part sliders 6 Each time you press this button the assigned parameter will change and the indicator lights to its left will turn on and off to show the current assignment 8 METRONOME button page 27 Use this button to toggle the metronome on and off 9 AUDIO PLAY REC buttons pages 35 ...

Страница 13: ...ge 19 Use these buttons to increase or decrease the value indicated by the on screen cursor in single units B PERFORMANCE PLAY SELECT button page 30 Use this button to open the screen for selecting Performances C PANEL LOCK button page 42 Use this button to toggle the Panel Lock function on and off When on control panel operations will be deactivated D SHIFT button page 48 Use this button in combi...

Страница 14: ...er audio equipment so that its output can be mixed with that of the stage piano NOTE To balance the volumes of the stage piano and the connected audio equipment adjust the output volume of the latter 9 TO HOST USB terminal page 44 Use this terminal to connect your stage piano to the USB terminal of a computer using a USB cable TO DEVICE USB terminal page 39 Use this terminal to connect a USB flash...

Страница 15: ...unsure how to make this connection contact your Yamaha dealer or service center CAUTION The stage piano remains charged and draws a small amount of power even when the P Power switch is set to the Off position If it will not be used for an extended period of time therefore be sure to unplug the power cord from the wall outlet CP40 STAGE 1 Ensure that the P Standby On switch on the rear panel is se...

Страница 16: ...ould be made via the UNBALANCED L MONO and R OUTPUT jacks on the rear panel If you would prefer to monitor your playing using a single keyboard amplifier or powered speaker the UNBALANCED L MONO OUTPUT jack should be used Output via a mixer It is commonplace for musical instruments to be connected to a mixer in recording and live performance environments In addition to the unbalanced jacks mention...

Страница 17: ...SIGNABLE FOOT SWITCH jack so that various functions can be assigned to it This allows you to control the assigned parameter by foot NOTE Refer to the Reference Manual pdf for details on how to assign a parameter to an FC4 or FC5 Foot Switch Foot controllers Used to control an assigned parameter an FC7 Foot Controller sold separately is connected via the 1 and 2 FOOT CONTROLLER jacks on the CP4 STA...

Страница 18: ...ff the stage piano Be sure therefore to store your work before it does so If the stage piano s AutoOff parameter is set to off that setting will be retained when you import system data that was saved externally regardless of the Auto Power Off setting contained in that data If however a specific Auto Power Off time has been set using the AutoOff parameter and system data is imported the Auto Power...

Страница 19: ...lso be used to display menu items and to move between panes on screens containing more than one Changing Setting Values Data Dial The Data Dial can be turned clockwise to increase values and vice versa In addition when adjusting parameters with a wide range of possible settings you can turn the Data Dial with the SHIFT button held down to increase or decrease in units of 10 1 NO and 1 YES buttons ...

Страница 20: ...ion to move between panes Entering Text When editing parameters supporting text input such as the name of a Performance first use the l and r buttons to move the flashing cursor to the character you wish to change You can then change the character at that position using the 1 NO and 1 YES buttons or the Data Dial Exiting from the Current Screen You can press the EXIT button to move one step back i...

Страница 21: ...t Voices can be assigned to them page 25 NOTE On the CP40 STAGE the SPLIT LAYER Part can be used as either a LAYER or SPLIT Part Changing Performances Voices Voices are linked to Performances that is to say when you select a new Performance the Voices for all Parts will change In addition if you select a Part and change its Voice that change will be reflected in the current Performance see the ill...

Страница 22: ... center of the control panel to select a Voice from the current category NOTE You can also use the 1 NO and 1 YES buttons to change the Voice 3 Play the keyboard to hear how the selected Voice sounds 4 Repeat Steps 1 to 3 above to audition a range of different Voices Tip Quick Reset function The procedures described in this section assume that the stage piano has just been turned on in its default...

Страница 23: ...ntially selects the same Part The SPLIT LAYER Part can be used as either a LAYER or SPLIT Part The on screen cursor will move to the LAYER Part to confirm that it is currently selected NOTE You can use the l r u and d buttons on this screen to move the cursor R and change the Part whose Voice is to be selected Only Parts that are currently turned on will be shown Tip Setting your favorite Voices T...

Страница 24: ...of layered Voices If necessary you can use the following procedure to adjust the individual volumes of the MAIN and LAYER Parts 1 Press the SLIDER FUNCTION button on the left of the control panel as many times as required to turn on the VOLUME light to its left 2 As you play the keyboard adjust each Part s volume as appropriate by moving the slider underneath its Part button Move the slider up to ...

Страница 25: ... SPLIT Part s Voice which is assigned to the left of the keyboard NOTE To change the MAIN Part s Voice using the Voice Category buttons and the Data Dial first move the cursor R to that Part using the u button Tip Creating layered sounds by simultaneously pressing Voice Category buttons You can conveniently create layered sounds by pressing and holding one Voice Category button and then pressing a...

Страница 26: ... the volume and vice versa Changing the MAIN Part volume CP4 STAGE Changing the SPLIT Part volume CP40 STAGE NOTE Each Part has its own slider On the CP40 STAGE the slider on the left corresponds to the SPLIT LAYER Part and also changes the setting when that Part is being used as a LAYER Part Removing Voice splitting To remove a split Voice press the SPLIT button once again The button s light will...

Страница 27: ...ct a different Performance while the metronome is playing therefore its tempo time signature volume and the like will change to reflect the new Performance s settings NOTE The metronome will stop playing automatically whenever you execute a File function page 39 The metronome will be temporarily silenced if you store the current Performance while it is playing Tip Supported Part configurations Pla...

Страница 28: ...ameter levels for individual Parts and are located underneath the corresponding Part buttons Using these sliders you can conveniently adjust Part volumes and effect levels as you play The SLIDER FUNCTION button can be used to set the sliders to control of the corresponding Parts volume chorus send or reverb send levels NOTE On the CP40 STAGE the slider on the left corresponds to the SPLIT LAYER Pa...

Страница 29: ...liders control the Low LowMid Mid HighMid and High bands while the three on the CP40 STAGE control the Low Mid and High bands Regardless of which slider you operate the current gain levels for all will be displayed on screen Pedals Refer to Connecting Pedals on page 17 Raising or Lowering the Pitch of Keyboard Notes and TRANSPOSE buttons Using the and TRANSPOSE buttons you can shift the pitch of k...

Страница 30: ... you turn on the instrument in its default condition the first Performance No 001 will be loaded Why not take a moment now to select and play other Performances using the following procedure 1 Press the PERFORMANCE PLAY SELECT button The Performance Select screen will be displayed and the button will start to flash Performance Select screen NOTE The Parts currently turned on are shown at the right...

Страница 31: ...The Common Edit menu will be displayed 3 Use the u button to select 01 Chorus Effect and then press the ENTER button The Chorus Effect screen will be displayed 4 Use the l and r buttons and the Data Dial to select a category and a type for the chorus effect Tip Changing Performances directly using the Voice Category buttons If you press the PERFORMANCE PLAY SELECT button with the SHIFT button held...

Страница 32: ...or each of a Performance s Parts Two are available for use in a Performance each containing two independent effects A and B As an example of setting parameters in the Performance Part Edit area the following procedure describes how to configure these effects for one of the current Performance s Parts 1 Ensure that the Part for which you wish to configure insertion effects is turned on i e its Part...

Страница 33: ...o suit a specific need you can adjust these parameters if necessary To do so press the d button to move to the screen s other panes 10 When you have finished setting Insertion Effect A press the EXIT button The Part Edit menu will again be displayed 11 Use the d button to select 04 Effect B and then press the ENTER button The Effect B screen will be displayed 12 Use the l and r buttons and the Dat...

Страница 34: ...ttons NOTE If the EffA BSw parameter Effect A B Part Switch is set to off for a Part insertion effects cannot be applied to it by pressing the A and B PART EFFECT buttons You can turn on the Effect A B Part Switch as follows Select the Part in question press EDIT select 02 Part and press ENTER select 01 Play Mode and press ENTER set EffA BSw to on On the CP4 STAGE the EffA BSw parameter can be tur...

Страница 35: ... to increase the playback volume in order to maintain a suitable balance Accordingly these characters should not be removed 5 If necessary use the d button to move to the screen s other panes and set the tempo time signature click sound and other metronome parameters for recording Move the cursor R to any parameter you wish to modify using the l and r buttons and then change the setting using the ...

Страница 36: ...yed using the stage piano must be located in the root directory of the USB flash memory device The directory initially displayed when you open the USB flash memory device on a computer or the like Your stage piano only supports the playback of 44 1 kHz 16 bit stereo audio files in WAV format 2 Press the J Stop button The first pane of the Audio Playback screen will be displayed 3 Ensure that the c...

Страница 37: ...Starting and stopping audio playback using a foot switch With an FC4 or FC5 Foot Switch connected via the ASSIGNABLE FOOT SWITCH jack you can make the following setting in order to start and stop playback of audio files using the foot switch Press UTILITY select 03 Controller press ENTER set FS Foot Switch Control Number to 98 Play Stop Tip Using the Key on Start function As described below your s...

Страница 38: ...ng with USB flash memory devices With a USB flash memory device plugged into your stage piano you can use it to save data that you have created on the instrument play audio files that it contains and perform a number of other related tasks Supported number of USB flash memory devices Only one USB flash memory device can be connected to your stage piano at any time Formatting USB flash memory devic...

Страница 39: ... USB flash memory device will be formatted NOTICE Do not remove a USB flash memory device from the TO DEVICE USB terminal while it is being formatted Failure to observe this precaution can lead to the USB flash memory device or the stage piano being permanently damaged When the USB flash memory device has been formatted the message Completed will be displayed and the instrument will then return to...

Страница 40: ...directory contains an All type file it will be displayed on screen NOTE If no All type file exists in the USB flash memory device s root directory the instrument will display the message File not found instead of the Load screen The directory initially displayed when you open the USB flash memory device on a computer or the like 4 Ensure that the cursor R is located at the File parameter select th...

Страница 41: ...s an effect applied just before the stage piano s sound is output in order to compress high volumes and smooth out differences in loudness Using the following procedure you can configure the master compressor to suit the environment in which the stage piano is played 1 Press the UTILITY button The Utility menu will be displayed 2 Use the u and d buttons to select 04 MasterComp and then press the E...

Страница 42: ...4 STAGE or foot controller CP40 STAGE NOTE Functions assigned to a foot switch or foot controller will remain active when the PANEL LOCK button is on If you try to operate a locked controller while the PANEL LOCK button is on the message Panel Locked will be displayed and the button will flash briefly Panel locking will always be disabled when the stage piano is turned on Changing lockable control...

Страница 43: ...will be displayed 2 Use the d button to select 07 Job and then press the ENTER button The Utility Job menu will be displayed 3 Use the u button to select 01 FactorySet and then press the ENTER button The Factory Set screen will be displayed 4 Set the PowerOn Auto parameter to off and then press the ENTER button The following confirmation message will be displayed before executing the Factory Set f...

Страница 44: ...Install the USB MIDI driver on your computer For instructions refer to the Installation Guide included in the downloaded driver package When asked to connect the TO HOST USB terminal on your instrument to the computer using a USB cable do so as shown at the top right 3 Setup your stage piano to allow MIDI data to be exchanged via the TO HOST USB terminal This setting can be made as follows on the ...

Страница 45: ...ules to the stage piano via its IN and OUT MIDI terminals This type of connection allows you to exchange MIDI data with these devices In addition to the two built in MIDI terminals the TO HOST USB terminal can also be used to exchange MIDI data However it is not possible to exchange MIDI messages via the MIDI terminals and the TO HOST USB terminal at the same time You will need to select which int...

Страница 46: ...one parameters refer to the Reference Manual pdf 9 Hold down the SHIFT button and press the d button to jump to the corresponding pane for other zones Repeat Steps 6 to 8 for all required zones 10 When you have finished setting zones press the EXIT button the required number of times The Performance screen will be displayed 11 For each zone configured to play another device set the MIDI receive ch...

Страница 47: ...rformance have the following fixed MIDI receive channels CP4 STAGE MAIN Part 1 LAYER Part 2 SPLIT Part 3 CP40 STAGE MAIN Part 1 SPLIT LAYER Part 2 In order to control your stage piano s tone generator using another MIDI device you will need to set its MIDI transmit channel to one of the above stage piano receive channels as appropriate For details on how to do this refer to the owner s manual that...

Страница 48: ...fect screen from the Performance Common Edit area NOTE You can also execute this function by pressing and holding the REVERB button SHIFT MASTER COMP Display the MasterComp screen from the Utility area NOTE You can also execute this function by pressing and holding the MASTER COMP button SHIFT PART EFFECT A Display the Effect A screen from the Performance Part Edit area NOTE You can also execute t...

Страница 49: ...ce has been set for a Voice Category button File already exists This message is displayed if a file with the same name as the one you are about to save already exists File not found This message is displayed if no file of the selected type exists Hold to lock unlock This message is displayed if a Panel Lock operation was not successful Be sure to press and hold the PANEL LOCK button for the requir...

Страница 50: ... from 001 to 999 To proceed either delete one or more of these files or rename them using a different naming format System memory crashed This message is displayed if a problem occurs while writing data to the instrument s internal memory Transmitting MIDI bulk This message is displayed while your stage piano is busy transmitting MIDI bulk data USB connection terminated This message is displayed i...

Страница 51: ...een set to an excessively low level Select Volume using SLIDER FUNCTION operate the Part sliders Ensure that Part buttons are not turned off A Part will not produce any sound when its button is turned off i e its light is not lit If a required Part is off press its Part button and verify that it lights up Review your effect and filter settings and ensure that they are appropriate In particular no ...

Страница 52: ...Ensure that note shift and detune parameters for each Part are set to 0 Select the Part in question press EDIT select 02 Part and press ENTER select 01 Play Mode and press ENTER set NoteShft and Detune to 0 Effects cannot be heard Ensure that the CHORUS and REVERB SYSTEM EFFECT buttons A and B PART EFFECT buttons and the MASTER COMP button are turned on as required If any of these buttons is off i...

Страница 53: ...e Press UTILITY select 02 MIDI and press ENTER confirm or change the device number using DevNo If you are having trouble receiving data ensure that the device number setting is identical to that used when transmitting the data Press UTILITY select 02 MIDI and press ENTER set the device number using DevNo Data cannot be saved on the connected USB flash memory device Ensure that the USB flash memory...

Страница 54: ...n Controllers Pitch bend wheel Modulation wheel Part slider 3 MASTER VOLUME dial Data Dial MASTER EQUALIZER slider 5 Pitch bend wheel Modulation wheel Part slider 2 MASTER VOLUME dial Data Dial MASTER EQUALIZER slider 3 Display 40 characters 2 lines Character LCD with back light Connectors UNBALANCED L MONO and R OUTPUT jacks standard mono phone BALANCED L and R XLR OUTPUT jacks PHONES jack stereo...

Страница 55: ...DC IN jack 14 Delete 37 Displaying menus 20 E EDIT button 13 31 33 46 Edit symbol 32 Effects 34 ENTER button 13 Entering text 20 EXIT button 13 20 F Factory Set 43 Favorite Voice 23 FILE button 13 39 40 File operations 39 FOOT CONTROLLER jack 14 17 Foot controllers 17 Foot switches 17 Format 39 H Headphones 16 I IN and OUT MIDI terminals 14 Insertion effects 32 K Key on Start 37 L LAYER button 12 ...

Страница 56: ...d button 12 35 Recording 35 Rename 37 Restoring initial settings 43 Reverb effect 31 S Save 39 SHIFT button 13 SLIDER FUNCTION button 12 24 26 28 32 Speakers 16 SPLIT button 12 25 SPLIT Part 21 Split point 26 SPLIT LAYER Part 21 Splitting 25 26 J Stop button 12 36 37 Store 30 STORE button 13 30 34 41 42 43 Storing a Performance 34 SUSTAIN FOOT SWITCH jack 14 17 Sustain 17 P switch 14 15 T TO DEVIC...

Страница 57: ...se documents will cause this warranty to be void This warranty covers only the Original Owner and is not transferable In Order to Obtain Warranty Service Warranty service will only be provided for defective products within the Warranted Area Contact your local authorized YAMAHA dealer who will advise you of the procedures to be followed If this is not successful contact YAMAHA at the address telep...

Страница 58: ...ay cause undesired operation See user manual instructions if interference to radio reception is suspected FCC DoC IMPORTANT NOTICE FOR THE UNITED KINGDOM Connecting the Plug and Cord WARNING THIS APPARATUS MUST BE EARTHED IMPORTANT The wires in this mains lead are coloured in accordance with the fol lowing code GREEN AND YELLOW EARTH BLUE NEUTRAL BROWN LIVE As the colours of the wires in the mains...

Страница 59: ......

Страница 60: ...S G Digital Musical Instruments Division 2013 Yamaha Corporation 307MWTO A0 Printed in Japan ZF97610 Yamaha Web Site English only http www yamahasynth com Yamaha Downloads http download yamaha com ZF97610 ...

Отзывы: