background image

File

60

CP1 Owner’s Manual

Reference

File

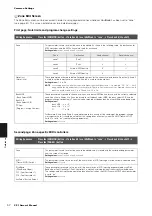
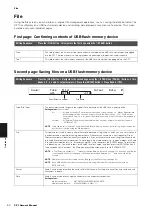
Using the File screen, you can perform a range of file management operations, such as saving the entire content of the 
CP1 User Memory on a USB flash-memory device and restoring data previously saved on such a device. This screen 
extends over seven individual pages. 

First page: Confirming contents of USB flash-memory device

Second page: Saving files on a USB flash-memory device

Editing Sequence:

Press the [FILE] button 

 Navigate to the first page using the [

L

PAGE] button

Free

This field displays the amount of free space currently available on the USB flash-memory device plugged 
into the CP1. The free memory is also displayed as a percentage of the device’s overall capacity.

Total

This field displays the total memory capacity of the USB flash-memory device plugged into the CP1. 

Editing Sequence:

Press the [FILE] button 

 Navigate to the second page using the [

L

PAGE] and [PAGE

R

] buttons 

 Turn 

Knobs 2, 3, 5, and 6 to set parameters 

 Press the [ENTER] button 

 Press Knob 4 [

YES

]

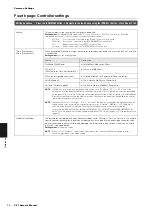
Type (File Type)

This parameter is used to specify the type of file to be saved on the USB flash-memory device. 

Setting values:

 all or external

all..................All data for the User Performance memory and system settings (i.e., Master Equalizer and 

Utility settings) will be saved as a single file with the file extension “.C1A”. The External 
Performance memory is not part of the User Memory and will not, therefore, be included in 
this file. 

external ........All External Performance memory data will be saved as a single file (with the file name 

“EXTBANK.C1E”).

NOTE

Type

 can be set to “external” only when the USB flash-memory device’s root directory is specified as the 

destination for saving using the 

File

 parameter. 

File

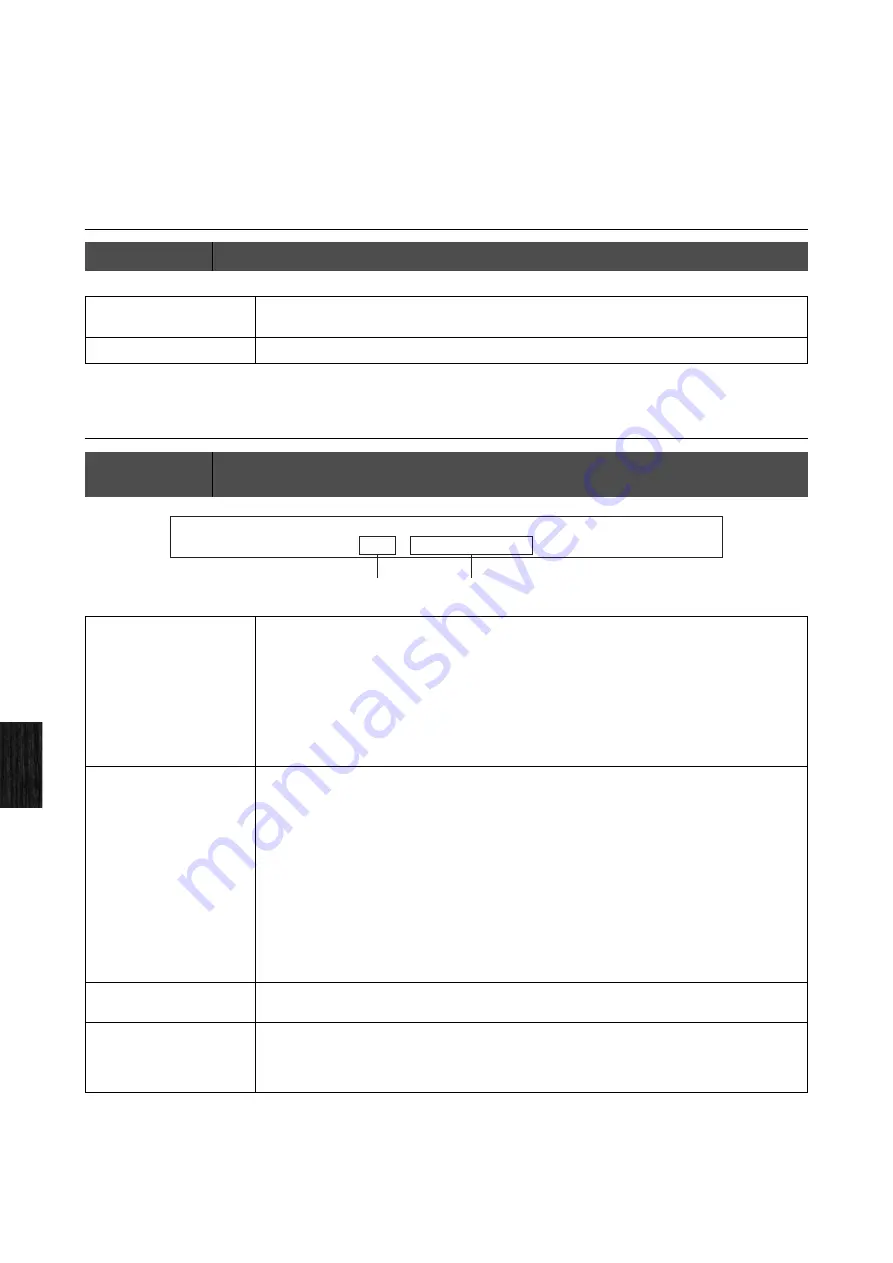
This parameter is used to specify where files are to be saved. Using Knobs 5 and 6, you can set a file name 
in order to create a new file for saving memory data. Whenever you save data, a new sequential File or 
Directory number will be automatically assigned to it. If you wish to overwrite an existing file with new data, 
turn Knob 3 to select the file in question. To move down into a subdirectory (i.e., to open a folder), turn Knob 
3 to select that subdirectory (i.e., “

directory name

|DIR”), and then press the [ENTER] button. To return from 

a subdirectory (i.e., to close a folder), turn Knob 3 to select “updir”, and then press the [ENTER] button. If 

Type

 has been set to “external”, the 

File

 parameter will be automatically set to “EXTBANK.C1E”. 

NOTE

A File / Directory number of “***” indicates that the data will be saved as a new file. Even if an existing file 
is chosen and its name is changed, the File number will be displayed as “***” and a new file will be 
created. 

NOTE

New directories can be created on the sixth page of the File screen (see page 62). 

NOTE

Each USB flash-memory device can only contain a single External Performance memory file (i.e., 
EXTBANK.C1E). 

Cursor

Knob 5 can be turned to move the cursor within the file name. Furthermore, each file name can be up to 8 
characters in length. 

Data

Knob 6 can be turned to change the character at the current cursor position. 

Setting values:


Upper case letters ............ ABCDEFGHIJKLMNOPQRSTUVWXYZ

Numbers and symbols ...... 0123456789!#$%&'()-@^_`{}~

all

***:[

1

C

.

A]

Save>

F

e

p

y

T

ile:

Cursor

a

t

a

D

2

File or Directory number

File name

Содержание CP1

Страница 1: ...nly http www yamahasynth com Yamaha Manual Library http www yamaha co jp manual U R G Pro Audio Digital Musical Instrument Division Yamaha Corporation 2009 Yamaha Corporation WR95680 909MWDH 01A0 Printed in Japan O w n e r s M a n u a l EN ...

Страница 2: ...lieve that our products and the pro duction methods used to produce them meet these goals In keeping with both the letter and the spirit of the law we want you to be aware of the following Battery Notice This product MAY contain a small non rechargeable battery which if applicable is soldered in place The average life span of this type of battery is approx imately five years When replacement becom...

Страница 3: ...o blades and a third grounding prong The wide blade or the third prong are provided for your safety If the provided plug does not fit into your outlet consult an electrician for replacement of the obsolete outlet 10 Protect the power cord from being walked on or pinched particularly at plugs convenience receptacles and the point where they exit from the apparatus 11 Only use attachments accessorie...

Страница 4: ...f any unusual smells or smoke should appear to be caused by it immediately turn off the power switch disconnect the electric plug from the outlet and have the instrument inspected by qualified Yamaha service personnel CAUTION Always follow the basic precautions listed below to avoid the possibility of physical injury to you or others or damage to the instrument or other property These precautions ...

Страница 5: ...e any hearing loss or ringing in the ears consult a physician Saving and backing up your data The data in the instrument s Edit Buffer see page 39 will be lost when it is turned off If you wish to keep settings you have made within the Edit Buffer for use later on therefore be sure to store them in User Memory see page 39 or save them externally on a USB flash memory device a computer or the like ...

Страница 6: ... Performances a breakdown of the piano voice types modulation effects amplifier simulators and compressors used to setup these presets and to create original piano sounds a list of the parameters used to configure each of these elements and MIDI related reference material SPECIAL NOTICE The contents of this Owner s Manual and the copyrights thereof are under exclusive ownership by Yamaha Corporati...

Страница 7: ...eakers but also of external effectors responsible for the rich variety of tones indispensable to quality sound production has made it possible to faithfully reproduce many electric piano sounds now regarded as classics Weighted wooden keyboard with synthetic ivory keytops Boasting a weighted hammer action design and synthetic ivory keytops the CP1 s 88 key wooden keyboard effortlessly reproduces t...

Страница 8: ...ne Generator s Blocks Parameters 20 Makeup of Performance Memory 21 Controller Section 23 Basic CP1 Operations 24 Changing Pages 24 Changing Setting Parameter Values 24 Setting Names 25 Entering Note Numbers 25 Edit Indicator 26 Exiting from the Current Screen 26 Quick Start Guide 27 Using CP1 Performances 27 Selecting a Performance 27 Using Knobs 1 to 6 to Change the Sound 28 Using Pedals 30 Bend...

Страница 9: ...elocity for each part 53 Fourth page Controller settings 54 Master Equalizer 55 First page Master Equalizer gain 55 Second to sixth pages Detailed settings for each band 55 Utility 56 First page Key related settings 56 Second page Tuning system and pedal settings 57 Third page Controller settings 57 Fourth page MIDI settings 58 Fifth page Other settings 59 File 60 First page Confirming contents of...

Страница 10: ...ith the CP1 The use of an inappropriate replacement can pose a fire and shock hazard CAUTION Make sure your CP1 meets the voltage requirement for the country or region in which it is being used The power cord includes a grounding pin to prevent electrical shock and damage to equipment When connecting to an outlet connect the adaptor s ground lead to the ground screw If you re unsure how to connect...

Страница 11: ...the rear panel If you would prefer to monitor your playing using a single keyboard amplifier or powered speaker the unbalanced L MONO output jack should be used Listening via a Mixer It is now commonplace for mixers to be connected to stage pianos used in recording and live performance environments In addition to the unbalanced jacks mentioned above therefore the CP1 also features a pair of profes...

Страница 12: ...e ASSIGNABLE foot switch jack and optional FC7 or FC9 foot controllers can be connected via the 1 and 2 foot controller jacks For details on how to assign parameters to these foot switches and controllers see the description concerning the fourth page of the Common Settings screen on page 54 below NOTE The SUSTAIN foot switch jack can also be used to connect an optional FC3 foot pedal or an option...

Страница 13: ...ted to the CP1 When turning off the stage piano start by turning fully down the MASTER VOLUME dial on the control panel and the volume of any connected keyboard amplifiers or powered speakers to MIN or 0 then turn off the amplifiers or speakers and finally press the P power switch on the rear panel TIP If the CP1 is turned on with a USB flash memory device already plugged in it will either create ...

Страница 14: ...ed by holding down the UTILITY button and pressing the L PAGE button and it can be increased by holding down the UTILITY button and pressing the PAGE R button Adjusting the Volume The CP1 s output volume is adjusted using the MASTER VOLUME dial located at the left of the control panel Whenever making adjustments using this dial it is wise to listen to the actual volume as you play NOTE The MASTER ...

Страница 15: ...ustration of the Demo Song screen is provided for demonstration purposes only and may differ from that actually displayed on your CP1 2 Select the demo song you would like to listen to using Knob 2 NOTE If a demo song is already playing it must be stopped before a new one can be selected 3 Press Knob 5 Play to start the selected demo song 4 To stop the demo song press Knob 5 Stop 5 To return to th...

Страница 16: ...essing and holding a button for at least one second you can call up the corresponding setting screen and the button will start to flash Even when a parameter setting screen has been displayed in this way the block can still be turned on or off by pressing the corresponding button It should be noted that the button for the currently selected block will flash in one of two different ways to indicate...

Страница 17: ...o call up the Utility screen FILE button see page 60 Press this button to call up the File screen STORE ASSIGN button see pages 29 and 40 Use this button to call up a screen for storing Performance settings Master Equalizer settings or Utility settings In addition by pressing and holding the STORE ASSIGN button for at least one second within the Performance screen or a setting screen for any block...

Страница 18: ...y assignable functions 7 1 and 2 foot controller jacks see page 12 Use these two jacks to connect optional FC7 and FC9 foot controllers in order to perform a range of freely assignable functions 8 Unbalanced L MONO and R output jacks see page 11 These two 1 4 mono phone jacks are used to output unbalanced stereo signals Alternatively if mono output is required only the L MONO jack should be connec...

Страница 19: ... create unique hardware combinations that would never be possible in the real world Each Performance allows the piano sounds produced by two different Parts to be sent through a common Reverb block for finishing Performances also contain a Common Settings area that allows a name a keyboard mode controllers pan settings and a host of other parameters to be configured for each These common settings ...

Страница 20: ...er Compressor Block Capable of modeling a range of power amplifiers speakers and compressors with remarkable levels of precision each Power Amplifier Compressor block lets you select either a power amplifier and speaker combination or a compressor for use in shaping the piano sound of the corresponding Part Positioned immediately after the Modulation Effect block this block further adjusts the ove...

Страница 21: ...ins exactly the same content as the Preset Performance memory CAUTION If you overwrite a Performance in the User Performance memory it will be permanently deleted You should take special care therefore when selecting where to store newly created Performances in order to avoid loosing irreplaceable data External Performance Memory Accessed using the EXTERNAL button External Performance memories are...

Страница 22: ...sh memory device in question is plugged in for the first time after turning on the CP1 data from its External Performance memory will be automatically loaded into the instrument s DRAM NOTE If a different USB flash memory device has already been plugged in and removed after turning on the CP1 the instrument will operate in line with the description from Previously plugged in after turning on CP1 b...

Страница 23: ... guarantee normal operation with every such device on the market Before purchasing a USB flash memory device for use with the CP1 therefore please visit the following web page to confirm whether or not it is supported http www yamahasynth com Working with USB flash memory devices With a USB flash memory device plugged into the CP1 you can use it to save Performances that you have created and to lo...

Страница 24: ...ts pages using the L PAGE and PAGE R buttons Of the above mentioned screens furthermore all but the Performance screen and the Zone Edit screen show the current page number in the top right corner Changing Setting Parameter Values Each of the six knobs located below the CP1 display can be turned and pressed to change and set the parameters assigned to them on the currently displayed screen Specifi...

Страница 25: ...to move the cursor within the name field and then use the knob assigned to the Data parameter to change the character at the cursor position Entering Note Numbers While any parameter requiring a note to be set can be modified in the usual way by turning the assigned knob you can also select a note by pressing and holding that knob and playing the note on the keyboard layer Data KbdMode E Name Curs...

Страница 26: ...rrent Screen From any level within the CP1 screen hierarchy you can press the EXIT button to move back up one screen level or to return to the Performance screen In addition with a Piano Pre Amplifier Modulation Effect or Power Amplifier Compressor screen or the Reverb or Master Equalizer screen displayed you can also return to the Performance screen either by holding the EXIT jump to edit button ...

Страница 27: ...ends across two different pages NOTE The first page from the Performance screen indicates which Performance is selected which types of piano it is constructed from and which parameters are assigned to Knobs 1 to 6 meanwhile the second page illustrates the same parameters together with their current settings NOTE This illustration of the Performance screen is provided for demonstration purposes onl...

Страница 28: ...e the assigned parameter affects both Part 1 and Part 2 no such number is displayed By turning Knobs 1 to 6 you can change the values set for the corresponding parameters in order to adjust the sound of the currently selected Performance On the first page of the Performance screen you can also press a knob to toggle on and off display of the current setting value for its assigned parameter TIP The...

Страница 29: ...ress the corresponding knob You will now be asked to indicate the knob to which the selected parameter is to be assigned 4 Press the knob to be used to modify the selected parameter The display will return to the Performance screen where you can confirm that the selected parameter is now assigned to the required knob NOTE When a new piano type modulation effect or power amplifier compressor is sel...

Страница 30: ...he FC3 foot pedal supports half damper playing Whenever one of these optional pedals is to be used the SusPedal parameter from the Utility screen must be set accordingly see page 57 SOSTENUTO Foot Switch Jack The Sostenuto pedal located in the middle of the CP1 pedal unit is connected to the SOSTENUTO foot switch jack via the dark grey plug When you play a note or chord on the keyboard and press t...

Страница 31: ...he corresponding button will light up or go out accordingly It should be noted however that the entire Part 1 or Part 2 will be turned on or off as a result of pressing the PIANO 1 or PIANO 2 button and whenever a PRE AMPLIFIER button is pressed the actual effect will depend on the corresponding piano type as shown below Furthermore the Output parameter from each Power Amplifier Compressor block i...

Страница 32: ...deactivated Lit The corresponding block is turned on i e activated Flashing with longer lit period The corresponding block or unit is turned on and its parameter setting screen is being displayed Flashing with shorter lit period The corresponding block or unit is turned off but its parameter setting screen is being displayed NOTE With certain piano types the corresponding Pre Amplifier unit will c...

Страница 33: ...Performances contained within the CP1 s External Memory at that time will be overwritten 2 Select a block or unit to configure by pressing and holding for at least one second the PIANO 1 PIANO 2 PRE AMPLIFIER 1 PRE AMPLIFIER 2 MODULATION EFFECT 1 MODULATION EFFECT 2 POWER AMPLIFIER COMPRESSOR 1 or POWER AMPLIFIER COMPRESSOR 2 button The corresponding parameter setting screen will be displayed NOTE...

Страница 34: ...garding the storing of Performances see page 40 NOTE If you wish to save your Performance in an External Performance memory be sure to plug the USB flash memory device containing that Performance memory into the USB TO DEVICE port before pressing the STORE button 14 Press and hold the MASTER EQUALIZER button for at least one second The Master Equalizer screen will be displayed NOTE You can jump to...

Страница 35: ... stage piano s keyboard to play the other instrument With this type of connection the same MIDI channel must be used by the CP1 and the other instrument to send and receive respectively While the keyboard can be used in this type of situation to play CP1 sounds and the other instrument s sounds simultaneously it is also possible to assign sounds to the keyboard in a number of different ways so tha...

Страница 36: ...puter could be used to play the stage piano or you could send MIDI data created by playing the CP1 keyboard to the computer for processing Connecting via USB The following procedure describes how to connect the USB TO HOST port on the rear of the CP1 to a USB port on your computer using a USB cable When connected in this way the CP1 and computer can exchange MIDI messages but no other types of dat...

Страница 37: ...ta If your CP1 or computer should freeze restart the application being used reboot the computer or turn the stage piano off once and then back on Use a USB A B cable Before connecting to a computer via the USB TO HOST port restore it from any power saving mode such as Suspend Sleep or Standby Connect the computer via the USB TO HOST port before turning on the CP1 Be sure to always perform the foll...

Страница 38: ... either of the following ways to play or record in comfort without each note being heard twice In this case local control of the CP1 should be deactivated In this case local control of the CP1 should be activated MIDI Thru is a function that relays MIDI messages received at a MIDI IN connector directly to a MIDI OUT connector With certain applications this function is also known as MIDI Echo NOTE ...

Страница 39: ... memory area is non permanent its content must be stored in User Memory if it is to be reused Furthermore whenever a new Performance is selected and edited the entire content of the Edit Buffer will be overwritten with the new data It is important therefore that any Performance in the Edit Buffer is stored as soon as you are happy with it 1 Internal Memory Preset Data ROM Preset Performance Demo S...

Страница 40: ...ng an External Performance memory ensure that the corresponding USB flash memory device is plugged into the instrument 3 Press the ENTER button to confirm your selection You will be asked to confirm that you wish to proceed 4 Press Knob 4 YES PUSH to do so When the Performance has been stored the message Completed will be displayed followed by the Performance screen for the stored Performance If y...

Страница 41: ...nce 1 Open the DAW application project file containing the MIDI data for the Performance you wish to restore 2 Start playback of the recorded MIDI data on the DAW application CAUTION When the CP1 receives data saved using the Bulk Dump function the Performance currently being edited on the instrument will be overwritten with that data Accordingly care should be taken to avoid overwriting irreplace...

Страница 42: ...ter or the like 1 Navigate to the fifth page of the Utility screen by pressing the UTILITY button and if necessary the PAGE R button 2 Press Knob 6 FctrySet PUSH You will be asked to confirm that you wish to proceed 3 Press Knob 4 YES PUSH to restore the CP1 s initial settings When the data has been restored the message Completed will be displayed followed by the Utility screen If you do not wish ...

Страница 43: ...nd delivers a more compact woody sound than the pianos of the CF series and its combination of warmth and power make this piano an excellent choice for many different types of music Supporting two band tone control the accompanying pre amplifier is specially tuned for the Yamaha S6 Grand Piano CP80 Reproducing the classic sound of the Yamaha CP80 Electric Grand Piano the CP80 piano type can also b...

Страница 44: ...ey off parameter sets the volume of this key off noise Setting values 16 to 16 Rls Tone Release Tone DXEP 1 to DXEP 4 This parameter is used to adjust the tone of notes when you remove your fingers from the keyboard Setting values 0 to 16 DampReso Damper Resonance Level CF 3Band CF 2Band S6 3Band S6 2Band This parameter can be used in conjunction with a connected Sustain pedal to recreate the soun...

Страница 45: ...the high mid frequency component L Low DXEP 1 to DXEP 4 This parameter is used to adjust the volume of the low frequency component LowMid Low Middle DXEP 1 to DXEP 4 This parameter is used to adjust the volume of the low mid frequency component M Mid CF 3Band S6 3Band This parameter is used to adjust the volume of the mid frequency component Middle CP80 CP88 This parameter is used to adjust the vo...

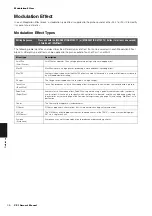
Страница 46: ...pe phaser the Max100 effect can modify the sound in a number of different ways based on its Mode parameter setting Flanger The Flanger effect reproduces the sound of a vintage flanger TouchWah Touch Wah Touch Wah produces a classic filter sweep effect in response to how hard or soft the keyboard is played PedalWah Pedal Wah Another classic filter sweep effect Pedal Wah is operated using a pedal or...

Страница 47: ...ter is used to set the phaser s input level Touch Wah and Pedal Wah This parameter is used to adjust the way in which the sound distorts F Feedback Flanger and 816Chorus This parameter is used adjust the degree to which output from the effect is fed back into its input M Manual Flanger This parameter is used to set the offset value for delay modulation Mix Flanger Chorus 816Chorus and Symphonic Th...

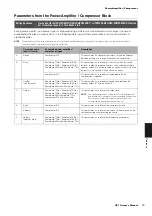
Страница 48: ... PowerAmp 71Rd I PowerAmp 71Rd I adds a warm vintage type distortion to the sound As such it is ideal for enhancing the acoustic nuances of electric pianos 73Rd I PowerAmp 73Rd I Also intended for use with electric pianos PowerAmp 73Rd I is a pleasant sounding power amplifier producing a spacious mellower tone 75Rd I PowerAmp 75Rd I PowerAmp 75Rd I is an electric piano power amplifier that energiz...

Страница 49: ...way in which the sound distorts In order to produce an effect the LineBal parameter s speaker output S must be raised by a certain amount If the line output L is maximized Drive will have no effect Compressor 376 This parameter is used to adjust the degree to which compression is applied L LineBal Line Balance PowerAmp 71Rd I PowerAmp 73Rd I PowerAmp 75Rd I PowerAmp 78Rd II PowerAmp 69Wr and Power...

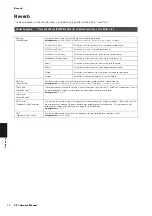
Страница 50: ... stage acoustics with wide sustained reverb sound Stage2 Emulation of the reverb typical of a smaller stage RevTime Reverb Time This parameter is used to set how long it takes for the reverb sound to fade to silence Setting values WoodRoom 0 3 to 10 0 seconds Other reverb types 0 3 to 30 0 seconds 1RevSend Reverb Send 1 These parameters are used to set how much of the output signal from Part 1 and...

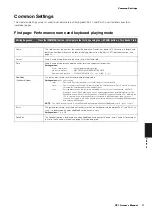
Страница 51: ...lit or zone layer Part 1 and Part 2 both extend over the full length of the keyboard split Part 1 is used for all keys below that set using the Point parameter Part 2 is used for the key set using the Point parameter and all higher keys zone Four individual zones can be setup extending over sections of the keyboard with Part1 playing on zone1 Part 2 playing on zone2 and external devices responding...

Страница 52: ...r These parameters are used to choose a voice on an external MIDI device for use with the currently selected zone Specifically Knobs 4 to 6 can be turned to set the bank select MSB the bank select LSB and the program change respectively The actual voice selected will depend on the other MIDI device being used Setting values Bank MSB 0 to 127 Bank LSB 0 to 127 PC 1 to 128 Furthermore Knob 4 and Kno...

Страница 53: ... Depth 1 and Velocity Sensitivity Depth 2 These parameters are used to define how the velocity with which the keys are played affects the MIDI velocities actually sent from Part 1 or Part 2 respectively As shown in the graph below the larger the value set the greater the degree to which MIDI velocities vary in response to changes in the playing velocity i e the steeper the slope of the graph If a ...

Страница 54: ... selected as a destination with Source set to PtchBend FC1 or FC2 one of the parameters from the Modulation Effect block will be assigned to the corresponding controller depending on the type of effect selected For details on the actual parameter that will be assigned see the Modulation Effect block s parameter list in the Data List booklet Specifically the parameter marked in the Control field wi...

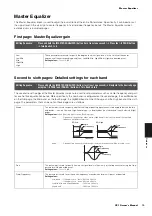
Страница 55: ... of the corresponding band Low LowMid Mid HighMid or High are boosted or cut Setting values 12 to 12 dB Editing Sequence Press and hold the MASTER EQUALIZER button for at least one second Navigate to the desired page using the L PAGE and PAGE R buttons Turn Knobs 3 to 6 Shape This parameter is used to specify whether shelving or peaking equalization is to be applied within the two end bands namely...

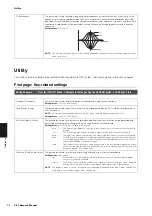
Страница 56: ...ermining how the actual velocities will be generated and transmitted according to the strength with which you play notes on the keyboard Setting values norm Normal soft hard wide or fixed norm The Normal curve produces velocities in direct proportion to the strength of your keyboard playing soft The Soft curve makes it easier to produce high velocities across the entire keyboard hard The Hard curv...

Страница 57: ...and Kirnberger scales improve the mean tone and Pythagorean scales by combining them in different ways Both are uniquely characterized by the way in which modulation can change the nuances of individual songs Often applied in the era of Bach and Beethoven they are used today to reproduce the music of that era on harpsichords Basenote This parameter is used with Scale settings other than Equal to s...

Страница 58: ...et a MIDI device number for the CP1 In order to successfully exchange Bulk Dump data parameter changes or other system exclusive messages this number must match the Device Number of the external MIDI device Setting values 1 to 16 all or off all System exclusive messages for all MIDI device numbers will be received Meanwhile data will be transmitted from the CP1 using Device Number 1 off No exchang...

Страница 59: ...16 PRE C 1 to 16 USR A 1 to 16 USR B 1 to 16 USR C 1 to 16 EXT A 1 to 16 EXT B 1 to 16 or EXT C 1 to 16 FctrySet Factory Set The Factory Set function can be used to restore the CP1 s User Memory to its initial condition Press Knob 6 to perform this operation When asked to confirm that you wish to proceed press Knob 4 YES PUSH to do so Alternatively you can press Knob 5 NO PUSH or press the EXIT bu...

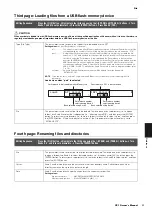
Страница 60: ...ith the file name EXTBANK C1E NOTE Type can be set to external only when the USB flash memory device s root directory is specified as the destination for saving using the File parameter File This parameter is used to specify where files are to be saved Using Knobs 5 and 6 you can set a file name in order to create a new file for saving memory data Whenever you save data a new sequential File or Di...

Страница 61: ...ance memory will be loaded from the file named EXTBANK C1E NOTE Type can be set to external only when the USB device s root directory is selected using the File parameter Load screen when perf is selected File This parameter is used to select the file to be loaded To move down into a subdirectory i e to open a folder turn Knob 3 to select that subdirectory i e directory name DIR and then press the...

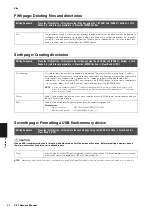
Страница 62: ... Press the ENTER button Press Knob 4 YES Dir Directory This field displays the name of the directory to be created The name can be set using Knobs 5 and 6 as described below Whenever you create a directory a new sequential Directory number will be automatically assigned to it To move down into a subdirectory i e to open a folder turn Knob 3 to select that subdirectory i e directory name DIR and th...

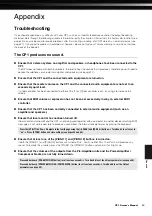
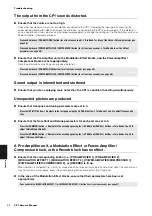
Страница 63: ...g it to increase the volume Ensure that MIDI volume or expression has not been set excessively low by an external MIDI controller Ensure that the CP1 has been correctly connected to external audio equipment such as an amplifier and speakers Ensure that local control has not been turned off If local control is turned off and the CP1 is not being used together with a computer or another device retur...

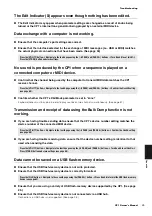
Страница 64: ...IER 2 MODULATION EFFECT 1 MODULATION EFFECT 2 POWER AMPLIFIER COMPRESSOR 1 POWER AMPLIFIER COMPRESSOR 2 or REVERB is lit up When a button is turned off i e not lit its respective unit or block will also be off and will not affect the sound in any way To turn on a unit or block press the corresponding button and confirm that it lights up In the case of the Modulation Effect blocks ensure that their...

Страница 65: ...vice number of the connected MIDI device If you are having trouble receiving data ensure that the device number setting is identical to that used when sending the data Data cannot be saved on a USB flash memory device Ensure that the USB flash memory device is not write protected Ensure that the USB flash memory device is correctly formatted Ensure that you are using a variety of USB flash memory ...

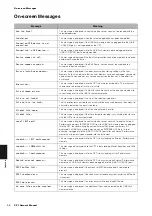
Страница 66: ...or directory you tried to access cannot be accessed because the amount of characters indicating the path is too long Illegal file name This message is displayed if the file name entered is invalid Illegal file This message is displayed if the file selected for loading is unsuitable either for use with the CP1 or for the current mode Load EXT perf This message is displayed to confirm whether or not...

Страница 67: ...message is displayed if an error occurs while communicating with a USB flash memory device USB connection terminated This message is displayed if connection with a USB flash memory device was lost due to the occurrence of an abnormal electric current USB device full This message is displayed if a USB flash memory device is full and no more files can be saved on it In such a case use a new USB flas...

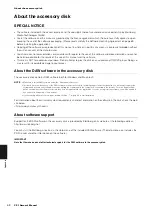
Страница 68: ...contains DAW software both for Windows and Macintosh NOTE Make sure to install DAW software under the Administrator account In order to have continuous use of the DAW software in the accessory disk including support and other benefits you will need to register the software and activate your software license by starting the software while the computer is connected to the Internet Click the Register...

Страница 69: ...ngineering disassembly decompilation or otherwise deriving a source code form of the SOFTWARE by any method whatsoever You may not reproduce modify change rent lease or distribute the SOFTWARE in whole or in part or create derivative works of the SOFTWARE You may not electronically transmit the SOFTWARE from one computer to another or share the SOFTWARE in a network with other computers You may no...

Страница 70: ...CIDENTAL OR CONSEQUENTIAL DAMAGES EXPENSES LOST PROFITS LOST DATA OR OTHER DAMAGES ARISING OUT OF THE USE MISUSE OR INABILITY TO USE THE SOFTWARE EVEN IF YAMAHA OR AN AUTHORIZED DEALER HAS BEEN ADVISED OF THE POSSIBILITY OF SUCH DAMAGES In no event shall Yamaha s total liability to you for all damages losses and causes of action whether in contract tort or otherwise exceed the amount paid for the ...

Страница 71: ... the system s receiving devices via MIDI cables If a receiving device s MIDI channel i e a MIDI Receive channel matches a MIDI Transmit channel the receiving device will produce sound according to the data sent by the corresponding transmitting device For details regarding MIDI Transmit and MIDI Receive channels see page 58 of the Reference section MIDI Channels MIDI Ports While the maximum number...

Страница 72: ...d Sostenuto Control No 66 Sostenuto messages can be used to modify the sound of notes in the same way as a piano s Sostenuto pedal Setting a value between 64 and 127 turns sostenuto on while values between 0 and 63 turn it off If sostenuto is turned on while the note generated by a specific Note On message is playing it will be sustained longer until the corresponding Note Off message is received ...

Страница 73: ...d a message with program change number 15 Pitch Bend Pitch Bend messages are continuous controller messages that allow the pitch of designated notes to be raised or lowered by a specified amount over a specified duration System Messages Rather than being associated with a specific channel MIDI system messages are used for synchronization of devices and other behavior of the instrument as a whole S...

Страница 74: ... Pre Amplifier Modulation Effect Power Amplifier Compressor Reverb Master Equalizer 5 band Controllers Pitch Bend wheel MASTER VOLUME dial Knobs 1 to 6 Display 55 character x 2 row vacuum fluorescent display VFD Connectors MIDI IN OUT and THRU connectors Headphones jack stereo phone Unbalanced L MONO and R output jacks standard mono phone Balanced L and R output connectors XLR SUSTAIN SOSTENUTO an...

Страница 75: ...43 CF 3Band 43 Chorus 46 Clean Clean Amp 48 Color 47 COMMON button 16 51 Common Settings 19 20 51 Comp376 Compressor 376 48 Compressor 19 20 48 Computer 36 Connections Audio Equipment 11 Computer 36 Other MIDI Devices 35 Pedal 12 Power Cord 10 ContrlNo Control Number 57 Controller settings 54 57 CP80 43 CP88 43 Cursor 51 60 61 62 customize 7 19 D D Chorus 46 DampReso Damper Resonance Level 44 Data...

Страница 76: ... 27 33 Performance Memory 21 Phase 47 PIANO 1 and PIANO 2 buttons 16 43 Piano type 19 20 27 43 Pitch Bend 31 Pitch Bend Range 53 Pk1Freq Peak1 Frequency 45 Pk1Gain Peak1 Gain 45 Pk2Freq Peak2 Frequency 45 Pk2Gain Peak2 Gain 45 Point 51 Power Cord 10 power switch 13 Power Amplifier 19 20 48 POWER AMPLIFIER COMPRESSOR 1 and POWER AMPLIFIER COMPRESSOR 2 buttons 16 48 Pre Amplifier 19 20 43 45 PRE AMP...

Страница 77: ...pose 56 Troubleshooting 63 TunCurve Piano Tuning Curve 56 Tune Master Tuning 56 Tuning 56 57 Type 47 Type File Type 60 61 U USB flash memory 22 23 28 39 40 41 60 61 62 USB TO DEVICE port 23 USB TO HOST port 36 37 USER button 21 27 User Memory 39 User Performance memory 21 39 40 Utility 40 56 UTILITY button 56 V VelCurve Velocity Curve 56 Velocity Sensitivity 53 Volume 14 16 45 W WerckMeister Werck...

Страница 78: ...nsible Party Yamaha Corporation of America Address 6600 Orangethorpe Ave Buena Park Calif 90620 Telephone 714 522 9011 Type of Equipment Stage Piano Model Name CP1 This device complies with Part 15 of the FCC Rules Operation is subject to the following two conditions 1 this device may not cause harmful interference and 2 this device must accept any interference received including interference that...

Страница 79: ...00 DENMARK YS Copenhagen Liaison Office Generatorvej 6A DK 2730 Herlev Denmark Tel 44 92 49 00 FINLAND F Musiikki Oy Kluuvikatu 6 P O Box 260 SF 00101 Helsinki Finland Tel 09 618511 NORWAY Norsk filial av Yamaha Scandinavia AB Grini Næringspark 1 N 1345 Østerås Norway Tel 67 16 77 70 ICELAND Skifan HF Skeifan 17 P O Box 8120 IS 128 Reykjavik Iceland Tel 525 5000 RUSSIA Yamaha Music Russia Office 4...

Страница 80: ...nly http www yamahasynth com Yamaha Manual Library http www yamaha co jp manual U R G Pro Audio Digital Musical Instrument Division Yamaha Corporation 2009 Yamaha Corporation WR95680 911MWDH 02B0 Printed in Japan O w n e r s M a n u a l EN ...

Отзывы: