background image

CVP-609/605 Owner’s Manual

36

Bas
ic O
per

at

ion
s

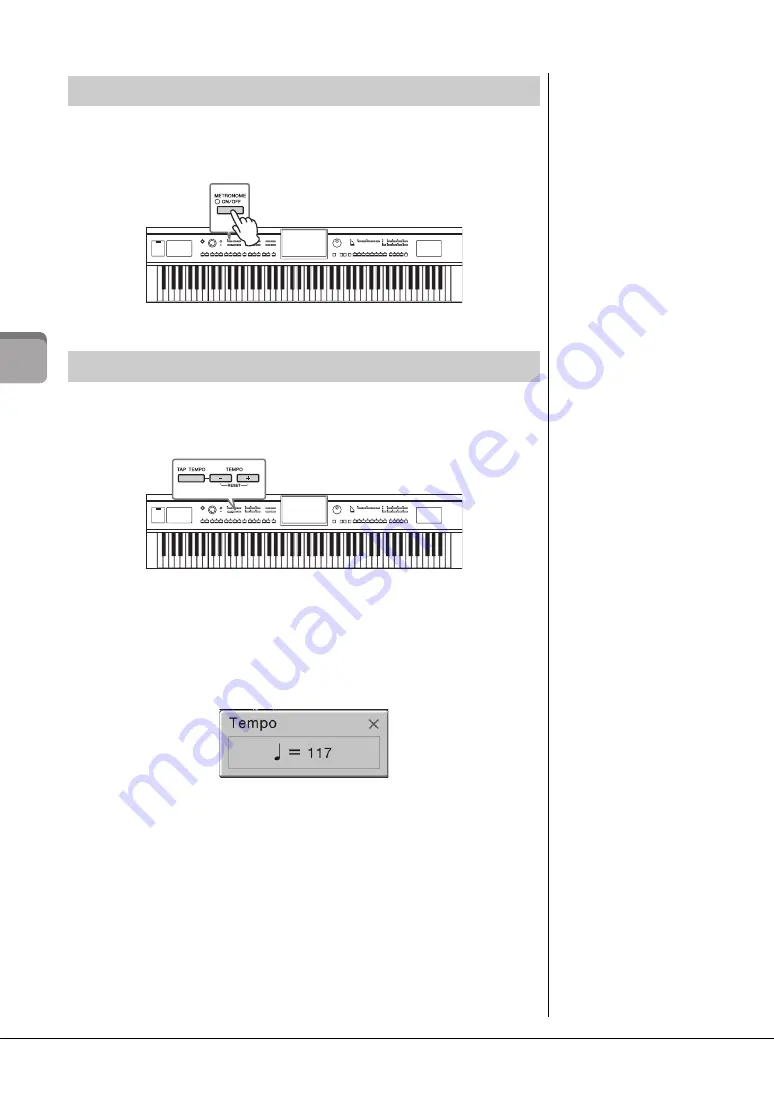
The [METRONOME ON/OFF] button lets you start or stop the metronome. The 
metronome provides a click sound, giving you an accurate tempo guide when you 
practice, or letting you hear and check how a specific tempo sounds.

The TEMPO [-] and [+] buttons let you change the playback tempo of Metronome, Style 
and MIDI Song. The tempo of the Style and MIDI Song can also be adjusted via the 
[TAP] button. 

TEMPO [-]/[+] buttons

Press the TEMPO [-] or [+] button to call up the Tempo pop-up display. Use the 
TEMPO [-]/[+] buttons to decrease or increase the tempo over a range of 5 – 500 beats 
per minute. Holding down either button can change the value continuously. Pressing 
both TEMPO [-] and [+] buttons can call up the default tempo of the last selected Style 
or Song.

[TAP] button

During playback of a Style or MIDI Song, you can change the tempo by tapping the 
[TAP] button twice at the desired tempo. When Style and Song are stopped, tapping the 
[TAP] button (four times for a 4/4 time signature) starts playback of the rhythm part of 
the Style at the tempo you tapped.

Using the Metronome

NOTE

You can also change the time 
signature, volume and sound 
of the metronome on the 
display called up via [Menu] 


[Metronome] 

 [Metronome].

Adjusting the Tempo

NOTE

If you want to adjust the tempo 
of an Audio Song, use the 
Time Stretch function on 
page 65.

Содержание Clavinova CVP-609

Страница 1: ...us que le s lecteur de tension est r gl sur la tension utilis e dans votre r gion En usine le s lecteur est initialement param tr sur 240 V Pour modifier ce r glage utilisez un tournevis plat et faite...

Страница 2: ...ly We sincerely believe that our products and the production methods used to produce them meet these goals In keeping with both the letter and the spirit of the law we want you to be aware of the foll...

Страница 3: ...not result in harmful interference with other electronic devices This equipment gen erates uses radio frequencies and if not installed and used according to the instructions found in the users manual...

Страница 4: ...ying Music Notation Score 60 Displaying Lyrics 61 Displaying Text 62 One handed Practice with the Guide Function 63 Repeat Playback 64 Adjusting the Pitch in Semitones Pitch Shift 65 Adjusting the Pla...

Страница 5: ...Name box then click SEARCH Unless indicated otherwise the illustrations and displays as shown in this manual are based on the CVP 609 in English These are for instructional purposes only and may appe...

Страница 6: ...way If it should appear to be malfunctioning discontinue use immediately and have it inspected by qualified Yamaha service personnel Do not expose the instrument to rain use it near water or in damp o...

Страница 7: ...me levels to minimum Be sure to set the volumes of all components at their minimum levels and gradually raise the volume controls while playing the instrument to set the desired listening level Do not...

Страница 8: ...solvents cleaning fluids or chemical impregnated wiping cloths Otherwise it may become discolored or degraded If you are using a model with a polished finish gently remove dust and dirt with a soft cl...

Страница 9: ...cations via Internet intranets and or other networks other content distribution systems pay audio or audio on demand applications and the like or on physical media compact discs digital versatile disc...

Страница 10: ...piano type as well as different room ambiences providing a total piano experience as if you were playing an actual piano Page 40 Naturally the CVP provides many realistic piano Voices for your playin...

Страница 11: ...audio recordings letting you sing along with or instead of your favorite artists and groups and enjoy performing even more Pages 61 71 By connecting your iPhone or iPad to the Clavinova and using app...

Страница 12: ...ROL buttons page 50 For controlling Style playback LCD touch screen page 20 Allows you to select or change the parameters by simply touching the virtual buttons or sliders on the display Data Dial pag...

Страница 13: ...lamps page 63 I O connectors page 84 Sheet music braces page 17 Music rest page 17 Music rest page 17 Sheet music braces page 17 I O connectors page 84 Key cover page 14 Guide lamps page 63 Pedals pag...

Страница 14: ...ng the MASTER VOLUME control Turning On Off the Power 1 1 1 2 The shape of the plug and outlet differ depending on locale CAUTION Hold the cover with both hands when opening or closing it Do not relea...

Страница 15: ...the instrument during recording or editing data might be lost and the instrument and external devices might be damaged Any data which is not saved via the Save operation will be lost if the power auto...

Страница 16: ...ersion The latest firmware can be downloaded from the website below http download yamaha com Copyright Touch here to call up copyright information Language Determines the language used in the display...

Страница 17: ...t lift the music rest slightly then turn it back slowly Using the Music Rest CAUTION When raising or lowering the music rest do not release your hands from the music rest until it is all the way up or...

Страница 18: ...in its raised position and lower the lid stay 3 Carefully lower the lid Opening Closing the Lid CVP 609 Grand Piano type CAUTION Do not let children open or close the lid Also be careful to avoid catc...

Страница 19: ...ed in the instrument package so that you can hang the headphones on the instrument Install the headphone hanger by following the instructions at the end of this manual Using Headphones CAUTION Do not...

Страница 20: ...play refer to page 22 File Selection display You can call up the desired type of display by touching the Style name Voice name or Song name on the Home display Home display This is the portal or home...

Страница 21: ...CVP 609 605 Owner s Manual 21 Display Structure By expanding the Song area you can call up the playback related controls on the display Song Selection display...

Страница 22: ...the area to the default status touch which appears at the upper right of the Voice area 3 Song area Indicates the current Song page 57 Touching a Song name calls up the Song Selection display Touch at...

Страница 23: ...the User tab is selected the current path or folder is shown here according to the folder structure 3 Selectable data files The files that can be selected are shown If two or more pages are available...

Страница 24: ...play touch at the upper right of the display or window or Close at the lower right of the display or window When a message information or confirmation dialog appears touching the appropriate item such...

Страница 25: ...knob and rotate your finger around the knob to change the parameter value Touch and hold This instruction means to touch the object in the display and hold it for a while When setting values by using...

Страница 26: ...the value This is useful if you have difficulty adjusting by touching on the display or want finer control over the adjustment Selecting an item from a list In File Selection displays page 23 and the...

Страница 27: ...of the display touch the one you want to replace The function selected in step 1 will be registered replacing the one selected here Moving a Shortcut 1 Touch and hold the desired icon until the color...

Страница 28: ...n be assigned as shortcut 1 Call up the operation display via Menu Assignable Assignable 2 Touch the desired button number to call up the list 3 Select the desired item from the functions and shortcut...

Страница 29: ...trument or USB flash memory 1 In the relevant display touch Save to call up the display for selecting the saving destination 2 Select the location to which you want to save the file To show the next h...

Страница 30: ...or folder by touching it 4 Touch Rename to call up the Character Entry window 5 Input the name of the selected file or folder page 33 NOTE In User memory no more than three folder levels can be create...

Страница 31: ...folders are shown 2 Touch File to call up the File Management icons 3 Enter checkmarks to the desired files folders by touching each item One or more files folders can be checked When you want to ente...

Страница 32: ...order of the files such as Voices and Styles in the Favorite tab 1 In the Voice Selection display or Style Selection display touch the Favorite tab 2 Touch Order to call up the Order Edit display 3 T...

Страница 33: ...ed 2 Edited Indicates edited Protected 2 Original Songs Make sure to save these to the same folder containing the corresponding Protected 2 Original Song These cannot be copied These can be moved save...

Страница 34: ...rom the list To convert into Kanji when the Language is set to Japanese When the entered hiragana characters are shown in reverse display highlighted touch several times to call up the conversion opti...

Страница 35: ...nd hold the damper pedal here all the notes shown will be sustained NOTE Certain Voices such as strings and brass sustain continuously when the damper sostenuto pedal is pressed Certain Voices such as...

Страница 36: ...over a range of 5 500 beats per minute Holding down either button can change the value continuously Pressing both TEMPO and buttons can call up the default tempo of the last selected Style or Song TA...

Страница 37: ...Voice which is sounding stop Style or Song playback or set the Left Hold function to Off Setting the Touch Sensitivity of the Keyboard Touch Curve Enter checkmarks to the boxes of the desired keyboar...

Страница 38: ...cted Transposing the Pitch in Semitones NOTE If you want to transpose the pitch of the Audio Song use the Pitch Shift parameter on page 65 The Transpose functions do not affect the Drum Kit or SFX Kit...

Страница 39: ...h Restore of All in step 3 above When the operation is complete the instrument will be restarted automatically Restoring the Factory programmed Settings C7 NOTE You can also restore the factory defaul...

Страница 40: ...nel settings for the piano performance and disables all other functions except for the pedal metronome and master volume setting 2 Play the keyboard You can play with the pedal page 35 and metronome p...

Страница 41: ...n if other buttons are pressed allowing you to play the keyboard use the pedals or adjust the master volume only 1 Press and hold down the PIANO ROOM button for two seconds or longer A message appears...

Страница 42: ...used for the Main and Layer parts The key which divides the keyboard into the left hand and right hand areas is referred to as Split Point and its guide lamp lights when the Left part is turned on Th...

Страница 43: ...s simply by using the Voice category selection buttons While holding down one of the Voice category selection buttons press another Voice category selection button The Voice corresponding to the first...

Страница 44: ...such as staccato legato and slur For details refer to page 46 Organ Flutes Voices Lets you recreate all of the classic organ sounds by adjusting the flute footage levels and the percussive sounds just...

Страница 45: ...ll up the Split Point Fingering window Menu Split Fingering 2 Touch Left or Style to turn it on If you want to set both Split Points to the same key turn both of them on 3 Touch to select the desired...

Страница 46: ...oices you can call up the Information window of the selected SA Voice or SA2 Voice by touching the S Art or S Art2 icon which appears on the upper right of the Voice name on the Home display Playing S...

Страница 47: ...s a reference to the sound generation of traditional pipe organs in which the sound is produced by pipes of different lengths in feet NOTE In addition to the Organ Flutes Voices other Voices can be ed...

Страница 48: ...rchestra even if you re playing by yourself Try out Style accompaniment with the following song After you understand how to use the Style try out other songs by using various Styles Mary Had a Little...

Страница 49: ...t 6 Touch R J START STOP to stop Style playback You can also stop playback by pressing one of the ENDING I III buttons at the Ending location on the notation page 48 A Style consists of eight parts ch...

Страница 50: ...n standby SYNC STOP button You can start and stop the Style anytime you want by simply playing or releasing the keys in the chord section of the keyboard Make sure that the ACMP ON OFF button is on pr...

Страница 51: ...d Main section the button lights in red Each is an accompaniment pattern of a few measures and it plays indefinitely Pressing the selected MAIN VARIATION button again maintains the same section but pl...

Страница 52: ...up Panel Settings Appropriate for the Current Style One Touch Setting Confirming the One Touch Setting Contents In the Style Selection display touch Information to call up the Information window that...

Страница 53: ...ch for music pieces and songs that are most suitable for playing with the current Style by using the Music Finder Records page 74 You can automatically call up appropriate settings such as Voice effec...

Страница 54: ...Play the rhythm you have in mind on the Drum or Piano section for one or two measures along with the metronome The timing at which you play the keys is analyzed over several seconds then playback of...

Страница 55: ...1 Call up the Split Point Fingering window Menu Split Fingering 2 Touch to select the desired Fingering Type Changing the Chord Fingering Type NOTE The Split Point Fingering window can be called up al...

Страница 56: ...plit the notes between your left and right hands for example playing a bass note with your left hand and a chord with your right or by playing a chord with your left hand and a melody note with your r...

Страница 57: ...his instrument as long as the files have been converted to WAV or MP3 format just like you do on a portable music player Availability of functions differs between MIDI Songs and Audio Songs In this ch...

Страница 58: ...ontrolled by the SONG CONTROL buttons page 59 4 Touch J STOP to stop playback NOTE On the Song Selection display or the Home display you can distinguish the data format of the Audio Song by the icon s...

Страница 59: ...lls backward forward continuously When you press or touch LL REW or RR FF a pop up window appears showing the current position of the Song NOTE For instructions on adjusting the tempo refer to page 36...

Страница 60: ...notation style For details on the Score display refer to the Reference manual on the website Moving the Song Playback Position In the Song area when expanded of the Home display the current position o...

Страница 61: ...cs data the lyrics are shown on the display You can look through the entire lyrics by touching or when Song playback is stopped As Song playback starts the color of the lyrics changes indicating the c...

Страница 62: ...TextViewer 2 Touch the bottom left corner on the display to call up the Text File Selection display 3 Select the desired text file and touch Close to show the text in the display You can look through...

Страница 63: ...guide lamps The playback of the Left and Extra parts will wait for you to play the notes correctly After you ve finished practicing touch Guide to turn off the Guide function One handed Practice with...

Страница 64: ...from Point A to Point B will be played back repeatedly For MIDI Songs an automatic lead in to help guide you into the phrase is added before Point A 4 Touch J Stop to stop playback The Song position...

Страница 65: ...the value from 70 to 140 Higher values result in a faster tempo You can cancel or attenuate the center position of the stereo sound This lets you sing karaoke style with just instrumental backing or p...

Страница 66: ...c Audio Rec Format This instrument allows you to record up to 80 minutes per single recording Before recording make the necessary settings such as Voice Style selection for MIDI recording and Audio Re...

Страница 67: ...file by following the instructions on page 29 steps 2 5 MIDI Songs can be saved to User MIDI Song tab In Audio recording Since the Audio Song file is automatically saved to the USB flash memory while...

Страница 68: ...e Song area then touch I Rec to call up the Song Recording window When you re record to an existing Song the name of the Song selected in step 1 appears When you record from scratch touch the New MIDI...

Страница 69: ...g You can also start recording by touching Rec Start or pressing the SONG CONTROL PLAY PAUSE button 6 After you finish your performance touch Stop on the Home display to stop recording 7 To hear the r...

Страница 70: ...to be converted 5 Touch Audio Convert to call up the Song Selection display for selecting the Save destination 6 Specify the Save destination location You can add a new folder by touching New Folder...

Страница 71: ...osition 2 Connect the microphone to the MIC LINE IN jack 3 Set the LINE MIC switch to MIC 4 Turn on the power of the instrument 5 If necessary turn on the microphone Adjust the INPUT VOLUME knob while...

Страница 72: ...ying Vocal Harmony Effects to Your Voice 4 3 6 1 Vocal Harmony name Mode When the Mode is set to Vocoder or Vocoder Mono NOTE The display shown at left is called up when the Harmony Mode is set to Voc...

Страница 73: ...ed playing the keyboard will not control the Vocoder effect 6 2 Play melodies on the keyboard or play back a Song and sing into the microphone You ll notice that you don t actually have to sing pitche...

Страница 74: ...ic Finder To use the Music Finder function more conveniently and effectively we recommend that you download the Records panel settings from the Yamaha website and load them to this instrument 1 On the...

Страница 75: ...the Records Touch one of the Sorting tabs to sort the Records in the corresponding order Touch the same tab to alternate the order ascending or descending Music Sorts the Records title of the music pi...

Страница 76: ...Enter the keyword for searching page 33 to start Search If you want to input two or more keywords insert a space between each word After the Search is completed the resulting Record list appears If no...

Страница 77: ...he Music Finder display In the Style column of the Record to which the Song is registered MIDI Song or Audio Song is shown Calling up the Song or Style registered to Music Finder You can call up the r...

Страница 78: ...tups to other buttons by repeating steps 1 3 The registered panel setups can be recalled by simply pressing the desired number button Registering Your Panel Setups Selecting the items to be registered...

Страница 79: ...l up the Registration Bank Selection display This display can be called up also by pressing the REGIST BANK and buttons simultaneously 2 Touch Save to save the Bank file For instructions on saving ref...

Страница 80: ...rnate between the two via To change the name of the selected Registration touch Rename To delete the selected Registration touch Delete Recalling a Registered Panel Setup NOTE When recalling setups th...

Страница 81: ...this display when you want to adjust the balance between all the parts of the Style Rhythm1 Rhythm2 These are the basic parts of the Style containing the drum and percussion rhythm patterns Bass The...

Страница 82: ...or future use select the Song file saved here 1 Call up the operation display via Menu SongCreator Channel Edit 2 Touch Setup 3 Touch Execute to execute the Setup 4 Touch Save to call up the Song Sele...

Страница 83: ...ary then touch OK to save the data The Mixer display lets you turn each channel of the current Style or Song on or off 1 In the Mixer display touch the Style tab Song Ch 1 8 tab or Song Ch 9 16 tab 2...

Страница 84: ...IN jack page 85 8 AUX OUT L L R R jacks page 85 9 INPUT VOLUME knob page 71 MIC LINE IN jack page 87 MIC LINE switch page 71 PHONES jacks page 19 1 6 7 8 2 3 4 5 Right higher key side Left lower key s...

Страница 85: ...al device NOTICE To avoid possible damage first turn on the power to the instrument then to the external device When turning off the power first turn off the power to the external device then to the i...

Страница 86: ...nt breaks and focus your eyes on distant objects to avoid eyestrain Monitor Type Selects the desired output monitor type NTSC or PAL to correspond to the standard used by your video equipment CVP 609...

Страница 87: ...gn the function to the connected pedal select Song Play Pause in the operation display Menu Assignable Pedal To the MIC LINE IN jack standard 1 4 phone jack you can connect a microphone guitar or othe...

Страница 88: ...ng or disconnecting the USB device during playback recording file management such as Save Copy Delete and Format operations or when accessing the USB device Failure to do so may result in freezing of...

Страница 89: ...ction Manual on the website For information about the compatible smart devices and application tools access the following page http www yamaha com kbdapps For inquiries about the included USB wireless...

Страница 90: ...ive channels on the instrument can be set via Menu MIDI For details refer to the Reference Manual on the website Connecting to a Computer USB TO HOST terminal NOTICE Use an AB type USB cable of less t...

Страница 91: ...ts depth for each part Pan Volume Adjusts panning and volume for each part Master Compressor Lets you turn on off the Master Compressor and edit related parameters Master EQ Lets you edit the Master E...

Страница 92: ...ote key in cents Keyboard Setting Determines the Touch Response of the keyboard or turns the Left Hold function on off 37 Metronome Setting Metronome Determines the metronome volume sound and time sig...

Страница 93: ...eful not to pinch your fingers Spread a large soft cloth such as a blanket on the floor Place the unit on the cloth with the key cover closed and the keyboard side on the bottom and lean the unit agai...

Страница 94: ...o that the side with the arrow mark is facing forward keyboard side If the plug does not fit easily do not try to force it but check the plug for correct orientation and then reinsert it into the conn...

Страница 95: ...ng the assembly please check the following Are there any parts left over Review the assembly procedure and correct any errors Is the Clavinova clear of doors and other movable fixtures Move the Clavin...

Страница 96: ...r hand so that the music rest will not fall Do not place the main unit upside down or with the rear side facing down 2 Attach units B and C to unit A 1 Align units B and A so that the protrusion fits...

Страница 97: ...ition CAUTION Be careful not to pinch your fingers When you raise the unit do not hold the key cover 6 Install unit F 1 Remove the cover from unit D 2 Untie and straighten out the bundled cord 3 Pass...

Страница 98: ...all the cover onto the groove correctly Correct Incorrect After completing the assembly please check the following Are there any parts left over Review the assembly procedure and correct any errors Is...

Страница 99: ...n the screw holes on the upper side of unit B with the bracket holes on units D and E then attach the upper corners of unit B to units D and E by manually tightening two thin screws 4 x 12 mm 2 Secure...

Страница 100: ...tor Before connecting the AC power cord check the setting of the voltage selector which is provided in some areas To set the selector for 110V 127V 220V or 240V main voltages use a minus screwdriver t...

Страница 101: ...s assembled or you can disassemble the unit down to the condition it was in when you first took it out of the box Transport the keyboard horizontally Do not lean it up against a wall or stand it up on...

Страница 102: ...upon the Voice The overall volume is too low or no sound is heard The master volume may be set too low Set it to an appropriate level with the MASTER VOLUME dial All keyboard parts are set to off On...

Страница 103: ...ress the ACMP ON OFF button You may be playing keys in the right hand range of the keyboard Make sure to play keys in the chord section of the keyboard Styles in a USB flash memory cannot be selected...

Страница 104: ...be heard in addition to the microphone sound Vocal Harmony is set to On Turn Vocal Harmony off page 72 The Vocal Harmony effect sounds distorted or out of tune Your vocal microphone may be picking up...

Страница 105: ...X PEDAL jack is reversed Turn the instrument s power off then turn it on again without pressing the footswitch or change the Polarity parameter from Menu Assignable Pedal AUX IN jack Sound input to th...

Страница 106: ...s 3 oz 81 kg 178 lbs 9 oz Control Interface Keyboard Number of Keys 88 Type Natural Wood NW Keyboard with Synthetic Ivory Keytops with real wood white keys Graded Hammer 3 GH3 Keyboard with Synthetic...

Страница 107: ...er VH1 60 Preset 60 User Intelligent Acoustic Control IAC Yes Functions Dual Layer Yes Split Yes Styles Preset Number of Preset Styles 566 420 Featured Styles 468 Pro Styles 55 Session Styles 7 Free P...

Страница 108: ...ellaneous Piano Room Yes Storage and Connectivity Storage Internal Memory approx 6 7 MB approx 2 5 MB External Memory Optional USB Flash Memory via USB TO DEVICE Connectivity Headphones x 2 Microphone...

Страница 109: ...on 51 EQ 82 F Factory Reset 39 Fast Forward 59 Favorite 32 File Selection display 23 Filter 82 Fingered 56 Fingered On Bass 56 Fingering type 55 Fixed Velocity 37 Folder 30 Foot Controller 87 Footswit...

Страница 110: ...Speaker 47 S SA Voice 46 SA2 Voice 46 Save 29 Score 60 Screen Out 86 Shortcut 27 Single Finger 55 Smart device 89 Soft pedal 35 Song 57 Song area 22 Sostenuto pedal 35 Speed tempo 36 65 Split Point 45...

Страница 111: ...s that used electrical and electronic products should not be mixed with general household waste For proper treatment recovery and recycling of old products please take them to applicable collection po...

Страница 112: ...stered by Cherry Lane Music Publishing Company Inc and Chrysalis Music International Copyright Secured All Rights Reserved Chim Chim Cher ee from Walt Disney s MARY POPPINS Words and Music by Richard...

Страница 113: ...erved Moon River from the Paramount Picture BREAKFAST AT TIFFANY S Words by Johnny Mercer Music by Henry Mancini Copyright 1961 Renewed 1989 by Famous Music Corporation International Copyright Secured...

Страница 114: ...usic Ltd and Blue Sky Rider Songs All Rights for E C Music Ltd Administered by Unichappell Music Inc All Rights for Blue Sky Rider Songs Administered by Irving Music Inc International Copyright Secure...

Страница 115: ...CVP 609 605 Owner s Manual 115...

Страница 116: ...pos Nakas S A The Music House 147 Skiathou Street 112 55 Athens Greece Tel 01 228 2160 SWEDEN Yamaha Music Europe GmbH Germany filial Scandinavia J A Wettergrens Gata 1 Box 30053 S 400 43 G teborg Swe...

Страница 117: ...http www yamaha com Yamaha Manual Library http www yamaha co jp manual Yamaha Downloads http download yamaha com U R G Digital Musical Instruments Division 2012 Yamaha Corporation 210MWAP B0 Printed...

Отзывы: