background image

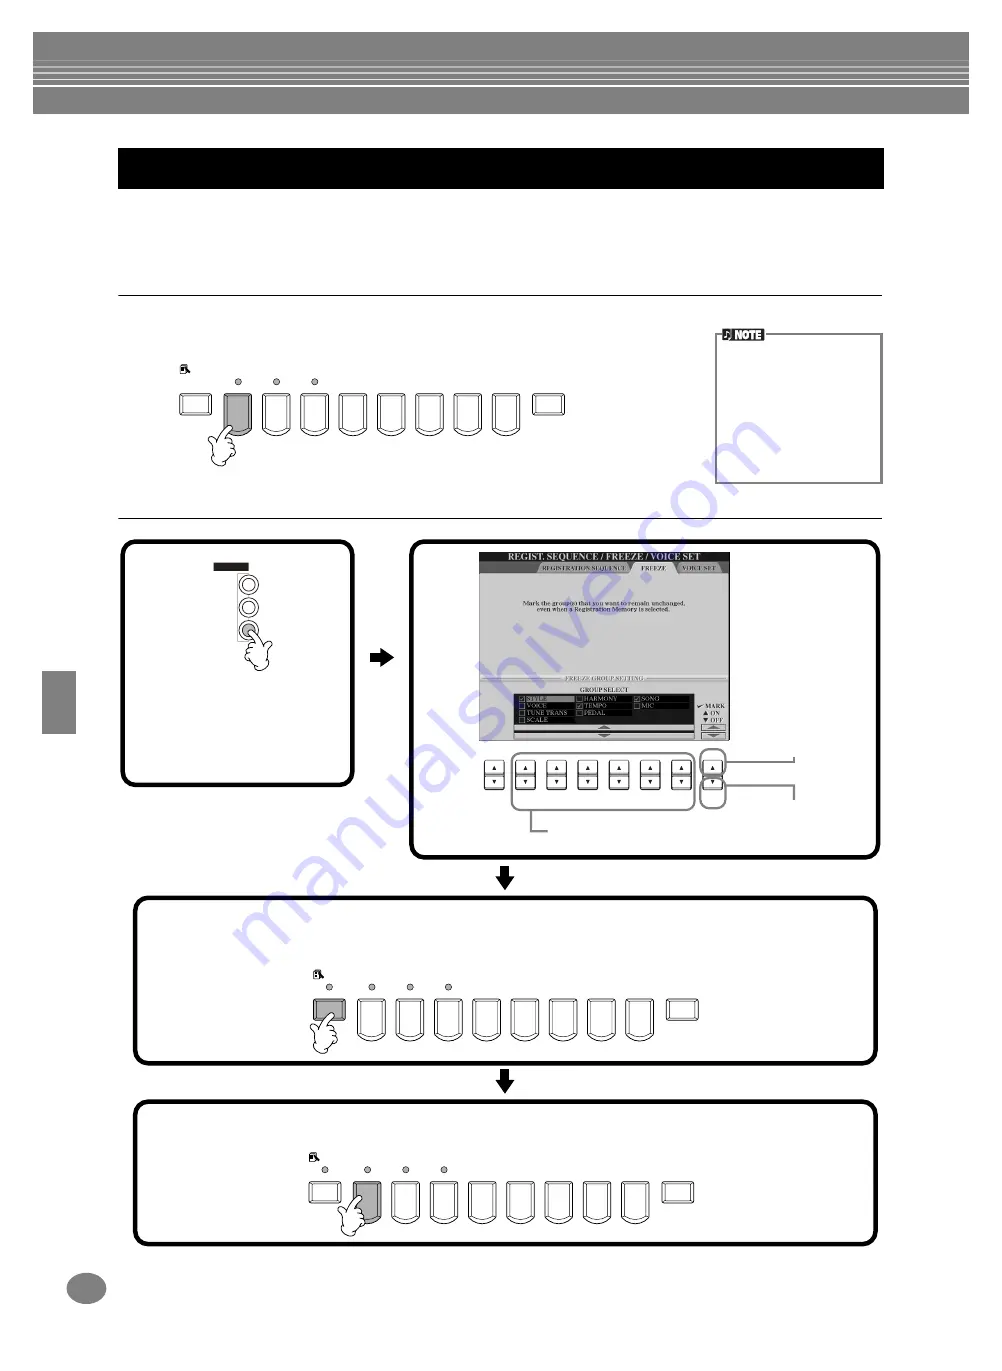
Saving and Recalling Custom Panel Setups — Registration Memory

CVP-210/208

90

You can recall all of the panel settings you’ve made — or only those you specifically want or need. For example, if you 
de-select “STYLE” in the 

REGISTRATION MEMORY

 display, you can keep the currently selected style even when you 

change the Registration Memory preset.

Recalling the Registered Settings

Select the desired bank in the REGISTRATION BANK display (page 89).
Press the appropriate REGISTRATION MEMORY button (any whose indicators are 
green) to recall the desired settings.

Selecting the Freeze Settings

Recalling a Registration Memory Setup

You can program your 
Registration Memory 
presets to be called up in 
sequence, in any order you 
desire. Once programmed, 
the presets 1 - 8 can be 
selected in sequence with 
the [BACK][NEXT] buttons 
or the pedal (page 145).

REGISTRATION MEMORY

FREEZE

MEMORY

1

2

3

4

5

6

7

8

MENU

DEMO

HELP

FUNCTION

REGISTRATION MEMORY

FREEZE

MEMORY

1

2

3

4

5

6

7

8

REGISTRATION MEMORY

FREEZE

MEMORY

1

2

3

4

5

6

7

8

1

1

2

3

4

5

6

7

8

Select the Freeze settings.

Enters a checkmark 
to the selected box.

2

3

Press the [FREEZE] button. When Freeze is active (lamp is lit), the settings you specified in the Freeze 
page will be maintained or left unchanged, even when changing Registration Memory presets.

4

Press the appropriate REGISTRATION MEMORY button (any whose indicators are green) to recall the 
desired settings.

Removes the 
checkmark from the 
selected box.

Call up the “FREEZE” 
page from the 
REGIST.SEQUENCE/
FREEZE/VOICE SET 
screen (page 145).

Содержание Clavinova CVP-208

Страница 1: ...anual Library http www2 yamaha co jp manual english M D G Pro Audio Digital Musical Instrument Division Yamaha Corporation 2003 Yamaha Corporation WA48350 AP 01A0 Printed in Indonesia OWNER S MANUAL OWNER S MANUAL CVP 210 208 OWNER S MANUAL CVP 210 208 CVP 210 208 DIC 99 ...

Страница 2: ...ly We sincerely believe that our products and the production methods used to produce them meet these goals In keeping with both the letter and the spirit of the law we want you to be aware of the following Battery Notice This product MAY contain a small non rechargable battery which if applicable is soldered in place The average life span of this type of battery is approximately five years When re...

Страница 3: ...plug from the outlet and have the instrument inspected by quali fied Yamaha service personnel CAUTION Always follow the basic precautions listed below to avoid the possibility of physical injury to you or others or damage to the instrument or other property These precautions include but are not limited to the following When removing the electric plug from the instrument or an outlet always hold th...

Страница 4: ...e force to be imposed on the adjustment mechanism possibly resulting in damage to the mechanism or even injury If the bench screws become loose due to extensive long term use tighten them periodically using the included tool Saving and backing up your data Some of the current memory data see page 43 is lost when you turn off the power to the instrument Save the data to a floppy disk the User Drive...

Страница 5: ... use Trademarks Apple and Macintosh are trademarks of Apple Computer Inc IBM PC AT is a trademark of International Business Machines Corporation Windows is the registered trademark of Microsoft Corporation All other trademarks are the property of their respective holders The photos of the harpsichord bandoneon hackbrett music box dulcimer and cimbalom shown in the displays of the CVP 210 208 are c...

Страница 6: ...g upward and the sliding shutter is facing forward towards the disk slot Carefully insert the disk into the slot slowly pushing it all the way in until it clicks into place and the eject button pops out To eject a floppy disk Before ejecting the disk be sure to confirm that data is not being written to the floppy disk If data is currently being written to the floppy disk in the following operation...

Страница 7: ... recommends that you use a commercially available dry type head cleaning disk to clean the head about once a month Ask your Yamaha dealer about the availability of proper head cleaning disks Never insert anything but floppy disks into the disk drive Other objects may cause damage to the disk drive or floppy disks To handle floppy disks with care Do not place heavy objects on a disk or bend or appl...

Страница 8: ... the unit as it is assembled or you can disassemble the unit down to the condition it was in when you first took it out of the box Transport the keyboard horizontally Do not lean it up against a wall or stand it up on its side Do not subject the instrument to excessive vibration or shock When transporting the assembled Clavinova make sure all screws are properly tightened and have not been loosene...

Страница 9: ...8 Using the DATA ENTRY Dial 50 Direct Access Instant Selection of Displays 51 Help Messages 53 Using the Metronome 54 Adjusting the Tempo 54 Tap Tempo 55 Reference Playing the Demos 56 Voices 58 Selecting a Voice 58 One touch Piano Play 59 Layer Left Playing Several Sounds Simultaneously 60 Layer Layering Two Different Voices 60 Left Setting Separate Voices for the Left and Right Sections of the K...

Страница 10: ...asic 115 Step Recording 116 Assembling an Accompaniment Style Assembly 117 Edit the Created Accompaniment Style 118 Change the Rhythmic Feel Groove and Dynamics 118 Editing the Channel Data 120 Making Style File Format Settings Parameter 121 Adjust the Volume Balance and Changing Voices Mixing Console 123 Operation 123 Setting the Level Balance and Voice Volume Voice 124 Changing the Tone of the V...

Страница 11: ... Control Clock etc System 148 Transmitting MIDI Data Transmit 149 Receiving MIDI Data Receive 150 Setting Root Note Channels Root 150 Setting Chord Channels Chord Detect 150 Other Settings Utility 151 Making Settings for Fade In Out Metronome Parameter Lock and Tap CONFIG 1 151 Making Settings for the Display Speaker System and Voice Number Indication CONFIG 2 152 Copying and Formatting Disks Disk...

Страница 12: ... for the Left and Right Sections of the Keyboard on page 61 Changing the sound Enhancing the sound with reverb and other effects Applying Voice Effects on page 61 Adjusting the Effects on page 126 Adjusting the Level Balance page 124 Combining two voices Layer Layering Two Different Voices on page 60 Playing separate voices with the right and left hands Left Setting Separate Voices for the Left an...

Страница 13: ... and recording the sounds to an external recorder AUX OUT jacks on page 156 Raising the volume Playing the sounds of the Clavinova through an external audio system and recording the sounds to an external recorder AUX OUT jacks on page 156 Outputting another instrument s sound from the Clavinova Outputting the sound of an external device through the built in speakers of the Clavinova AUX IN jacks o...

Страница 14: ...o your singing DEMO Explore the Demos page 20 56 These not only showcase the stunning voices and styles of the instrument they introduce you to the various functions and features and give you hands on experience using the Clavinova STYLE Back up your performance with Auto Accompaniment page 28 63 Playing a chord with your left hand automatically plays the auto accompaniment backing Select an accom...

Страница 15: ... with a computer quickly and easily page 157 Dive in and take advantage of the wide world of computer music software Connections and setup are exceptionally easy and you can play back your computer recorded parts with different instrument sounds all from a single Clavinova PIANO Set up the piano instantly page 59 You can call up all the optimum piano settings for the Clavinova with just a single b...

Страница 16: ... cover is opened and may be nearly impossible to remove This could cause electric shock short circuit fire or other serious damage to the instrument To raise the music rest 1 Pull the music rest toward yourself as far as it will go 2 Lower the music rest until it locks in place To lower the music rest 1 Pull the music rest toward yourself as far as it will go 2 Gently lower the music rest backward...

Страница 17: ...el CAUTION Do not use the Clavinova at a high volume level for a long period of time or your hearing may be damaged Connect a pair of headphones to one of the PHONES jacks Two PHONES jacks are provided Two sets of standard stereo headphones can be plugged in If you are using only one pair of headphones you can plug them into either of these jacks Using the Headphone Hanger A headphone hanger is in...

Страница 18: ...ECT ACCESS button P 51 BACK button P 44 50 NEXT button P 44 50 VOICE PART ON OFF LAYER button P 60 VOICE PART ON OFF LEFT button P 60 1 8 buttons P 39 49 ENTER button P 50 DATA ENTRY dial P 50 EXIT button P 44 VOICE EFFECT REVERB button P 61 DSP button P 61 VARIATION button P 61 HARMONY ECHO button P 62 MONO button P 62 LEFT HOLD button P 62 POWER METRONOME MASTER VOLUME STYLE ACMP AUTO FILL IN OT...

Страница 19: ...playing lyrics when an XF file containing lyric data is played SMF is the most common format used for MIDI sequence files The Clavinova is compatible with SMF Formats 0 and 1 and records song data using SMF Format 0 Vocal Harmony Vocal Harmony employs state of the art digital signal processing technology to automatically add appropriate vocal harmony to a lead vocal line sung by the user Vocal Har...

Страница 20: ...Song Book playback page 21 Disk Song Playback page 21 Short demo playback of the selected voice in the Voice Open display page 26 Reference on page 56 Demo button MENU DEMO HELP FUNCTION 2 Press the BACK NEXT button to select the Demo categories BACK NEXT Function Demos demon strate many of the different functions on the CVP 210 208 Style Demos introduce you to the rhythms and accompaniment styles...

Страница 21: ...77 Song related buttons Floppy disk drive BALANCE and CHANNEL buttons Make sure that the Lan guage setting for the instru ment page 154 is the same as that of the file name of the song that you are playing back Disks bearing this logo contain song data for voices defined in the GM standard Disks bearing this logo contain song data using the XG format an extension of the GM standard that provides a...

Страница 22: ... the DIRECT ACCESS button followed by the EXIT button 3 Press the A button to select the preset songs Song Book folder A E D C B Press the BACK NEXT button to select the drive PRESET FLOPPY DISK From the MAIN display the display shown when the power is turned on you can select songs voices accom paniment styles etc A E D C B ...

Страница 23: ...L ON OFF button 2 Press the 1 8 button corresponding to the channel you wish to turn on or off REC TOP START STOP NEW SONG SYNC START To rewind or fast forward to the playback point of the song press the REW or FF button With song data software Standard MIDI format 0 that includes lyrics you can view the lyr ics on the display during playback You can also view the score See pages 84 and 87 for det...

Страница 24: ... Press the 1 8 button corresponding to the part of which the volume you wish to adjust 8 Press the SONG START STOP button to stop playback BALANCE 1 2 3 4 5 6 7 8 You can call up a full set of mixing controls by pressing the MIXING CONSOLE button page 123 REC TOP START STOP NEW SONG SYNC START The FADE IN OUT but ton page 69 can be used to produce smooth fade ins and fade outs when starting and st...

Страница 25: ...layed press the DIRECT ACCESS button followed by the EXIT button 2 Select a voice group Reference on page 58 Voice related buttons F J I VOICE PART ON OFF H G LAYER LEFT The voice you re selecting here belongs to the MAIN part and is called the MAIN voice See page 60 for more information You ll want to hear the MAIN voice all by itself so make sure that the LAYER and LEFT parts are turned off PIAN...

Страница 26: ...re And that s just the beginning Check out these other voice related features Instant setup of the Clavinova for piano play with the press of a single button page 59 Create your own original voices quickly and easily by changing the settings of existing voices page 91 Set up your favorite panel settings including voices styles and more and call them up whenever you need them page 88 A E D C B For ...

Страница 27: ... on the keyboard that separates the two voices called the Split Point To do this simultaneously hold down the F or G button and press the desired key on the keyboard For more information see page 141 6 Play the voices The notes you play with your left hand sound one voice while the notes you play with your right sound a different voice or voices MAIN and LAYER voices are meant to be played with th...

Страница 28: ...or orchestra Playing a style 1 Press the D button to call up the style group If the MAIN screen is not displayed press the DIRECT ACCESS button followed by the EXIT button 2 Select a style group and a style Reference on page 63 Style related buttons A E D C B Press the BACK NEXT button to select the memory location of the style For this example PRESET is selected A E D C B A E D C B For this examp...

Страница 29: ...he TEMPO display 7 Try playing other chords with your left hand For information on how to enter chords see Chord Fingerings on page 66 8 Press the STYLE START STOP button to stop the style And there s much more Check out these other style related features Easily create your own original styles page 113 Set up your favorite panel settings including styles voices and more and call them up whenever y...

Страница 30: ...lo Echo and other effects are available too 1 Turn HARMONY ECHO on 2 Turn ACMP on page 28 3 Play a chord with your left hand and play some notes in the right hand range of the keyboard The CVP 210 208 has various Harmony Echo types page 146 The Harmony Echo type may change according to the selected MAIN voice Harmony Echo is just one of the many Voice Effects you can use Try out some of the other ...

Страница 31: ...EAK via BREAK via BREAK max three patterns max three patterns INTRO page 70 ENDING page 70 An Intro doesn t necessarily have to be at the beginning If you want you can play an Intro section in the middle of your performance by simply pressing the INTRO button at the desired point Watch your timing with the Break sections If you press a BREAK button too close to the end of the measure i e after the...

Страница 32: ...Touch Setting setups You can also create your own One Touch Setting setups For details refer to page 72 Here s another way to further automate musical changes and spice up your performance Use the convenient OTS One Touch Setting Link function to automatically change One Touch Settings when you select a different Main section page 72 Other Controls FADE IN OUT The FADE IN OUT button can be used to...

Страница 33: ...on 2 Select a record For this example press the 1 3 button to select a record by song title 3 Play along with the style playback Press the EXIT button to return to the MAIN display Reference on page 73 MUSIC FINDER button MUSIC FINDER 1 2 3 4 5 6 7 8 Select the desired record Press the BACK NEXT button to select the desired page of records For this example ALL is selected Split Point Auto Accompan...

Страница 34: ...of Search 1 and 2 appear in the correspond ingly numbered SEARCH 1 2 displays F J I H G A E D C B F J I 1 2 3 4 5 6 7 8 H G 6 Press the 8 START SEARCH button The search function calls up all records that contain the entered word or words 3 Press the F G and H to clear the previous conditions if necessary 4 For this example press the A button to call up the display for inputting the song title Refe...

Страница 35: ...usic Finder data call up the MUSIC FINDER Open Save window from the SYSTEM RESET page page 154 of the UTILITY display and follow the same procedure as that in the Open Save window for Voice page 40 48 To recall the saved data execute the appropriate operation from the MUSIC FINDER s Open Save window Records can be replaced or added page 75 In the instructions above all Music Finder data is handled...

Страница 36: ...en is not displayed press the DIRECT ACCESS button followed by the EXIT button 7 Press the SONG START STOP button and play the part 8 Press the SONG START STOP button to stop playback Reference on page 77 Song related buttons TRACK 1 R To cancel the left hand part press the TRACK 2 button A E D C B If the selected song does not contain lyric data lyrics are not displayed If you want to start the s...

Страница 37: ...ss the REC button 6 Recording starts as soon as you start playing the keyboard 7 When you ve finished recording press the REC button 8 To hear your newly recorded performance return the song to the beginning by using the TOP button and press the SONG START STOP button 9 Save the recorded data as required pages 40 48 REC TOP START STOP REW FF REPEAT NEW SONG SYNC START REC REC The recorded data wil...

Страница 38: ...t phrase you want to work on and repeat it until you ve got it down 1 While the song is playing back press the GUIDE button once to turn the GUIDE function off 2 Just before the desired phrase comes around press the REPEAT button to designate the beginning point for Repeat 3 Just after the phrase finishes press the REPEAT button again to designate the end point 4 Turn the GUIDE function on again 1...

Страница 39: ...ed to other various functions such as Song Start Stop and Glide The functions assigned to the three different pedals are displayed here 9 Registration Sequence page 145 You can save your custom panel settings as a Registration Memory preset and recall it at any time pressing the appropriate REGISTRATION MEMORY 1 8 button You can also use the Registration Sequence function to program the Registrati...

Страница 40: ...ice Style etc Moreover you can organize your data efficiently by putting various files of the same type into a single folder The Open Save displays for Song Voice Style and Registration Bank can be called up from the MAIN display the display shown when the power is turned on by pressing the appropriate A J button Open Save Display A E D C B F J I H G The following Open Save display types are also ...

Страница 41: ...riginal data to floppy disk Commercially available disk software can also be called up here Naturally these files are available only when the appropriate disk is inserted in the floppy disk drive File All data both pre programmed and your own original are stored as files Current Memory Current Memory is the area where the voice is called up when you select a voice Also it is the area where you edi...

Страница 42: ...sic Finder Main Display Picture Lyrics Background Picture Copy Copy Paste Cut Paste This is the Voice Open Save display called up by pressing the PIANO but ton in the VOICE section Select a Memory drive by using the BACK NEXT buttons System Setup System Setup System Setup The Open Save display indicates only those files that can be man aged from the selected display The FD Floppy Disk drive of the...

Страница 43: ...ter Creating a New Record Record Edit Edit Edit Edit Data not maintained when the power is turned off Features Current Memory Data maintained when the power is turned off Compare Save The Save operation is executed from the Open Save display The corresponding Open Save display can be called up from the FUNCTION UTILITY SYSTEM RESET display Save The data in the USER FLOPPY DISK drive is main tained...

Страница 44: ...ish to call up In the example display shown above the voice files are shown Use the DATA ENTRY dial and the ENTER button When you turn the DATA ENTRY dial the highlight moves among the available files folders Highlight the desired file or folder voice files are shown in the example above and press the ENTER button to call up the selected item Double clicking the appropriate A J button calls up the...

Страница 45: ...e 1 NAME button page 39 The NAME display appears 2 Select the appropriate file folder and press the 7 OK button The currently selected file folder is highlighted To select another file folder press one of the A J buttons A file folder name can con tain up to 50 half size letters or 25 Hiragana and kanji let ters including the Icon ID see the note below and the extension The file name will appear o...

Страница 46: ...e 7 OK button To stop the operation press the 8 CANCEL button This operation cannot be used to directly move a file folder from one floppy disk to another If you want to do this cut and paste the file or folder from the first floppy disk to the USER page then change disks and paste it to the FLOPPY DISK page All files folders in a floppy disk can be copied to another disk in one batch page 153 4 C...

Страница 47: ...the first floppy disk to the User page then change disks and paste it to the Floppy Disk page 4 Call up the destination display Only the USER and FLOPPY DISK pages can be selected as the destination Press the 4 PASTE button The file folder you copied is now pasted at the destination Please note that the copy functions are intended for your personal use only END 1 Press the 5 DELETE button page 40 ...

Страница 48: ...tored in the USER page but can not be copied to another floppy disk Folder directories can con tain up to four levels The maximum total number of files and folders which can be stored is 3 200 but this may differ depending on the length of the file names The maximum number of files which can be stored in a folder will be 250 Enter a name for the new file page 49 Press the 8 OK button To stop the o...

Страница 49: ...he ENTER button one or several times to convert the characters into the appropriate kanji The reversed area can be changed by the DATA ENTRY dial The converted area can be changed back to hiragana by the 7 DELETE button The reversed area can be cleared at once by the 8 CANCEL button To actually enter the change press the 8 OK button or enter the next character To enter the hiragana itself without ...

Страница 50: ...ues by rotating the DATA ENTRY dial In the example BALANCE display turning the dial adjusts the volume of the part in reverse display highlight To adjust the volume of another part first select the part by pressing the button corresponding to the part then rotate the DATA ENTRY dial Selecting items You can select the desired item or function in the display by rotating the DATA ENTRY dial The selec...

Страница 51: ...INTRO MAIN START STOP ON MIN MAX OFF ENDING rit TAP TEMPO REW REPEAT TOP FF REC MIC SIGNAL OVER FADE IN OUT TAP TEMPO DEMO HELP FUNCTION SOUND CREATOR DIGITAL RECORDING MIXING CONSOLE BALANCE CHANNEL ON OFF TRANSPOSE TEMPO SYNC STOP START STOP PART PART A E D C B F J I DIRECT ACCESS 1 2 3 4 5 6 7 8 EXIT START STOP SONG EXTRA TRACKS TRACK 2 TRACK 1 VOCAL HARMONY TALK EFFECT VH TYPE SELECT MIC SETTI...

Страница 52: ...MIXING CONSOLE SONG PART VOLUME VOICE VOLUME settings 124 CHANNEL ON OFF VOICE settings DIRECT ACCESS Exit from the Direct Access mode NEXT BACK ENTER EXIT Return to the MAIN display VOICE PART LAYER MIXING CONSOLE TUNE OCTAVE settings 125 LEFT VOICE EFFECT REVERB EFFECT REVERB settings 126 DSP DSP settings VARIATION EFFECT TYPE selection HARMONY ECHO FUNCTION HARMONY ECHO 146 MONO MIXING CONSOLE ...

Страница 53: ...TH SETTING REVERB DSP VARIATION HELP 1 2 3 4 5 6 7 8 BACK NEXT DATA ENTRY ENTER EXIT MENU DEMO HELP FUNCTION 2 1 Select the desired Help topic 2 2 Call up the topic Select the Language if necessary The language selected here are also used for various Messages shown during operations Help messages can be displayed in any one of the following languages ENGLISH JAPANESE GERMAN FRENCH SPANISH ITALIAN ...

Страница 54: ...ronome can all be changed page 151 Adjusting the Tempo POWER METRONOME MASTER VOLUME STYLE ACMP AUTO FILL IN OTS LINK BREAK INTRO MAIN START STOP ON MIN MAX OFF ENDING rit TAP TEMPO REW REPEAT TOP FF REC MIC SIGNAL OVER FADE IN OUT TAP TEMPO DEMO HELP FUNCTION SOUND CREATOR DIGITAL RECORDING MIXING CONSOLE BALANCE CHANNEL ON OFF TRANSPOSE TEMPO SYNC STOP START STOP PART PART A E D C B F J I DIRECT...

Страница 55: ...y page 64 78 tapping the TAP TEMPO button starts the song play back in the same manner For songs and styles in 2 4 and 4 4 time tap four times for 3 4 time tap three times for 5 4 time tap five times TEMPO RESET TAP TEMPO Tap the TAP TEMPO button twice to change the tempo 1 Playback the song or the accompaniment style page 63 78 2 Indicates the default initial tempo setting for the currently selec...

Страница 56: ...ION GUITAR BASS ORGAN FLUTES ORGAN ACCORDION BRASS WOODWIND CHOIR PAD SYNTH XG USER STRINGS LEFT DATA ENTRY FREEZE MEMORY 1 1 4 3 2 3 4 7 5 8 6 2 ENTER VOICE EFFECT VOICE MUSIC FINDER ONE TOCTH SETTING REVERB DSP VARIATION MENU DEMO HELP FUNCTION A E D C B F J I 1 2 3 4 5 6 7 8 BACK NEXT H G MENU DEMO HELP FUNCTION 2 3 Press one of these buttons to start the desired demo 2 2 Use these to select di...

Страница 57: ...ntroduction screen appears in the display and the Demo starts playing Select the desired word or item by using the DATA ENTRY dial then press the ENTER button or number buttons 1 2 etc to call it up Use the BACK NEXT buttons in the introduction screen to call up the previ ous or next page n Press the SONG START STOP button to stop the Demo song To start the Demo again from the point at which it wa...

Страница 58: ...CHOIR PAD SYNTH XG USER STRINGS VOICE A E D C B F J I 1 2 3 4 5 6 7 8 BACK NEXT H G END EXIT 1 Select the desired voice group 2 3 Select the voice 2 1 Select the memory location of the voice PRESET USER FLOPPY DISK Press this to start the demo of the selected voice To stop the demo at any time press this button again Press this to call up the display for selecting the voice group Indicates that th...

Страница 59: ... sounds are assigned to individual keys letting you play the sounds from the keyboard Live Drums These are high quality drum sounds taking full advantage of Stereo Sampling and Dynamic Sampling Organ Flutes This authentic organ voice lets you use the Sound Creator to adjust the various footages and craft your own original organ sounds Live SFX These are high quality Latin percussion sounds taking ...

Страница 60: ... RESET GUIDE MENU BACK NEXT VOICE PART PIANO ON OFF HARMONY ECHO LEFT HOLD MONO DIGITAL STUDIO H G LAYER PIANO HARPSI E PIANO PERCUSSION GUITAR BASS ORGAN FLUTES ORGAN ACCORDION BRASS WOODWIND CHOIR PAD SYNTH XG USER STRINGS LEFT DATA ENTRY FREEZE MEMORY 1 1 4 3 2 3 4 7 5 8 6 2 ENTER VOICE EFFECT VOICE MUSIC FINDER ONE TOCTH SETTING REVERB DSP VARIATION VOICE PART ON OFF H G LAYER LEFT LAYER part ...

Страница 61: ...PLIT POINT button in the MAIN display The operation steps are the same as in the STYLE SETTING SPLIT POINT display of the FUNC TION page page 141 n Each part MAIN LAYER and LEFT can have its own volume setting page 65 n You can also use the LAYER and LEFT functions together to create a combi nation layer split To do this set separate voices for the left and right sections of the keyboard as indica...

Страница 62: ... using the Layer function with a mono phonic voice Set the Main voice to play polyphonically and set the Layer voice to play monophonically MONO In this case the melody you play including the top notes of any chords sounds monophonically Try this using the following voices MAIN voice Brass Section polyphonic LAYER voice Sweet Trump monophonic The Portamento effect creates a smooth pitch glide betw...

Страница 63: ... EXTRA TRACKS TRACK 2 TRACK 1 VOCAL HARMONY TALK EFFECT VH TYPE SELECT MIC SETTING STYLE L R SYNC START RESET RESET GUIDE MENU BACK NEXT VOICE PART PIANO ON OFF HARMONY ECHO LEFT HOLD MONO DIGITAL STUDIO H G LAYER PIANO HARPSI E PIANO PERCUSSION GUITAR BASS ORGAN FLUTES ORGAN ACCORDION BRASS WOODWIND CHOIR PAD SYNTH XG USER STRINGS LEFT DATA ENTRY FREEZE MEMORY 1 1 4 3 2 3 4 7 5 8 6 2 ENTER VOICE ...

Страница 64: ...Start Enabling this lets you start the style simply by playing the keyboard As soon as you play a chord with the auto accompaniment section the style starts For details about chord fingerings refer to page 66 Accompaniment Style Characteristics The defining characteristics of some of the accompaniment styles are indicated above the relevant style names in the Open Save display Session These styles...

Страница 65: ...YLE START STOP button again to stop the rhythm playback END You can also start the rhythm simply by playing a key on the keyboard if Sync Start is enabled turn on the SYNC START button BALANCE PART CHANNEL ON OFF BALANCE display Adjust the output level of the Part Parts played from the keyboard MAIN LAYER LEFT STYLE part Auto Accompaniment section SONG part MIC part CHANNEL ON OFF display Call up ...

Страница 66: ...ample playing a bass note with your left hand and a chord with your right or by playing a chord with your left hand and a melody note with your right AI FINGERED This mode is basically the same as FINGERED with the exception that less than three notes can be played to indicate the chords based on the previously played chord etc AI FULL KEYBOARD When this advanced auto accompaniment mode is engaged...

Страница 67: ...2 3 5 7 or 3 7 2 C79 Seventh add sharp eleventh 7 11 1 2 3 4 5 7 or 1 2 3 4 5 7 C7 11 Seventh add thirteenth 713 1 3 5 6 7 or 3 6 7 C713 Seventh sharp ninth 7 9 1 2 3 5 7 C7 9 Seventh flatted fifth 7 5 1 3 5 7 C7 5 Seventh augmented 7aug 1 3 5 7 C7aug Seventh suspended fourth 7sus4 1 4 5 7 C7sus4 Suspended second sus2 1 2 5 Csus2 Chord Types Recognized in the Fingered Mode Example for C chords C C...

Страница 68: ...s If you press the INTRO button you can play back an Intro section while an accompaniment is play ing You can dynamically con trol the level of the accompaniment by how softly or strongly you play the keys in the Auto Accompaniment section of the keyboard page 141 If you press the SYNC START button while an accompaniment is play ing the accompaniment will stop and the CVP 210 208 will enter Syn ch...

Страница 69: ...sn t stop when the ending is finished If you select a different style while the style is not playing the default tempo for that style is also selected If the accompa niment is playing the same tempo is maintained even if you select a differ ent style When STOP ACMP is set to on and the accompani ment is not playing you can play both chords and bass in the Auto Accom paniment section in the keyboar...

Страница 70: ... A short phrase used to add variation to the style STYLE ACMP AUTO FILLIN OTS LINK BREAK INTRO MAIN ENDING rit A B C D SYNC STOP SYNC START START STOP 1 2 Play the style and switch among the accompaniment sections as they play page 30 31 Fill in patterns play automatically between each change in the Main sections You can also add a fill in by pressing the selected MAIN button again To cancel the A...

Страница 71: ...SS ORGAN FLUTES ORGAN ACCORDION BRASS WOODWIND CHOIR PAD SYNTH XG USER STRINGS LEFT DATA ENTRY FREEZE MEMORY 1 1 4 3 2 3 4 7 5 8 6 2 ENTER VOICE EFFECT VOICE MUSIC FINDER ONE TOCTH SETTING REVERB DSP VARIATION ONE TOUCH SETTING 1 2 3 4 STYLE ACMP AUTO FILLIN OTS LINK BREAK INTRO MAIN ENDING rit A B C D SYNC STOP SYNC START START STOP ONE TOUCH SETTING 1 2 3 4 1 Select a style page 63 2 Press one o...

Страница 72: ... Settings 1 2 3 and 4 respectively The One Touch Settings can be set to change with the sections in one of two different timings page 141 Immediately when you press a section button At the next measure in an accompaniment style after you press a section button To cancel the OTS Link function press the OTS LINK button again END MEMORY ONE TOUCH SETTING 1 2 3 4 1 Select a style 2 Set up the panel co...

Страница 73: ...T VOICE MUSIC FINDER ONE TOCTH SETTING REVERB DSP VARIATION MUSIC FINDER F J I 1 2 3 4 5 6 7 8 H G MUSIC FINDER Select a record For example select the top record by pressing the 1 button to call up the recommended setups The setting data shown here is referred to as a record All Show all records FAVORITE Show the records that have added to the Favorite page SEARCH1 2 Show the results by SEARCH fun...

Страница 74: ... specific location for searching You can further narrow down your search by using the SEARCH 1 and 2 selections F H CLEAR Clears the entered item at left 1 TEMPO FROM You can also narrow your search by specifying a tempo range This lets you set the minimum tempo for the search Press the buttons simultaneously to instantly reset the tempo value to the minimum 2 TEMPO TO You can also narrow your sea...

Страница 75: ...y without clearing the record CANCEL Press this to close the message box and return to the previous display J NEW RECORD Registers a new record The smallest available empty record number is used for registering When you press this button a message appears prompting you to execute abort or cancel the operation YES Press this to register the record and close the display NO Press this to close the di...

Страница 76: ...ord is registered by pressing the J NEW RECORD button If you exit from the MUSIC FINDER EDIT display without actually editing or registering a record the input genre name is deleted 8 OK Executes all editing and changes to the record When you press this button a message appears prompting you to execute abort or cancel the operation YES Press this to replace the record and close the display NO Pres...

Страница 77: ...hestra Collection format Disks having this logo mark feature song data compatible with Yamaha s original MIDI file format Songs you recorded page 97 and stored to the CVP 210 208 or disk POWER METRONOME MASTER VOLUME STYLE ACMP AUTO FILL IN OTS LINK BREAK INTRO MAIN START STOP ON MIN MAX OFF ENDING rit TAP TEMPO REW REPEAT TOP FF REC MIC SIGNAL OVER FADE IN OUT TAP TEMPO DEMO HELP FUNCTION SOUND C...

Страница 78: ...nd press it again at the end of the song to fade out Adjust the tempo by using the TEMPO buttons page 54 or the TAP TEMPO button You can even change the playback speed by tapping out the tempo simply tap the TAP TEMPO button twice 1 2 3 The song starts To stop the song immediately press the button again Press the button in order to go back to the previous screen START STOP EXIT If the MAIN screen ...

Страница 79: ...ART STOP button 2 Select the desired accompaniment style 3 Start the style by pressing the STYLE START STOP button 4 While the song is playing insert a break or change sections with the STYLE section buttons Fill in patterns play when you switch sections The style automatically stops when the song finishes or is stopped The accompaniment stops when you stop the song If the accompaniment style is p...

Страница 80: ...not be able to be read properly by the instrument and as such you may not be able to select them The maximum capacity is about 200 300KB however this may differ depending on the data contents of each song Insert the disk shutter side first and label face up REC TOP START STOP REW FF REPEAT NEW SONG SYNC START During playback you can have the song return to the top and play back again from the begi...

Страница 81: ...ou specify which parts are muted when pressing the TRACK 1 TRACK 2 EXTRA TRACKS buttons Repeat Playback of a Specific Range REC TOP START STOP REW FF REPEAT NEW SONG SYNC START START STOP 2 1 Play back the song page 78 80 You can also specify Points A and B when the song is stopped Set Point A by pressing the REPEAT but ton then use the FF but ton to move to the desired end location then set Point...

Страница 82: ... you play the key in time with the music the melody flows smoothly with the song For sing along performance Karao Key This convenient function lets you control the song and accompaniment playback with just one finger while you sing along Simply play a key on the keyboard in time with the music any key is fine and the accompaniment parts of the song follow your playing This lets you control the tim...

Страница 83: ...START Start the song and try playing the part you ve muted Adjust the tempo by using the TEMPO buttons page 54 Stop the song For details on the SONG SET TING display see page 140 n The guide lamps light according to song channel recorded to Tracks 1 and 2 and the chord data in the song when such data is included Normally you can leave the AUTO SET CH function set to ON and the song channel will au...

Страница 84: ...he displayed notation is generated by the Clavinova based on the song data As a result it may not be exactly the same as com mercially available sheet music of the same song especially when displaying notation of complicated pas sages or many short notes n Some song data for the Clavinova has been recorded with special free tempo settings For such song data the tempo beat measure and music nota ti...

Страница 85: ...identals see the chart below 5 QUANTIZE This gives you control over the note resolution in the notation letting you shift or correct the timing of all displayed notes so that they line up to a particular note value Make sure to select the smallest note value which is used in the song Note resolution 1 4 note 1 8 note 1 16 note 1 32 note 1 4 note triplet 1 8 note triplet 1 16 note triplet 1 32 note...

Страница 86: ...he root note is indicated as Do For example in the key of G major the root note of Sol would be indicated as Do As with Fixed Do the indication differs depending on the selected language 7 COLOR NOTE When this is set to ON the notes in the display appear in color C red D yellow E green F orange G blue A purple and B white 8 OK This closes the detailed setting display and starts generating the nota...

Страница 87: ... not contain lyric data lyrics are not displayed The language used for lyr ics display depends on the particular lyric data If the lyrics are garbled or unread able you can remedy this by changing the LYRICS LANGUAGE setting from the SONG SETTING dis play page 140 Start the song 4 2 REC TOP START STOP REW FF REPEAT GUIDE NEW SONG SYNC START REC TOP START STOP REW FF REPEAT GUIDE NEW SONG SYNC STAR...

Страница 88: ...7 8 Registering Panel Setups Registration Memory Keep in mind that songs or styles on disk cannot registered to Registration Memory If you want to register a disk based song or style copy the relevant data to USER in the SONG STYLE display page 40 and register the data separately REGISTRATION MEMORY FREEZE MEMORY 1 2 3 4 5 6 7 8 END F J I 1 2 3 4 5 6 7 8 H G 1 Set up the panel controls as desired ...

Страница 89: ...urns on indicator is red Name This operation is the same as that in Naming Files and Folders page 45 in Basic Operations Organizing Your Data Delete This operation is the same as that in Deleting Files Folders page 47 in Basic Operations Organizing Your Data Save the result of the Name Delete operation by returning to the REGISTRATION BANK display and pressing the 8 UP button Keep in mind that the...

Страница 90: ...presets to be called up in sequence in any order you desire Once programmed the presets 1 8 can be selected in sequence with the BACK NEXT buttons or the pedal page 145 REGISTRATION MEMORY FREEZE MEMORY 1 2 3 4 5 6 7 8 MENU DEMO HELP FUNCTION REGISTRATION MEMORY FREEZE MEMORY 1 2 3 4 5 6 7 8 REGISTRATION MEMORY FREEZE MEMORY 1 2 3 4 5 6 7 8 1 1 2 3 4 5 6 7 8 Select the Freeze settings Enters a che...

Страница 91: ...H XG USER STRINGS LEFT DATA ENTRY FREEZE MEMORY 1 1 4 3 2 3 4 7 5 8 6 2 ENTER VOICE EFFECT VOICE MUSIC FINDER ONE TOCTH SETTING REVERB DSP VARIATION SOUND CREATOR Operation NATURAL VOICE REGULAR VOICE ORGAN FLUTES F J I H G DIGITAL STUDIO SOUND CREATOR DIGITAL RECORDING MIXING CONSOLE PART 1 Press the F G or H button to select the Part MAIN LAYER or LEFT containing the voice you wish to edit Indic...

Страница 92: ... 146 Natural Voices and Regular Voices Built into the CVP 210 208 are two different tone generation sources Natural and XG The Natural tone generation source and its voices feature a huge amount of wave memory giving you enormous and finely detailed expressive power over the sound The XG source which powers the Regular voices provide maximum compatibility with a wide variety of devices and song da...

Страница 93: ...keyboard range Determines the depth of sustain sampling for the damper pedal Determines the depth of string resonance The available parameters differ depending on the selected voice 1 2 3 4 5 6 7 8 Set the volume of the current edited voice Set the portamento time of each part MAIN LAYER VOICE Regular Voice only page 125 Determines the touch sensitivity or how greatly the volume responds to your p...

Страница 94: ...effect see diagram Higher settings result in a more pronounced Vibrato SPEED Determines the speed of the Vibrato effect see diagram DELAY Determines the amount of time that elapses between the playing of a key and the start of the Vibrato effect see diagram Higher settings increase the delay of theVibrato onset In addition to making the sound either brighter or more mellow Filter can be used to pr...

Страница 95: ...tone Normal Standard tone Mellow Soft and mellow tone Dark Dark tone The same as the Mixing Console on page 126 If you select Bright or Metallic as the type of brilliance the volume level will increase slightly In this case raising the MASTER VOLUME may result in distortion If this happens lower the vol ume accordingly SPEED parameter is added when selecting VIBE ROTOR DSP type This parameter enab...

Страница 96: ...brato Speed Determines the speed of the vibrato effect controlled by the Vibrato On Off and Vibrato Depth above Mode The MODE control selects between two modes FIRST and EACH In the FIRST mode attack is applied only to the first notes played and held simultaneously while the first notes are held any subsequently played notes have no attack applied In the EACH mode attack is applied equally to all ...

Страница 97: ...ong Editing page 107 The CVP 210 208 also lets you edit the songs you ve recorded by the Quick Recording Multi Recording and Step Recording methods When re recording a specific section of an already recorded song use the Punch IN OUT function page 106 POWER METRONOME MASTER VOLUME STYLE ACMP AUTO FILL IN OTS LINK BREAK INTRO MAIN START STOP ON MIN MAX OFF ENDING rit TAP TEMPO REW REPEAT TOP FF REC...

Страница 98: ...ll be recorded automatically to TRACK 1 To specify the track for recording simultaneously hold down the REC button and press the button corresponding to the track you want to record You can select TRACK 1 or TRACK 2 and the EXTRA TRACKS for recording at the same time Specifying the recording track To record your keyboard performance Press either the TRACK 1 or TRACK 2 button To record the auto acc...

Страница 99: ... 1 Voice MAIN LAYER LEFT Accompaniment style RHYTHM 1 Accompaniment style RHYTHM 2 Accompaniment style BASS Accompaniment style CHORD1 Accompaniment style CHORD2 Accompaniment style PAD Accompaniment style PHRASE1 Accompaniment style PHRASE2 MIDI 2 Voice MAIN 10 Accompaniment style RHYTHM 2 3 Voice MAIN 11 Accompaniment style BASS 4 Voice MAIN 12 Accompaniment style CHORD1 5 Voice MAIN 13 Accompan...

Страница 100: ...P button The recording can be started stopped by pressing the pedal if the recording punch in out function is set to the pedal page 106 5 To stop recording press the REC button again You can also use the pedal to stop recording by releasing it if the recording punch in out function has been assigned to the pedal page 106 To pause press the SONG START STOP button To resume recording press the SONG ...

Страница 101: ...utton 3 Press the A button to call up the Song Creator display A E D C B 2 Press the DIGITAL RECORDING button 4 Using the BACK NEXT buttons select the 1 16 tab for recording melodies and other parts or select the CHD Chord tab for recording chords and after selecting the 1 16 tab select a record channel with the F CH button F J I BACK NEXT H G 5 Call up the Step Record display by pressing the G bu...

Страница 102: ...is is available only when recording the melody For information on gate time settings see below Each press of this button toggles among the three basic note selectors at the bottom of the display normal dotted and triplet This is available only when recording the melody Deletes the event at the cursor Use these to move the selected event in units of measures BAR beat and clocks For information on m...

Страница 103: ...ntered data can be edited from the SONG CREATOR 1 16 display page 110 1 1 1 Select this note 1 3 press this to input a tie 1 2 While holding down this note 2 2 2 2 3 2 1 Select this note 4 4 1 Press this button to display the dotted notes 4 2 Select this note 4 3 5 5 1 Call up the normal notes by pressing this button 5 3 5 2 Select this note The notation display on the instrument may not be accu r...

Страница 104: ...ords and Sections Chord Step For example you can input the following chord progression by the procedure described below Enter the chords by using the currently selected chord fingering method in the Auto Accompaniment section of the keyboard C F G F G7 C MAIN A BREAK MAIN B 1 Press the MAIN A button to specify the section and enter the chords as shown at right C F G MAIN A MAIN C F G Select this n...

Страница 105: ... Press the MAIN B button to specify the section and enter the chord indicated at right C F G F G7 C MAIN A BREAK MAIN B MAIN C 003 1 000 Select this note value and play the chords indicated at right To enter a fill in press the AUTO FILL IN button and press one of the MAIN A D buttons END Mark An END mark is shown in the display indicating the end of the song data The actual position of the End ma...

Страница 106: ...nch In Out function is set to ON the current function assignment of the sostenuto pedal is cancelled These settings determine how recording will stop as well as what happens to previously recorded data Replace All This deletes all data following the point at which recording is stopped Punch Out This maintains all data following the point at which recording is stopped Punch Out At Overwrite recordi...

Страница 107: ... quantized Selects the quantize size resolution See the below for the details Determines how strongly the notes will be quantized If a value less than 100 is selected notes will be moved toward the specified quantization beats only by the specified amount Applying less than 100 quantization lets you preserve some of the human feel in the recording Executes the Quantize operation After the operatio...

Страница 108: ...done Calls up the SONG display from which you can save the edited data These select the channel to be deleted A E D C B F J I 1 2 3 4 5 6 7 8 H G Use these to select the desired edit operation Executes the Mix operation After the operation is completed this button changes to UNDO letting you restore the original data if you re not satisfied with the Mix results The Undo function only has one level...

Страница 109: ...P operation Once SET UP has been executed the operation cannot be cancelled or undone Calls up the SONG display from which you can save the edited data Determines which playback features and functions will be automatically called up along with the selected song All events with the exception of KEYBOARD VOICE can be recorded only at the beginning of the song Before you select or checkmark any of th...

Страница 110: ...up the Step Recording display page 102 Calls up the Filter display page 112 letting you select only the events you wish to shown in the Event List Calls up the SONG display from which you can save the edited data Holding this button down while using the A and B buttons lets you select multiple events For fine adjustment of the event value Cuts deletes all selected events The cut events are copied ...

Страница 111: ...s rhythm bass etc are turned on off CH Vol Channel volume Determines the level of specific channels rhythm bass etc S Vol Style volume Determines the level of the entire accompaniment style Parameter Description ScBar Score initial measure This determines the number of the top measure The measure number is indicated in the MAIN display or in the music notation Only one value can be specified at th...

Страница 112: ...yrics and displays the next set of lyrics A E D C B F J I 1 2 3 4 5 6 7 8 H G 1 Move the cursor to the event containing the lyric star 3 Use these buttons to call up the Lyric display from which you can input lyrics From the Lyric display page 49 enter the new word your name 4 Press this button to save the newly changed lyric data 2 Move the cursor to the word star To actually enter an edited valu...

Страница 113: ...ordings or for recording parts that are difficult to play Assembling an Accompaniment Style page 117 This convenient feature lets you create composite styles by combining various patterns from the internal preset accompaniment styles For example if you want to create your own original 8 beat style you could take rhythm patterns from the 8 Beat 1 style use the bass pattern from 8 Beat 2 and import ...

Страница 114: ...dable range 7 RTR Retrigger Rule how the pitches of the chord change Output These are the patterns recorded to the accompaniment styles page 121 This data is created by chords played in the Auto Accompaniment section of the keyboard page 66 These settings are edited from the PARAMETER display These parameters determine how the pitch of the source pattern is converted when you play chords in the Au...

Страница 115: ...f the style starts playing back Since the rhythm pattern loops repeatedly you can record new sounds and notes on each pass while listening to the pattern Icons above the keys conveniently indicate the percussion instruments assigned to the keys 3 Stop recording by pressing the STYLE START STOP button again 4 With the REC CHANNEL display shown close the display by pressing the EXIT button If you ve...

Страница 116: ... the Pattern Length change Recording Precautions The basic chord used for the accompaniment style is called the source chord All chords that play and the pitches that sound are derived from the source chord When recording the Main and Fill In sections for a source chord of CM7 keep the following points in mind When recording to the Bass or Phrase channels try to use only the recommended notes this...

Страница 117: ...channels Any channels set to ON in the REC CHANNEL display page 115 are played back simultaneously OFF Mutes the selected channel If the selected channel is set to ON in the REC CHANNEL display page 115 OFF does not appear and is not available 1 These let you select the accompaniment style that will be used for each channel of your original style Select the desired channel by pressing the A D F I ...

Страница 118: ...eat the Swing parameter will selectively delay the 2nd 4th 6th and 8th beats of each measure to create a swing feel The settings A through E produce different degrees of swing with A being the most subtle and E being the most pronounced Fine Selects a variety of Groove templates to be applied to the selected section The PUSH settings cause certain beats to be played early while HEAVY settings dela...

Страница 119: ...ty while values below 100 reduce it A E D C B F J I 1 2 3 4 5 6 7 8 H G Use these to select the desired edit operation Calls up the Style display and lets you store the edited accompaniment style data Executes the Dynamics operation After the operation is completed this button changes to UNDO letting you restore the original data if you re not satisfied with the Dynamics results The Undo function ...

Страница 120: ...copied from one measure or group of measures to another location within the specified channel Use the 4 TOP and 5 LAST buttons to specify the first and last measures in the region to be copied Use the 6 DEST button to specify the first measure of the destination location to which the data is to be copied Bar Clear This function clears all data from the specified range of measures within the select...

Страница 121: ... pattern Two settings are available Root Trans Root Transpose When the root note is transposed the pitch relationship between notes is maintained For example the notes C3 E3 and G3 in the key of C become F3 A3 and C4 when they are transposed to F Use this setting for channels that contain melody lines Root Fixed The note is kept as close as possible to the previous note range For example the notes...

Страница 122: ...imit of the note transposition for the chord root change Any notes calculated to be higher than the highest key are transposed down to the octave just below the highest key This setting is effective only when the NTR parameter page 121 is set to Root Trans Note Limit This sets the note range highest and lowest notes for voices recorded to the style channels By judicious setting of this range you c...

Страница 123: ...CREATOR DIGITAL RECORDING MIXING CONSOLE BALANCE CHANNEL ON OFF TRANSPOSE TEMPO SYNC STOP START STOP PART PART A E D C B F J I DIRECT ACCESS 1 2 3 4 5 6 7 8 EXIT START STOP SONG EXTRA TRACKS TRACK 2 TRACK 1 VOCAL HARMONY TALK EFFECT VH TYPE SELECT MIC SETTING STYLE L R SYNC START RESET RESET GUIDE MENU BACK NEXT VOICE PART PIANO ON OFF HARMONY ECHO LEFT HOLD MONO DIGITAL STUDIO H G LAYER PIANO HAR...

Страница 124: ...etup display Closes the Auto Revoice Setup screen without executing the settings 1 2 Each press of this button switches among the various parts channels Use these to select the VOICE PANPOT or VOLUME parameter rows Allows you to select the specific voice to be replaced PIANO BASIC and DRUM can be called up simulta neously ALL REVOICE Replaces all of the replaceable XG voices with the rich and auth...

Страница 125: ...ed n Be careful with these con trols Depending on the selected voice extreme set tings may result in noise or distortion SOUND CREATOR DIGITAL RECORDING MIXING CONSOLE BALANCE CHANNEL ON OFF PART A E D C B F J I DIGITAL STUDIO H G 1 2 3 4 5 6 7 8 Switches between the HARMONIC and BRIGHTNESS parameters HARMONIC Allows you to adjust the resonance effect see Harmonic Content on page 94 BRIGHTNESS Det...

Страница 126: ...fect block group of similar or related effects PART Determines the part to which the Insertion effect is applied It is effective only when BLOCK is set to DSP1 PARAMETER is set to CONNECTION and VALUE is set to Insertion or when BLOCK is set to DSP 3 7 CVP 210 or DSP 3 5 CVP 208 CATEGORY The various effect programs in Type below are grouped into categories This parameter may not be available depen...

Страница 127: ...8 H G A E D C B Determines the effect block Calls up the display for storing the effect Determines the effect category Determines the effect type Determines the effect parameter to be adjusted Determines the level of the effect return level This is not available when BLOCK is set to DSP1 PARAMETER is set to CONNECTION and VALUE is set to Insertion or when BLOCK is set to DSP 3 7 CVP 210 DSP 3 5 CV...

Страница 128: ... J I H G A E D C B SOUND CREATOR DIGITAL RECORDING MIXING CONSOLE PART DIGITAL STUDIO F J I 1 2 3 4 5 6 7 8 H G A E D C B GAIN Q FREQ FREQ Select this to call up the MASTER EQ display Use the 1 8 buttons to adjust the EQ High parameters amount of gain of the high frequency for each part Use the 1 8 buttons to adjust the EQ High parameters amount of gain of the low frequency for each part Use the 1...

Страница 129: ...effects The DSP 1 effect on the other hand can be configured for either System or Insertion routing The illustration below shows how the various effect blocks are set up and traces the signal flow for the send return controls set on the CVP 210 208 For Regular Voices CVP 210 OUT Rev Send MAIN VOICE Dry Cho Send Unused DSP blocks are automatically assigned to the active parts Rev Send LAYER VOICE D...

Страница 130: ...set as an Insertion effect here PART is set to one of the STYLE channels it is put here in the signal flow When DSP is set as a System effect it is put here in the signal flow Unused DSP blocks are automatically assigned to the active parts Rev Send SONG each channel Dry Cho Send DSP Send DSP3 DSP4 DSP5 For Natural Voices OUT Rev Send MAIN VOICE Dry Cho Send DSP Send Rev Send LAYER VOICE Dry Cho S...

Страница 131: ... RESET GUIDE MENU BACK NEXT VOICE PART PIANO ON OFF HARMONY ECHO LEFT HOLD MONO DIGITAL STUDIO H G LAYER PIANO HARPSI E PIANO PERCUSSION GUITAR BASS ORGAN FLUTES ORGAN ACCORDION BRASS WOODWIND CHOIR PAD SYNTH XG USER STRINGS LEFT DATA ENTRY FREEZE MEMORY 1 1 4 3 2 3 4 7 5 8 6 2 ENTER VOICE EFFECT VOICE MUSIC FINDER ONE TOCTH SETTING REVERB DSP VARIATION MIC SIGNAL OVER VOCAL HARMONY TALK EFFECT VH...

Страница 132: ...ender Threshold Vibrato Depth Sets the depth of vibrato applied to the harmony sound Also affects the lead vocal sound if a Lead Gender Type is selected Vibrato Rate Sets the speed of the vibrato effect Vibrato Delay Specifies the length of the delay before the vibrato effect begins when a note is produced Harmony 1 2 3 Volume Sets the volume of the first second or third harmony note respectively ...

Страница 133: ...l when the input from the microphone falls below a specified level This effectively cuts off extraneous noise allowing the desired signal vocal etc to pass SW SW is the abbreviation of Switch This turns Noise Gate on or off TH TH is the abbreviation of Threshold This adjusts the input level at which the gate begins to open Making Settings for the Vocal Harmony and Microphone MICROPHONE SETTING F G...

Страница 134: ...t the balance between the lead vocal your own voice and Vocal Harmony Raising this value increases the volume of the Vocal Harmony and decreases that of the lead vocal When this is set to L H63 L Lead Vocal H Vocal Harmony only the Vocal Harmony is output when it is set to L63 H only the lead vocal is output MODE All of the Vocal Harmony types fall into one of three modes which produce harmony in ...

Страница 135: ...es the volume of the microphone sound These set the depth of the reverb and chorus effects applied to the microphone sound This determines the amount of attenuation to be applied to the overall sound excepting the microphone input allowing you to effectively adjust the balance between your voice and the overall instrument sound 1 2 3 4 5 6 7 8 F G H I J A B C D E A B C D E This turns the DSP effec...

Страница 136: ...mines the method for playing indicating chords when using the auto accompaniment features You can even check how to play the chord since the individual notes are indicated in the display POWER METRONOME MASTER VOLUME STYLE ACMP AUTO FILL IN OTS LINK BREAK INTRO MAIN START STOP ON MIN MAX OFF ENDING rit TAP TEMPO REW REPEAT TOP FF REC MIC SIGNAL OVER FADE IN OUT TAP TEMPO DEMO HELP FUNCTION SOUND C...

Страница 137: ...TV monitor connected to the VIDEO OUT terminal Making MIDI Settings System page 148 These determine various system messages settings such as Clock Start Stop System Exclusive as well as Local Control on off Transmit page 149 This determines how playback data is sent to connected MIDI devices i e which parts are assigned to which MIDI Transmit channels This also lets you specify the type of data to...

Страница 138: ... amount of tuning The tuning range is from 64 through 0 to 63 Each increment equals one cent one cent is one hundredth of a semitone Determines the fine tuning of the selected note in 1 cent steps Press the 4 or 5 buttons simultaneously to instantly reset the value to the factory setting Determines the base note for each scale When the base note is changed the pitch of the keyboard is transposed y...

Страница 139: ...erger This composite scale combines the Werckmeister and Kirnberger systems which were themselves improvements on the mean tone and Pythagorean scales The main feature of this scale is that each key has its own unique character The scale was used extensively during the time of Bach and Beethoven and even now it is often used when performing period music on the harpsichord Arabic Use these tunings ...

Страница 140: ...d parts n Phrase Mark This data specifies a certain location in the song data A E D C B F J I 1 2 3 4 5 6 7 8 H G Determines the Guide method Turns guide lamps ON or OFF Determines the timing for the guide lamps JUST The guide lamps light precisely at the moment you should play NEXT The guide lamps light just before the moment you should play If you miss the proper timing the guide lamps flash Tur...

Страница 141: ...paniment volume changes in response to your playing strength in the Auto Accompaniment section of the keyboard Determines the default section that is automatically called up when selecting different accompaniment styles when accompaniment is stopped Determines the split points for the auto accompaniment ACMP and the left hand range LEFT The same value can be set for both or for each independently ...

Страница 142: ...r method is actually selected Chord Tutor The Chord Tutor feature is essentially an electronic chord book that shows you appropriate fingerings for chords it is useful when you want to play certain chords Simply specify the desired chord via the 6 8 buttons and the fingerings for the Fingered method are indicated in the display Making Settings for the Pedals and Keyboard Controller A E D C B F J I...

Страница 143: ... SONG START STOP button STYLE START STOP Same as the STYLE START STOP button TAP TEMPO Same as the TAP TEMPO button SYNCHRO START Same as the SYNC START button SYNCHRO STOP Same as the SYNC STOP button INTRO Same as the INTRO button MAIN A Same as the MAIN A button MAIN B Same as the MAIN B button MAIN C Same as the MAIN C button MAIN D Same as the MAIN D button FILL DOWN A fill in plays automatic...

Страница 144: ...ally you can set this so that the voice is not affected by touch page 93 1 2 3 4 5 6 7 8 KEYBOARD For this setting Transpose affects the pitch of the keyboard played voices Main Layer and Left and the accompaniment styles SONG For this setting Transpose affects only the pitch of the songs MASTER For this setting Transpose affects the pitch of the entire instrument keyboard voices accompaniment sty...

Страница 145: ...me folder Indicates the file name of the selected Registration Memory bank Indicates the Registration Memory preset numbers in the order of the current Registration Sequence These move the cursor position in the sequence Replaces the number at the cursor position with the currently selected Registration Memory number Inserts the number of the currently selected Registration Memory preset immediate...

Страница 146: ... be turned on or off independently for each part Normally these should all be set to ON Harmony echo and Left pedal assignment cannot be set for the Layer and Left parts Setting Harmony and Echo 1 2 3 4 5 6 7 8 Determines the Harmony type For details see page 147 Determines the lowest velocity value at which the harmony note will sound This allows you to selectively apply the harmony by your playi...

Страница 147: ... Chords played to the left of the split point control the harmony Harmony notes based on the chord and the selected type are automatically added to the melody played to the right of the split point Showing the Clavinova Display on a TV Video Out Occasionally some flashing parallel lines may appear in the television or video monitor This does not necessarily indicate that the monitor is malfunction...

Страница 148: ... edit displays see the following pages Preset MIDI Templates Factory Set All Parts Transmit all parts including Main Layer and Left Master KBD The Clavinova functions as a master keyboard for controlling external tone generators or other devices KBD Style Transmit Upper and Lower keyboard play instead of the individual parts Main Layer Left Song All Transmit channels are set to correspond to the S...

Страница 149: ...ANSMIT Turns MIDI transmission of MIDI chord exclusive data chord detect root and type ON or OFF CHORD SYS EX Rx RECEIVE Turns MIDI reception of MIDI chord exclusive data generated by external equipment ON or OFF Transmitting MIDI Data Transmit Data Types in the MIDI TRANSMIT RECEIVE Display Available in RECEIVE display only page 150 Note Messages which are generated when the keyboard is played Ea...

Страница 150: ... 2 notes ACMP BASS The received notes are used as the accompaniment BASS notes ACMP CHORD1 2 The received notes are used as the accompaniment CHORD 1 and CHORD 2 notes ACMP PAD The received notes are used as the accompaniment PAD notes ACMP PHRASE1 2 The received notes are used as the accompaniment PHRASE 1 and PHRASE 2 notes EXTRA PART1 5 There are five parts specially reserved for receiving and ...

Страница 151: ...ime it takes for the volume to fade out or go from maximum to minimum range of 0 20 0 seconds Determines the time the volume is held at 0 following the fade out range of 0 5 0 seconds 1 2 3 4 5 6 7 8 Determines the level of the metronome sound Determines which sound is used for the metronome Bell Off Conventional metronome sound with no bell Bell On Conventional metronome sound with bell English V...

Страница 152: ...elected parameter is locked checkmarked or unlocked empty 1 2 3 4 5 6 7 8 Determines the level of the tap sound Determines the particular sound used for the Tap Start function Any drum or percussion sound in the Standard Kit page 59 can be selected 1 2 3 4 5 6 7 8 Determines the brightness of the backlit display Determines whether or not the voice bank and number are shown in the PRESET page of th...

Страница 153: ...3 At the Please insert a destination disk and press the OK button prompt eject the source disk and replace it with a blank formatted disk then press OK To abort the operation press CANCEL 4 When the operation is finished or when prompted eject the destination disk Commercially available music data is subject to protection by copyright laws Copying commer cially available data is strictly prohibite...

Страница 154: ...guage solves the above problems Reading the files on the computer with a different language system may cause similar problems to those above A E D C B F J I 1 2 3 4 5 6 7 8 H G These call up the corresponding Open Save displays These let you store the corresponding data as files to disk for future recall Pressing each of these buttons calls up the corresponding Open Save display from which you can...

Страница 155: ...2 Set the MIC LINE switch located next to the MIC LINE IN jack to the MIC position 3 Use the INPUT VOLUME knob located next to the MIC LINE IN jack to set the microphone volume The volume should be set high enough that the SIGNAL lamp on the front panel lights steadily when you sing but not so high that the OVER lamp lights page 131 Before connecting the Clavinova to other electronic components tu...

Страница 156: ...ns could result in a feedback loop that will make normal performance impossible and may even damage the Clavinova CAUTION LEVEL FIXED L R AUX OUT L R R Audio cable To powered speaker RCA pin plug RCA pin plug AUX IN Cassette tape recorder stereo system Phone plug standard When these are connected with RCA pin plug LEVEL FIXED the sound is output to the external device at a fixed level regardless o...

Страница 157: ...the following sections What s MIDI page 159 What You Can Do With MIDI page 161 MIDI functions page 148 8 Connecting a computer USB terminal MIDI terminal Connecting your CVP 210 208 to a computer allows you to transfer data back and forth between the two and take advantage of the powerful and versatile music software available You can connect the devices in one of two ways Using the USB terminal U...

Страница 158: ...onnect the Clavinova to your com puter you must connect the USB cable before turning on the power of the instrument Also do not turn the power of the Clavinova on off while any appli cation software that uses USB or MIDI is running If you turn the power of the Clavinova on or off or connect discon nect the USB cable in the following states problems will occur in the computer system possibly causin...

Страница 159: ...t from MIDI data In the above example the actual acoustic sounds of the pianist s performance are captured in the recording as audio data and this is recorded to CD When you play back that CD on your audio system you can hear the actual piano performance The piano itself is not necessary since the recording contains the actual sounds of the piano and your speakers reproduce them Internal amp Inter...

Страница 160: ...ta The auto accompaniment styles and songs also consist of MIDI data MIDI is an acronym that stands for Musical Instrument Digital Interface which allows electronic musical instruments to communicate with each other by sending and receiving compatible Note Control Change Program Change and various other types of MIDI data or messages The CVP 210 208 can control a MIDI device by transmitting note r...

Страница 161: ...The messages transmitted received by the CVP 210 208 are shown in the MIDI Data Format and MIDI Implementation Chart in the separate Data List What You Can Do With MIDI The following MIDI settings can be made on the Clavinova MIDI templates preset MIDI setups for various applications page 148 Transmit page 149 Receive page 150 Local Control page 148 Clock page 149 Record performance data 1 16 chan...

Страница 162: ... data memory capacity They are also used to indicate the format type of disk Playback is only possible when the MIDI device to be used is compatible with the format of the disk Sequence Format The system which records song data is called sequence format Playback is only possible when the sequence format of the disk matches that of the MIDI device The CVP 210 208 is compatible with the following fo...

Страница 163: ...vel1 as is most commercially available software XG XG is a major enhancement of the GM System Level 1 format and was developed by Yamaha specifically to provide more voices and variations as well as greater expressive control over voices and effects and to ensure compatibility of data well into the future Song data recorded on the CVP 210 208 using voices in the XG category is XG compatible DOC Th...

Страница 164: ...rd side on the bottom and lean the unit against the wall so that the unit will not fall or slip Place a soft cloth against the wall to protect the instrument and wall from scratches Be sure to position the keyboard side on the bottom CAUTION Please do not touch the speaker net Doing so may damage the speaker inside CAUTION Do not place the main unit with the rear side facing down CAUTION Do not la...

Страница 165: ... keyboard side If the plug will not go in easily do not force it Double check the orientation of the plug then try again 2 Align the pedal cord into the groove on the rear leg and install the plastic cover onto the groove Be careful not to insert the cover s attachment strip between the groove wall and the leg Install the speaker cover on the speaker box so that the dented side comes to the upper ...

Страница 166: ...ch pedal is properly assigned to SUSTAIN SOSTENUTO and SOFT page 142 The damper pedal has no effect or the sound continuously sustains even when the damper pedal is not pressed The pedal cable plug may not be properly connected Make sure to securely insert the pedal plug into the proper jack page 164 165 Not all simultaneously played notes sound You may be exceeding the maximum polyphony of the Cl...

Страница 167: ... the Clavinova s USB terminal When a voice is changed the previously selected effect is changed Each voice has its own suitable preset values which are automatically recalled when the corresponding Voice Set parameters are turned on page 146 There is a slight difference in sound quality between notes played on the keyboard Some voices have a looping sound Some noise or vibrato is noticeable at hig...

Страница 168: ... Microphone 1 Effect Types REVERB1 29 Preset 3 User REVERB2 5 CHORUS1 25 Preset 3 User CHORUS2 3 DSP1 164 Preset 3 User DSP2 12 DSP3 4 5 6 DSP6 CVP 210 only 164 Preset 10 User 88 Preset 10 User DSP7 CVP 210 only 88 Preset 10 User Brilliance 5 Master EQ 5 Preset 2 User Part EQ 27 Parts Vocal Harmony 59 Preset 10 User 49 Preset 10 User Accompaniment Style Number of Accompaniment Styles 261 247 Numbe...

Страница 169: ...Language 6 languages English Japanese German French Spanish Italian Help Direct Access Piano setting button including Piano Lock Master Volume Fade In Out Transpose Keyboard Song Master Tuning Tuning Curve Flat Stretch Natural Piano Voice only Scale Equal Temperament Pure Major Pure Minor Pythagorean Mean Tone Werckmeister Kirnberger Arabic 1 2 Touch Response 5 level Jacks Connectors PHONES 2 MIDI...

Страница 170: ...r Your Music 73 Cent 138 Change the Rhythmic Feel 118 Changing Pitch related Settings 125 Changing the Automatically Selected Voice Settings 146 Changing the Icon 50 Changing the Tone of the Voice 125 Changing the Touch Sensitivity and Transpose 144 Channel 65 80 107 120 140 Channel Messages 160 Channel Muting 65 CHANNEL ON OFF button 18 65 80 Channel Transpose 109 CHD 111 Chord 99 Chord Detect 15...

Страница 171: ...perations 45 Files folders in a floppy disk 46 Fill 70 Filter 94 112 125 FINGERED 66 FINGERED ON BASS 66 First Key On 106 FLOPPY DISK drive 41 42 43 Floppy disk drive 6 19 Follow Lights 82 Foot Controller 62 157 FOOTAGE Organ Flutes 96 Footswitch 62 157 Formatting a Disk 153 FREEZE button 19 90 145 FULL KEYBOARD 66 FUNCTION button 18 136 G Gate Time 102 GENRE 74 76 GENRE NAME 76 GM System Level 1 ...

Страница 172: ... NTR Note Transposition Rule 121 NTT Note Transposition Table 122 O OCTAVE 125 One Touch Setting 32 ONE TOUCH SETTING 1 4 buttons 19 71 72 One touch Piano Play 59 ON OFF button POWER 18 17 Open Save displays 40 Organ Flutes 59 Organizing Files by Creating a New Folder 48 Other Parameters in the Basic Display 116 Other Playback related Operations 80 Other Settings 151 OTS LINK button 18 72 Outputti...

Страница 173: ... 70 Selecting items 50 Selecting the Freeze Settings 90 Sequence Format 162 Sequencer 160 Set Up 109 Setting Auto Accompaniment related Parameters 141 Setting Chord Channels 150 Setting Harmony and Echo 146 Setting Root Note Channels 150 Setting Separate Voices for the Left and Right Sections of the Keyboard 61 Setting Song related Parameters 140 Setting the Fingering Method 142 Setting the Level ...

Страница 174: ...1 42 43 USER EFFECT 127 154 Using Your Clavinova with Other Devices 155 Utility 151 V VARIATION button 18 61 Velocity 102 119 Velocity Change 120 VH TYPE SELECT button 18 131 VIBRATO 94 VIDEO OUT jack 19 147 156 Vocal CueTIME 82 VOCAL HARMONY button 18 131 VOCAL HARMONY CONTROL 134 Vocal Harmony Type 131 Voice Allocation Format 163 VOICE buttons 15 19 58 Voice Characteristics 59 Voice Effects 61 V...

Страница 175: ...MEMO 175 CVP 210 208 MEMO ...

Страница 176: ...MEMO CVP 210 208 176 MEMO ...

Страница 177: ...locations that do not significantly contribute to their operating temperature Placement of this product close to heat sources such as radiators heat registers and other devices that produce heat should be avoided 8 This product was NOT designed for use in wet damp loca tions and should not be used near water or exposed to rain Examples of wet damp locations are near a swimming pool spa tub sink or...

Страница 178: ...e which can be determined by turning the unit OFF and ON please try to eliminate the problem by using one of the following measures Relocate either this product or the device that is being affected by the interference Utilize power outlets that are on different branch circuit breaker or fuse circuits or install AC line filter s In the case of radio or TV interference relocate reorient the antenna ...

Страница 179: ...ns Greece Tel 01 228 2160 SWEDEN Yamaha Scandinavia AB J A Wettergrens Gata 1 Box 30053 S 400 43 Göteborg Sweden Tel 031 89 34 00 DENMARK YS Copenhagen Liaison Office Generatorvej 8B DK 2730 Herlev Denmark Tel 44 92 49 00 FINLAND F Musiikki Oy Kluuvikatu 6 P O Box 260 SF 00101 Helsinki Finland Tel 09 618511 NORWAY Norsk filial av Yamaha Scandinavia AB Grini Næringspark 1 N 1345 Østerås Norway Tel ...

Страница 180: ...anual Library http www2 yamaha co jp manual english M D G Pro Audio Digital Musical Instrument Division Yamaha Corporation 2003 Yamaha Corporation WA48350 AP 01A0 Printed in Indonesia OWNER S MANUAL OWNER S MANUAL CVP 210 208 OWNER S MANUAL CVP 210 208 CVP 210 208 DIC 99 ...

Отзывы: