73
CLP-340/CLP-340M/CLP-340C
VERSION UPGRADE
■
Do not turn off the power while installing.
Do not pull off the USB fl ash memory from the instrument while installing.
1
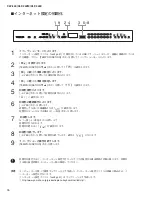
S e t t h e [ S E L E C T ] sw i t c h fo r t h e [ U S B TO
DEVICE] terminal to the position A . (Fig. 1)
2
Insert the USB fl ash memory containing the data
for version upgrade “CLP-340_instdat.bin” into the
terminal A . (Photo 1)
3
Turn on the [POWER] switch while holding down
the [PLAY/PAUSE] button of the instrument.
(Fig. 1)
4
“
UPd
” will be shown on the 7-segment LED and
the LED for the [GRAND PIANO 1] button will
fl ash.
5
Press the [GRAND PIANO 1] button to start the
installment. (Fig. 1)
6
The 7-segment LED will show “
0.00
” for about
90 seconds and then the installment will be
executed automatically.
7
The LED for the [GRAND PIANO 2] button will
fl ash during the installment.
8
When the installment is finished, “
End
” will
be shown on the 7-segment LED and the LED
for the [GRAND PIANO 1] button will light up
continuously.
It will take about 10 minutes to complete the
installment.
9
Turn off the [POWER] switch of the instrument.
(Fig. 1)
10
Disconnect the USB fl ash memory.
[POWER] switch
USB TO DEVICE
SELECT
[USB TO DEVICE] terminal
[PLAY/PAUSE] button
[GRAND PIANO 1] button [GRAND PIANO 2] button
Fig. 1
Photo 1
Содержание Clavinova CLP-340
Страница 39: ...39 CLP 340 CLP 340M CLP 340C DM Circuit Board Pattern side パターン側 2NA WN13290 ...
Страница 41: ...41 CLP 340 CLP 340M CLP 340C MA80S Circuit Board Pattern side パターン側 2NA WB55420 2 ...
Страница 47: ...47 CLP 340 CLP 340M CLP 340C E E E E GH3 EBUS L Circuit Board 2NAK8 V890460 1 Pattern side パターン側 ...
Страница 49: ...49 CLP 340 CLP 340M CLP 340C G G G G GH3 EBUS M Circuit Board 2NAK8 V890470 1 Pattern side パターン側 ...
Страница 51: ...51 CLP 340 CLP 340M CLP 340C I I I I GH3 EBUS H Circuit Board 2NAK8 V890480 2 Pattern side パターン側 ...
Страница 95: ...11 CLP 340 CLP 340M CLP 340C 50 44 50 46 24 2a 45 50 26 2 2 2 50 50 50 53 2 PANEL STAY ASSEMBLY パネル固定金具Ass y ...


